Exercise - Deploy an Azure Arc data controller
Azure Arc data controller is the Kubernetes operator that brings all of the Arc-enabled components together allowing you to get the benefits of Azure data service in your Arc-enabled environment. This unit covers the prerequisites and implements an Arc data controller in your environment.
Prerequisites
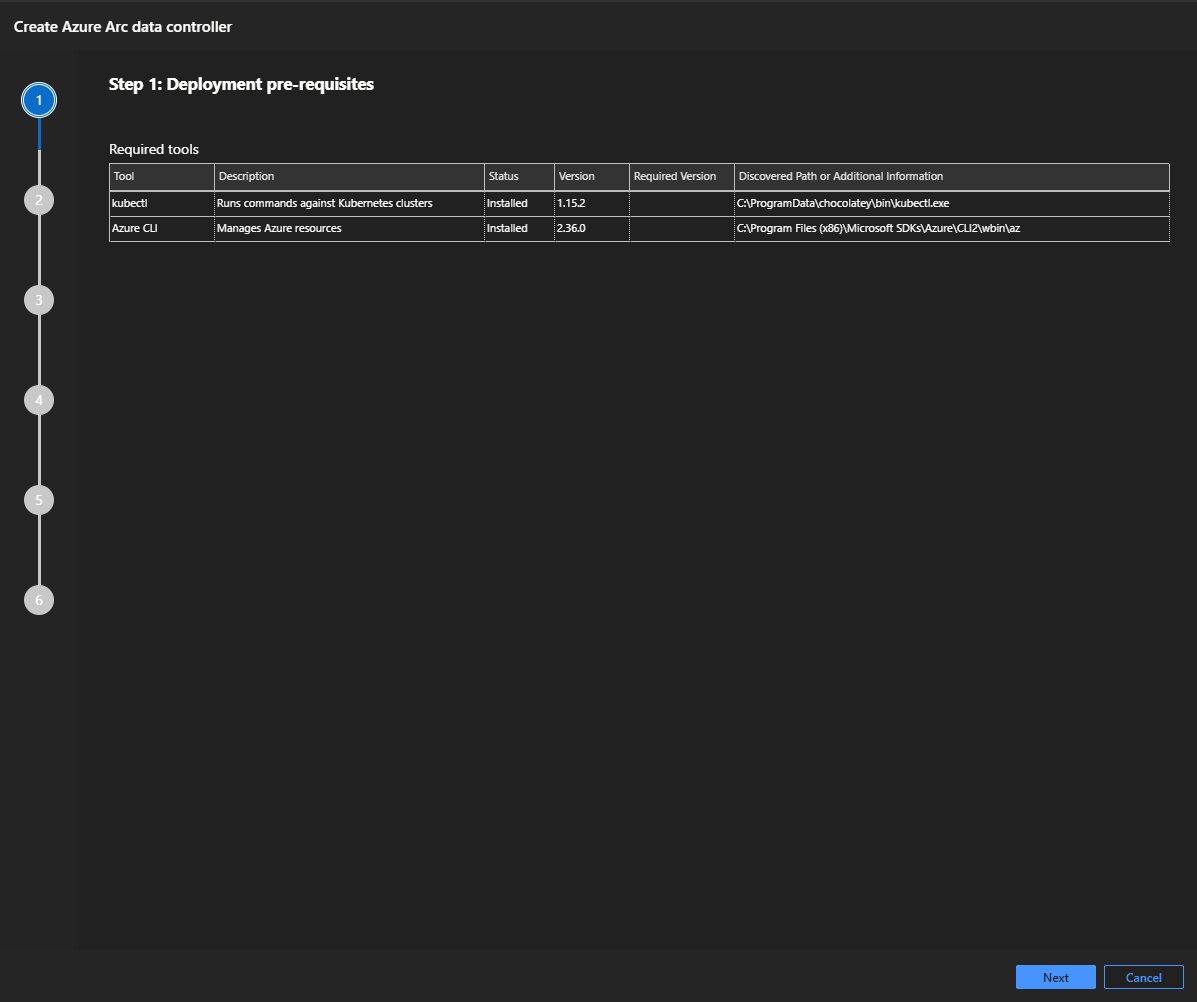
Before you proceed, complete the following prerequisites:
Install/Upgrade Azure CLI to the latest version.
Add arcdata and associated k8s CLI extensions:
arcdata:az extension add --name arcdataconnectedk8s:az extension add --name connectedk8scustomlocation:az extension add --name customlocationk8s-configuration:az extension add --name k8s-configurationk8s-extension:az extension add --name k8s-extension
Have access to your Kubernetes Cluster V1.21 and above.
Register providers for Azure Arc-enabled Kubernetes.
Microsoft.KubernetesMicrosoft.KubernetesConfigurationMicrosoft.ExtendedLocation
Create a destination Resource Group in your Azure subscription.
Size your Kubernetes cluster for your workload.
Arc-enable your Kubernetes cluster
To Arc-enable your kubernetes cluster, or to connect your Kubernetes cluster to Azure, execute the az connectedk8s command. Before running this command, ensure you have downloaded your kubeconfig file. This prerequisite step is only required when you deploy in directly connected mode.
To confirm that your Arc-enabled Kubernetes cluster is ready and available to deploy your Arc data controller, view the shadow object (object representation of the Arc-enabled Kubernetes cluster) in the portal:
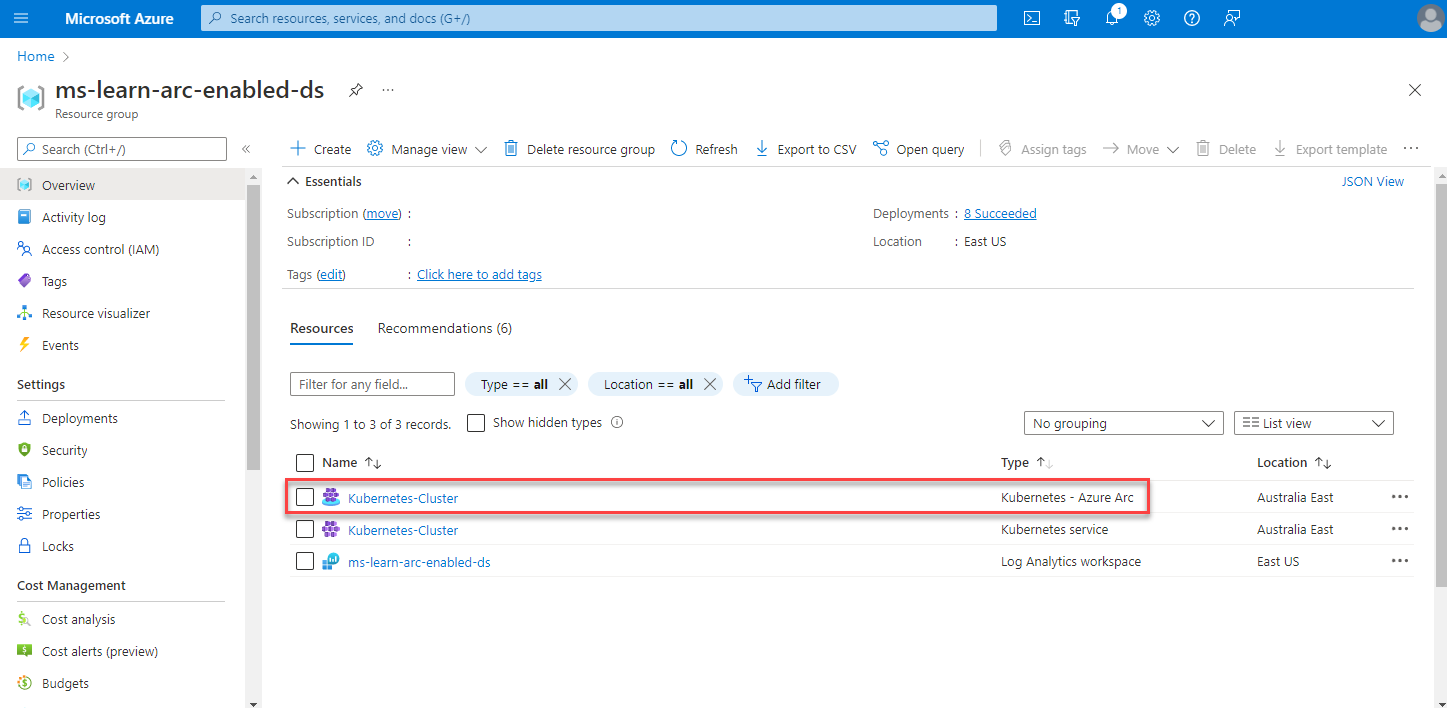
In the image above, the resource Kubernetes-cluster of resource type Kubernetes service is our Kubernetes cluster (which could be on-premises, any public cloud, or in this instance, located in Azure). The second highlighted resource of type Kubernetes -Azure Arc is our shadow resource for our Arc-enabled cluster that we can manage in the Azure portal.
Enable custom locations on the kubernetes cluster.
Lastly, confirm Azure Arc agents for Kubernetes have been deployed.

Deploy the Arc data controller
The deployment mode you choose has multiple methods available. Choose either the directly connected mode or indirectly connected mode. You can choose which option to work through based on your connectivity mode requirement.
Azure Arc-enabled data services are supported on Kubernetes platforms V1.21 and above. Each Kubernetes type has slightly different instructions to create your data controller. Specific instructions on each type:
- Azure Kubernetes Service (AKS)
- AKS on Azure Stack HCI
- Azure Red Hat OpenShift (ARO)
- Red Hat OpenShift Container Platform (OCP)
- Open source, upstream Kubernetes (kubeadm)
- AWS Elastic Kubernetes Service (EKS)
- Google Cloud Kubernetes Engine Service (GKE)
For the deployment options below we are using an AKS deployed Kubernetes cluster. All options related to storage classes are associated with the AKS cluster supported storage classes. The choice of Service type is going to depend on the configuration of your Kubernetes cluster. The kubernetes cluster used in this exercise is configured as a load balanced service type. If you are configured in a node port type, use node port instead of load balancer appropriately in the exercise. The type of Kubernetes cluster implemented in your environment dictates the types of provisioned and presented storage types. To complete the exercise, you need to know your storage classes. Talk to your infrastructure team or Kubernetes admin if you are unsure.
Deploy in directly connected mode
To deploy your Arc data controller, you have several options:
- GUI deployment:
- Azure portal
- Azure Data Studio
- CLI deployment:
- Azure portal Cloud Shell
- Azure Data Studio terminal window
Choose which of the options you wish to walk through. All provide you with the same outcome.
Option 1: Azure portal GUI deployment
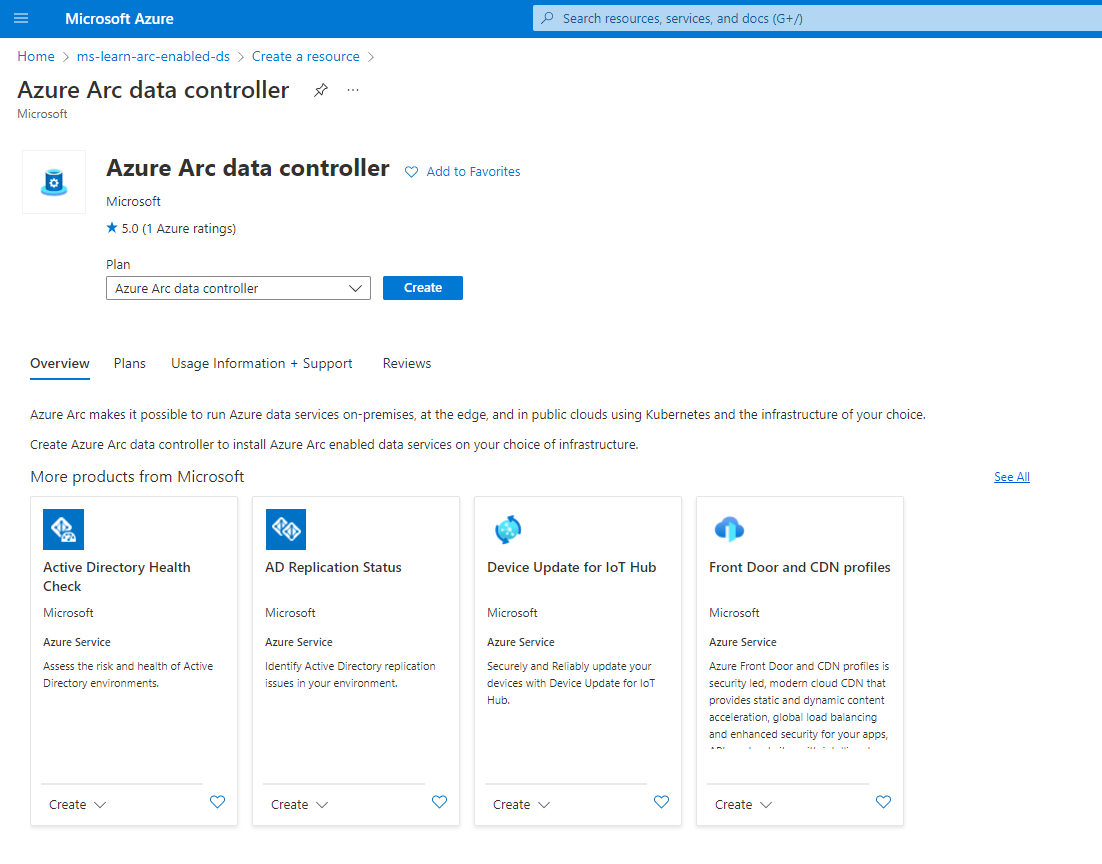
In the Azure portal, select + Create resource.
Search for Azure Arc data controller.
Select Create.
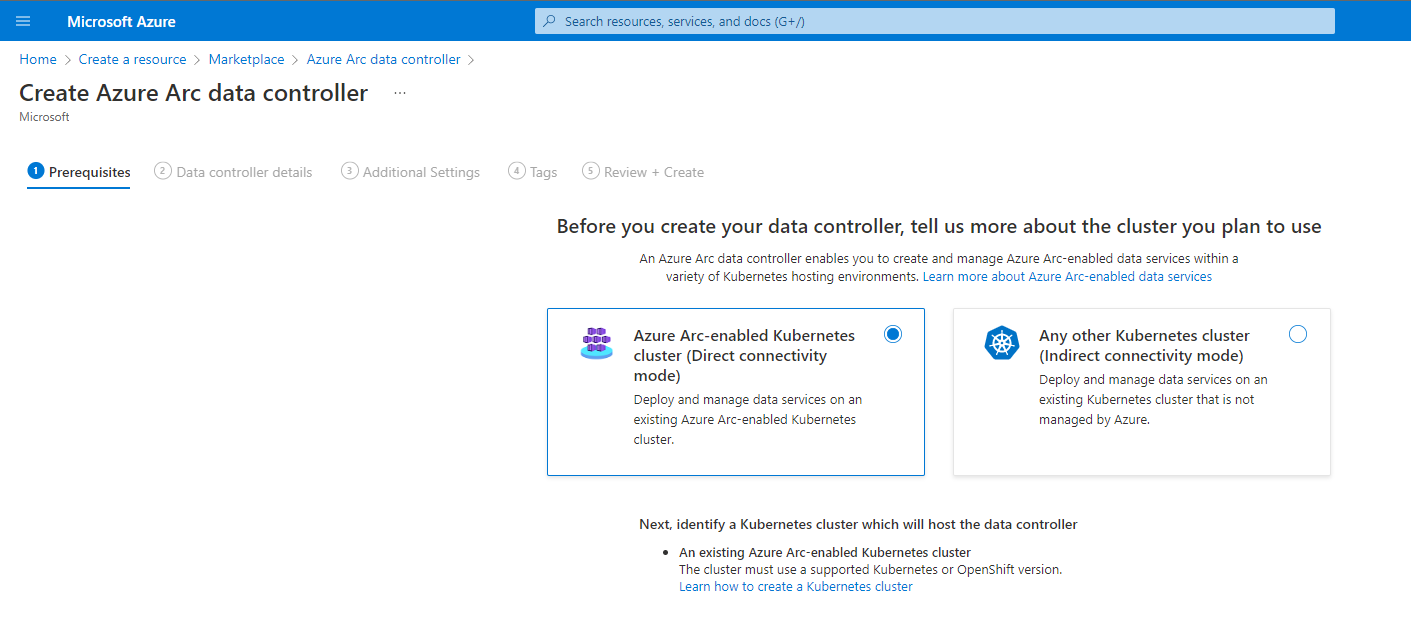
Select Azure Arc-enabled Kubernetes cluster (Directly connected mode) | Click Next: Data controller details.
Choose the Resource Group you created and into which you deployed your Azure Arc-enabled Kubernetes cluster.
Name your Arc data controller appropriately.
Select Create new custom location.
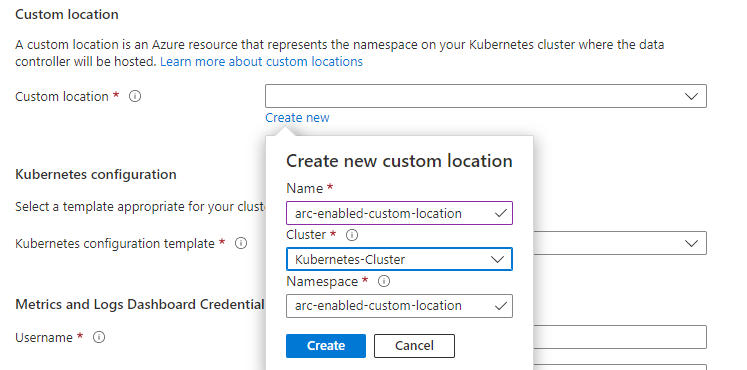
For the Kubernetes configuration template, choose the appropriate storage class. On the AKS cluster for this exercise, specify
azure-arc-aks-premium-storage.If your Kubernetes cluster is either on-premises or in a public cloud. change the configuration template to a custom template and complete all of the required information. In particular, note your infrastructure location.
Microsoft provides templates for various environments, such as GKE and OpenShift. If you see an option that matches your environment, Microsoft provides a configuration template for you. Otherwise, specify a custom template.
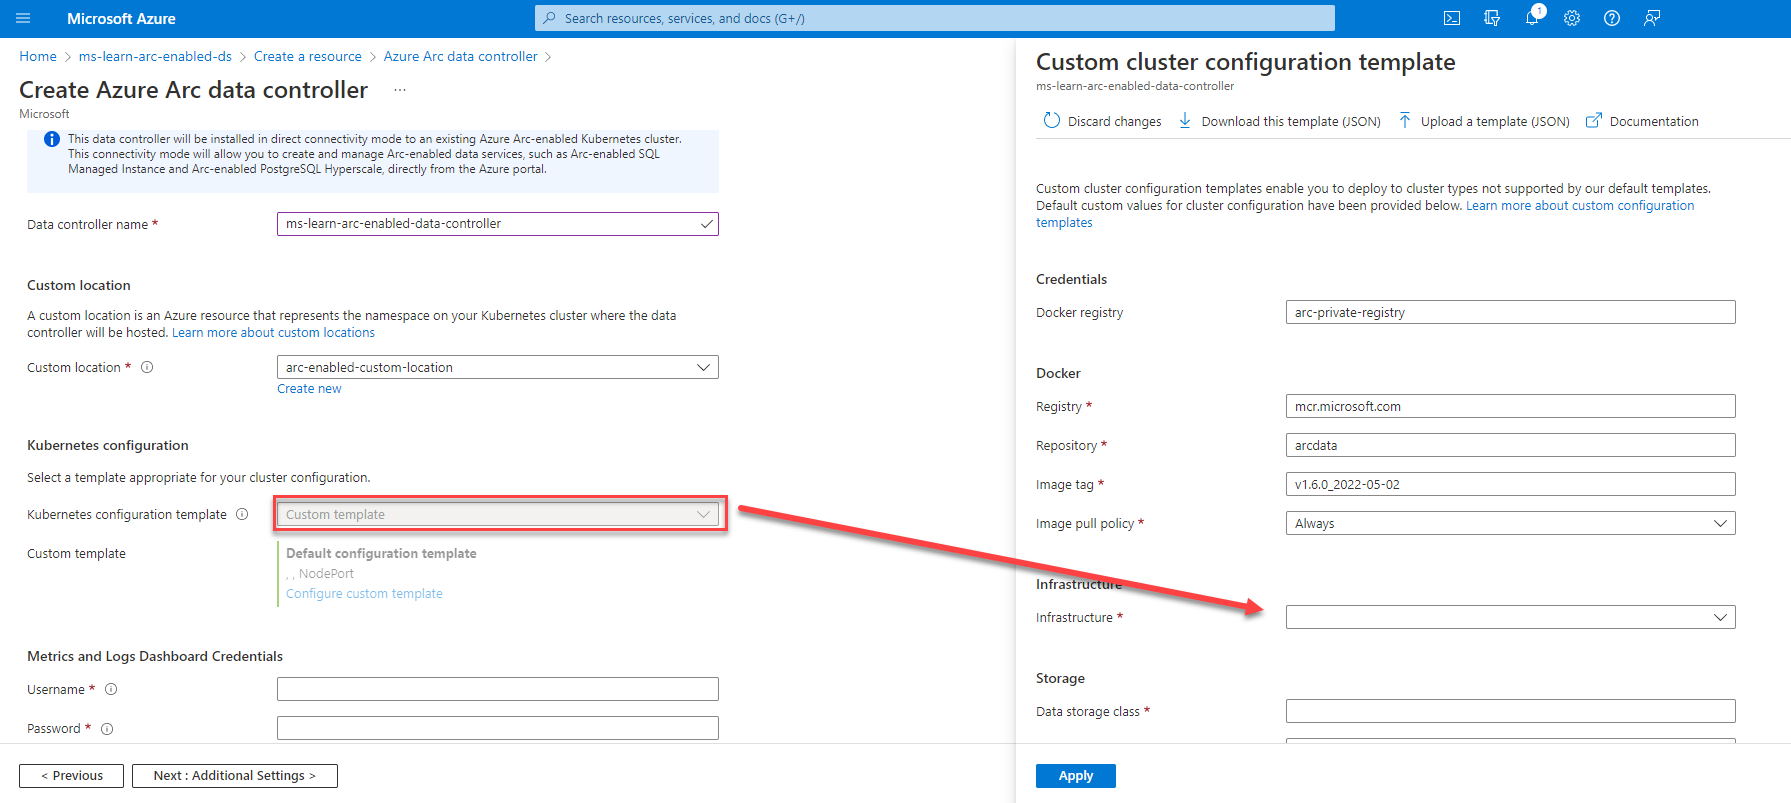
For Service type, select Load balancer.
Set a user name and password for Metrics and Logs Dashboards (Kibana and Grafana) that you view locally.
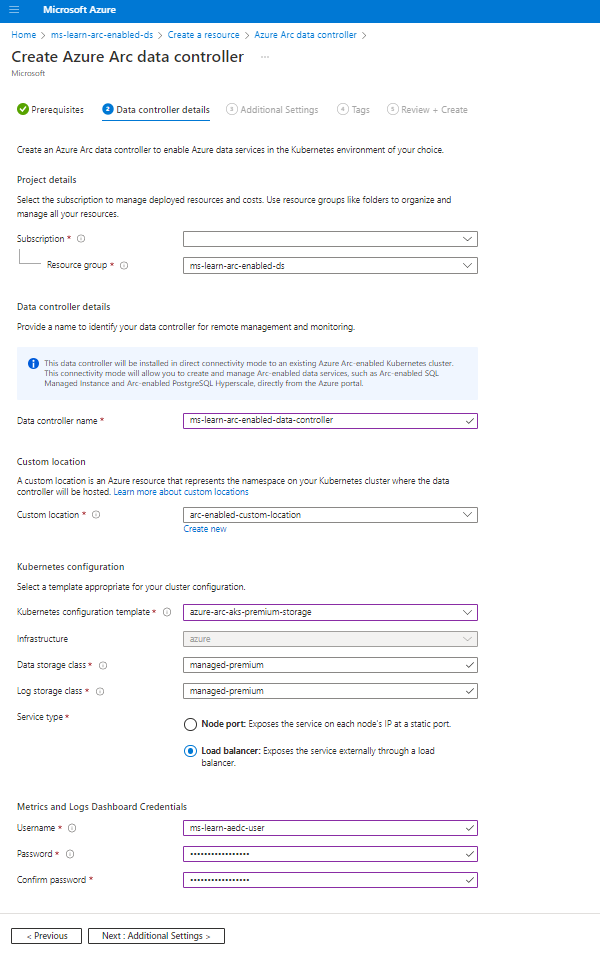
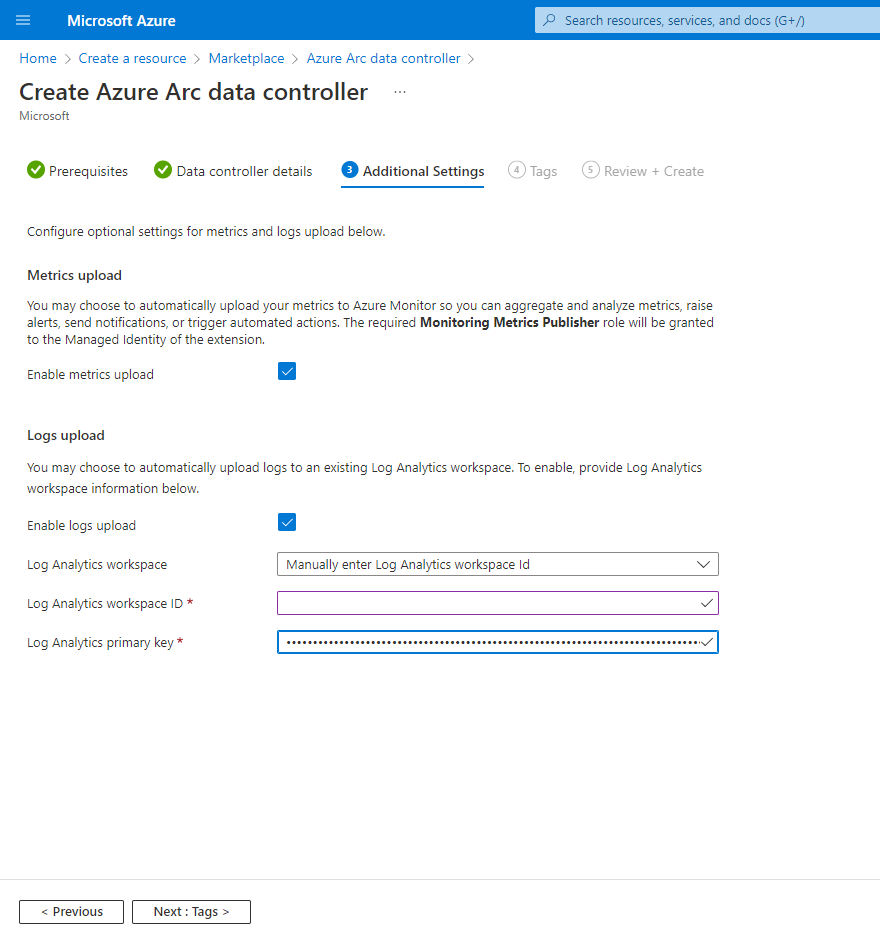
Select Next: Additional Settings
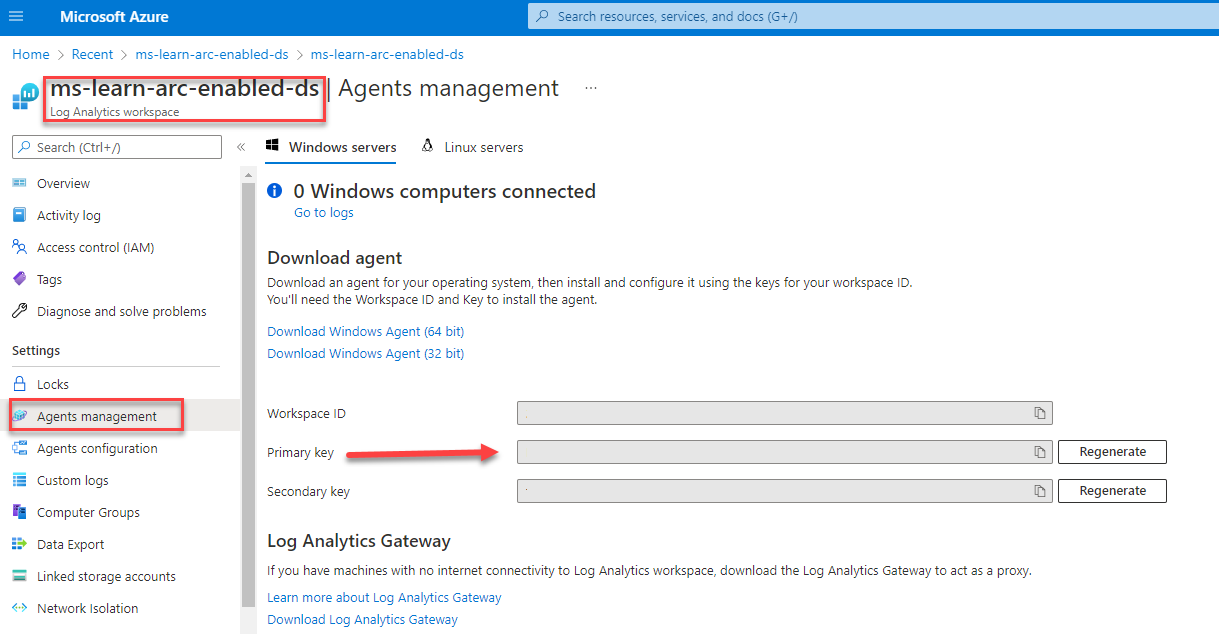
You may already have a Log Analytics workspace configured, or you can create a new workspace specifically for your Arc data controller. Find the Log Analytics workspace ID and primary key (both values are required) under Settings > Agents management of your Log Analytics workspace.
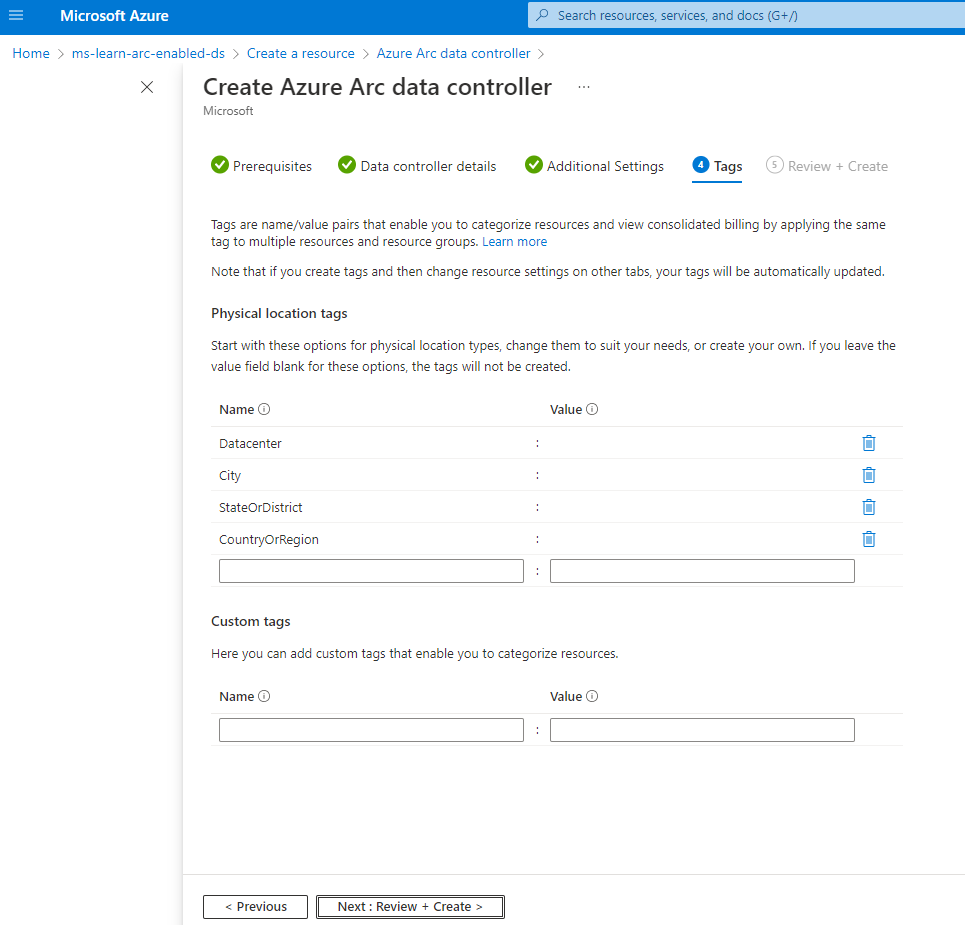
Add Tags for your Arc data controller.
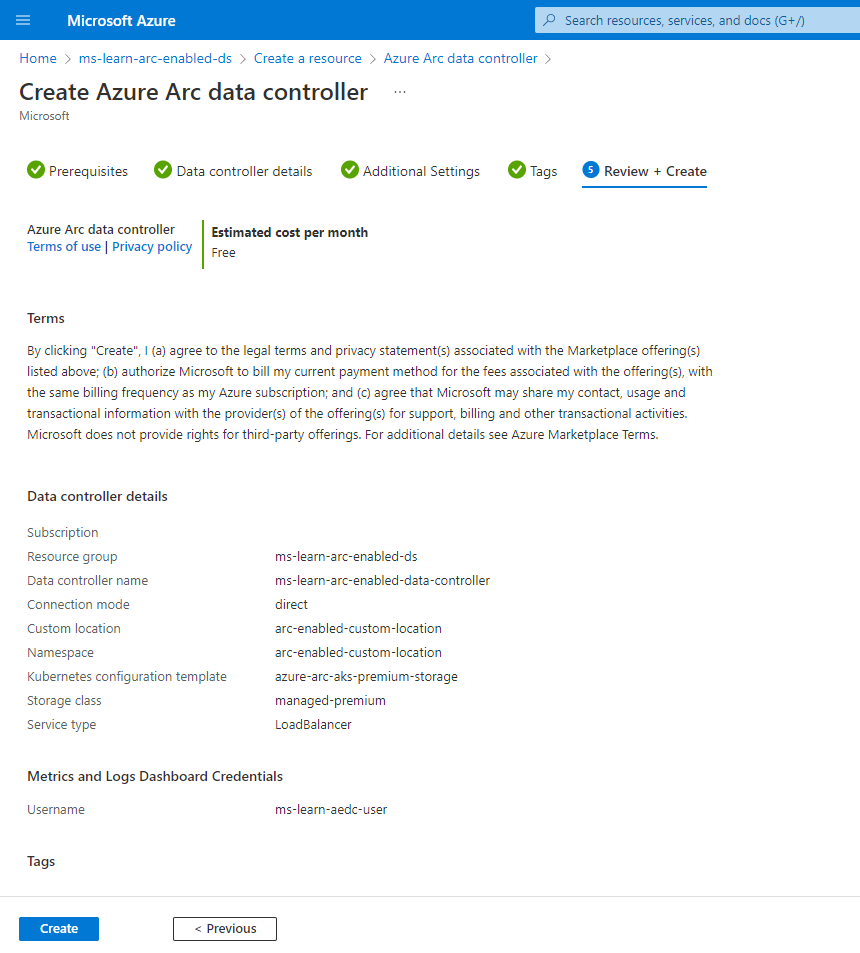
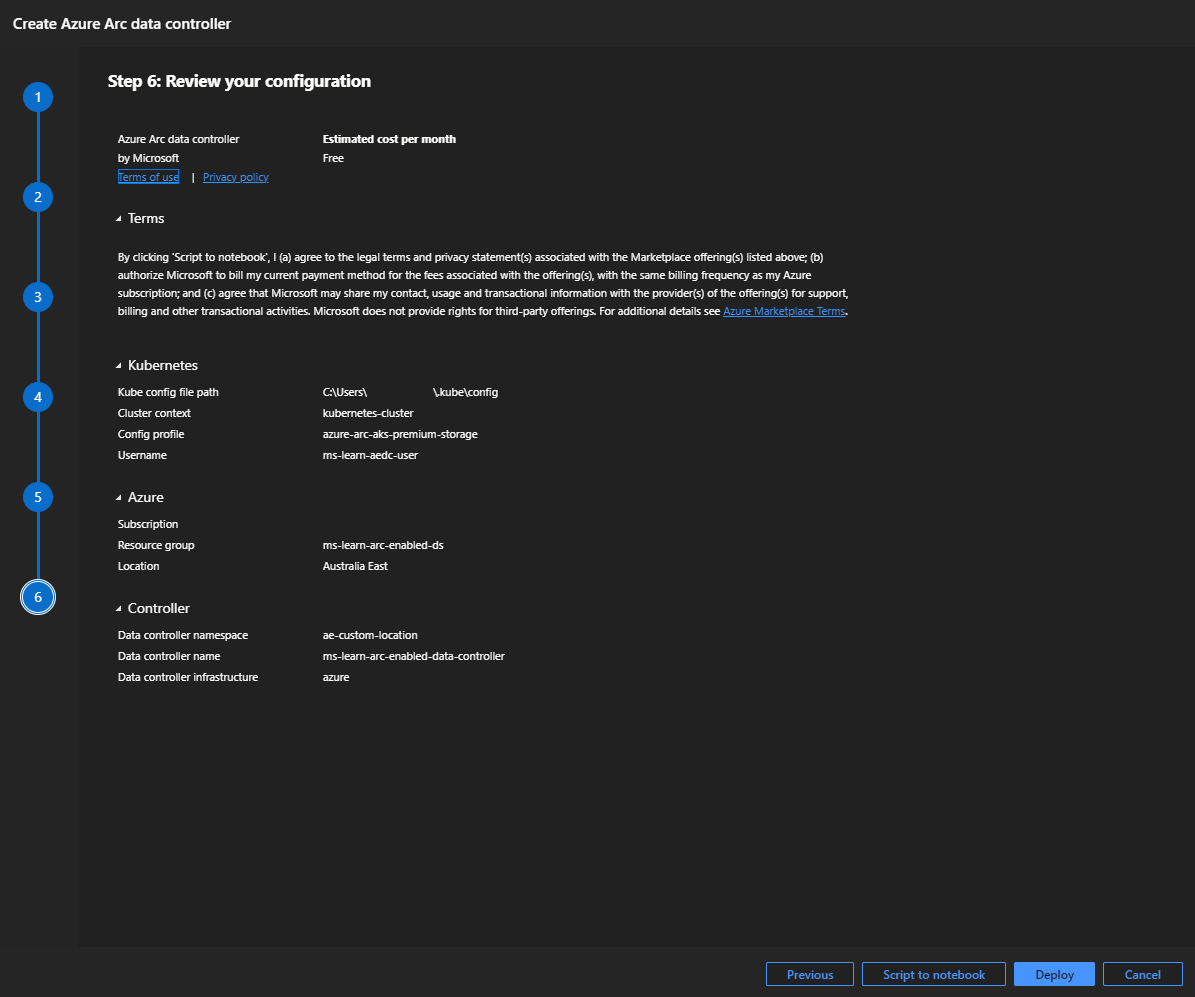
On Review + Create and confirm all details are correct. Select Create.
Monitor the creation of the Arc data controller with this command:
kubectl get datacontroller --namespace <namespace>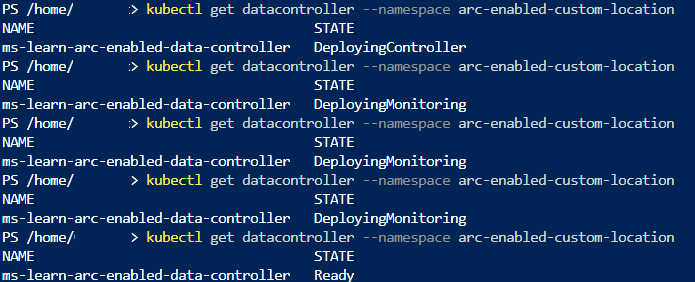
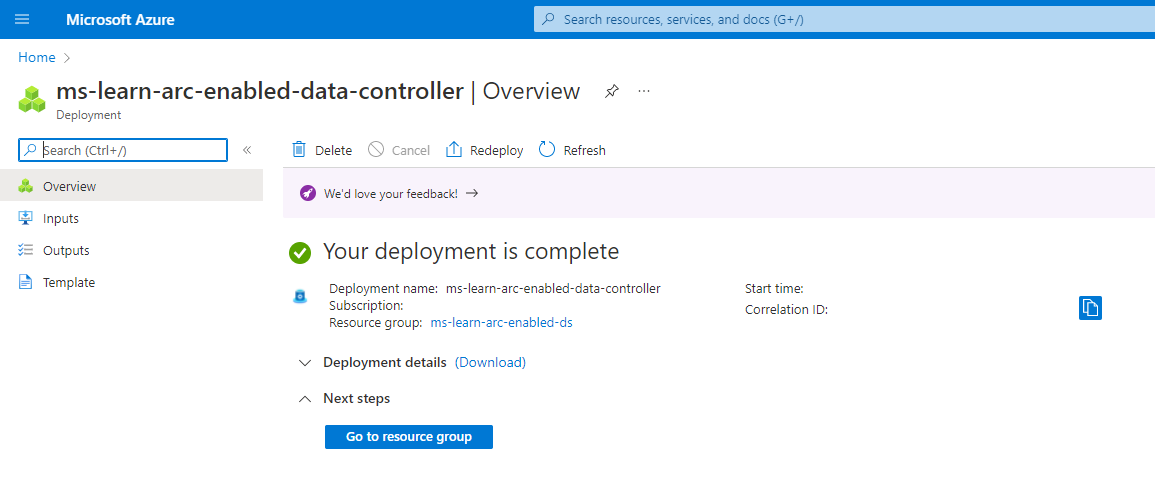
Congratulations! You have successfully deployed your Arc data controller in directly connected mode.
Validate the deployment against the Kubernetes cluster. Execute
kubectl get nsin the Cloud Shell.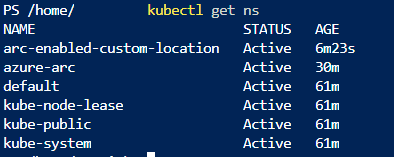
Confirm all packages deployed to the Kubernetes cluster as part of the deployment. Execute
Kubectl get crdin the Cloud Shell.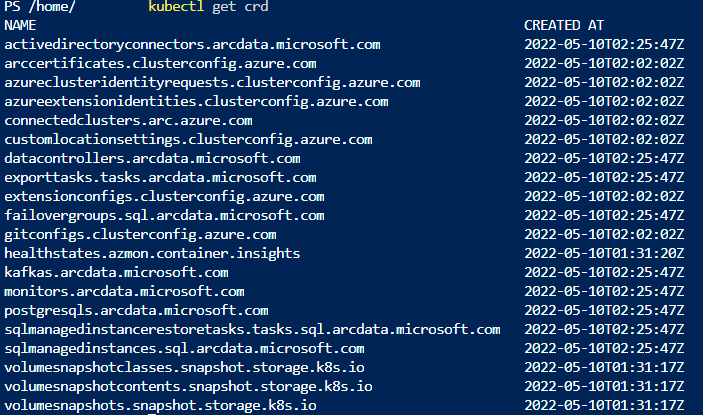
Review all the resources created under the Custom location type resource. Execute
Kubectl get pods --namespace <namespace>in the Cloud Shell.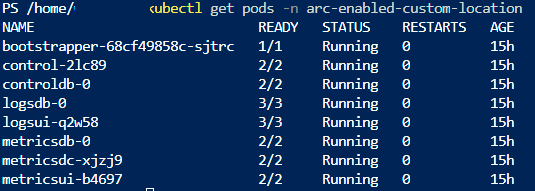
Option 2: Azure Data Studio GUI deployment
This deployment method, you will use Azure Data Studio (ADS) and the associated ADS extensions Azure Arc & Azure CLI.
Ensure that you have navigated to your .kube directory in the ADS terminal before executing any CLI commands.
Before using ADS for the deployment, you need to create a custom location in your chosen subscription and resource group where you deploy your Arc data controller. In ADS, open the terminal window and connect to your subscription and download your
kubeconfig file.$Env:MySuscriptionID = 'enter your subscription ID here' $Env:MyResourceGroup = 'enter your resource group name here' $Env:MyCluster = 'enter your kubernetes cluster name here' az account set --subscription $Env:MySuscriptionID az aks get-credentials --resource-group $Env:MyResourceGroup --name $Env:MyCluster
Create your custom location for your Azure Arc data controller that you deploy on your Azure Arc-enabled Kubernetes cluster. With the Azure portal Cloud Shell, execute the following commands:
Create the Arc-enabled kubernetes cluster custom location extension using the following command:
$Env:MyNamespace = 'enter your namespace name here'
$Env:MyCustomlocationExtension = 'enter your custom location extension name here'

az k8s-extension create --cluster-name $Env:MyCluster `
    --resource-group $Env:MyResourceGroup `
    --name $Env:MyCustomlocationExtension `
    --cluster-type connectedClusters `
    --extension-type microsoft.arcdataservices `
    --auto-upgrade false `
    --scope cluster `
    --release-namespace $Env:MyNamespace `
    --config Microsoft.CustomLocation.ServiceAccount=sa-arc-bootstrapper
In the ADS terminal window confirm the creation of the newly created custom location extension:
az k8s-extension show --resource-group $Env:MyResourceGroup `
    --cluster-name $Env:MyCluster `
    --name $Env:MyCustomlocationExtension `
    --cluster-type connectedclusters
In the ADS terminal window, confirm the status of the cluster using the following kubectl CLI command. The bootstrapper pod should be in a running state :
kubectl get pods --name $Env:MyNamespaceCreate custom location following steps 2,3 & 4. The
extensionInstanceNamein step 3 relates to the extension name you used in the step above. In step 4 add the optional parameter--location.In the ADS terminal window, confirm the creation of the Arc-enabled custom location.
az customlocation list -o table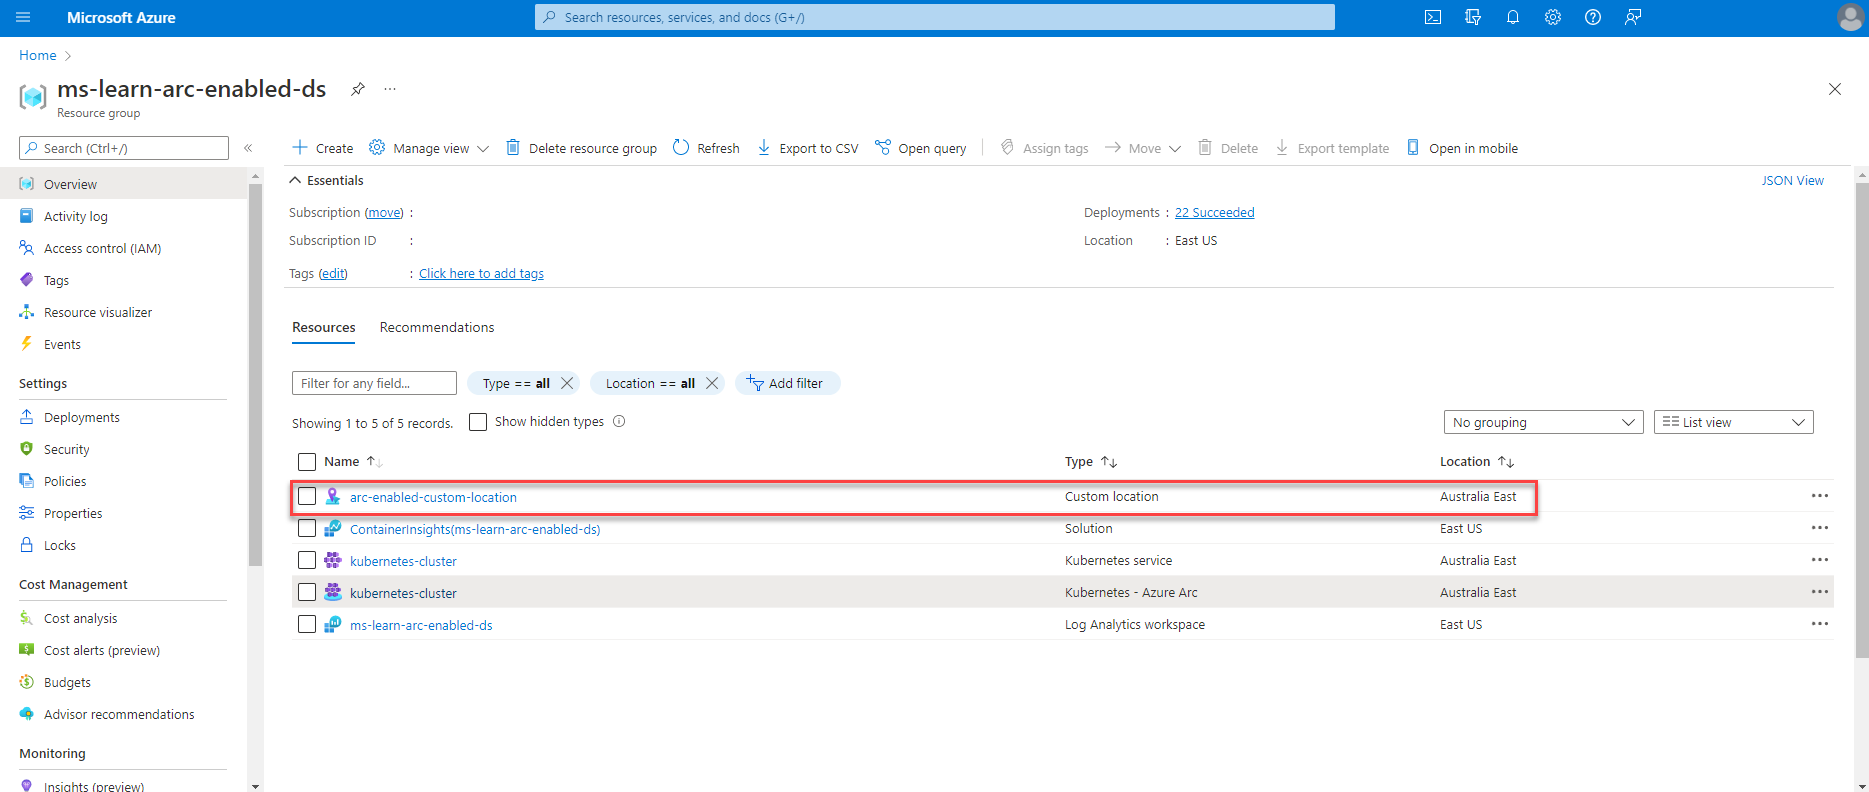
Confirm you have Azure Data Studio downloaded and installed.
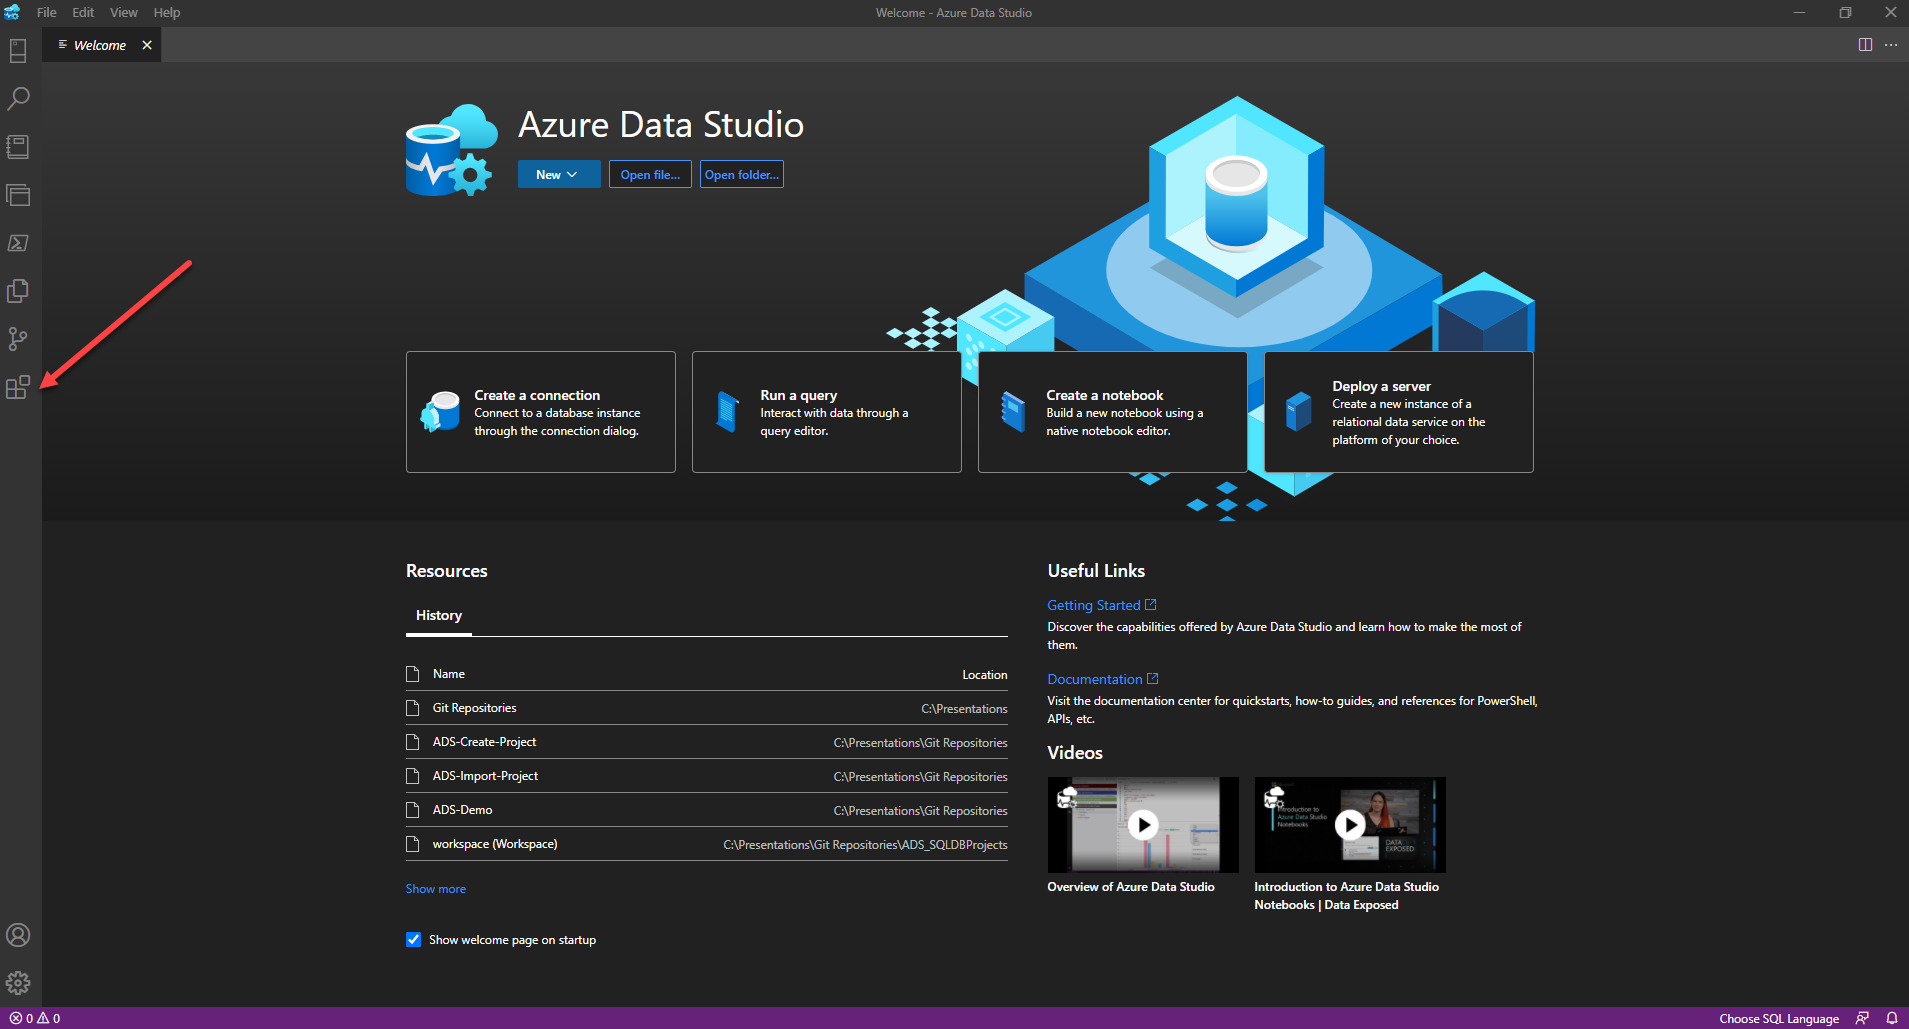
Open ADS and navigate to the Extensions.
Search for
azure cli. Install the Azure CLI Extension.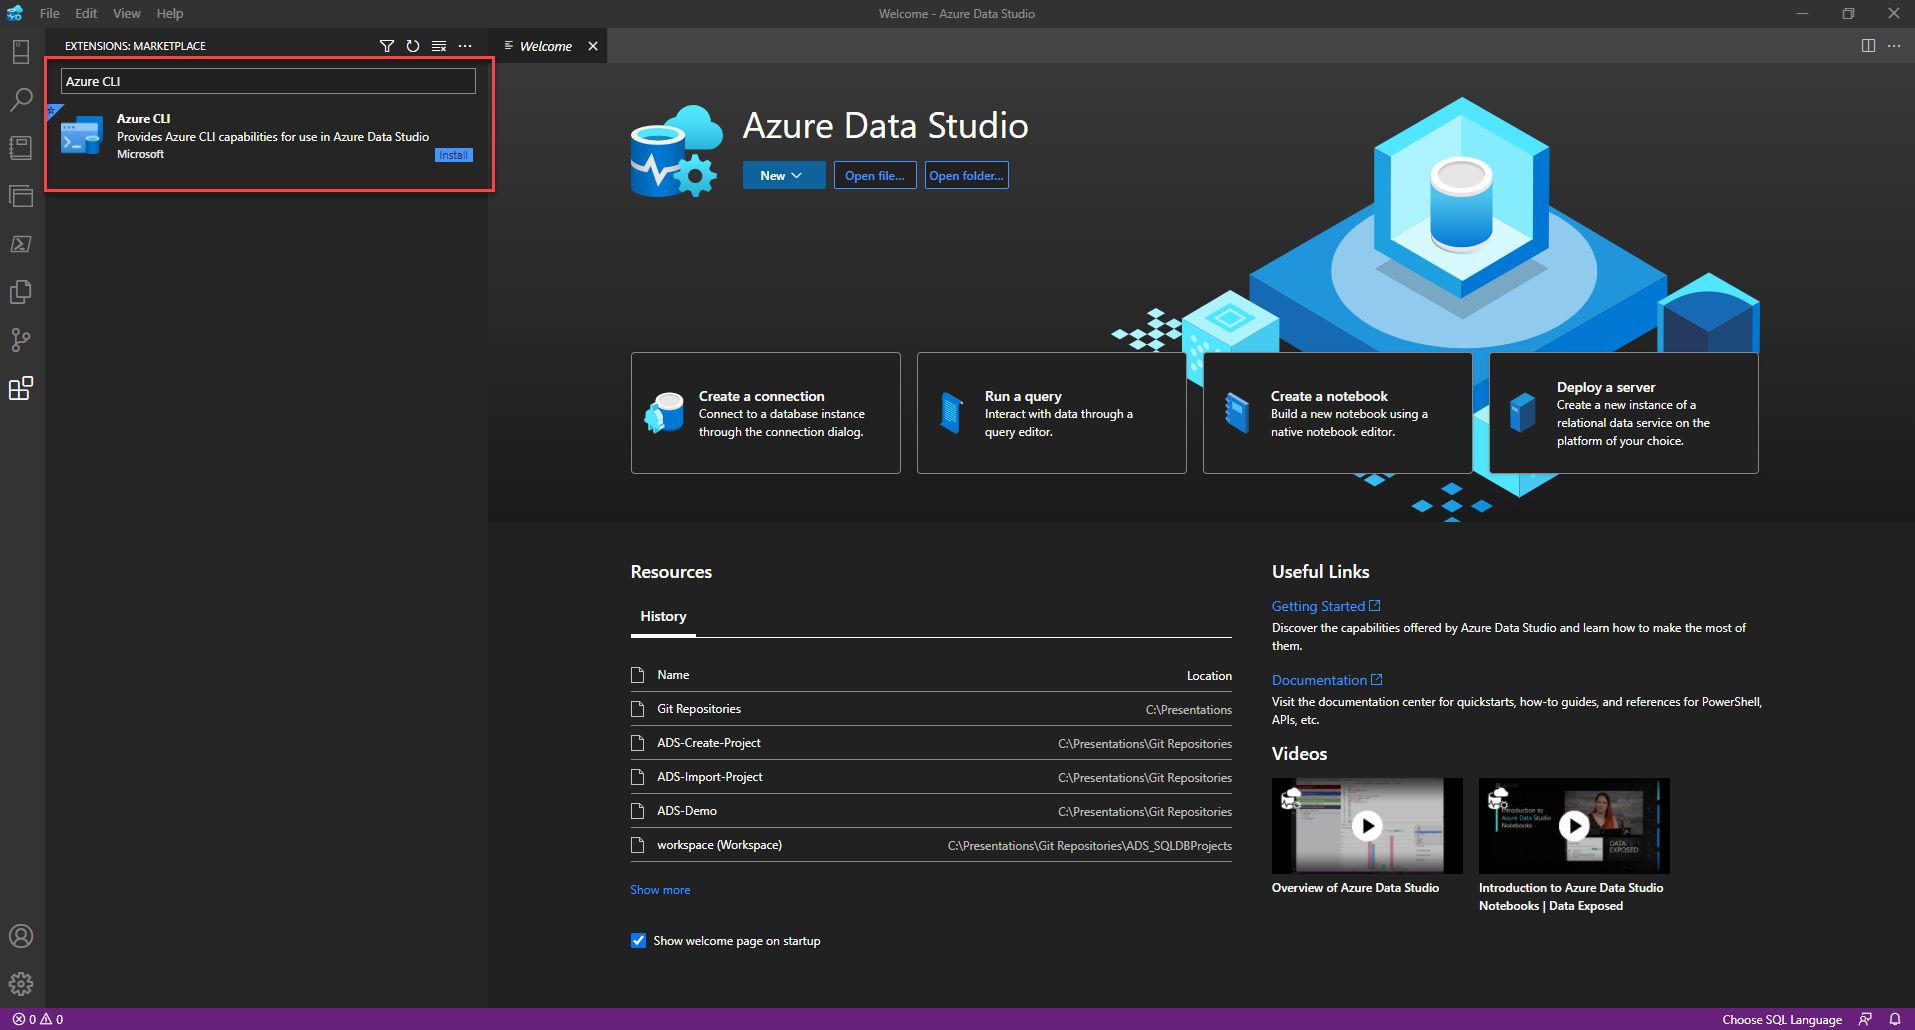
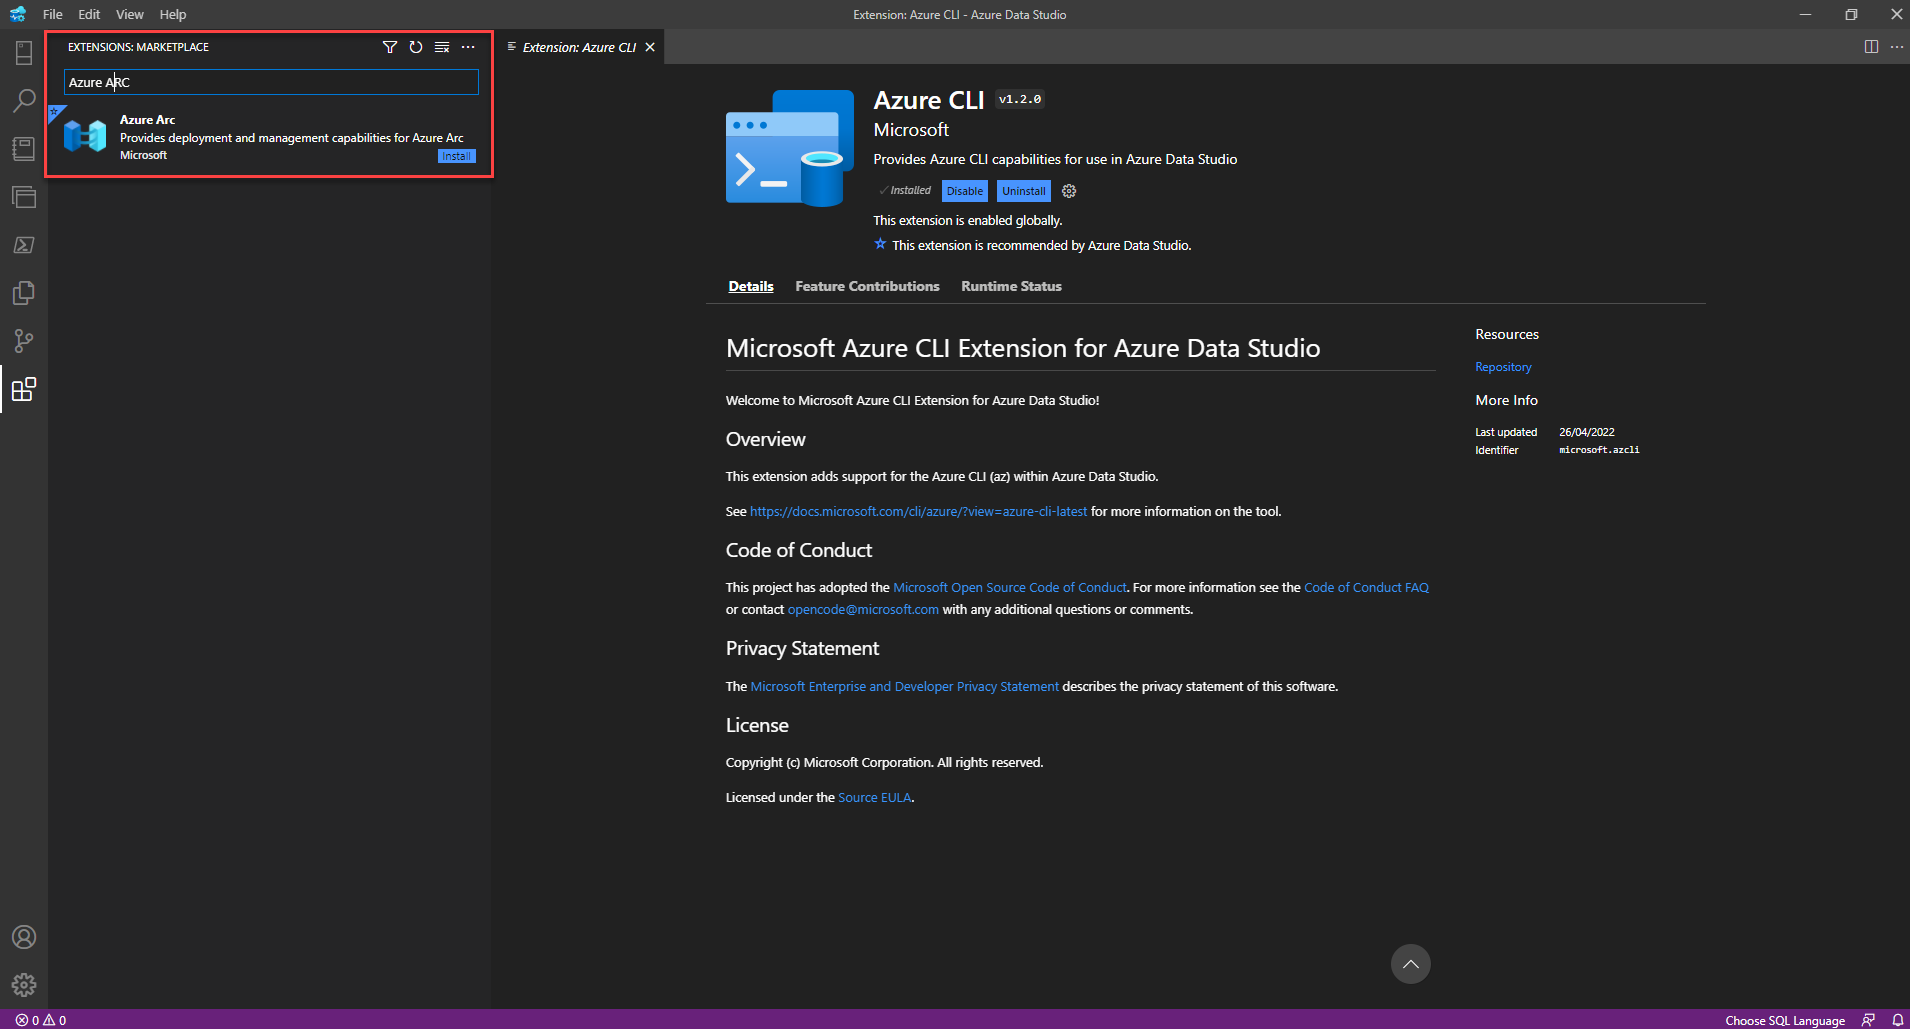
Search for Azure Arc. Install the Azure Arc Extension.
After installing both extensions, close and restart ADS.
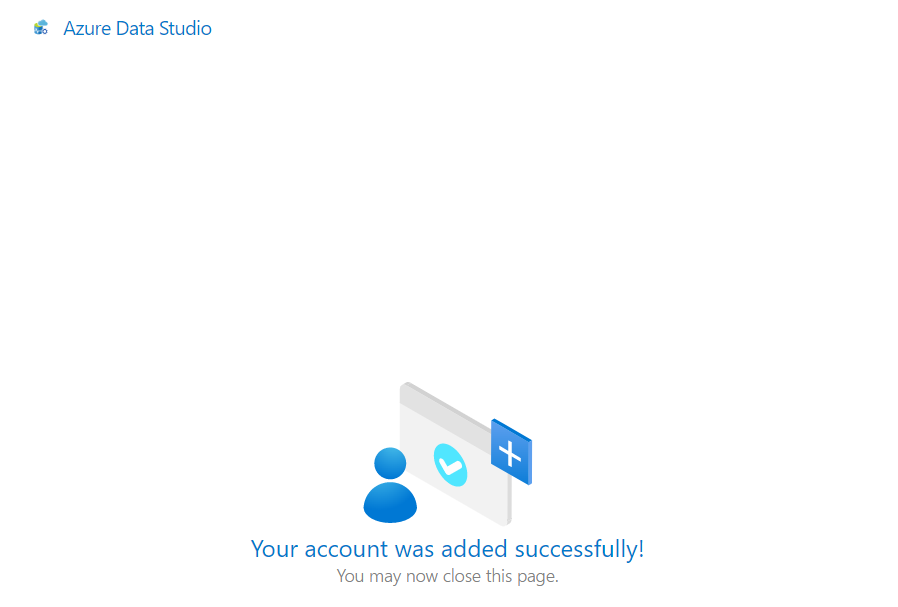
Once ADS has restarted, navigate to the Linked Accounts section and select Add an account.
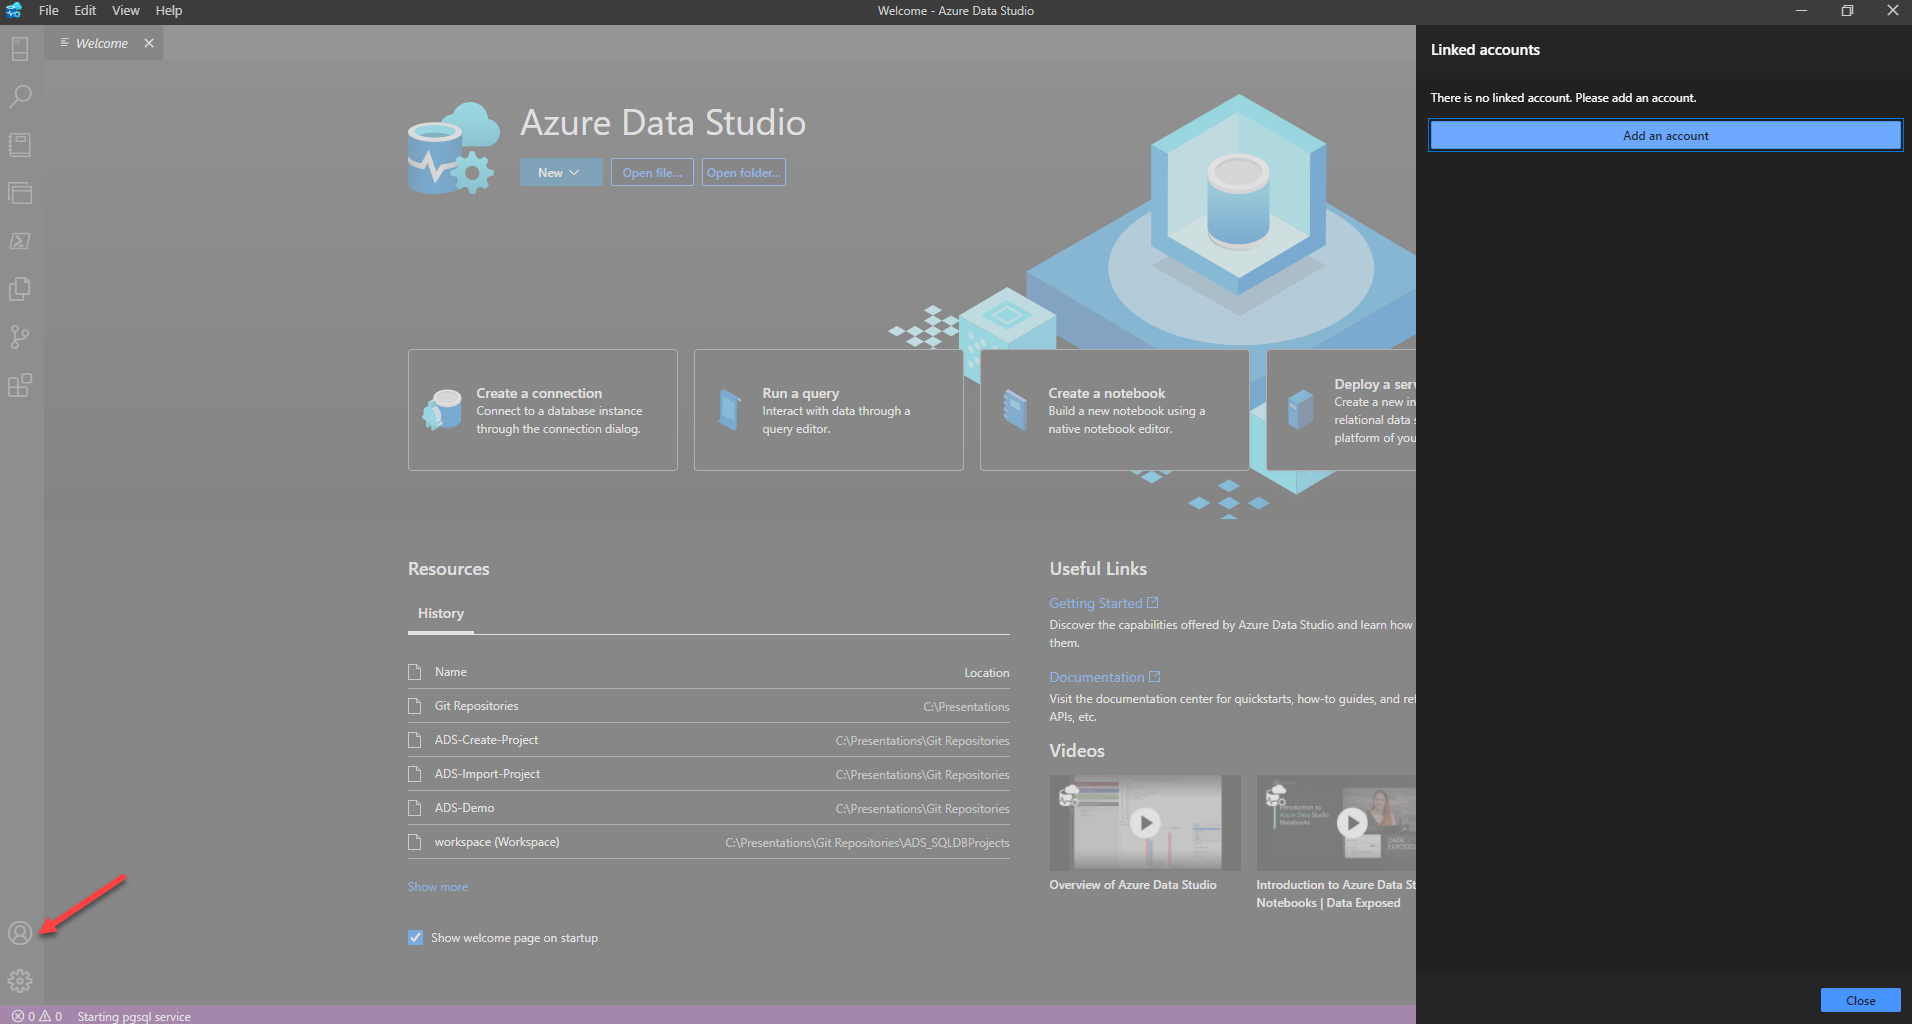
Sign in to your Azure subscription. You have successfully added a Linked Account to your Azure subscription. Select Close.
Open the terminal window and download your Arc-enabled Kubernetes Cluster config file to your workstation. You can use the command:
az aks get-credentials --resource-group <resourcegroupname> `
    --name <Arc-enabled Kubernetes Cluster Name> `
    --file <download location>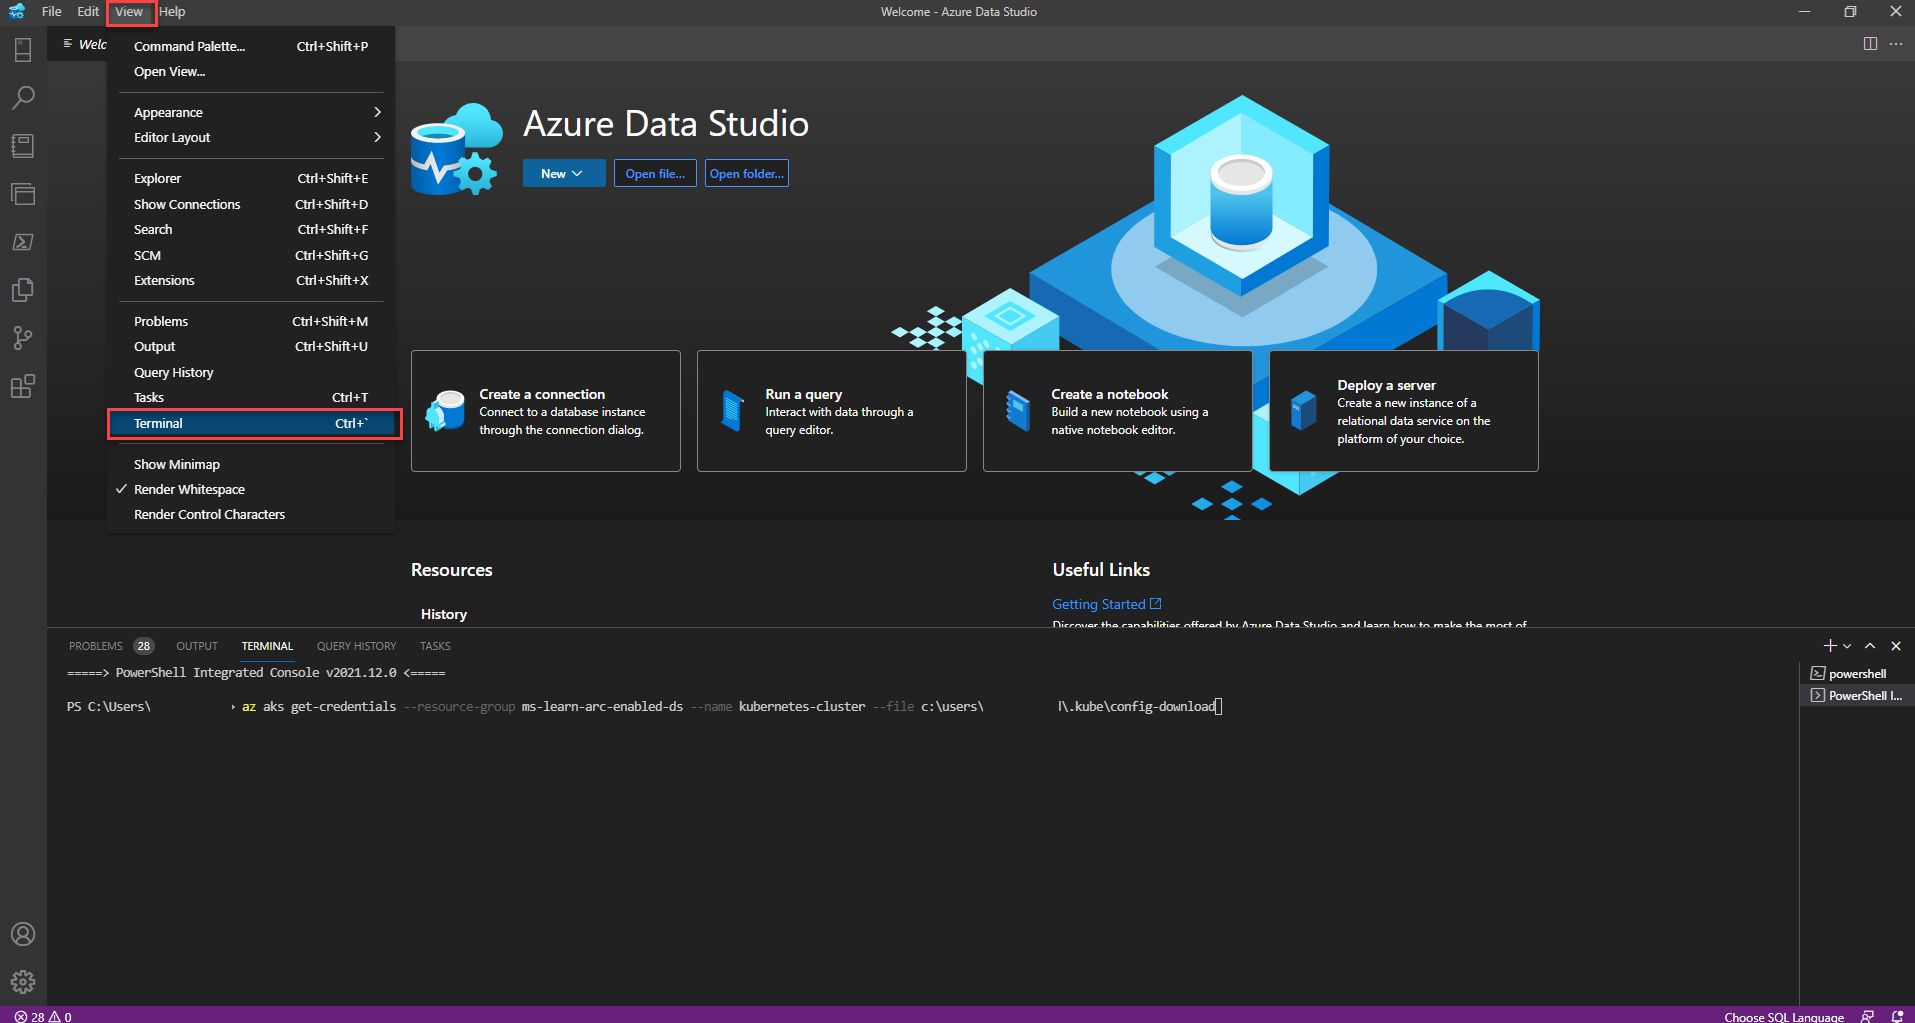
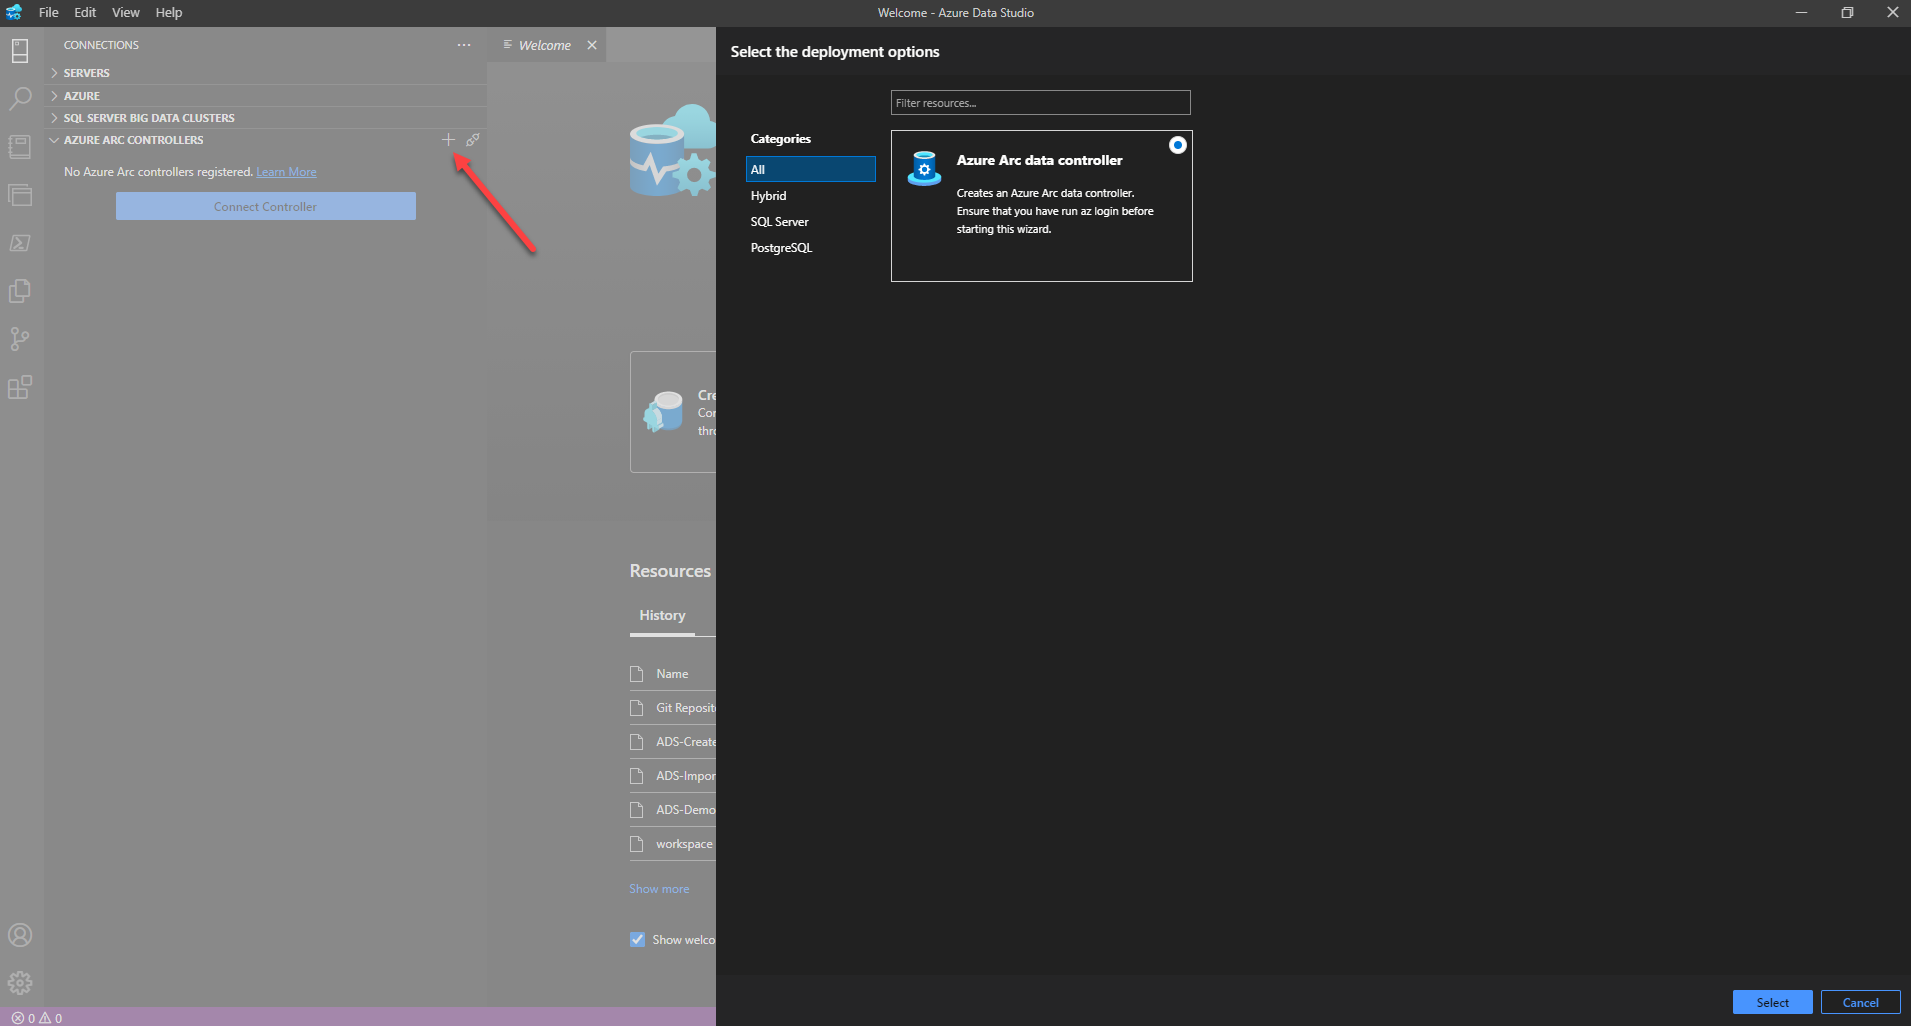
Expand the ADS Connections tab, and expand the Azure Arc controllers dropdown.
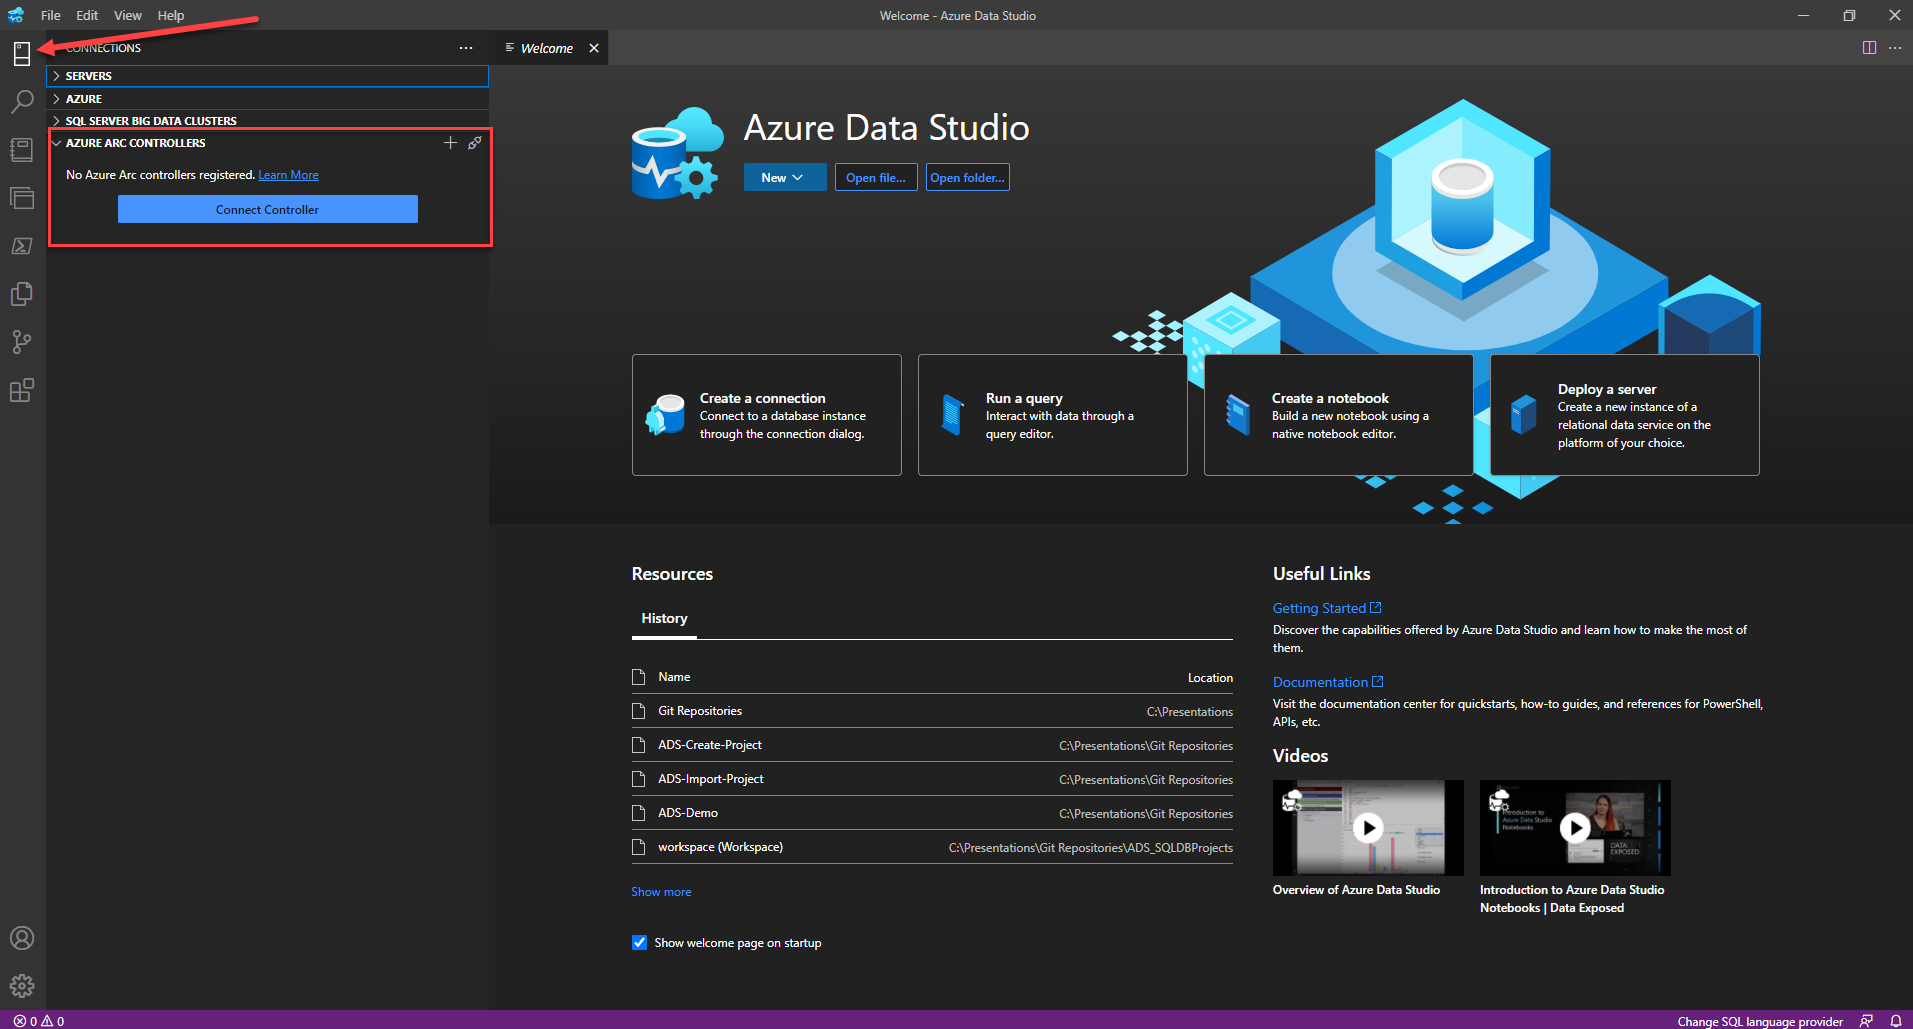
Select + Create New Azure Arc Controller, ensure Azure Arc data controller is selected, and select Select.
Confirm the deployment prerequisites are in-place. Click Next.
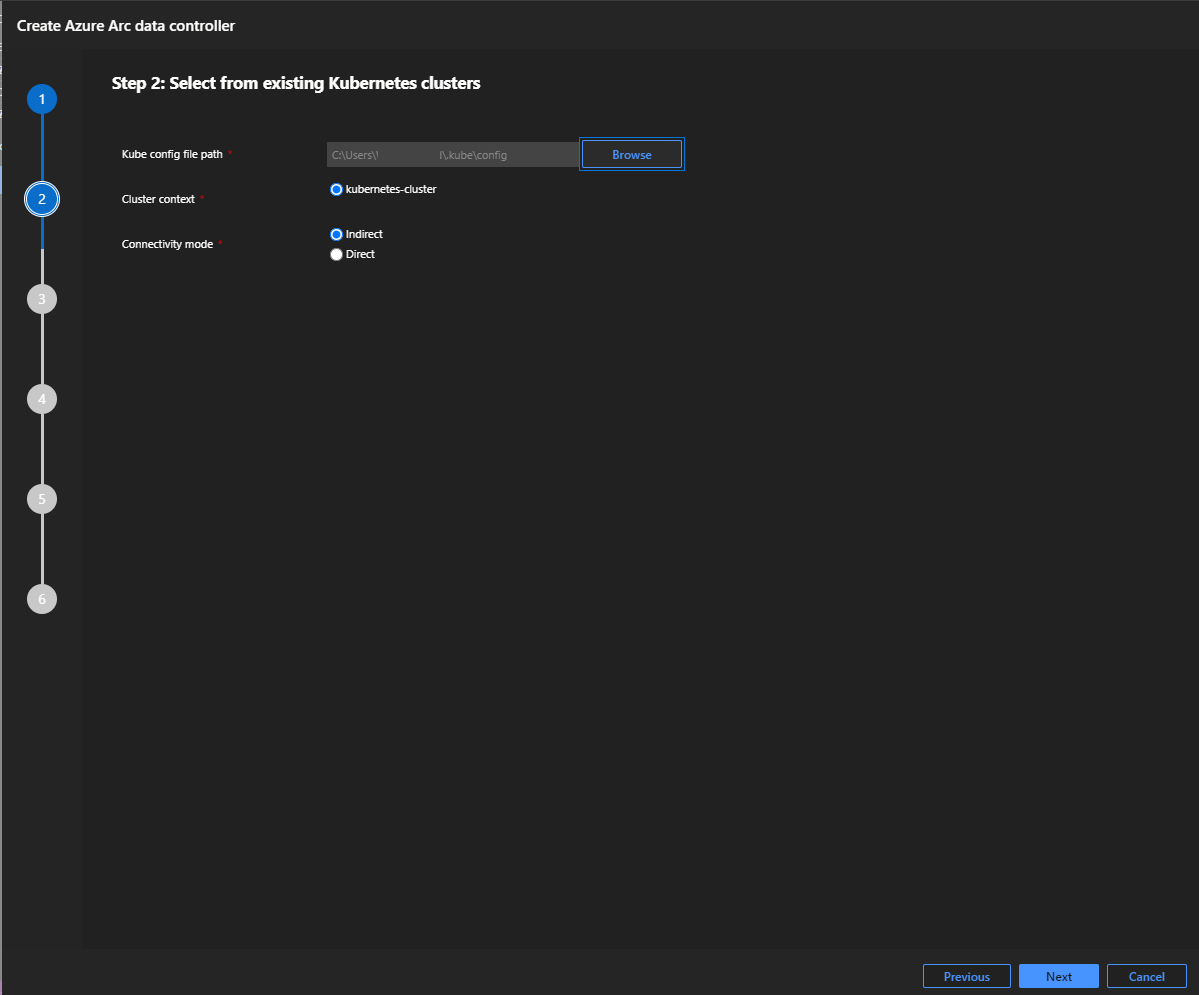
With your downloaded Arc-enabled Kubernetes Cluster config file in the default location, confirm your Arc-enabled Kubernetes Cluster is selected. Ensure the chosen connectivity mode is Direct. Select Next.

For the Kubernetes configuration template, choose the appropriate storage class. This exercise uses an AKS cluster. Specify
azure-arc-aks-premium-storage. Select Next.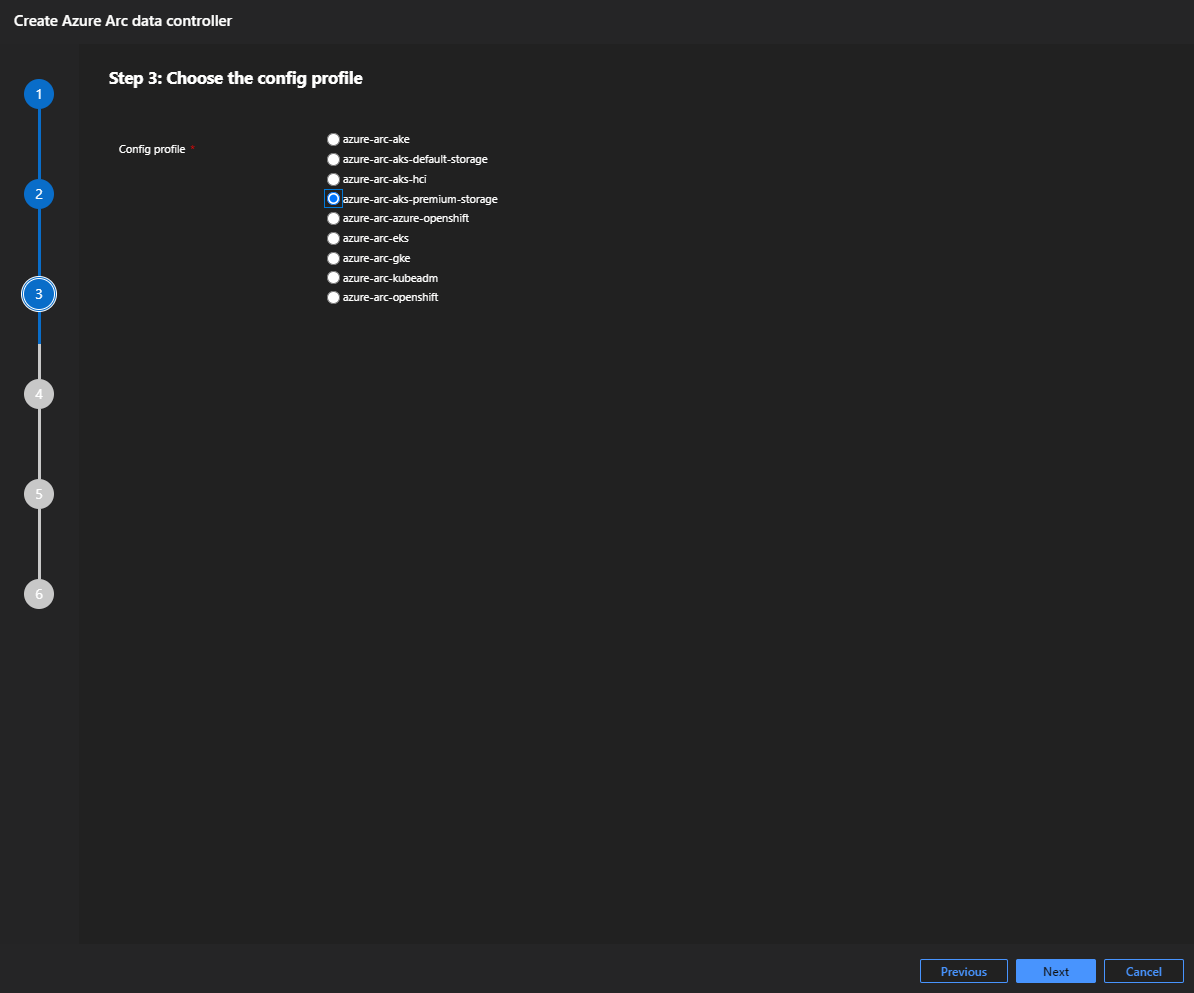
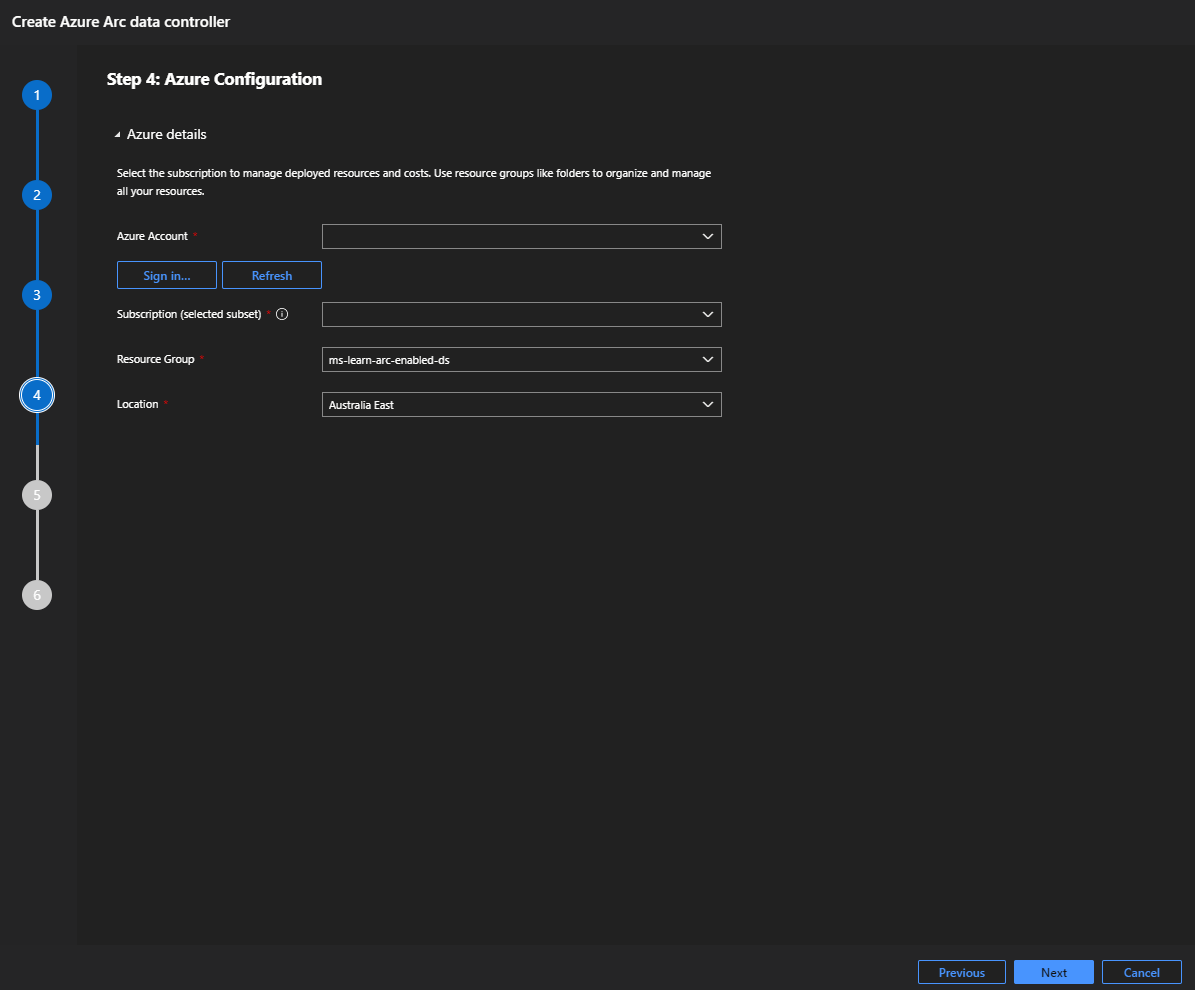
In step 11 above, you connected to your subscription. Confirm the Azure account is correct connected to the correct subscription. Choose the resource group you configured in the prerequisites at the top of this section. Choose the location you are deploying your Arc data controller to. Select Next.
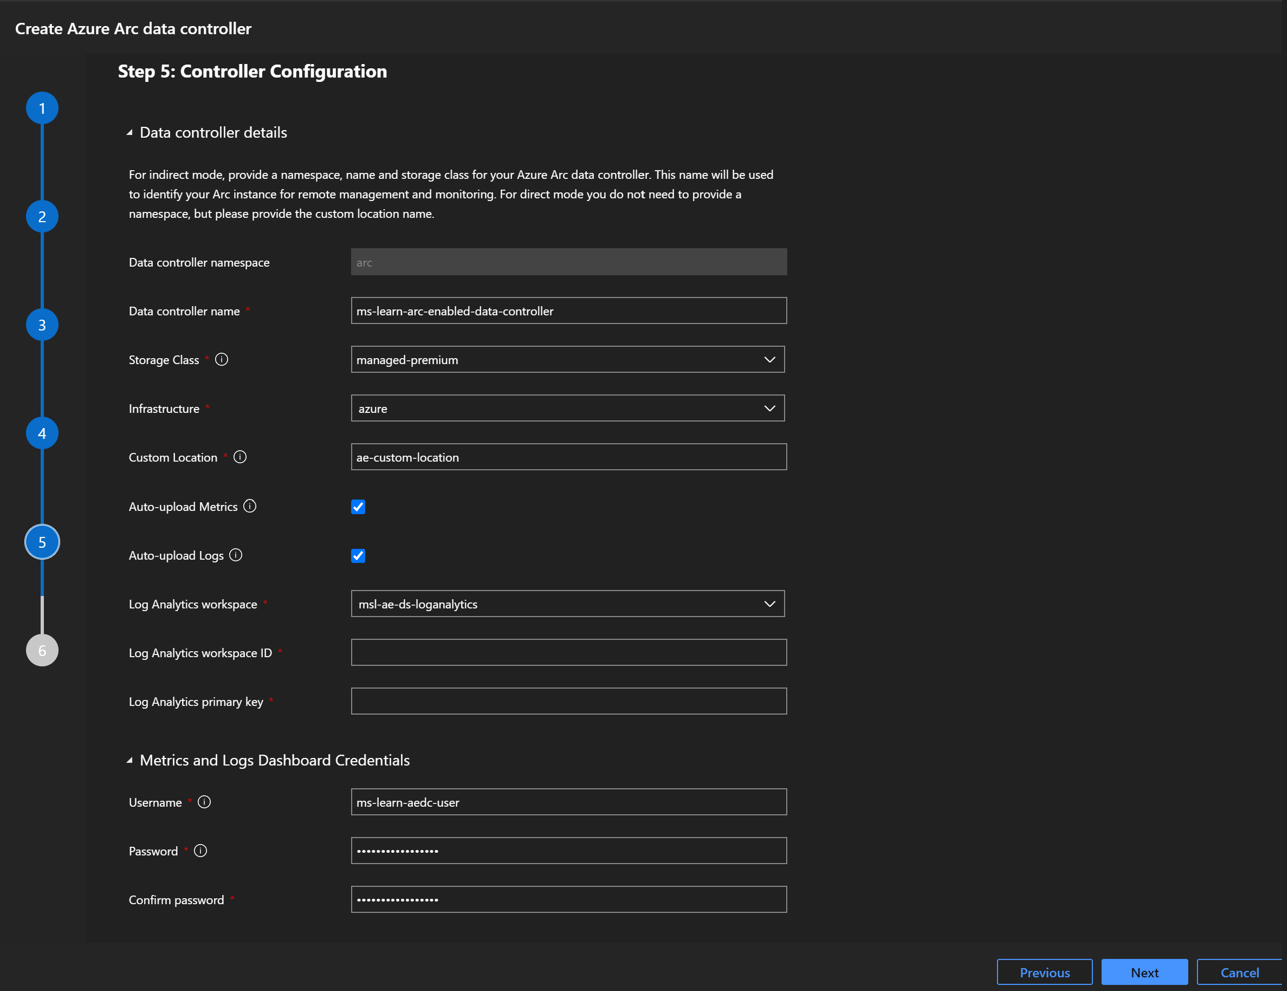
To create the Arc data controller, gather the following information:
- Data Controller Name: Your custom name
- Storage Class: dependent on your config profile selection above
- Infrastructure: dependent on the location of your Kubernetes Cluster
- Custom Location: An Azure resource representing the namespace on your Kubernetes Cluster where you will host the data controller.
- Auto-upload Metrics: Ensure you select this with the directly connected mode
- Auto-upload Logs: Ensure you select this with the directly connected mode
- Log Analytics workspace ID: available from your Log Analytics workspace
- Log Analytics primary key: available from your Log Analytics workspace
- Metrics and Logs Dashboard Credentials (Kibana and Grafana)
Review the configuration details, and you are ready to deploy. Select Deploy.
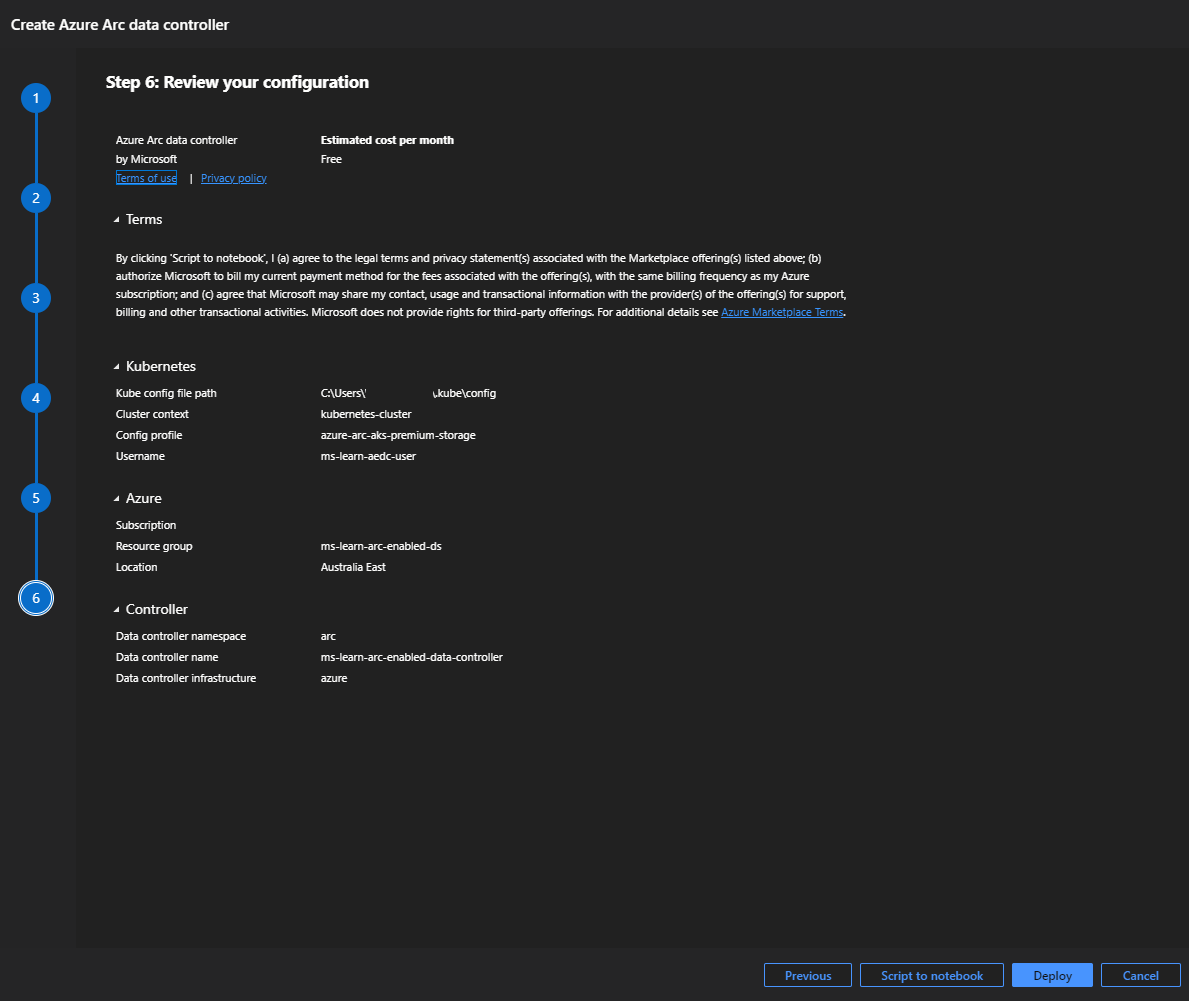
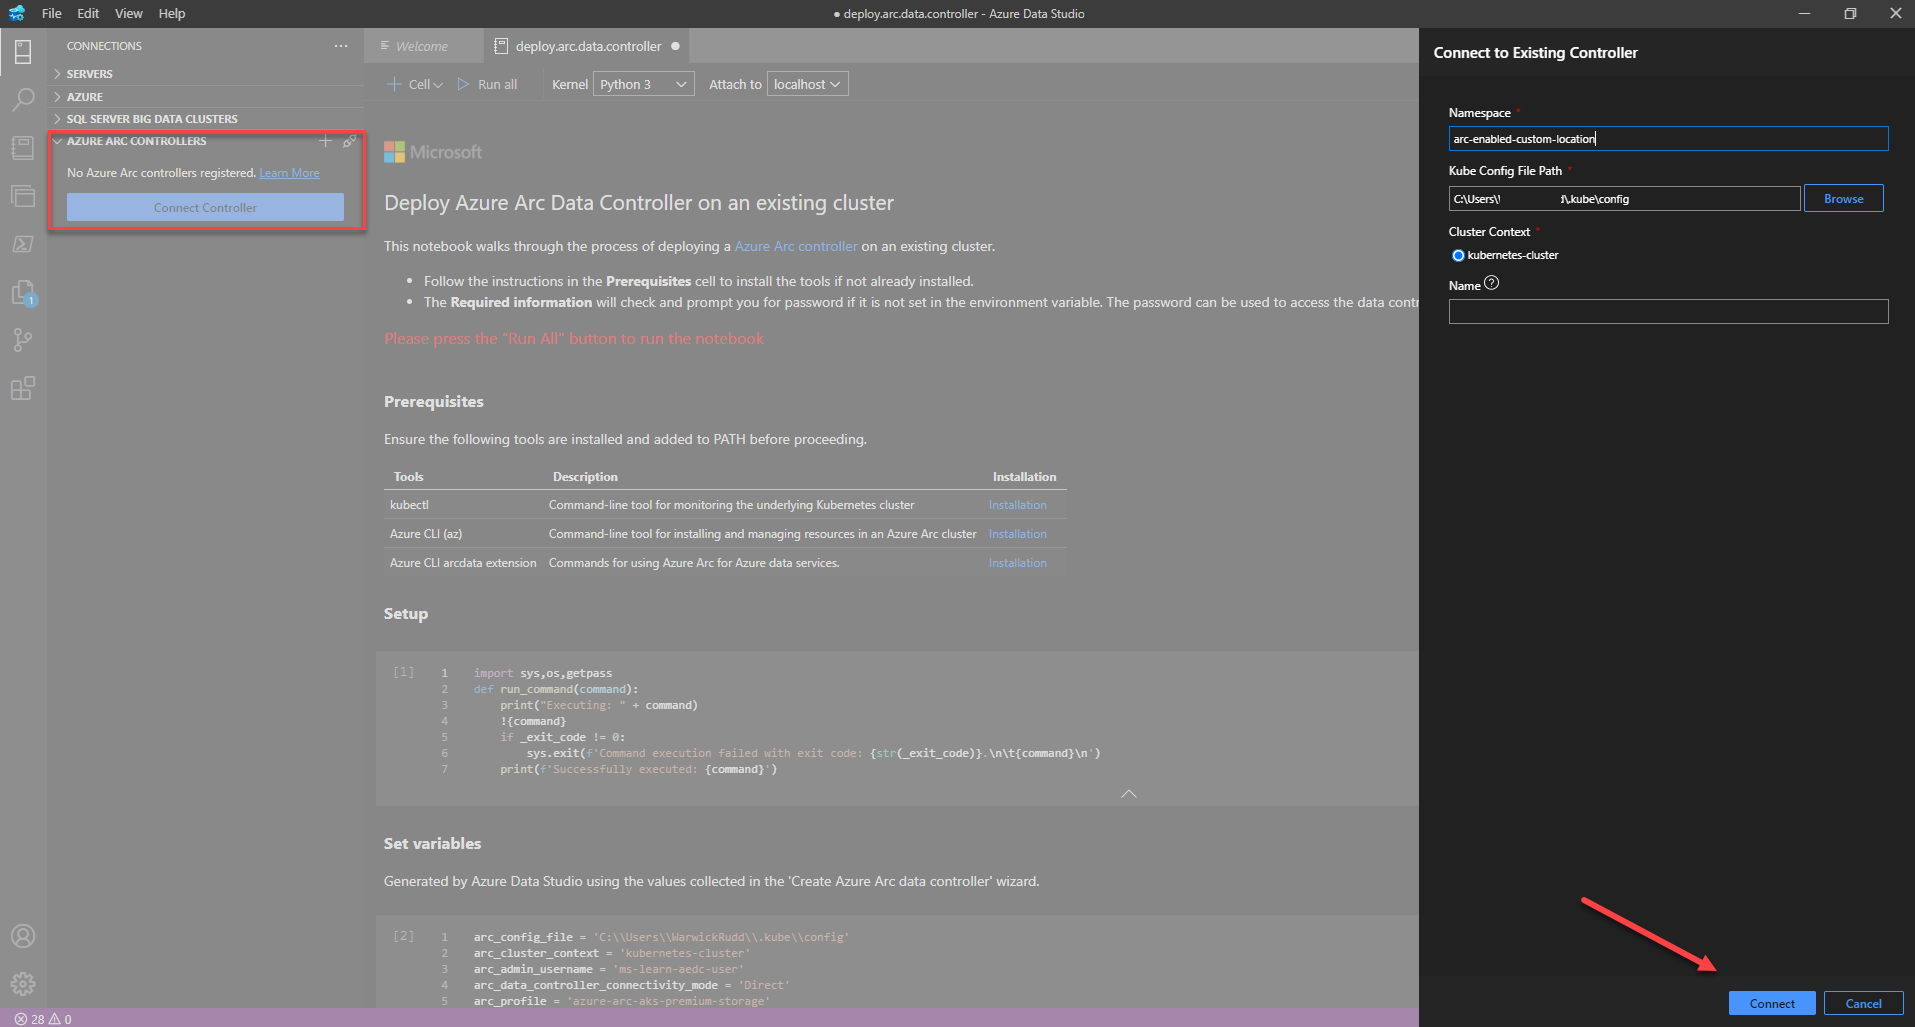
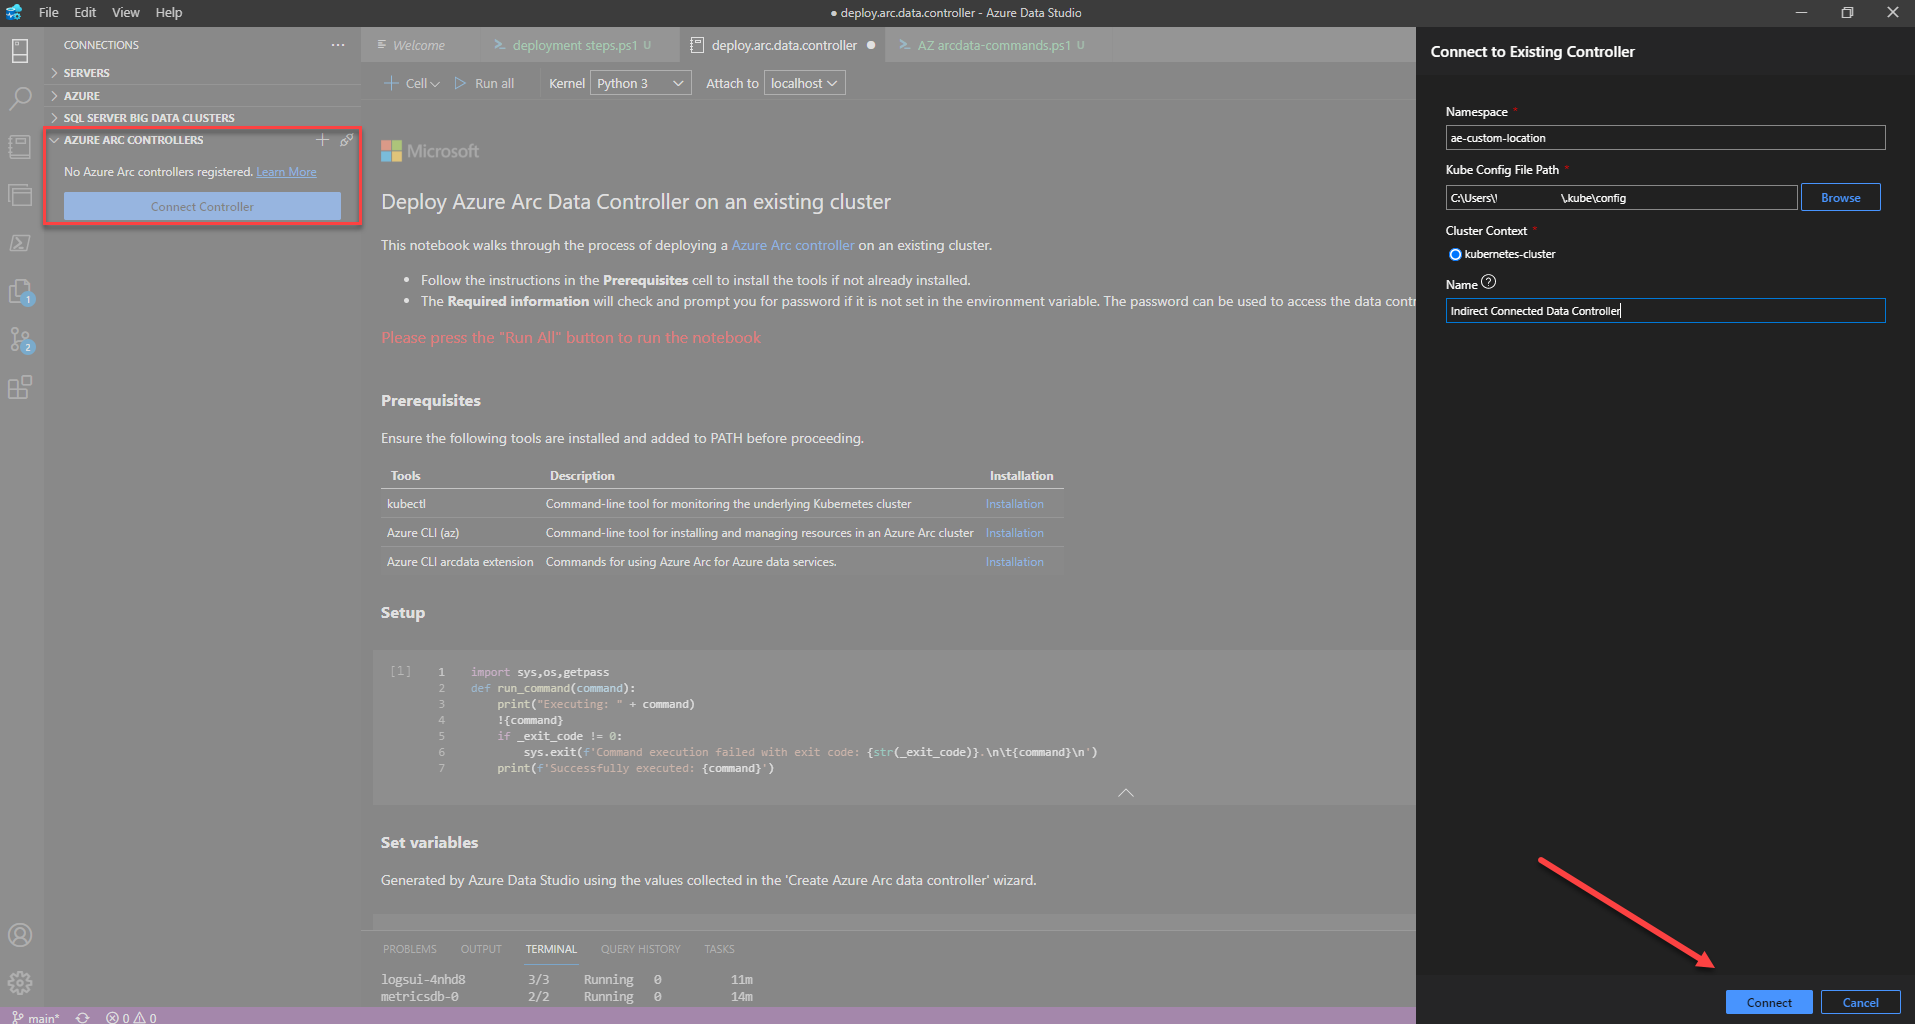
This opens up a notebook called deploy.arc.data.controller, which automatically starts executing each of the created cells. A prompt will request you to log in to your Azure subscription to allow the deployment to start.
Once the deployment has completed, select Connect Controller in the connections tab. Enter the namespace for the data controller you just created and select connect.
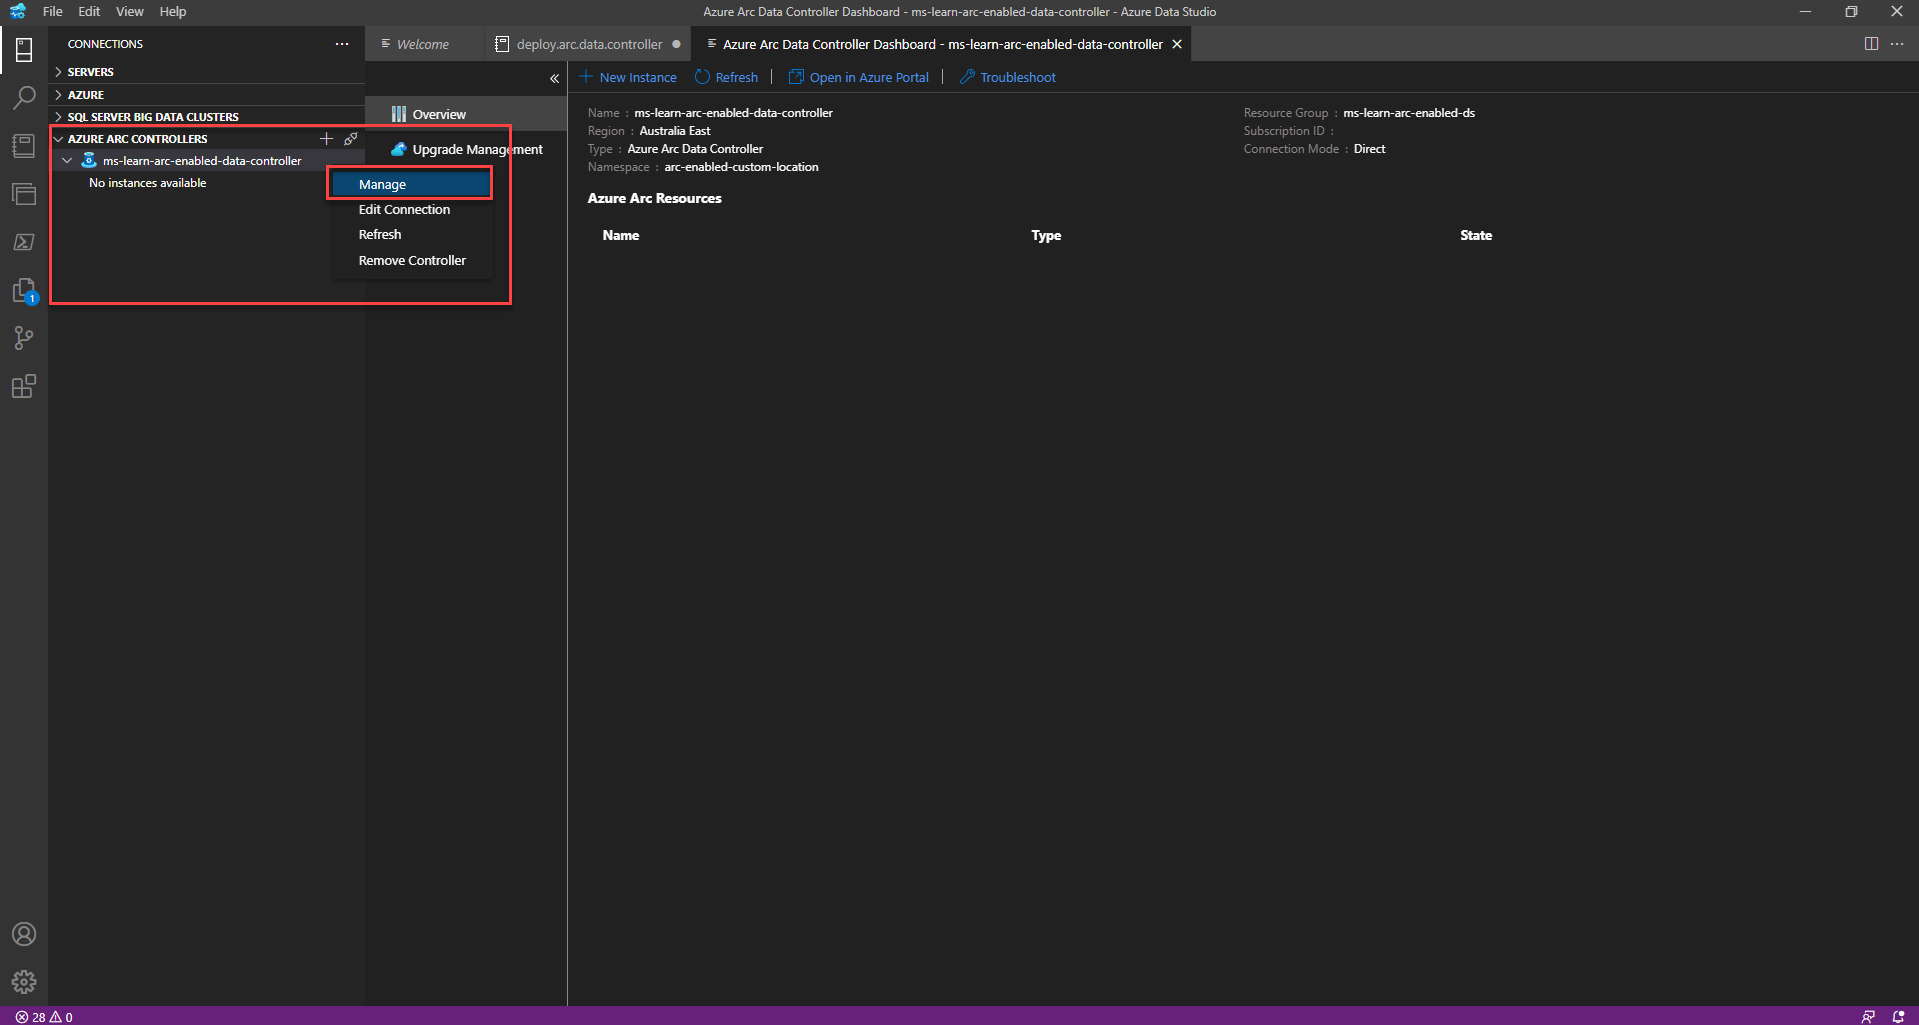
To manage your Arc data controller right-click on the data controller and select Manage.
Option 3: Azure portal Cloud Shell deployment
In this exercise option, you create the Arc data controller via the CLI from the Azure portal. Ensure you have walked through the prerequisites at the start of this exercise.
In the Azure portal, open the Cloud Shell.
Set your parameters to be used during this deployment.
$Env:MySuscriptionID = 'enter your subscription ID here'
$Env:MyResourceGroup = 'enter resource group name here'
$Env:MyCluster = 'enter kubernetes cluster name here'
$Env:Mylocation = 'enter resource location here'
$Env:MyCustomlocationExtension = 'enter custom location extension name here'
$Env:MyCustomlocation = 'enter custom location name here'
$Env:MyNamespace = 'enter data controller name space here'
Download the Kubernetes cluster
kubeconfig file.az account set --subscription $Env:MySuscriptionID az aks get-credentials --resource-group $Env:MyResourceGroup --name $Env:MyClusterArc-enable your Kubernetes Cluster.
az connectedk8s connect --name $Env:MyCluster --resource-group $Env:MyResourceGroup --location $Env:MylocationConfirm your Arc-enabled Kubernetes cluster.
az connectedk8s list --resource-group $Env:MyResourceGroup --output tableEnable the Cluster-Connect and Custom-location Arc-enabled features on your Arc-enabled Kubernetes cluster.
az connectedk8s enable-features --name $Env:MyCluster `
    --resource-group $Env:MyResourceGroup `
    --features cluster-connect custom-locations
Confirm all Azure Arc Agents have been deployed and are running in the azure-arc namespace.
kubectl get deployments,pods --namespace azure-arcCreate your Arc-enabled custom location extension in your Kubernetes - Azure Arc type resource.
az k8s-extension create --cluster-name $Env:MyCluster `
    --resource-group $Env:MyResourceGroup `
    --name $Env:MyCustomlocationExtension `
    --cluster-type connectedClusters `
    --extension-type microsoft.arcdataservices `
    --auto-upgrade false `
    --scope cluster `
    --release-namespace $Env:MyNamespace `
    --config Microsoft.CustomLocation.ServiceAccount=sa-arc-bootstrapper
Confirm your newly created Arc-enabled custom location extension.
az k8s-extension show --resource-group $Env:MyResourceGroup `
    --cluster-name $Env:MyCluster `
    --name $Env:MyCustomlocationExtension `
    --cluster-type connectedclusters
Confirm your custom location namespace has been created and has the bootstrapper running.
kubectl get pods -n $Env:MyNamespaceAssign permissions to the Arc-enabled custom location extension.
$Env:MSI_Object_Id=(az k8s-extension show `
    --resource-group $Env:MyResourceGroup `
    --cluster-name $Env:MyCluster `
    --cluster-type connectedClusters `
    --name $Env:MyCustomlocationExtension | convertFrom-json).identity.principalId

az role assignment create --assignee $Env:MSI_Object_Id `
    --role "Contributor" `
    --scope "/subscriptions/$Env:MySuscriptionID/resourceGroups/$Env:MyResourceGroup"

az role assignment create --assignee $Env:MSI_Object_Id `
    --role "Monitoring Metrics Publisher" `
    --scope "/subscriptions/$Env:MySuscriptionID/resourceGroups/$Env:MyResourceGroup"
Create the Arc-enabled custom location.
$Env:HostClusterID=az connectedk8s show --name $Env:MyCluster `
    --resource-group $Env:MyResourceGroup `
    --query id -o tsv

$Env:ExtensionID=az k8s-extension show --name $Env:MyCustomlocationExtension `
    --cluster-type connectedClusters `
    --cluster-name $Env:MyCluster `
    --resource-group $Env:MyResourceGroup `
    --query id -o tsv

az customlocation create --name $Env:MyCustomlocation `
    --resource-group $Env:MyResourceGroup `
    --namespace $Env:MyNamespace `
    --host-resource-id $Env:HostClusterID `
    --cluster-extension-ids $Env:ExtensionID `
    --location $Env:Mylocation
Validate the creation of the Arc-enabled custom location.
az customlocation list -o tableDeclare some parameters specific to creating the Arc data controller.
$Env:MyDataController = 'enter your data controller name here'
$Env:MyConnectMode = 'direct'
$Env:MyProfile = 'azure-arc-aks-premium-storage'  (Choose your storage profile)
$Env:MyStorageClass = 'managed-premium' (Choose your storage class)
$Env:arc_infrastructure = 'azure'
$ENV:AZDATA_LOGSUI_USERNAME= 'enter Kibana dashboard username here'
$ENV:AZDATA_LOGSUI_PASSWORD= 'enter Kibana dashboard password here'
$ENV:AZDATA_METRICSUI_USERNAME= 'enter Grafana dashboard username here'
$ENV:AZDATA_METRICSUI_PASSWORD= 'enter Grafana dashboard password here'
Create Arc data controller.
az arcdata dc create --name $Env:MyDataController `
    --k8s-namespace $Env:MyNamespace `
    --subscription $Env:MySuscriptionID `
    --resource-group $Env:MyResourceGroup `
    --location $Env:Mylocation `
    --connectivity-mode $Env:MyConnectMode `
    --profile-name $Env:MyProfile `
    --auto-upload-logs true `
    --auto-upload-metrics true `
    --custom-location $Env:MyCustomlocation `
    --storage-class $Env:MyStorageClass `
    --infrastructure $Env:arc_infrastructure `
    --custom-location $Env:MyCustomlocation `
    --cluster-name $Env:MyCluster
Monitor the deployment of your Arc data controller. Use the command:
kubectl get datacontrollers --namespace $Env:MyNamespace.

<##
    The deployment will go through 3 states before it finishes:

    - State = Deploying Controller
    - State = Deploying Monitoring
    - State = Ready
##>
Confirm all resources have been deployed into your Arc-enabled custom location namespace.
kubectl get pods -n $Env:MyNamespace
Option 4: Azure Data Studio Terminal window deployment
In this deployment method, use Azure Data Studio (ADS) and the associated ADS extensions Azure Arc & Azure CLI. Use the CLI from the Azure Data Studio Terminal. Ensure you have walked through the prerequisites at the start of this exercise and installed the Azure Arc and Azure CLI Azure Data Studio extensions.
Ensure that you have navigated to your .kube directory in the ADS terminal before executing any CLI commands.
In the Azure portal, open the Cloud Shell.
Set your parameters to be used during this deployment.
$Env:MySuscriptionID= 'enter your subscription ID here'
$Env:MyResourceGroup= 'enter resource group name here'
$Env:MyCluster= 'enter kubernetes cluster name here'
$Env:Mylocation= 'enter resource location here'
$Env:MyCustomlocationExtension= 'enter custom location extension name here'
$Env:MyCustomlocation= 'enter custom location name here'
$Env:MyNamespace= 'enter data controller name space here'
Download the Kubernetes cluster
kubeconfig file.az account set --subscription $Env:MySuscriptionID az aks get-credentials --resource-group ` $Env:MyResourceGroup --name $Env:MyClusterArc-enable your Kubernetes Cluster.
az connectedk8s connect --name $Env:MyCluster `
    --resource-group $Env:MyResourceGroup `
    --location $Env:Mylocation
Confirm your Arc-enabled Kubernetes cluster.
az connectedk8s list --resource-group $Env:MyResourceGroup --output tableEnable the Cluster-Connect and Custom-location Arc-enabled features on your Arc-enabled Kubernetes cluster.
az connectedk8s enable-features --name $Env:MyCluster `
    --resource-group $Env:MyResourceGroup `
    --features cluster-connect custom-locations
Confirm all Azure Arc Agents have been deployed and are running in the azure-arc namespace.
kubectl get deployments,pods --namespace azure-arcCreate your Arc-enabled custom location extension in your Kubernetes - Azure Arc type resource.
az k8s-extension create --cluster-name $Env:MyCluster `
    --resource-group $Env:MyResourceGroup `
    --name $Env:MyCustomlocationExtension `
    --cluster-type connectedClusters `
    --extension-type microsoft.arcdataservices `
    --auto-upgrade false `
    --scope cluster `
    --release-namespace $Env:MyNamespace `
    --config Microsoft.CustomLocation.ServiceAccount=sa-arc-bootstrapper
Confirm your newly created Arc-enabled custom location extension.
az k8s-extension show --resource-group $Env:MyResourceGroup `
    --cluster-name $Env:MyCluster `
    --name $Env:MyCustomlocationExtension `
    --cluster-type connectedclusters
Confirm your custom location namespace has been created and has the bootstrapper running.
kubectl get pods -n $Env:MyNamespaceAssign permissions to the Arc-enabled custom location extension.
$Env:MSI_Object_Id=(az k8s-extension show --resource-group $Env:MyResourceGroup `
    --cluster-name $Env:MyCluster `
    --cluster-type connectedClusters `
    --name $Env:MyCustomlocationExtension | convertFrom-json).identity.principalId

az role assignment create --assignee $Env:MSI_Object_Id `
    --role "Contributor" `
    --scope "/subscriptions/$Env:MySuscriptionID/resourceGroups/$Env:MyResourceGroup"

az role assignment create --assignee $Env:MSI_Object_Id `
    --role "Monitoring Metrics Publisher" `
    --scope "/subscriptions/$Env:MySuscriptionID/resourceGroups/$Env:MyResourceGroup"
Create the Arc-enabled custom location.
$Env:HostClusterID=az connectedk8s show --name $Env:MyCluster `
    --resource-group $Env:MyResourceGroup `
    --query id -o tsv

$Env:ExtensionID=az k8s-extension show --name $Env:MyCustomlocationExtension `
    --cluster-type connectedClusters `
    --cluster-name $Env:MyCluster `
    --resource-group $Env:MyResourceGroup `
    --query id -o tsv

az customlocation create --name $Env:MyCustomlocation `
    --resource-group $Env:MyResourceGroup `
    --namespace $Env:MyNamespace `
    --host-resource-id $Env:HostClusterID `
    --cluster-extension-ids $Env:ExtensionID `
    --location $Env:Mylocation
Validate the creation of the Arc-enabled custom location.
az customlocation list -o tableDeclare some parameters specific to the creation of the Arc data controller.
$Env:MyDataController= 'enter your data controller name here'
$Env:MyConnectMode = 'direct'
$Env:MyProfile = 'azure-arc-aks-premium-storage'  (Choose your storage profile)
$Env:MyStorageClass = 'managed-premium' (Choose your storage class)
$Env:arc_infrastructure = 'azure'
$ENV:AZDATA_LOGSUI_USERNAME= 'enter Kibana dashboard username here'
$ENV:AZDATA_LOGSUI_PASSWORD= 'enter Kibana dashboard password here'
$ENV:AZDATA_METRICSUI_USERNAME= 'enter Grafana dashboard username here'
$ENV:AZDATA_METRICSUI_PASSWORD= 'enter Grafana dashboard password here'
Create Arc data controller.
az arcdata dc create --name $Env:MyDataController `
    --k8s-namespace $Env:MyNamespace `
    --subscription $Env:MySuscriptionID `
    --resource-group $Env:MyResourceGroup `
    --location $Env:Mylocation `
    --connectivity-mode $Env:MyConnectMode `
    --profile-name $Env:MyProfile `
    --auto-upload-logs true `
    --auto-upload-metrics true `
    --custom-location $Env:MyCustomlocation `
    --storage-class $Env:MyStorageClass`
    --infrastructure $Env:arc_infrastructure `
    --custom-location $Env:MyCustomlocation `
    --cluster-name $Env:MyCluster
Provide the Log Analytics Workspace ID and associated primary key. You can retrieve these from inside the portal. Navigate to your Log Analytics workspace. The workspace ID and primary key are available in the Settings > Agents management section.
Monitor the deployment of your Arc data controller. Use the command:
kubectl get datacontrollers --namespace $Env:MyNamespace

<##
    The deployment will go through 3 states before it finishes:

    - State = Deploying Controller
    - State = Deploying Monitoring
    - State = Ready
##>
Confirm all resources have been deployed into your Arc-enabled custom location namespace.
kubectl get pods -n $Env:MyNamespace
Deploy in indirectly connected mode
To deploy your Azure Arc data controller, you can use one of the following options:
- GUI deployment: Azure Data Studio
- CLI deployment: Azure Data Studio terminal window
Once you have deployed your data controller in indirectly connected mode, this resource is now displayed in your Azure subscription. Use Azure Data Studio to manage and maintain your data controller.
In preparation for configuring your environment to utilize a data controller in indirectly connected mode, your environment needs access to port 443 and the Microsoft Container Registry, allowing you to pull images.
Option 1: Azure Data Studio GUI deployment
In this deployment method, use Azure Data Studio (ADS) and the associated ADS extensions Azure Arc & Azure CLI.
Navigate to your .kube directory in the ADS terminal before you run any CLI commands.
You can check to see that you have a current Kubernetes connection and confirm your current context with the following commands:
kubectl cluster-info
kubectl config current-context

Confirm you have Azure Data Studio downloaded and installed.
Open ADS and navigate to the Extensions.
Search for Azure CLI and install the Azure CLI Extension.
Search for "Azure Arc" and install the Azure Arc Extension.
After you install both extensions, close and restart ADS.
Once ADS has restarted, navigate to the Linked Accounts section and select Add an account.
Sign in to your Azure subscription. You have successfully added a Linked Account to your Azure subscription. Click Close.
Open the terminal window and download your Arc-enabled Kubernetes Cluster config file to your workstation. You can use the command:
az aks get-credentials --resource-group <resourcegroupname> `
    --name <Arc-enabled Kubernetes Cluster Name> `
    --file <download location>
Expand the ADS Connections tab, and expand the Azure Arc Controllers dropdown.
Select + Create New Azure Arc Controller, ensuring Azure Arc data controller is selected. Click Select.
Confirm the deployment prerequisites are in-place. Select Next.
With your downloaded Arc-enabled Kubernetes Cluster config file in the default location, confirm your Arc-enabled Kubernetes Cluster is selected.
Ensure the chosen connectivity mode is Indirect. Select Next.
For the Kubernetes configuration template, choose the appropriate storage class. For this exercise, use an AKS cluster for this exercise, so we specify azure-arc-aks-premium-storage. Select Next.
Step 7 above connected to your subscription. Confirm the Azure account is correct, and the subscription is connected to the right subscription. Choose the resource group you previously configured in the prerequisites section at the top of this section. Choose the location to which you are deploying your Arc data controller. Select Next.
To create the Arc data controller, provide the following information:
- Data Controller Namespace: Your data controller namespace
- Storage Class: dependent on your config profile selection above
- Infrastructure: dependent on the location of your Kubernetes Cluster
- Custom Location: Only required for directly connected mode
- Auto-upload Metrics: Only required for directly connected mode
- Auto-upload Logs: Only required for directly connected mode
- Log Analytics workspace ID: Only required for directly connected mode
- Log Analytics primary key: Only required for directly connected mode
- Metrics and Logs Dashboard Credentials (Kibana and Grafana)

Review the configuration details, and you are ready to deploy. Select Deploy.
This opens up a notebook called deploy.arc.data.controller, which automatically starts executing each of the created cells. As this is an indirect mode deployment, you will not be requested to log into your Azure subscription.
To monitor the deployment status in the terminal window in ADS, you can execute the following commands:
kubectl get datacontroller --namespace 'enter your namespace here'This command works through the following three states during the deployment:
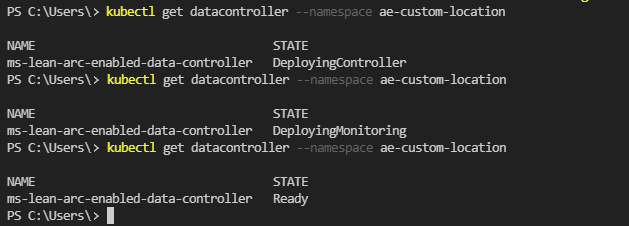
The following command shows all the deployed services and the status of those services in the data controller namespace:
kubectl get pods --namespace 'enter your namespace here'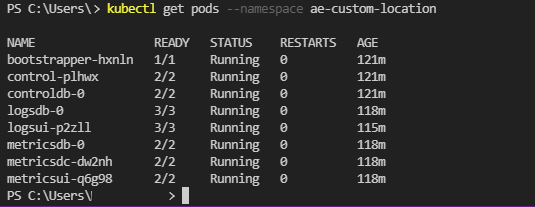
Once the deployment has completed, select Connect Controller in the connections tab. Enter the namespace for the data controller you just created and select connect.
You can manage your Arc data controller by right-clicking on the data controller and selecting Manage.

Option 2: Azure Data Studio terminal deployment
In this exercise option, you create the data controller onto your Kubernetes cluster located either on-premises or in the public cloud via the CLI from Azure Data Studio. Ensure you have completed the prerequisites at the start of this exercise.
You can check to see that you have a current Kubernetes connection and confirm your current context with the following commands:
 kubectl cluster-info
kubectl config current-context


In the Azure portal, open the Cloud Shell.
Set your parameters to be used during this deployment.
$Env:MySuscriptionID= 'enter your subscription ID here'
$Env:MyResourceGroup= 'enter resource group name here'
$Env:Mylocation= 'enter resource location here'
$Env:MyNamespace= 'enter data controller name space here'
$Env:MyDataController= 'enter your data controller name here'
$Env:MyConnectMode = 'Indirect'
$Env:MyProfile = 'azure-arc-aks-premium-storage'  (Choose your storage profile)
$Env:MyStorageClass = 'managed-premium' (Choose your storage class)
$Env:arc_infrastructure = 'azure'
$ENV:AZDATA_LOGSUI_USERNAME= 'enter Kibana dashboard username here'
$ENV:AZDATA_LOGSUI_PASSWORD= 'enter Kibana dashboard password here'
$ENV:AZDATA_METRICSUI_USERNAME= 'enter Grafana dashboard username here'
$ENV:AZDATA_METRICSUI_PASSWORD= 'enter Grafana dashboard password here'
Download the Kubernetes cluster
kubeconfig file.az account set --subscription $Env:MySuscriptionID` az aks get-credentials --resource-group $Env:MyResourceGroup ` --name $Env:MyClusterCreate Arc data controller.
az arcdata dc create --name $Env:MyDataController `
    --k8s-namespace $Env:MyNamespace `
    --use-k8s `
    --subscription $Env:MySuscriptionID `
    --resource-group $Env:MyResourceGroup `
    --location $Env:Mylocation `
    --connectivity-mode $Env:MyConnectMode `
    --profile-name $Env:MyProfile `
    --storage-class $Env:MyStorageClass `
    --infrastructure $Env:arc_infrastructure `
    --cluster-name $Env:MyCluster
Monitor the deployment of your Arc data controller. Use the command:
kubectl get datacontrollers --namespace $Env:MyNamespaceThe deployment goes through three (3) states before it is finished:
Confirm all resources have been deployed into your data controller namespace:
kubectl get pods -n $Env:MyNamespaceSelect Connect Controller in the connections tab once the deployment has been successfully completed. Enter the namespace for the data controller you just created and select connect.
After the deployment completes, you can manage your Arc data controller. Right-click the data controller and select Manage.