Prepare device IDs for Autopilot
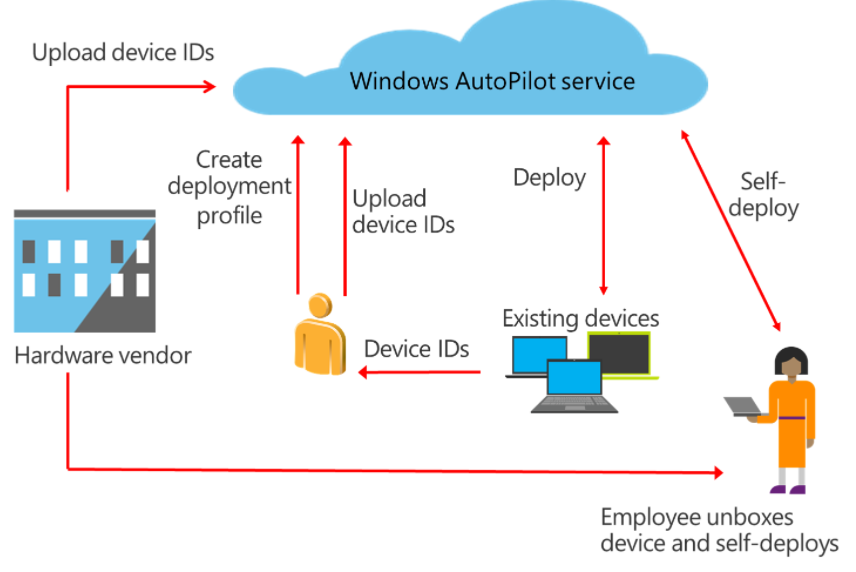
After you meet all the prerequisites, you can set up Windows Autopilot deployment. The setup process includes:
- Obtaining the hardware IDs of the devices that you want to deploy to the cloud service.
- Uploading the hardware IDs
- Creating a Windows Autopilot deployment profile.
- Applying the Windows Autopilot deployment profile to the devices or device groups.
Manage Windows Autopilot in Intune
If you want to manage Windows Autopilot in the Intune, you must configure automatic mobile device management enrollment of Microsoft Entra member Windows 10 or Windows 11 devices. You can configure automatic mobile device management enrollment by performing the following steps:
- In the Azure portal, select Microsoft Entra ID.
- On the Microsoft Entra blade, select Mobility (MDM and MAM), and then in the details pane, select Microsoft Intune.
- On the Microsoft Intune blade, in MDM user scope, select All if you want all users to be able to enroll their devices to mobile device management. If you want only some users to be able to enroll their devices to mobile device management, select Some, specify the groups whose members should be able to enroll, and then select Save.
As discussed earlier, you can create Windows Autopilot deployment profiles in the Endpoint Manager admin center.
Prepare a Microsoft Autopilot deployment
You can manage Windows Autopilot deployment by using:
- Intune
- Microsoft Store for Business
Note
Microsoft Store for Business is a cloud service that organizations of any size can use. Organizations use it to distribute both modern Windows apps that vendors develop for a general audience and line-of-business (LOB) apps that are available only for the organization*.*
You must perform the first step—uploading device specific information, including hardware IDs—in Microsoft Store for Business or Microsoft Intune. If you plan to manage Windows Autopilot in Intune, you’ll have to sync Windows Autopilot devices from Microsoft Store for Business to Intune.
To deploy devices by using Windows Autopilot, you must first obtain the CSV file that contains the device specific information.
Get the CSV file from your OEM partner
If your OEM partner supports Windows Autopilot, you can obtain a CSV file from them when you purchase the devices. You can also generate a device specific CSV file yourself, based on the device inventory. The CSV file should have the following three columns:
- Device Serial Number
- Windows Product ID
- Hardware Hash
Generate your own CSV file
If the OEM partner does not provide a CSV file, you can generate a device specific file by obtaining and running the Get-WindowsAutopilotInfo.ps1 Windows PowerShell script. You can install the script by running the following cmdlet:
Install-Script -Name Get-WindowsAutopilotInfo
After installing the script, you can generate device specific information and save it to the D:\Devices\Device1.csv file by running the following cmdlet:
Get-WindowsAutopilotInfo.ps1 –OutputFile D:\\Devices\\Device1.csv
Upload the device specific CSV file
To do this, you must have the Admin role in Microsoft Store for Business or Global admin role in Intune. When you upload a CSV file, you will receive a notification if the upload was successful and the number of devices that were added. If there was any error, for example, if the CSV file was not formatted properly or some devices were already in Microsoft Store for Business, you can download the CSV file with error information and URLs that point to detailed error descriptions, and then you can review the details.
When you upload a CSV file, you can add devices to an existing Windows Autopilot deployment group, create a new Windows Autopilot deployment group for the devices, or add them without using groups. You can use groups when you want to apply the same deployment settings to multiple devices at once.
To complete this process using Intune, use the following procedure:
- In Endpoint Manager admin center, navigate to Devices > Enroll Devices > Devices. Select Import.
- Browse and locate your CSV file.
- Import the file.
- After import is complete, select Device enrollment, select Windows enrollment, select Windows Autopilot, select Devices and then select Sync.
- Refresh the view to see the new devices.
Import a device hash directly into Intune
In certain circumstances, it may be beneficial to directly import the device hash into Microsoft Intune rather than generating the file as shown above. This is often useful in testing scenarios or perhaps could be useful if you have a batch of machines that are being built by onsite technicians ready for users.
The following example imports the device directly into Intune along with assigning a Dynamic variable tag (Autopilot-Devices) to a Microsoft Entra group to ensure the device ends up in a specific group:
Open a powershell prompt on the Autopilot device at the 'Welcome screen':
Install-Script -Name Get-WindowsAutopilotInfo
Get-WindowsAutoPilotInfo.ps1 -online -GroupTag "Autopilot-Devices" -Assign
Next unit: Implement device registration and out-of-the-box customization
Having an issue? We can help!
- For issues related to this module, explore existing questions using the #Microsoft Endpoint Manager Training tag or Ask a question on Microsoft Q&A.
- For issues related to Certifications and Exams, post on Certifications Support Forums or visit our Credentials Help.