Exercise - Clean up your Azure DevOps environment
You're finished with the tasks for this module. Here, you'll clean up your Azure resources and clean up your Azure DevOps environment.
Important
This page contains important cleanup steps. Cleaning up helps ensure that you don't run out of free build minutes. It also helps ensure that you're not charged for Azure resources after you complete this module.
Clean up Azure resources
Here, you delete your Azure App Service instance. The easiest way to delete the instance is to delete its parent resource group. When you delete a resource group, you delete all resources in that group.
You may use the Azure portal user interface or Azure CLI to manage resources. Here you tear down your deployment by using the Azure CLI through Azure Cloud Shell. The steps are similar to the steps that you used when you created the resources.
To clean up your resource group:
Go to the Azure portal and sign in.
From the menu bar, select Cloud Shell. When prompted, select the Bash experience.

Run the following
az group deletecommand to delete the resource group that you used,python-cicd-rg:az group delete --name python-cicd-rgWhen prompted, enter
yto confirm the operation.As an optional step, after the previous command finishes, run the following
az group listcommand:az group list --output tableYou find that the resource group
python-cicd-rgno longer exists.
Disable the pipeline or delete your project
This project was configured to automatically run a pipeline each time there was a change to the repo. The pipeline runs use up free build minutes on our hosted agents. To avoid losing those free build minutes, disable or delete your pipeline before you move to the next module.
Choose one of the following options.
Option 1: Disable the pipeline
Disable the pipeline so that it doesn't process build requests. You can re-enable the build pipeline later if you want to. Choose this option if you want to keep your DevOps project and your build pipeline for future reference.
To disable the pipeline:
In Azure Pipelines, navigate to your pipeline.
From the drop-down menu, select Settings:
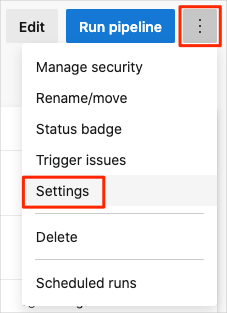
Under Processing of new run requests, select Disabled, then select Save.
Your pipeline will no longer process build requests.
Option 2: Delete the Azure DevOps project
Delete your Azure DevOps project, including the build pipeline. Choose this option if you don't need your DevOps project for future reference.
To delete the project:
In Azure DevOps, navigate to your project. This will be the name you entered when creating the project after installing the Azure Pipelines extension in GitHub.
Select Project settings in the lower corner.
In the Project details area, go to the bottom and select Delete.
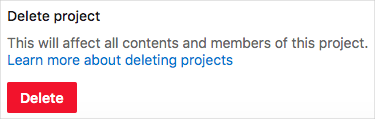
In the window that appears, enter the project name. Select Delete again.
Your project is now deleted.