Exercise - Isolate a tenant in a multitenant database
To improve resource allocation and make guarantees of tenant quality of service in the Tailspin Toys multitenant SaaS application, you want to isolate the largest stores in dedicated nodes in the cluster. In this exercise, you add a new worker node to your cluster, separate the most prominent tenant's data into dedicated shards, and then move that store to the new worker node.
Add a new node to the cluster
Now that you have migrated the Tailspin Toys database to a multi-node instance, you want to isolate the company's largest and most active tenant to a dedicated node in the cluster to reduce resource contention. You first want to scale your cluster by adding a new worker node.
In the Azure portal, go to your Azure Cosmos DB for PostgreSQL Cluster resource.
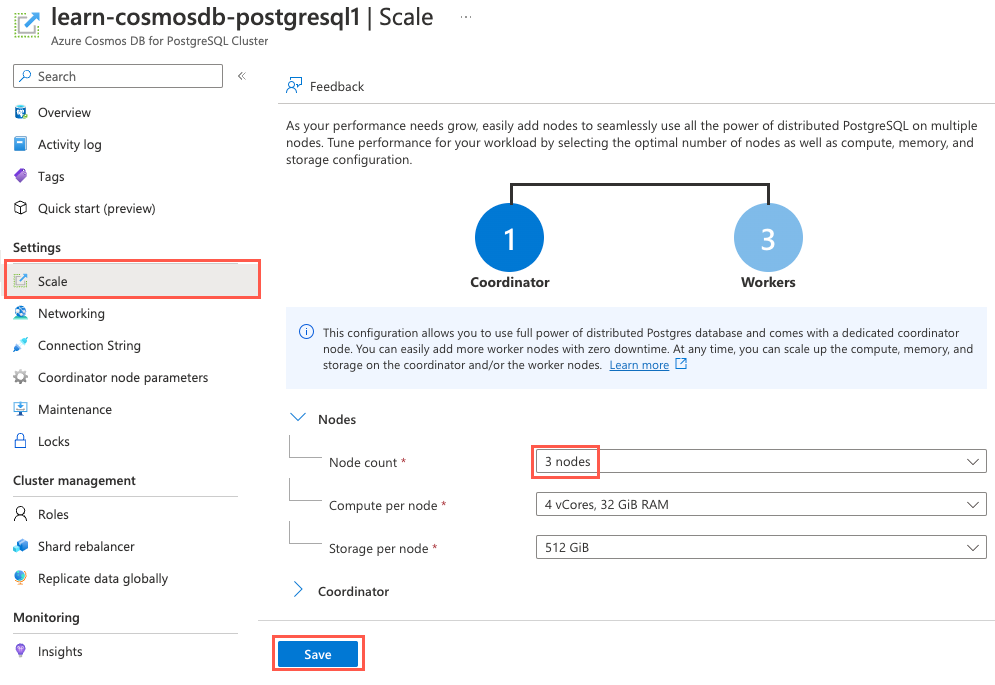
On the left menu under Settings, select Scale. On the Scale pane, expand the Node count dropdown and increase the node count to 3 nodes. Then select Save.
After your new node is successfully added, the node is available in the system. However, no tenants are stored on it yet, and no queries are run there. You use built-in functions to relocate the Tailspin Toys most active tenant to the new worker node.
Connect to the database by using psql in Azure Cloud Shell
Use psql at the command prompt to make your database changes. psql is a command-line tool that you can use to interactively issue queries to a PostgreSQL database, and then view the query results.
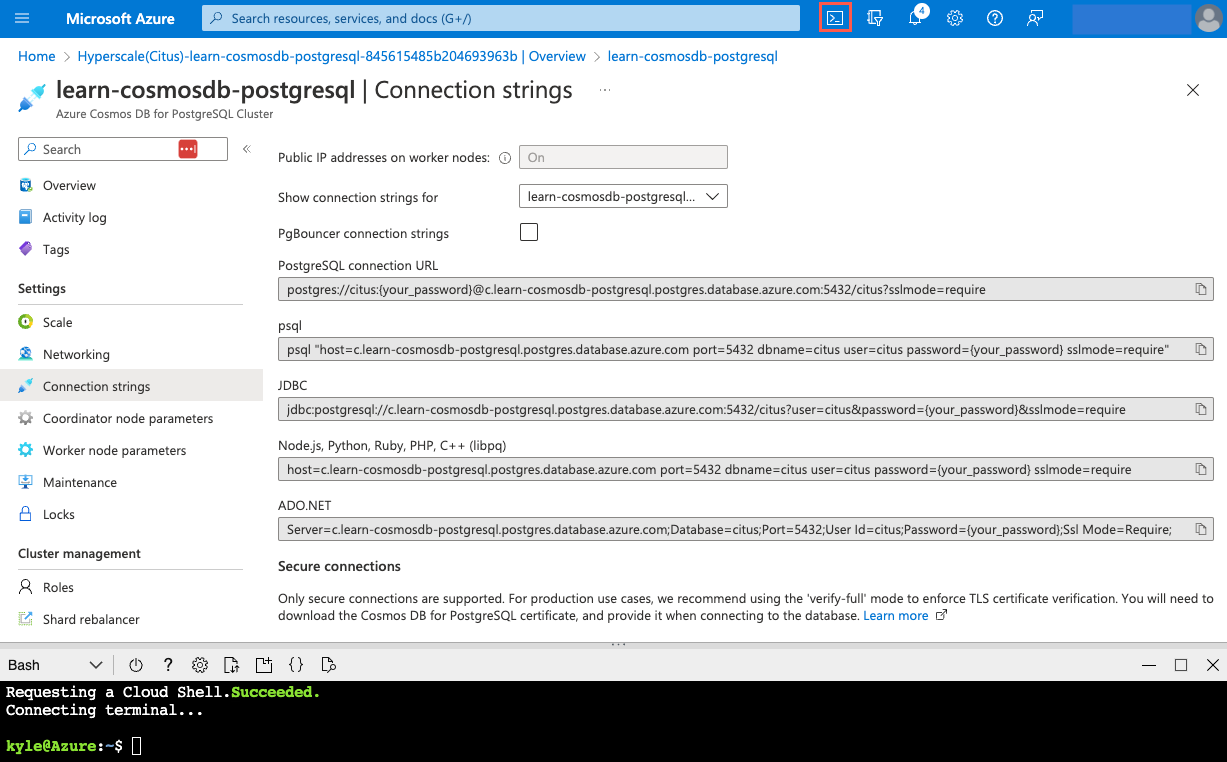
In the Azure portal, go to your Azure Cosmos DB for PostgreSQL Cluster resource. On the left menu under Settings, select Connection strings, and then copy the connection string that's labeled psql.

Paste the connection string into a text editor like Notepad. Replace the
{your_password}token with the password that you created for thecitususer when you created your cluster. Copy the updated connection string to use later.On the Connection strings pane in the Azure portal, open Azure Cloud Shell by selecting the icon in the global controls.
Cloud Shell opens as an embedded panel at the bottom of your browser window. Alternatively, you can open Azure Cloud Shell in a separate web browser window or tab.
In the Cloud Shell pane, ensure that Bash is selected for the environment. Then use the psql command-line utility to connect to your database. Paste your updated connection string (the one that contains your correct password) at the command prompt in Cloud Shell, and then run the command as in the following example:
psql "host=c.learn-cosmosdb-postgresql.postgres.database.azure.com port=5432 dbname=citus user=citus password={your_password} sslmode=require"
Identify a candidate tenant for isolation
To help reduce resource contention in the database, Tailspin Toys has requested that you identify tenants that are relevant candidates for isolation. You want to evaluate which tenants consume the most resources, and then isolate the tenants in a dedicated node in the database.
By querying the
citus_stat_statementsview, you can identify the tenant that sends in the most queries and consumes the most processing time.SELECT partition_key AS store_id, COUNT(*) AS unique_queries, SUM(c.calls) AS total_queries, SUM(total_exec_time) AS total_query_time FROM citus_stat_statements AS c INNER JOIN pg_stat_statements AS p ON c.queryid = p.queryid WHERE partition_key is not null GROUP BY store_id ORDER BY total_query_time DESC LIMIT 1;You know from the table distribution process that
ordersandline_itemsare the largest tables in the database. These two tables receive the most table writes. You can use the total number of orders as a proxy for tenants that place the heaviest load on the database, and which take up the most storage space. Run the following query to view the top five tenants based on order volume and annual sales:SELECT o.store_id, date_part('year', o.ordered_at) AS year, COUNT(o.order_id) AS order_volume, SUM(line_amount) AS annual_sales FROM orders AS o INNER JOIN line_items AS l ON o.store_id = l.store_id AND o.order_id = l.order_id WHERE o.ordered_at BETWEEN '2022-10-01' AND '2022-12-30' GROUP BY o.store_id, year ORDER BY order_volume DESC LIMIT 5;Another approach, which takes advantage of the
citus_shardsview and theget_shard_id_for_distribution_column()function, is to calculate the percentage of table and shard sizes that are occupied by each tenant. For example, run the following query against theorderstable to view the top five stores by space occupied:-- Get the percentage of table and shard size per tenant WITH order_percentage AS ( SELECT store_id, COUNT(store_id) / SUM(count(*)) OVER() AS pct_of_orders FROM orders GROUP BY store_id ORDER BY pct_of_orders DESC ) SELECT store_id, (SELECT get_shard_id_for_distribution_column('orders', store_id)) AS shardid, pg_size_pretty(pct_of_orders * citus_table_size('orders')) AS storage_space_used, ROUND(pct_of_orders, 4) AS percent_of_table_size, ROUND(( SELECT (pct_of_orders * citus_table_size('orders'))/SUM(shard_size) FROM citus_shards WHERE shardid = (SELECT get_shard_id_for_distribution_column('orders', store_id)) ), 4) AS percent_of_shard_size FROM order_percentage LIMIT 5;Based on the output of this query and earlier queries, store
5is the largest and most active tenant in the Tailspin Toys database. When you view the percentages from the query, you can see that the store makes up 21 percent of table space and 96 percent of the shard. Those values make the store an ideal candidate for isolation.
Isolate the Tailspin Toys largest tenant in a new shard
Now that you've identified the tenant storing the most data and sending a high percentage of traffic into the Tailspin Toys database, you want to isolate that tenant in a dedicated shard.
Use the isolate_tenant_to_new_shard() function to move the data for the tenant into a dedicated shard. The table has colocated data, so you're also required to use the CASCADE option to move colocated table data.
SELECT isolate_tenant_to_new_shard('orders', 5, 'CASCADE');
The output from running isolate_tenant_to_new_shard() provides the ID of the new shard in which the tenant was isolated:
    isolate_tenant_to_new_shard
-----------------------------
                        102145
Move the tenant to a dedicated node in the cluster
To improve resource allocation and better provide guarantees of tenant quality of service in the Tailspin Toys multitenant SaaS application, you want to move the largest tenants to dedicated nodes.
Before you move a shard to a new node, you must determine what node currently holds that shard. Copy the
shardidvalue that was returned in the previous step, replace the{INSERT_NEW_SHARD_ID}token in the following query with the copied value, and then run the query to determine which node holds the new shard.SELECT nodename, nodeport FROM citus_shards WHERE shardid = {INSERT_NEW_SHARD_ID};When the scaling operation to add your new worker node has been completed successfully, use the following query to retrieve the list of active nodes from the metadata tables:
SELECT * from citus_get_active_worker_nodes() ORDER BY node_name;The new node should have a name that starts with
private-w2. If you don't see the node, wait one or two minutes, and then rerun the query.Finally, call the
citus_move_shard_placement()function to move the shard to the new worker node that you created for this tenant. Before you execute the following query, you should replace the following tokens:- Replace
{INSERT_NEW_SHARD_ID}with theshardidvalue of the new shard. - Replace
{CURRENT_HOST_NODE_NAME}with the name of the node in which the shard currently resides (retrieved in step 1). - Replace
{TARGET_HOST_NODE_NAME}with the name of the node that you want to move the shard to (retrieved in step 2).
SELECT citus_move_shard_placement( {INSERT_NEW_SHARD_ID}, '{CURRENT_HOST_NODE_NAME}', 5432, '{TARGET_HOST_NODE_NAME}', 5432);- Replace
Verify that the shard was moved to the new node by running the following command. Replace
{INSERT_NEW_SHARD_ID}with theshardidvalue of the new shard.SELECT nodename, nodeport FROM citus_shards WHERE shardid = {INSERT_NEW_SHARD_ID};The output should show that you moved the shard to the target node, similar to the following example:
                              nodename                            | nodeport
------------------------------------------------------------------+----------
 private-w2.learn-cosmosdb-postgresql.postgres.database.azure.com |     5432
You can view the shard details on the new node, including the sizes of table data in each shard. Before you execute the following query, switch to the extended view by running
\xat the command prompt.SELECT table_name, nodename, COUNT(shardid) AS shard_count , shardid, pg_size_pretty(SUM(shard_size)) AS size FROM citus_shards WHERE nodename LIKE('private-w2%') GROUP BY table_name, nodename, shardid ORDER BY table_name DESC;In the query output, note the
shard_countandsizevalues. Your new node contains a single shard for each table, and each of those shards has data for store ID5only.-[ RECORD 1 ]-------------------------------------------------------------------- table_name | line_items nodename | private-w2.learn-cosmosdb-postgresql.postgres.database.azure.com shard_count | 1 shardid | 102148 size | 240 MB -[ RECORD 2 ]-------------------------------------------------------------------- table_name | orders nodename | private-w2.learn-cosmosdb-postgresql.postgres.database.azure.com shard_count | 1 shardid | 102145 size | 122 MB -[ RECORD 3 ]-------------------------------------------------------------------- table_name | products nodename | private-w2.learn-cosmosdb-postgresql.postgres.database.azure.com shard_count | 1 shardid | 102142 size | 16 kB -[ RECORD 4 ]-------------------------------------------------------------------- table_name | stores nodename | private-w2.learn-cosmosdb-postgresql.postgres.database.azure.com shard_count | 1 shardid | 102139 size | 8192 bytes
Stop scheduled jobs and disconnect from the database
Congratulations! You've successfully isolated the largest tenant on a dedicated node in the Tailspin Toys multitenant SaaS application's Azure Cosmos DB for PostgreSQL database.
In Cloud Shell, disable the task that creates orders in the database:
SELECT cron.unschedule('create_orders');In Cloud Shell, run the following command to disconnect from your database:
\q
Clean up resources
It's essential that you clean up any unused resources. You're charged for the configured capacity, not for how much of the database is used.
- Open a web browser and go to the Azure portal.
- On the left menu, select Resource Groups, and then select the
learn-cosmosdb-postgresqlresource group that you created to in this module. - On Overview, select Delete resource group.
- To confirm deletion, enter the name of the resource group that you created, and then select Delete.