Examine the anti-malware pipeline
Exchange Online Protection (EOP) uses multiple anti-malware engines. This design enables it to offer multilayered protection to catch all known malware. The EOP service scans messages for malware (viruses and spyware). If EOP detects malware, it deletes the message. EOP might also send notifications to senders or administrators it deletes an infected message. You can also choose to replace infected attachments with either default or custom messages that notify the recipients of the malware detection.
Note
Organizations can't disable anti-malware scanning.
For standalone EOP customers, the service only scans inbound and outbound messages that it routes. It doesn't scan messages sent from a sender in one organization to a recipient in the same organization. However, for another layer of defense, you can pair the EOP service with the built-in anti-malware protection capabilities of Exchange Server. This combination of services scans internal messages for malware.
EOP is available for Exchange Online customers and for on-premises Exchange customers. For the latter, the Exchange Enterprise CAL with Services includes EOP. In both Exchange Online and on-premises Exchange, EOP scans inbound and outbound messages that it routes. It also scans internal messages sent from a sender in an organization to a recipient in the same organization.
Anti-malware policies in EOP
In Microsoft 365 organizations with mailboxes in Exchange Online or standalone Exchange Online Protection (EOP) organizations without Exchange Online mailboxes, EOP automatically protects email messages against malware. EOP uses anti-malware policies for malware protection settings.
Microsoft 365 comes with a default anti-malware policy. Admins can view, edit, and configure (but not delete) the default anti-malware policy to meet the needs of their organizations. For greater granularity, they can also create custom anti-malware policies that apply to specific users, groups, or domains in their organization. Custom policies always take precedence over the default policy. However, an organization can change the priority (that is, the running order) of its custom policies.
An organization can configure anti-malware policies in the Microsoft Defender portal. It can also configure anti-malware policies in Exchange Online PowerShell for Microsoft 365 organizations with mailboxes in Exchange Online. For organizations without Exchange Online mailboxes, they can use standalone EOP PowerShell.
To add, modify, and delete anti-malware policies, you must be a member of the Organization Management or Security Administrator role groups. For read-only access to anti-malware policies, you must be a member of the Global Reader or Security Reader role groups.
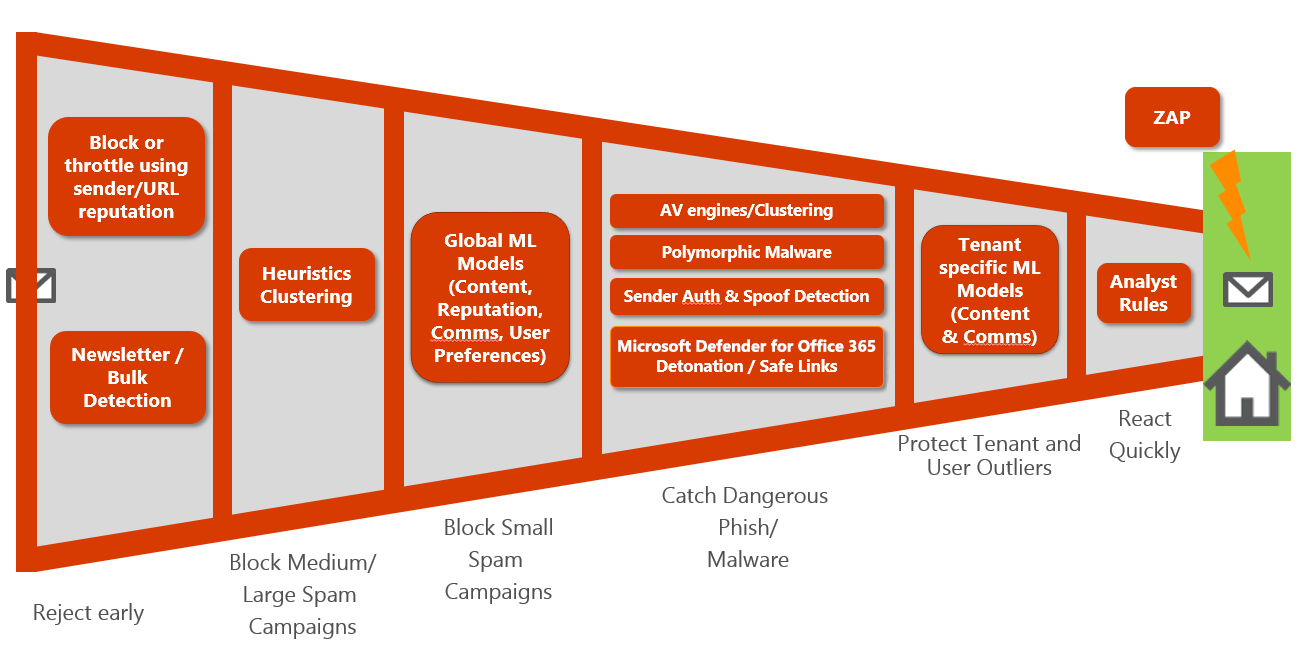
The anti-malware pipeline
Organizations that host mailboxes in Exchange Online rely on Exchange Online Protection (EOP) to protect incoming and outgoing mail. When an organization joins Microsoft 365, an administrator must add Microsoft 365 specific MX and TXT records to their domain name in DNS.
- The MX record ensures that email sent to the tenant’s domain arrives in mailboxes hosted in Exchange Online through the EOP service.
- The Sender Protection Framework (SPF) record is a special type of TXT record in DNS. It identifies a host as a valid sender for the organization's domain.
The system catches a sizeable amount of spam and bulk email at the first entry point in Microsoft 365, before EOP even comes into play. Microsoft 365 uses techniques such as IP and sender reputation, combined with heuristics, to identify spam and bulk email. Once mail passes through the first entry point in Microsoft 365, multiple signature-based anti-virus scanners scan the message. This process alone is effective in catching up to 80% of commodity malware coming into the network. But heavily modified malicious attachments, and attachments released with many different variants coming out at the same time can still get through.
Once mail enters the Microsoft 365 network, EOP scans individual files using a technique called reputation block. With reputation block, EOP compares file attachments with the results of scans that Microsoft 365 previously completed. EOP then checks to see if there are specific files, or pieces of files that it previously identified as malicious. If so, EOP checks whether the files, or pieces of files, appear to match something in an incoming message.
Microsoft 365 uses heuristic clustering to identify mail as suspicious based on an analysis of delivery patterns. When this process occurs, the system sends a sample from a cluster to a hypervisor sandbox environment where it opens the file for further analysis. This analysis includes:
- Checking for anomalies such as changes in memory, the registry, or encryption of the hard drive.
- Checking for changes in network traffic, such as connections to hacker’s command and control servers.
- Identifying when malware tries to obfuscate itself or use evasion techniques.
Once the system collects these signals, it runs the results through a machine-learning (ML) model and a set of static rules. This process determines whether the file is suspicious or, in fact, truly malicious.
Organizations that enable Microsoft Defender for Office 365 in their tenants extend the protection of EOP. Microsoft Defender for Office 365 provides this extra protection by scanning mail that made it through the filters and techniques described earlier.
- Microsoft Defender's Safe Attachments feature scans all file attachments. In fact, it scans files even if they don't appear to be suspicious. By doing so, it protects against malware that doesn’t have a known anti-virus signature. The Safe Attachments service opens attachments in the same sandbox environment that EOP uses. It then analyzes the environment for behavioral changes to the registry, memory, and so on.
- After the Safe Attachments process finishes, Microsoft Defender for Office 365 runs the actual body of the message, including the message headers, through EOP’s anti-spam, phish, and spoof filters.
- If there are any URLs embedded in the message body, and the organization enabled Microsoft Defender for Office 365 in its tenant, then Microsoft Defender's Safe Links feature checks the link against a list of known malicious URLs. Microsoft Defender updates this list approximately every 20 minutes.
- Finally, Microsoft engages a team of security analysts, or cyber hunters. Their role is to identify new threat campaigns and quickly implement rules to further protect the Microsoft 365 network against cyber-attacks.
The anti-malware pipeline consisting of EOP and Microsoft Defender for Office 365 provides protection against all types of spam and advanced threats. This pipeline provides protection through a multi-layered, defense-in-depth approach to solving email security.
Create anti-malware policies in the Microsoft Defender portal
Note
Microsoft 365 Defender is now Microsoft Defender XDR (Extended Detection and Response).
When an organization creates a custom anti-malware policy in the Microsoft Defender portal, it creates:
- The malware filter rule
- The associated malware filter policy
Microsoft Defender XDR uses the same name for both the malware filter rule and policy. You must complete the following steps to create an anti-malware policy in the Microsoft Defender portal:
Use one of the following methods to navigate to the Microsoft Defender portal:
- In the Microsoft 365 admin center, select Show all in the navigation pane. Under Admin centers, select Security.
- In your browser, enter the following URL in the address bar: https://security.microsoft.com
In the Microsoft Defender portal, under the Email & Collaboration section in the navigation pane, select Policies & rules.
On the Policies & rules page, in the list of policies, select Threat policies.
On the Threat policies page, under the Policies section, select Anti-malware.
On the Anti-malware page, the Default policy is displayed in the list of policies. Select Create to create a custom policy.
The Create a new anti-malware policy wizard opens. On the Name your policy page, configure the following settings and then select Next:
- Name. Enter a unique, descriptive name for the policy.
- Description. Optionally enter a description of the policy.
On the Users and domains page, identify the internal recipients that the policy applies to (recipient conditions) and then select Next:
- Users. The specified mailboxes, mail users, or mail contacts.
- Groups
- Members of the specified distribution groups or mail-enabled security groups.
- The specified Microsoft 365 Groups.
- Domains. All recipients in the specified accepted domains in your organization.
Select inside the appropriate box, start typing a value, and select the value that you want from the results. Repeat this process as many times as necessary. To remove an existing value, select the X icon next to the value.
For users or groups, you can use most identifiers (name, display name, alias, email address, account name, etc.). However, the results display the corresponding display name. For users, enter an asterisk (*) by itself to see all available values.
Multiple values in the same condition use OR logic (for example, [recipient1] or [recipient2]). Different conditions use AND logic (for example, [recipient1] and [member of group 1]).
Select the Exclude these users, groups, and domains option to add exceptions for the internal recipients that the policy applies to (recipient exceptions). If you select this option, you must then configure the exceptions. The settings and behavior are exactly like the conditions.
On the Protection settings page that appears, configure the following settings and then select Next:
Enable the common attachments filter. If you select this option, the policy treats messages with the specified attachments as malware. As such, it automatically quarantines the message. You can modify the default list by selecting Customize file types.
Enable zero-hour auto purge for malware. If you select this option, ZAP quarantines previously delivered malware messages. For more information, see Zero-hour auto purge (ZAP) in Exchange Online. Select one of these values:
Quarantine policy. Select the quarantine policy that applies to messages that are quarantined as malware. Quarantine policies define what users are able to do to quarantined messages, and whether users receive quarantine notifications. For more information, see Quarantine policies.
If you enter a blank value, the system uses the default quarantine policy (AdminOnlyAccessPolicy for malware detections). When you later edit the anti-malware policy or view the settings, the system displays the default quarantine policy name.
Quarantine policy. Select the quarantine policy that applies to messages that are quarantined as malware. For more information about this quarantine policy, see Anatomy of a quarantine policy. The available options include:
DefaultFullAccessPolicy. This policy grants full access to the quarantine. When malware is detected, it's automatically moved to the quarantine without any other notifications or restrictions. Essentially, it’s a silent process where no alerts are generated.
AdminOnlyAccessPolicy (Default). With this policy, quarantine notifications to regular end-user (non-admin) recipients are disabled. Only administrators have access to the quarantine. As such, when malware is detected in messages to regular end users, the messages are placed in quarantine, but the recipients don't have visibility or control over them. Only administrators can review and manage the quarantined items. This option is the default quarantine policy used for malware detections.
Tip
If your organization wants to notify end-user recipients that have messages quarantined as malware, you must create or use an existing quarantine policy where quarantine notifications are turned on. For instructions, see Create quarantine policies in the Microsoft Defender portal. You should note, however, that even when notifications are turned on, users still can't release their own messages that were quarantined as malware by anti-malware policies, regardless of how the quarantine policy is configured. If the policy allows users to release their own quarantined messages, users can only request the release of their quarantined malware messages. It's still up to an administrator to release requested quarantined messages.
DefaultFullAccessWithNotificationPolicy. This policy combines aspects of both the previous options. When malware is detected, it's moved to the quarantine, but users receive a notification about the action. Administrators can still manage the quarantine, and users are informed of the event.
Admin notifications. The policy only sends notifications to administrators for attachments classified as malware. Select none, one, or both of these options:
Notify an admin about undelivered messages from internal senders. If you select this option, enter a notification email address in the Admin email address box that appears.
Notify an admin about undelivered messages from external senders. If you select this option, enter a notification email address in the Admin email address box that appears.
Tip
Admin notifications are only sent for attachments that are classified as malware. The quarantine policy that's assigned to the anti-malware policy determines whether recipients receive email notifications for messages that were quarantined as malware.
Customize notifications. This setting replaces the default notification text used for senders or administrators. For more information about the default values, see Anti-malware policies.
- Use customized notification text. If you select this option, you must use the From name and From address boxes to specify the sender's name and email address used in the customized notification message.
On the Review page that appears, review your settings. You can select Edit in each section to modify the settings within the section. Or you can select Back or select the specific page in the wizard.
When the settings are correct, select Submit.
On the confirmation page that appears, select Done.
Create anti-malware policies using Exchange PowerShell
Creating an anti-malware policy in Exchange PowerShell is a two-step process:
- Create the malware filter policy.
- Create the malware filter rule that specifies the malware filter policy that the rule applies to.
Keep in mind the following items when using Exchange PowerShell to create anti-malware policies:
- You can create a new malware filter rule and assign an existing, unassociated malware filter policy to it.
- You can't associate a malware filter rule with more than one malware filter policy.
- You can configure the following settings on new anti-malware policies in PowerShell. The Microsoft Defender portal doesn't include these settings until after you create the policy:
- Create the new policy as disabled (Enabled
$falseon the New-MalwareFilterRule cmdlet). - Set the priority of the policy during creation (Priority<Number>) on the New-MalwareFilterRule cmdlet).
- Create the new policy as disabled (Enabled
- A new malware filter policy that you create in PowerShell isn't visible in the Microsoft Defender portal until you assign the policy to a malware filter rule.
Step 1: Use Exchange PowerShell to create a malware filter policy
Note
In the cloud-based service, the Action parameter values DeleteMessage, DeleteAttachmentAndUseDefaultAlert, and DeleteAttachmentAndUseCustomAlert don't delete messages. Instead, the messages are always quarantined.
To create a malware filter policy, use this syntax:
New-MalwareFilterPolicy -Name "<PolicyName>" [-Action <DeleteMessage | DeleteAttachmentAndUseDefaultAlert | DeleteAttachmentAndUseCustomAlert>] [-AdminDisplayName "<OptionalComments>"] [-CustomNotifications <$true | $false>] [<Inbound notification options>] [<Outbound notification options>] [-QuarantineTag <QuarantineTagName>]
The following example creates a new malware filter policy named Contoso Malware Filter Policy with these settings:
- Quarantine messages that contain malware without notifying the recipients. It doesn't use the Action parameter because the default value is DeleteMessage.
- Don't notify the message sender when the system detects malware in the message. It doesn't use the EnableExternalSenderNotifications or EnableInternalSenderNotifications parameters, and the default value for both is
$false. - Notify the administrator admin@contoso.com when the system detects malware in a message from an internal sender.
- Use the default quarantine policy for malware detections. It doesn't use the QuarantineTag parameter.
New-MalwareFilterPolicy -Name "Contoso Malware Filter Policy" -EnableInternalSenderAdminNotifications $true -InternalSenderAdminAddress admin@contoso.com
Step 2: Use Exchange PowerShell to create a malware filter rule
To create a malware filter rule, use this syntax:
New-MalwareFilterRule -Name "<RuleName>" -MalwareFilterPolicy "<PolicyName>" <Recipient filters> [<Recipient filter exceptions>] [-Comments "<OptionalComments>"]
The following example creates a new malware filter rule named Contoso Recipients with these settings:
- The malware filter policy named Contoso Malware Filter Policy is associated with the rule.
- The rule applies to recipients in the contoso.com domain.
New-MalwareFilterRule -Name "Contoso Recipients" -MalwareFilterPolicy "Contoso Malware Filter Policy" -RecipientDomainIs contoso.com
Test your anti-malware policy settings
In the past, organizations used a common test virus known as EICAR to test their anti-malware settings. The EICAR.txt file isn't a virus. The European Institute for Computer Antivirus Research (EICAR) developed this file to safely test anti-virus installations and settings. However, over the years, Microsoft enhanced Exchange Online to the point where it quarantines messages containing well-known test viruses such as EICAR before they even reach Microsoft Defender for Office 365 for processing.
So how do you test your anti-malware settings? After you define anti-malware settings, one good way to see how the EOP service is working is by viewing the security-related reports in Microsoft Defender for Office 365. For more information on using these reports to validate your policies, see View Defender for Office 365 reports in the Microsoft Defender portal.
Knowledge check
Choose the best response for the following question. Then select “Check your answers.”