Deploy a custom Start menu in Windows 10
The default Start menu in Windows may not be the best layout for an organization. While the default items should expose users to features that they may be unaware of, many of these features are consumer or entertainment related and not always appropriate for a commercial or education environment. Organizations may want to take advantage of the customization options available to better expose users to tools and resources that users might not be aware of.
After technicians deploy devices, making configurations on each device would be tedious. Fortunately, there’s a way for administrators to create a standard, customized layout that they can apply to multiple desktops. You can also create various layouts if different groups within an organization have additional requirements. For example, you might want to create a grouping of LOB apps, but the LOB apps in Accounting differ from the LOB apps used in Human Resources.
Creating the Start menu XML layout file
Creating custom Start menus is easy.
Administrators set up a device with a fresh installation of Windows or installation using an organizations base image.
Customize the Start menu on that device to the desired layout. Pin or unpin apps, create or delete app groups, drag tiles to the desired location, and resize tiles as needed.
Export the Start menu to an XML file using the Export-StartLayout command in Windows PowerShell. Use the -UseDesktopApplicationID switch and after the -Path switch, add the UNC path and filename.
For example, if you wish to export to a file called "StartLayoutMarketing.xml" and save to the location \FileServer01\StartLayouts\:
Export-StartLayout -UseDesktopApplicationID -Path \\FileServer01\StartLayouts\StartLayoutMarketing.xmlOnce the file is exported, it's ready to be applied to desktops. You can optionally edit the XML file if you wish.
Example of a layout file produced by Export-StartLayout:
<LayoutModificationTemplate Version="1" xmlns="https://schemas.microsoft.com/Start/2014/LayoutModification">
  <DefaultLayoutOverride>
    <StartLayoutCollection>
      <defaultlayout:StartLayout GroupCellWidth="6" xmlns:defaultlayout="https://schemas.microsoft.com/Start/2014/FullDefaultLayout">
        <start:Group Name="Life at a glance" xmlns:start="https://schemas.microsoft.com/Start/2014/StartLayout">
          <start:Tile Size="2x2" Column="0" Row="0" AppUserModelID="Microsoft.MicrosoftEdge_8wekyb3d8bbwe!MicrosoftEdge" />
          <start:Tile Size="2x2" Column="4" Row="0" AppUserModelID="Microsoft.Windows.Cortana_cw5n1h2txyewy!CortanaUI" />
          <start:Tile Size="2x2" Column="2" Row="0" AppUserModelID="Microsoft.BingWeather_8wekyb3d8bbwe!App" />
        </start:Group>
      </defaultlayout:StartLayout>
    </StartLayoutCollection>
  </DefaultLayoutOverride>
</LayoutModificationTemplate>
Full layouts versus partial layouts
The above process is considered a full layout. It’s important to know that the layout is locked when a full layout is applied. Users can’t change the Start menu, which includes not being able to pin or unpin apps. This might be ideal for scenarios like kiosks, but not for a user’s device assigned to them for everyday use.
Consider a partial layout in scenarios where you want to use layouts but still provide flexibility for end users to customize the layout. Creating a partial layout is nearly identical to creating a full layout. Following the steps above, you configure the groups and tiles you wish to apply, and export the layout.
Open the layout .xml file.
Modify the <DefaultLayoutOverride> element to include the following property:
<DefaultLayoutOverride LayoutCustomizationRestrictionType="OnlySpecifiedGroups">Save the XML file.
The groups specified in the XML file will still be locked, and users will be unable to edit the group or the tiles within the group. Any applications that were duplicated in another group will be removed and only exist in the locked group.
Note
If the Start layout is applied by a policy (such as Group Policy) and the policy is removed, the groups remain on the devices but become unlocked.
Customizing the taskbar
Besides the Start menu, Windows 10 allows administrators to create custom taskbar configurations that can define other apps to be pinned to the taskbar and remove default pinned apps. Like the Start menu, you can create multiple configurations for different audiences.
You can add the taskbar configuration to the same XML file that defines the Start menu layout. Alternatively, you can create an XML file that only contains taskbar configuration. Unlike the previous process, you can’t configure a device taskbar and export the configuration. You must create a new XML file or edit an existing file to add the taskbar configuration information.
Below is an example of a configuration file that contains only taskbar information.
<?xml version="1.0" encoding="utf-8"?>
<LayoutModificationTemplate
    xmlns="http://schemas.microsoft.com/Start/2014/LayoutModification"
    xmlns:defaultlayout="http://schemas.microsoft.com/Start/2014/FullDefaultLayout"
    xmlns:start="http://schemas.microsoft.com/Start/2014/StartLayout"
    xmlns:taskbar="http://schemas.microsoft.com/Start/2014/TaskbarLayout" Version="1">
  <CustomTaskbarLayoutCollection>
    <defaultlayout:TaskbarLayout>
      <taskbar:TaskbarPinList>
        <taskbar:UWA AppUserModelID="Microsoft.MicrosoftEdge_8wekyb3d8bbwe!MicrosoftEdge" />
        <taskbar:DesktopApp DesktopApplicationLinkPath="%APPDATA%\Microsoft\Windows\Start Menu\Programs\System Tools\File Explorer.lnk" />
      </taskbar:TaskbarPinList>
    </defaultlayout:TaskbarLayout>
  </CustomTaskbarLayoutCollection>
</LayoutModificationTemplate>
Identifying the application identifier
To pin an application to the taskbar, you’ll need to determine the element type and identifier of the application.
- Universal Windows Platform apps use the element
<taskbar:UWA>and include the Application User Model ID (AUMID). - Desktop applications use the element
<taskbar:DesktopApp>and include the Desktop Application Link Path.
To get this information, run the following PowerShell command on a device with the app installed.
Get-StartApps
In the AppID column, you’ll find the AUMID or Desktop Application Link Path listed. Alternatively, if you’re also customizing the Start menu and the application is in the Start menu, you can find the AUMID or Desktop Application Link Path in the application’s Start menu element in the export file.
Removing default apps
The above example will append to the right of default and existing user-pinned apps. You can choose to remove the default apps and add the apps listed by adding the following property to the <CustomTaskbarLayoutCollection> element:
<CustomTaskbarLayoutCollection PinListPlacement="Replace">
To remove all default apps and not pin any apps, set the <taskbar:TaskbarPinList> element to contain one <taskbar> element that looks like the following:
<taskbar:TaskbarPinList>
  <taskbar:DesktopApp DesktopApplicationLinkPath="#leaveempty"/>
</taskbar:TaskbarPinList>
Applying configurations
Once the configuration file is complete, you need to deploy the configuration. The three methods for deploying are:
- Group Policy
- Windows Configuration Designer provisioning package
- Mobile device management (MDM)
If you use a provisioning package to apply the configuration and a user unpins the app in the taskbar, the user’s changes will be undone the next time explorer.exe restarts (such as a reboot). User changes on the taskbar persist if the configuration is applied with Group Policy.
If you use Group Policy and your configuration contains a taskbar layout but no Start menu configuration (or a full Start menu layout), the user won’t be able to change the Start menu, only the taskbar. To ensure users have some ability to customize the Start menu when a taskbar configuration is being applied, include a partial Start layout.
To configure Start Layout policy settings in Local Group Policy Editor:
On the test computer, press the Windows key, type gpedit, and then select Edit group policy (Control panel).
Go to User Configuration or Computer Configuration > Administrative Templates >Start Menu and Taskbar.
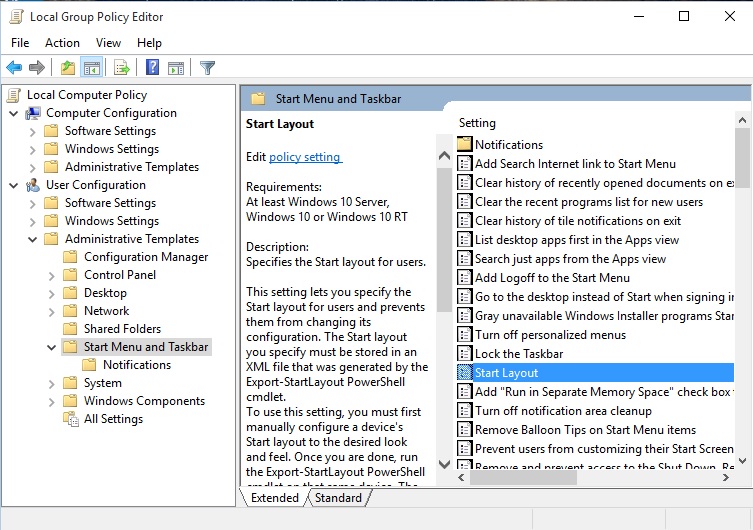
Right-click Start Layout in the right pane, and select Edit.
This opens the Start Layout policy settings.
Enter the following settings, and then select OK.
Select Enabled.
Under Options, specify the path to the .xml file that contains the Start and taskbar layout. For example, type C:\Users\Test01\StartScreenMarketing.xml.
Optionally, enter a comment to identify the Start and taskbar layout.