Acceptance test library
The Acceptance test library (ATL) is an X++ test library that allows developers to create consistent test data. It makes test code more readable, and methods that create test data become more easily discovered. ATL also supports high performance of test cases. You can use the classes within the ATL to create repeatable tests that will write test data and run processes by using that data. This feature can simplify some of the more complicated data setup and processes that would be required testing through the user interface (UI).
When creating classes and methods in ATL, you must follow rigid structuring and naming. Classes are grouped into the following concepts:
- Navigation - Discover entities and test data methods.
- Test data methods - These methods are used to set up test data.
- Entities - Represent data and associated behavior that is perceived as a single unit.
- Creators - Let you create specific test data.
- Commands - Run business operations.
- Queries - Find entities.
- Specifications - Describe expected entities at the end of the test.
The ATL code generator quickly creates and updates new ATL entities, queries, and specifications based on tables and data entities.
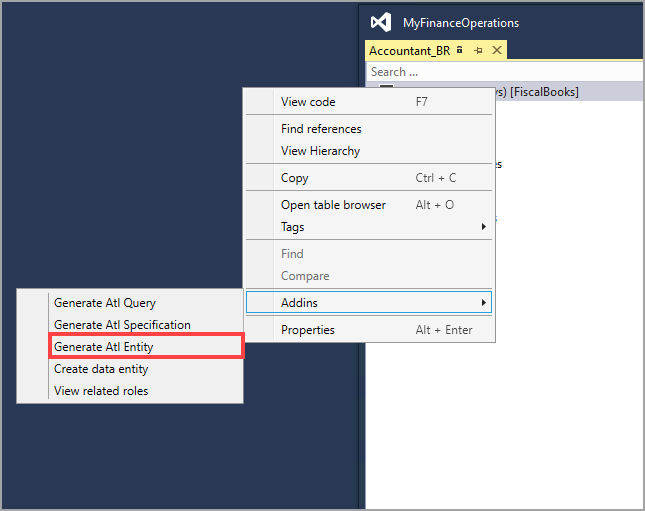
The following steps help you create an ATL entity class by using the code generation:
- In Visual Studio, open the table you want to use in the Designer window.
- On the Addins menu, select Generate ATL Entity.
- Select the fields that should be included in the ATL Entity class.
- Select Add.
- Rename the entity and fields as needed.
- Select Generate to create the class.
To create an ATL query class by using the wizard, follow these steps:
- In Visual Studio, open the table you want to use in the Designer window.
- On the Addins menu, select Generate ATL Query.
- Select the fields and relations that should be included in the ATL Query class.
- Select Add.
- Rename the entity, fields, and the relations as needed.
- Select Generate to create the class.
To create an ATL Specification class by using the wizard, follow these steps:
- In Visual Studio, open the table you want to use in the Designer window.
- On the Addins menu, select Generate ATL Specification.
- Select the fields that should be included in the ATL Specification class.
- Select Add.
- Rename the specification and fields as needed.
- Select Generate to create the class.
To learn more about the Acceptance test library (ATL), go to Acceptance test library resources.