Customize the model's behavior for batch scoring
When you've trained a model, you want to use the model to generate new predictions. Imagine, for example, that you've trained a forecasting model. Each week, you apply the model to historical sales data to generate the sales forecast of the coming week.
In Microsoft Fabric, you can use a saved model and apply it to your data to generate and save the new predictions. The model takes the new data as input, performs the necessary transformations, and outputs the predictions.
The information about the model's expected inputs and outputs is stored in the model artifacts that are created during model training. While tracking your model with MLflow, you can change the model's expected behavior during batch scoring.
Tip
Learn more about training and tracking machine learning models with MLflow in Microsoft Fabric.
Customize the model's behavior
To apply a trained model to new data, the model needs to know what the shape is of the expected data input, and how to output the predictions. The information about expected inputs and outputs is stored, together with other metadata, in the MLmodel file.
When you track a machine learning model with MLflow in Microsoft Fabric, the expected inputs and outputs of the model are inferred. With MLflow's autologging, the model folder and the MLmodel file are automatically created for you.
Whenever you want to change the model's expected inputs or outputs, you can change how the MLmodel file is created when the model is tracked within the Microsoft Fabric workspace. The schema of the data input and output is defined in the model signature.
Create the model signature
After tracking a model with MLflow during model training, you can find the MLmodel file in the model folder, stored with the experiment run:
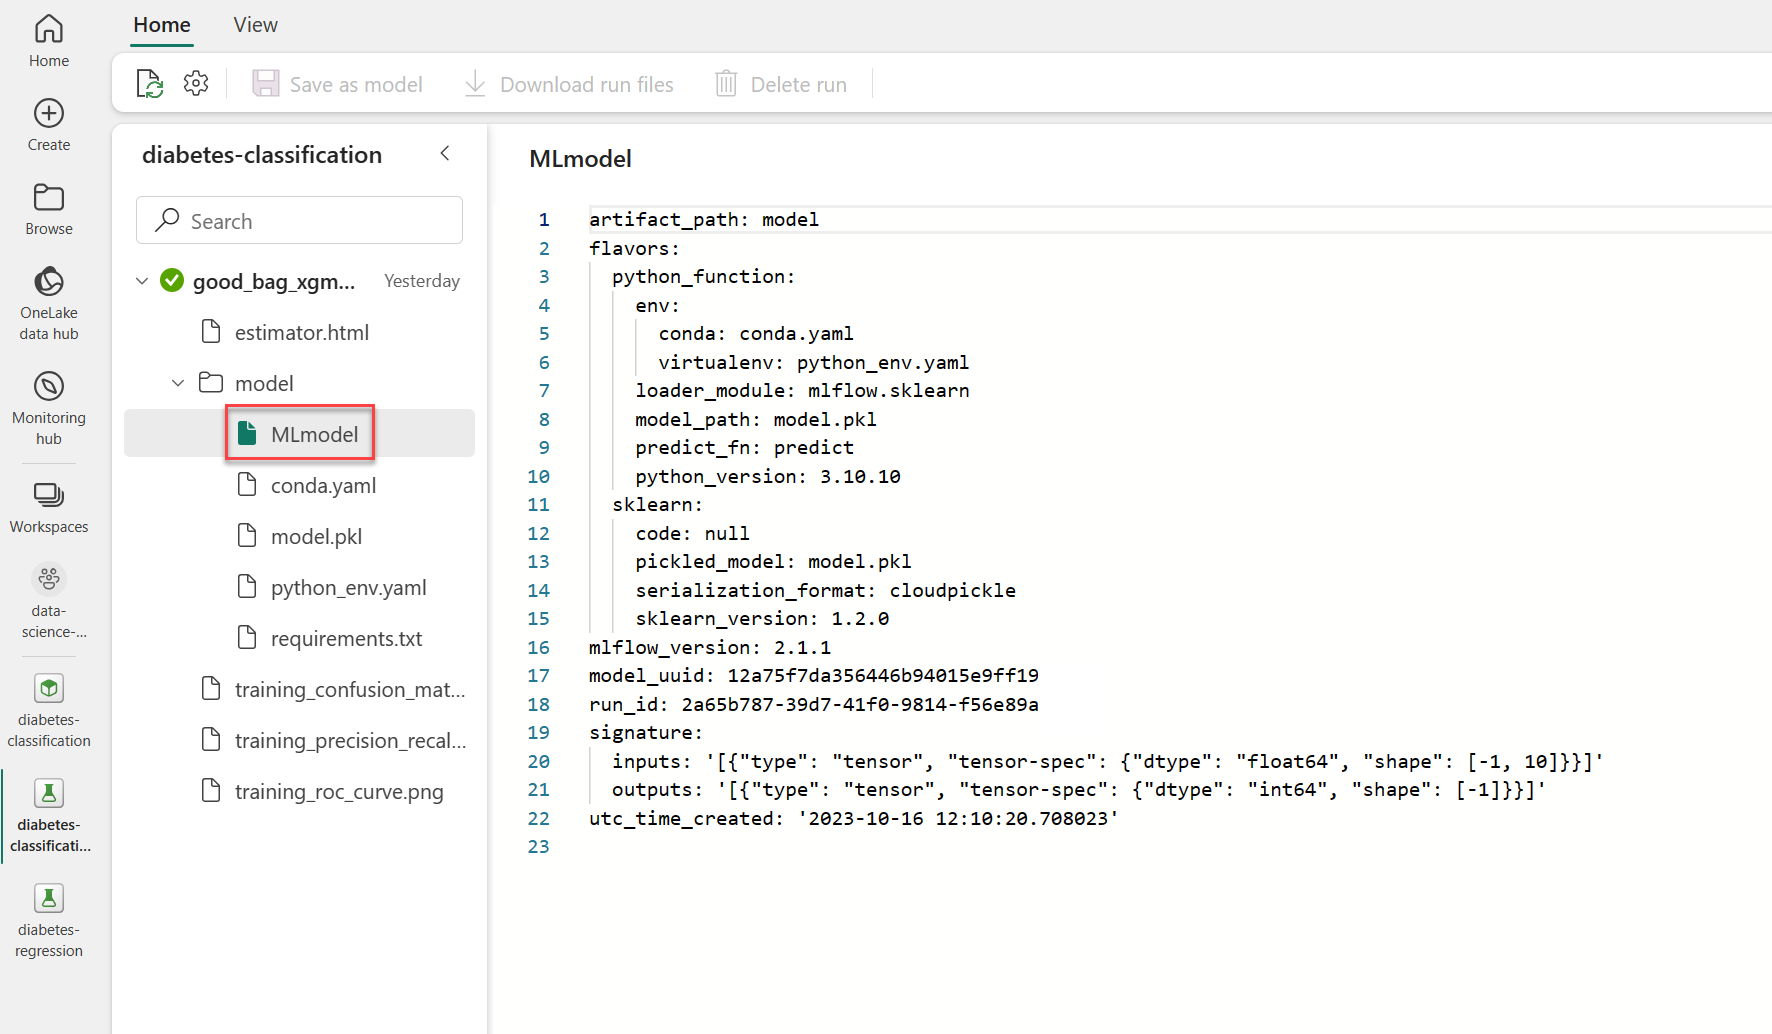
As you explore the example MLmodel file, you notice that the expected inputs and outputs are defined as tensors. When you apply the model through the wizard, only one input column is shown, as the input data is expected to be an array.
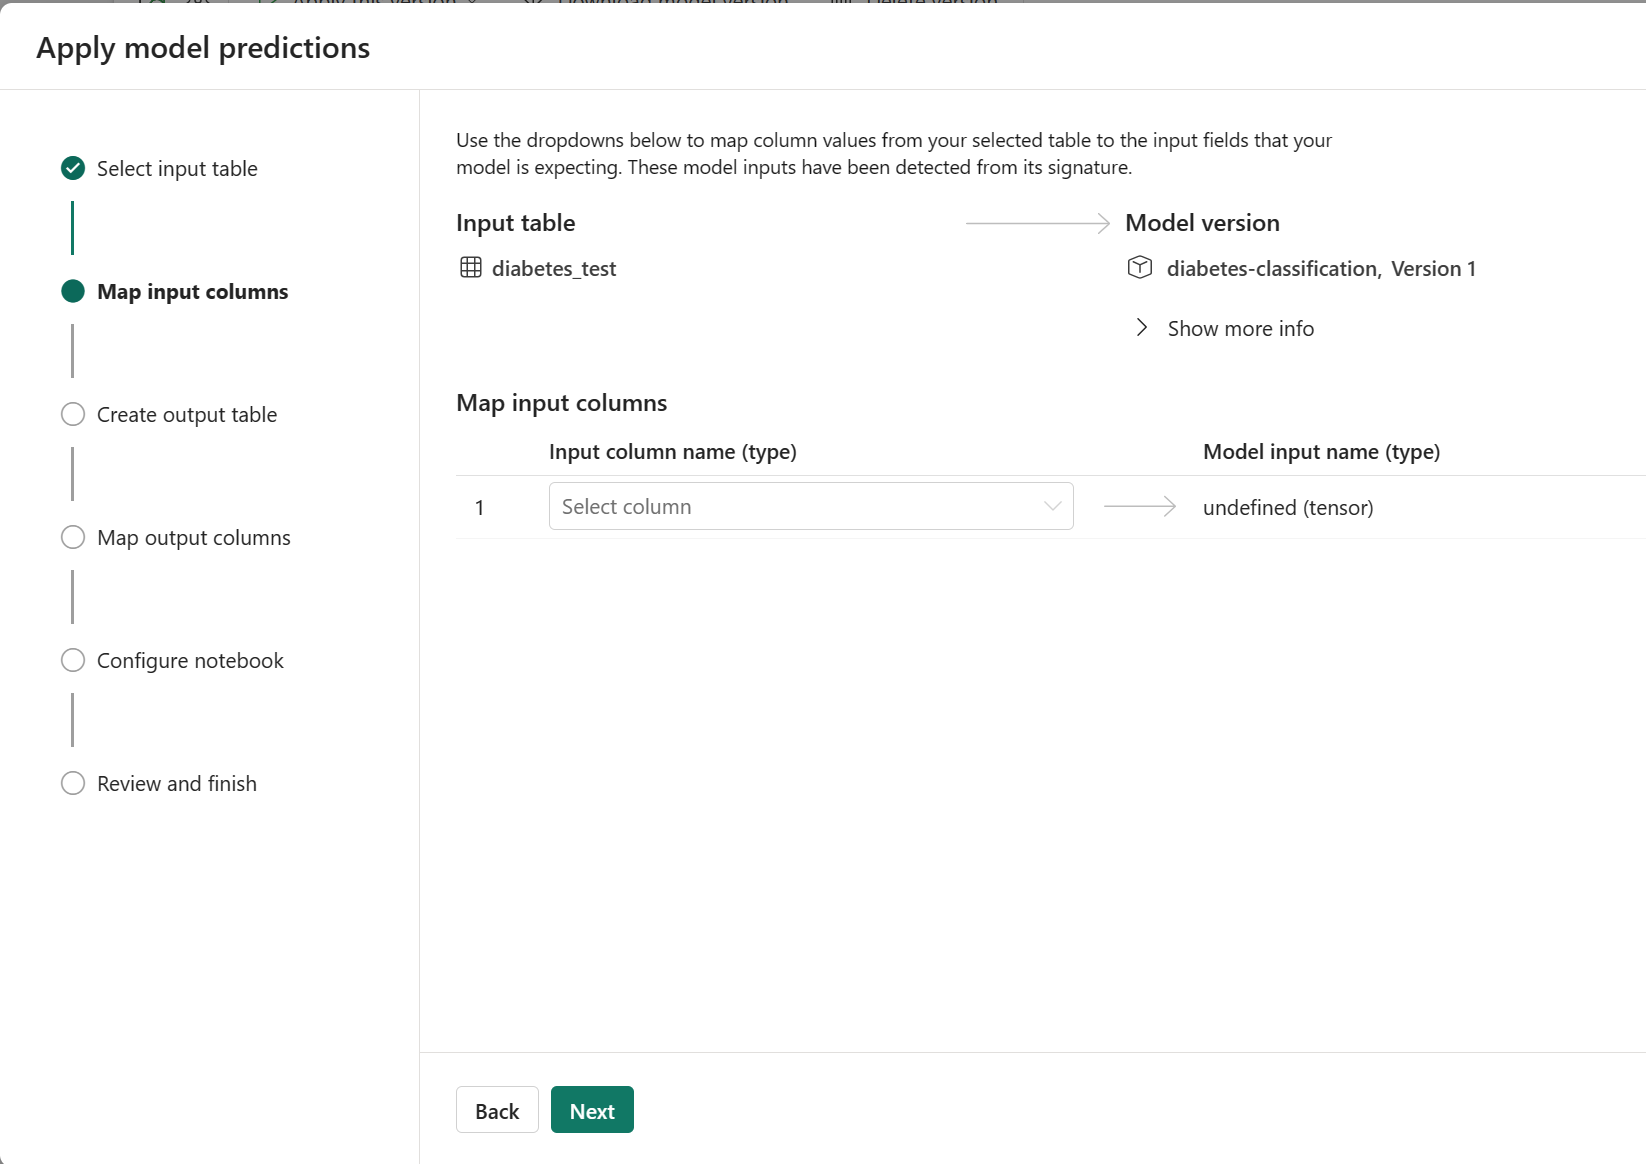
To change how the model should be applied, you can define the various expected input and output columns.
Let's explore an example of when you train a model with scikit-learn and you use MLflow's autologging to log all other parameters and metrics. To manually log a model, you can set log_models=False.
To define the input schema, you use MLflow's Schema class. You can specify the expected input columns, their data types, and their names. Similarly, you can define the output schema, which commonly consists of one column that represents the target variable.
Finally, you create the model signature object by using MLflow's ModelSignature class.
from sklearn.tree import DecisionTreeRegressor
from mlflow.models.signature import ModelSignature
from mlflow.types.schema import Schema, ColSpec

with mlflow.start_run():
   # Use autologging for all other parameters and metrics
   mlflow.autolog(log_models=False)

   model = DecisionTreeRegressor(max_depth=5)

   # When you fit the model, all other information will be logged
   model.fit(X_train, y_train)

   # Create the signature manually
   input_schema = Schema([
   ColSpec("integer", "AGE"),
   ColSpec("integer", "SEX"),
   ColSpec("double", "BMI"),
   ColSpec("double", "BP"),
   ColSpec("integer", "S1"),
   ColSpec("double", "S2"),
   ColSpec("double", "S3"),
   ColSpec("double", "S4"),
   ColSpec("double", "S5"),
   ColSpec("integer", "S6"),
   ])

   output_schema = Schema([ColSpec("integer")])

   # Create the signature object
   signature = ModelSignature(inputs=input_schema, outputs=output_schema)

   # Manually log the model
   mlflow.sklearn.log_model(model, "model", signature=signature)
As a result, the MLmodel file that is stored in the model output folder looks like:
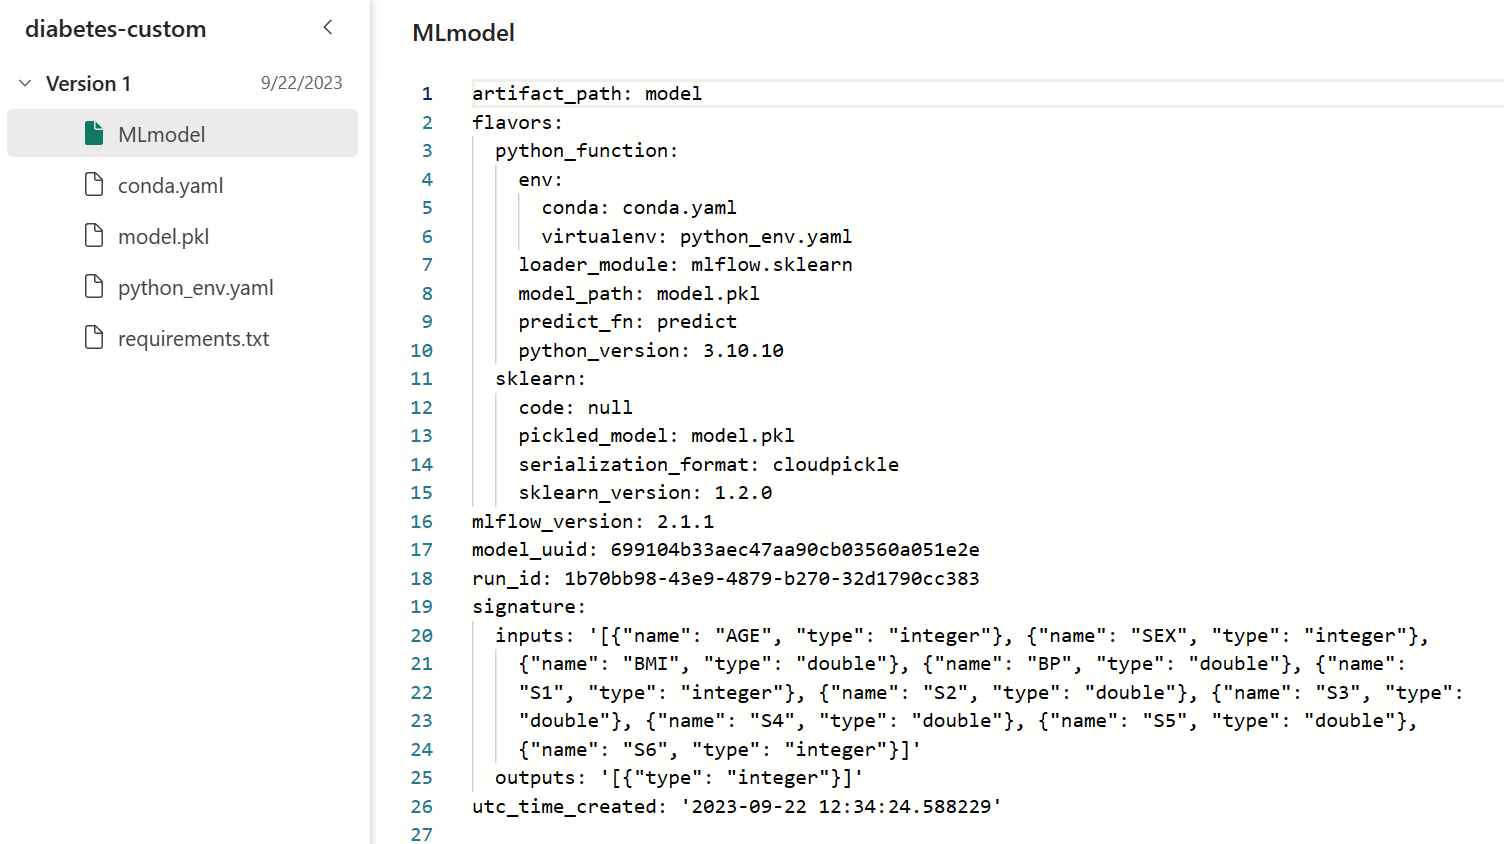
When applying the model through the wizard, you can find the input columns to be clearly defined and easier to align with the dataset you want to generate predictions for.

Save the model to the Microsoft Fabric workspace
After training and tracking a machine learning model with MLflow in Microsoft Fabric, you can inspect the contents of the model output folder in the experiment run. By exploring the MLmodel file specifically, you can decide whether your model is going to behave as expected during batch scoring.
To use a tracked model for generating batch predictions, you need to save it. When you save a model in Microsoft Fabric, you can:
- Create a new model.
- Add a new version to an existing model.
To save a model, you need to specify the model output folder, as that folder contains all the necessary information about how the model should behave during batch scoring, and the model artifacts themselves. Commonly, the trained model is stored as a pickle file in the same folder.
You can easily save a model by navigating to the respective experiment run in the user interface.
Alternatively, you can save a model through code:
# Get the experiment by name
exp = mlflow.get_experiment_by_name(experiment_name)

# List the last experiment run
last_run = mlflow.search_runs(exp.experiment_id, order_by=["start_time DESC"], max_results=1)

# Retrieve the run ID of the last experiment run
last_run_id = last_run.iloc[0]["run_id"]

# Create a path to the model output folder of the last experiment run
model_uri = "runs:/{}/model".format(last_run_id)

# Register or save the model by specifying the model folder and model name
mv = mlflow.register_model(model_uri, "diabetes-model")