Set up core components
Core components are set up to sync all your resources from Microsoft Power Platform into tables to get more visibility into the apps, flows, and makers that exist in your environment. The core components contain assets that are relevant to citizen developers, makers, administrators, and security.
The following information is available for each app:
- Display name
- App ID
- Environment
- Owner
- Created on
- Modified on
- Published on
- Last launched on (if collecting audit log information is configured)
- App plan classification (standard, premium, extended)
- Shared users
- Shared groups
- Shared with tenant (yes/no)
- App type (canvas, model-driven, SharePoint form app)
- App orphaned
Power Apps Connector represents a standard or custom connector. The following information is available for each connector:
- Connector ID
- Display name
- Icon background color and URI
- Is custom connector (yes/no)
- Maker (for custom connectors)
- Publisher
- Tier (standard/premium)
Maker represents a user who creates an app, flow, custom connector, or environment. The following information is available for each maker (retrieved from Microsoft 365 user profiles):
- Display name
- ID
- Email (user principal name)
- City
- Country/region
- Department
- Job title
- Office
- Number of apps (rollup)
- Number of flows (rollup)
Audit Log represents session details for Power Apps. The following information is available for each audit log entry:
- Operation (launched app, deleted app, deleted flow)
- App/cloud flow ID
- User city, country/region, department, job title (from Microsoft 365)
- Audit log event time
With Power BI reports, you can get a holistic view of Dataverse data with visualizations and insights for Environments, Apps, Flows, Connectors, Connection References, Makers, and Audit Log tables.

Create an environment for the CoE Kit
An environment with Dataverse is required to set up the CoE.
Select Environments > New, and then enter a name, type, and purpose.
Select Yes for creating the database and then select Next.
Leave Sample apps and data set to No.
Select Save.
For the rest of the exercises, you need to be in this new environment. To switch environments, select the environment name in the upper right corner of the screen and then select the environment you created.
Import the Creator Kit
The CoE Starter Kit includes features that require the installation of the Creator Kit in the environment where you install the CoE Starter Kit.
Instructions for installing the Creator Kit
There are two ways to import the Creator Kit solution:
Here are the steps to manually install the solution from AppSource. For more on how to install from AppSource, see Install the Creator Kit.
Download the Creator Kit.
In the top right-hand corner of Power Apps, select the environment you created in the previous section.
On the left navigation pane, select Solutions.
Select Import Solution > Browse and then choose the file you downloaded in Step 1.
When the solution is imported, it displays a success message.


For more information about importing solutions, see Import solutions.
Create connections
Microsoft recommends creating all connections prior to importing the CoE Starter Kit to make the setup go faster.
Go to Power Automate
Select your CoE environment, and go to More > Connections > New Connection

In the top right-hand corner, search for Dataverse and then select the + icon to add the connection.

Create connections for the following connectors:
- Approvals
- Microsoft Dataverse
- Microsoft Dataverse (legacy)
- Microsoft Teams
- Office 365 Groups
- Office 365 Outlook
- Office 365 Users
- Power Apps for Admins
- Power Apps for Makers
- Power Automate for Admins
- Power Automate Management
- Power Platform for Admins
- Power Query Dataflows
- RSS
- SharePoint
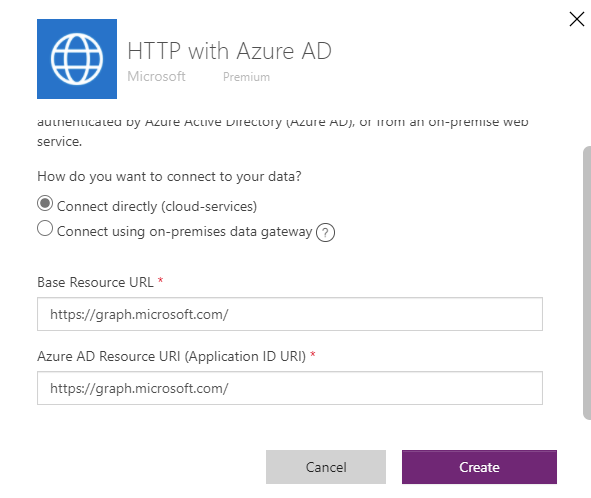
- HTTP with Microsoft Entra ID (preauthorized)
Create a connection for HTTP with Microsoft Entra ID, and set Base Resource URL and Entra ID Resource URI (Application ID URI) to
https://graph.microsoft.com/for commercial tenants.For GCC, GCC High, or DoD, check your service root endpoint for Microsoft Graph.


Set up the Inventory components using the Setup Wizard
Import the core components solution
Next, import the core components solution the same way you imported the Creator Kit.
Download the CoE Starter Kit compressed file.
Extract the compressed (.zip) file. The CoE Starter Kit compressed file contains all solution components in addition to the non–solution-aware components that make up the CoE Starter Kit.
For more information, see Set up core components.
Import the CenterOfExcellenceCoreComponents_x_x_x_xx_managed.zip solution file from the extracted folder.
When the compressed (.zip) file loads, select Next.
Review the information and then select Next.
All of the connections were already established from a previous step. If you need to create a new connection, just select Refresh when you return to this screen. You won't lose your import progress.
Select Next.
For commercial cloud tenants, leave all the environment variables blank. For GCC, GCC High, or DoD, see Microsoft Graph and Graph Explorer service root endpoints to enter the value for Graph URL Environment Variable.
Select Import.
The import can take up to 15 minutes to complete.

Open the Setup Wizard to complete the configuration
Once the solution imports, select Solutions.
Select the Managed tab.
Select Center of Excellence - Core Components display name to open the solution.

Select Apps from the left menu.
Select CoE Setup and Upgrade Wizard to play the app.

A list of connections used by the app appears. Select Allow to continue.
The app provides a step-by-step process to configure the CoE Core Components. Review the prerequisites then select Next to continue.


Configure communication methods
Assign a Microsoft 365 group for each type of persona that uses the Power Platform.
Admin persona: Add your Power Platform admins to this group. This group is used to share apps with all admins and to receive mail notifications and alerts regarding governance processes.
Maker persona: Add your Power Platform makers to this group. This group is used to send notifications to makers and new makers are added to this group.
User persona: Add your Power Platform users to this group. This group is used to send notifications to users.

Note
If you create a group, but the group name still isn't an option to select in the app, you will need to find the Entra ID Object Number of the Group in the Azure portal.

Once you assign the Microsoft 365 groups, select Next to continue.
Configure mandatory settings
Review the information on the screen and select Next to continue.

Configure inventory data source
Verify that Cloud Flows is selected then select Next. This configures the CoE Kit to use Cloud Flows to collect the inventory data. For most organizations this is the recommended option. The Data export (Preview) option is an alternative data collection method that saves the inventory data directly to Azure Data Lake Storage and is intended for large tenants. This method is in preview and outside the scope of this exercise. For more information about the data export option, see What data source should I use for my Power Platform inventory?.

Run setup flows
There are required flows that need to complete processing before continuing. This takes up to 15 minutes and you need to periodically check the status by clicking Refresh. Once the flows complete, select Next to continue.

Run inventory flows
These are flows that need to be turned on to start collecting inventory data. Go through and turn on any flows that are turned off. As you turn on the flows, they disappear from the lists. Once you turn on all the flows, select Next to continue.

Note
As of 12/22/2023, the Inventory flows may show as "Off" in the app, when they are actually turned on.
Share apps
This step shares the CoE Kit apps with the admin persona group. Select Share all to grant access. Once the apps are shared, select Next to continue.

Publish Power BI dashboard
Instructions are provided to publish the Power BI dashboard. Review the instructions then press Next to continue.

Finish
Next, you'll see links to more information about the features of the CoE Kit.
What's in the Core components
CoE Admin Command Center
Explore more features
Managed Environments overview
