Exercise – Time and expense scenarios
In this exercise, you will perform a series of time and expense tasks that are based on various real-life scenarios through different users.
This exercise uses standard demo data that is available in Project Operations. You can access a trial environment of Project Operations by selecting Get started in the upper-right corner of the Dynamics 365 Project Operations page.
Task 1: Assign project approvers
In this task, you will assign Admin Account and Spencer Low as project approvers, who will approve anytime or expense entries that are submitted.
- Open the (Project) web browser tab, select the Team tab, and then select Admin Account. Select the more commands icon and then select Edit.
- On the Project Team Member page, in the Project Approver box, select Yes and then select Save and Close.
- Repeat steps 1-2 for Spencer Low.
Task 2: Time entries
In this task, you are playing the role of Jacob Hancock, Consulting Lead, who will be creating and submitting time entries.
Create a time entry
To create a time entry, follow these steps:
In the web browser, select the settings icon and then select New incognito window (Google Chrome) or select New InPrivate window (Microsoft Edge).
In the new web browser, in the web address box, enter office.com and then press the Enter key.
On the Welcome to Office webpage, select Sign in and then sign in as jacobh@<yourdomainname>.
On the Office 365 page, select the waffle icon and then select Dynamics 365.
On the Dynamics 365 Home page, select Project Operations.
Under the My Work section, select Time Entries, on the My Weekly Time Entries page, select + New. Jacob needs to create five time entries that will cover the entire week.
On the Quick Create: Time Entry pane, complete the following settings, select the down arrow, and then select Save & Create New.
Setting Perform the following actions Date Select the calendar icon and select Monday this week Duration Select 8 hours Type Select Work Project Select the search icon and select PP1 Adventure Works Prof Services Project Task Select the search icon and select Resource Estimation Repeat step 7 four more times, incrementing the date by one day.
On the My Weekly Time Entries page, press the F5 key to refresh the page, select the row, and then select Submit.
After processing has finished, notice that the Entry Status has changed to Submitted.
Approve a time entry
In this task, you are playing the role of Admin Account (Project Manager) and will be reviewing and approving time entries.
- In the (Project) web browser tab that is signed in as Admin Account, and under the My Work section, select Approvals.
- On the Time Entries for Approval page, select all entries and then select Approve. Select OK in the dialog box.
- After processing has finished, in the navigation menu, select Projects and then select the PP1 Adventure Works project.
- On the Project page, select the Related tab and then select Actuals.
- Review the Actual Associated View page.
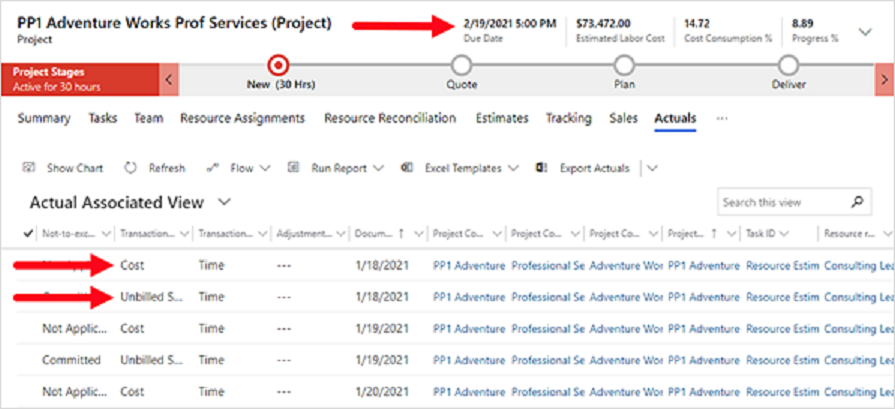
Note
Two transactions occur each day: one for costs and one for sales.
Recall a time entry
In this task, you are playing the role of Jacob Hancock, Consulting Lead, who will be recalling the approved time entries and changing the Friday entry as a vacation day due to a family emergency.
Open the web browser that has Jacob Hancock signed in.
On the My Weekly Time Entries page, select the row and then select Recall.
In the Recall of approved entries dialog box, in the Reason to Recall box, enter Family emergency on Friday - I will change the entry to a vacation day and then select Yes.
Open the Admin web browser.
On the navigation menu, select Approvals and change the view to Recall Requests for Approval.
On the Recall Requests for Approval page, select all entries, select Approve, and then select OK in the dialog box.
Open the Jacob Hancock web browser.
On the My Weekly Time Entries page, press the F5 key to refresh the page. When the Entry Status displays Returned, you can edit the entry. Because you can't modify only one entry, you will have to delete the row and re-create the entries.
On the My Weekly Time Entries page, select the row, select Delete, and then select OK in the Confirm Deletion dialog box.
On the My Weekly Time Entries page, in the menu bar, select + New.
On the Quick Create: Time Entry pane, complete the following settings, select the down arrow, and then select Save & Create New.
Setting Perform the following actions Date Select the calendar icon and select Monday this week Duration Select 8 hours Type Select Work Project Select the search icon and select PP1 Adventure Works Prof Services Project Task Select the search icon and select Resource Estimation Repeat step 9 for Tuesday to Thursday.
For Friday, complete the following settings and then select Save and Close.
Setting Perform the following actions Date Select Friday Duration Select 8 hours Type Select Vacation Description Enter Family Emergency When you are finished, press the F5 key to refresh the page, select both rows, select Submit, and then select OK in the dialog box.
Switch to the Admin web browser.
Change to the Time Entries for Approval view, select all entries, select Approve, and then select OK in the dialog box.
Change to the Absences/Vacations for Approval view, select the vacation entry, select Approve, and then select OK in the dialog box.
Cancel time approval – Non-chargeable time
In this task, you are playing the role of Admin Account (Project Manager) and you will be changing one of Jacob Hancock's approved time entries to a non-chargeable time entry.
- Change the view to My Past Approvals and select the last chargeable/approved entry. Select Cancel Approval and then select OK in the Cancel Approval dialog box.
- Change the view to Time Entries for Approval, select in the Billing Type box, select Non-Chargeable, and then select Approve.
- When the processing is complete, select Refresh and ensure that the Approver name, Admin Account, is displayed.
- Change the view to My Past Approvals and notice that the billing type has changed to Non-Chargeable.
Note
You can also review the Actual Associated View from the Projects > Projects page, to see the non-chargeable entries.
Task 3: Expense entries
In this task, you are playing the role of a Jacob Hancock, Consulting Lead, who will create and submit travel expenses for the Adventure Works project. Jacob is teaching a workshop in two weeks and has booked airfare for the occasion.
Create an expense entry
To create an expense entry, follow these steps:
Open the Jacob Hancock web browser.
Under the My Work section, select Expenses, and on the My Expenses page, select + New.
On the Quick Create: Expenses pane, complete the following settings and then select Save and Close.
Setting Perform the following actions Transaction Date Select the calendar icon and select today’s date Project Select the search icon and select PP1 Adventure Works Prof Services (Project) Project Task Select the search icon and select Deliver Workshops Expense Purpose Enter Travel Expenses Expense Category Select Flight Sales tax amount Enter 39.00 On the My Expenses page, select the row and then select Submit. After processing has finished, notice that the Expense Status has changed to Submitted.
Approve the expense entry
In this task, you are playing the role of Admin Account (Project Manager) and will be reviewing and approving time entries.
- Open the Admin Account web browser.
- Under the My Work section, select Approval and then change the view to Expense Entries for Approval.
- On the Expense Entries for Approval page, select the entry, select Approve, and then select OK in the dialog box.
- After the processing has finished, in the navigation menu, under the Projects section, select Projects and then select the PP1 Adventure Works project.
- On the Project page, select the Related tab and then select Actuals.
- On the Actual Associated View page, search for the Expense transaction class to view the two approved expense entries: one for cost and the other for unbilled sales. You can double-click the entry to view the expense details.
Recall the expense entry
In this task, you are playing the role of Jacob Hancock, Consulting Lead, who will be recalling the approved expense entry and changing the Sales Tax amount to 89.00 USD.
- Open the web browser that has Jacob Hancock signed in.
- On the My Expenses page, select the row and then select Recall.
- In the Recall of approved entries dialog box, in the Reason to Recall box, enter The sales tax amount is incorrect. It should be $89.00 and then select Yes.
- Open the Admin web browser.
- On the navigation menu, under the My Work section, select Approvals and change the view to Recall Requests for Approval.
- On the Recall Requests for Approval page, select the row, select Approve, and then select OK in the dialog box.
- Open the Jacob Hancock web browser.
- On the My Expenses page, press the F5 key to refresh the page, select the row, and then select Edit.
- On the Travel Expenses page, change the Sales tax amount to 89.00 and then select Submit.
- Open the Admin web browser.
- Change the view to Expense Entries for Approval, select the entry, select Approve, and then select OK in the dialog box.
Cancel an expense approval – Non-chargeable expense
You have been informed by Molly Clark, Account manager, that the company will not be charging back travel expenses to Adventure Works.
In this task, you are playing the role of Admin Account (Project Manager) and you will be changing one of Jacob Hancock’s approved time entries to a non-chargeable time entry.
- Change the view to My Past Approvals, select the Travel Expenses entry, select Cancel Approval, and the select OK in the Cancel Approval dialog box.
- Change the view to Expense Entries for Approval, select in the Billing Type box, select Non-Chargeable, select Approve, and then select OK in the dialog box.
- Change the view to My Past Approvals. Notice that the billing type for Travel Expenses has changed to Non-Chargeable.
- You can also review the Actual Associated View from the Projects > Projects page to see the non-chargeable entries.