How does GitHub organization and permissions work?
In the previous unit, you explored the different ways that users can authenticate themselves with GitHub. In this unit, you'll learn about permissions for each hierarchical level:
- Repository permissions
- Team permissions
- Organization permissions
- Enterprise permissions
Repository permission levels
You can customize access to each repository by assigning specific permission levels. There are five standard repository-level permissions:
- Read: Recommended for non-code contributors who want to view or discuss your project. This level is good for anyone that needs to view the content within the repository but doesn't need to actually make contributions or changes.
- Triage: Recommended for contributors who need to proactively manage issues and pull requests without write access. This level is useful for project managers who track issues and discussions without modifying code.
- Write: Recommended for contributors who actively push to your project. Write is the standard permission for most developers.
- Maintain: Recommended for project managers who need to manage the repository without access to sensitive or destructive actions.
- Admin: Recommended for people who need full access to the project, including sensitive and destructive actions like managing security or deleting a repository. These people are repository owners and administrators.
You can give organization members, outside collaborators, and teams different levels of access to repositories owned by an organization. Each permission level grants progressively more access to repository content and settings. Choose the level that best fits each person or team's role in your project without giving more access to the project than necessary.
Administrators can also create custom roles in GitHub Enterprise, extending one of these base roles with additional permissions as needed.
What is repository forking?
Forking is a way to create a personal copy of someone else's repository under your own GitHub account. When you fork a repository, you get your own version that you can freely modify without affecting the original project. This process is a common workflow for contributing to open source or experimenting with changes safely.
You can also keep your fork up to date by pulling in changes from the original repository, often called the “upstream” repo.
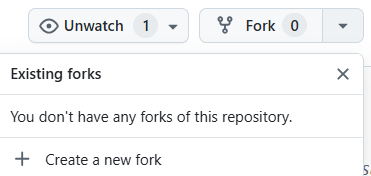
Here’s how to fork a repository:
On GitHub.com, navigate to the main page of the repository you want to fork.
In the upper-right corner, select Fork.
Choose an owner for the fork (your personal account or an organization).
Optionally, rename the forked repository or include all branches.
Select Create fork.
Managing fork permissions (for admins)
For organization-owned repositories, administrators can control whether repositories can be forked:
- Public repositories: Forking is always allowed.
- Private repositories: Forking can be disabled or restricted to organization members only.
- Internal repositories: These can only be forked within the same enterprise account.
To configure fork settings:
Go to the Organization repository’s Settings.
In the left sidebar, under Access, click Member privileges.
Locate the Repository forking options and update them as needed.
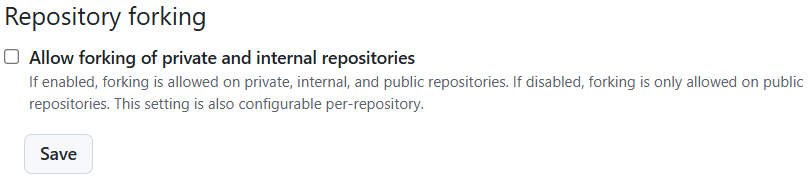
Tip
If you disable forking for a private repository, no one (including organization members) will be able to fork it.
To learn more, see the GitHub Docs article on Fork a repo.
Viewing Repository Insights
Repository insights on GitHub offer a powerful way to monitor and analyze your project's activity, contributions, and dependencies. By leveraging these insights, you can track project health, identify bottlenecks, and ensure security. This section will guide you through the steps to access repository insights and provide best practices for using them effectively.
Steps to View Repository Insights
- Navigate to the repository on GitHub.
- Under the repository name, click on the Insights tab.
- Explore the following sections within the Insights tab:
- Contributors: View a graph of contributions over time, including commits, additions, and deletions by each contributor.
- Traffic: Monitor repository traffic, including unique visitors and page views.
- Commits: Analyze commit activity over time.
- Code Frequency: Track the number of lines added and deleted over time.
- Dependency Graph: View the dependencies of your repository and identify potential security vulnerabilities.
Best Practices for Using Repository Insights
- Monitor Contributions: Use the Contributors section to identify active contributors and areas of the repository that are receiving the most attention.
- Track Traffic: Use the Traffic section to understand how users are interacting with your repository and identify trends in engagement.
- Address Vulnerabilities: Regularly review the Dependency Graph to ensure your repository remains secure.
By leveraging repository insights, you can make data-driven decisions to improve collaboration, security, and project management.
Ways Users Receive Repository Access
Actions of a User Given a List of Their Repository Permissions
A user’s effective permissions in a repository are influenced by various factors, including:
- Repository Role: (e.g., Admin, Write, Read)
- Team Membership: (e.g., inherited permissions from a team)
- Organization Membership: (e.g., default organization permissions, SSO requirements)
When you combine these different permission sources, GitHub applies the highest level of access granted to the user. For example, if a user has Read access through a team but also has Write access directly assigned as a collaborator, they will effectively have Write permissions.
Repository Membership Options
When granting access to a repository, there are several ways a user can become a collaborator:
| Membership Type | Description |
|---|---|
| Direct Collaborator | Added explicitly to the repository with a specific role (Read, Triage, Write, Maintain, or Admin). Recommended for external contributors or small teams. |
| Team Membership | A user inherits repository access via their team membership. Team permissions are often set at the organization level for consistent, scalable management. |
| Organization Default Permissions | If the repository is part of an organization, there may be a default permission level for all organization members (e.g., None, Read). Owners can override these defaults for specific teams or users. |
| Outside Collaborator | A user who is not a member of the organization but has explicit access to a repository. Useful for contractors, freelancers, or open-source contributors needing limited access. |
Monitoring and Auditing Repository Access
Regularly auditing who has access to a repository ensures proper security and compliance. Here are some recommended steps and tools:
View Access in Repository Settings:
- Navigate to Settings > Manage access (for the repository).
- Review the list of users and teams, along with their permission levels.
Organization Audit Log (GitHub Enterprise or Organization-level):
- Organization owners can view changes to membership, repository access, and permissions in the Audit log.
- Filter events by repository name or access changes for a more focused view.
Enterprise Audit Log (GitHub Enterprise):
- If you manage multiple organizations, use the Enterprise account’s audit log to track changes across all organizations and repositories.
- This is especially valuable for compliance reporting or large-scale security reviews.
Automated Scripting:
- Use the GitHub REST API or GraphQL API to programmatically list collaborators, teams, and permissions.
- Integrate scripts with your CI/CD pipeline or security dashboards to continuously monitor and flag anomalies.
Tip: Set up branch protection rules and required reviews to add another layer of security and accountability for all code changes.
Team permission levels
A team in a GitHub organization is a group of users who collaborate on shared repositories. Teams help streamline access management and communication by applying consistent permissions across multiple repositories at once. Key benefits include:
- Centralized Access Control: Assign repository permissions (e.g., Read, Write) to the entire team instead of managing each user individually.
- Structured Collaboration: Organize members by department, project, or role for more efficient collaboration.
- Visibility & Communication: Each team can have its own discussion board, making it easier to share updates and coordinate efforts.
Teams provide an easy way to assign repository permissions to several related users at once. Members of a child team also inherit the permission settings of the parent team, providing an easy way to cascade permissions based on the natural structure of a company.
There are two levels of permissions at the team level:
| Permission level | Description |
|---|---|
| Member | Team members have the same set of abilities as organization members |
| Maintainer | Team maintainers can do everything team members can, plus: - Change the team's name, description, and visibility. - Request that the team change parent and child teams. - Set the team profile picture. - Edit and delete team discussions. - Add and remove organization members from the team. - Promote team members to also have the team maintainer permission. - Remove the team's access to repositories. - Manage code review assignment for the team. - Manage scheduled reminders for pull requests. |
An organization owner can also promote any member of the organization to be a maintainer for a team.
To audit access to a repository that you administer, you can view a combined list of teams and users with access to your repository in your settings:
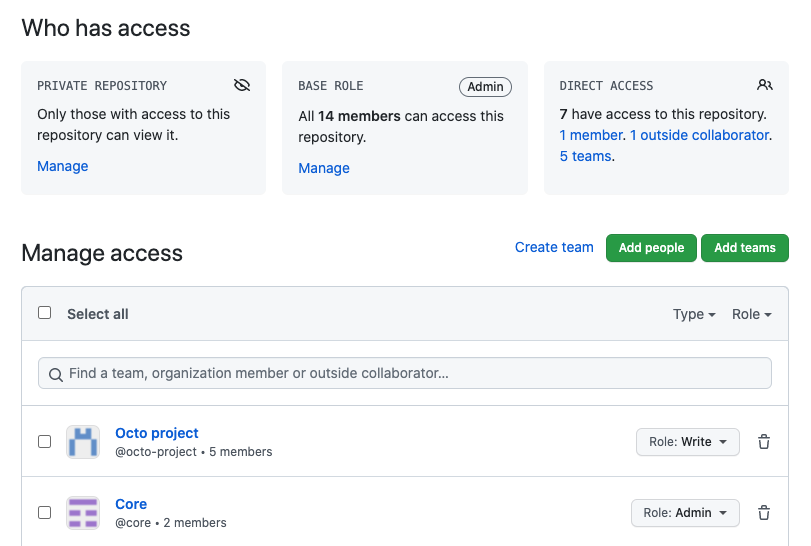
GitHub offers several permission levels that can be assigned to teams. When you grant a team access to a repository, you can choose from the following permission models:
Permission Models
| Permission Level | Description | Best For |
|---|---|---|
| Read | Users can view and clone the repository. Can open and comment on issues and pull requests. | Individuals who need read-only or review access. |
| Triage | Users can manage issues and pull requests (e.g., label, assign, comment). Cannot push changes to the repository. | Project managers or contributors who need to triage and organize issues without contributing code. |
| Write | Users can push to branches (except protected branches). Can manage issues and pull requests. | Active contributors who need to commit code or update documentation. |
| Maintain | Users can manage repository settings, issues, and pull requests. Cannot delete or transfer the repository. | Project maintainers who handle routine repository management but don’t require full admin rights. |
| Admin | Users have full control over the repository, including setting permissions, deleting the repository, and managing all settings. | Those who need top-level administrative access. |
Tip: Always follow the Principle of Least Privilege—assign the lowest permission level necessary for each team to perform its tasks effectively. This approach reduces the risk of accidental or unauthorized changes.