Govern and manage data from SQL Server by using Microsoft Purview
Your company stores extensive data in on-premises SQL Server databases. Much of that data is correlated with existing data sets in your Azure database solution. Additionally, some of your company’s data sources are hosted on Azure Virtual Machines. You decide to use Microsoft Purview to discover and create a unique catalog of all your data sets since it can connect to all your resources.
Register data sources from on-premises SQL Server
To register data sources from a SQL Server on-premises, first ensure you can register data sources successfully from a SQL Server instance that’s running either in your on-premises datacenter or in Azure VM by ensuring that:
You have the data source administrator role and data reader roles on collection where you want your data sources to reside. These roles are required to register a data source.
Configure either SQL Authentication or Windows Authentication for your SQL Server. Use SQL Server Management Studio to change and configure the authentication mode to support both SQL Server and Windows Authentication modes.
The SQL account that you’ll use to access the data on your SQL server has permission to access the master database. The Microsoft Purview scanner must enumerate the sys.databases that resides in the master database.
Create and manage self-hosted integration runtime
The next step is to create a self-hosted integration runtime (SHIR) in your Microsoft Purview account. Microsoft Purview uses the SHIR component to run data scans across different network environments. You first must create a Microsoft integration runtime in your Microsoft Purview account, and then download and install the SHIR on the on-premises machine that runs any supported 64-bit version of the Windows operating system.

Note
SHIR installation on a domain controller isn’t supported.
Also you should configure an appropriate power plan on the computer on which you install SHIR to avoid hibernation, which prevents SHIR from responding to data requests.
Register the Microsoft integration runtime on your computer
The computer that will host the Microsoft Integration Runtime component needs to have connectivity with your on-premises SQL Server.

It’s a best practice to test the connectivity to the on-premises SQL Server from the computer that’s hosting the Microsoft Integration Runtime infrastructure. To test the connection:
Open the Microsoft Integration Runtime Configuration Manager.
To open the Diagnostics Tool, Select Diagnostics.
Provide the source and credentials for the data source, and then run the test.
Tip
If you experience any issues while running the test, create a support ticket by selecting the Send logs button.

Prepare credentials in Azure Key Vault
Use Azure Key Vault to store credentials for accessing a data source from SQL Server in Azure VM. You need to create a credentials object, or secret, that contains a password for authenticating the data source. Ensure that the managed identity that’s representing the Microsoft Purview account has Get and List permissions for secrets. In Azure Key Vault, modify the access policy to include the Microsoft Purview account and on the Add access policy pane, for Secret Management Operations, select Get and List.

Note
You can configure the Key Vault to disable public access. However, if you do, you must enable access to trusted Microsoft services to bypass firewalls.
Enable integration between Microsoft Purview and Azure Key Vault
Once you create the Azure Key Vault and configure the secret, follow these steps to enable integration between Microsoft Purview and the Azure Key Vault:
To open the Management Center, in Microsoft Purview Governance Portal, select the Management link, and then select Credentials.
To start the wizard for creating a new connection, on the Credentials pane, select Manage Key Vault connections, and then select +New.
In the New Key Vault pane, enter the required information including name, description, your Azure subscription, and a new Key Vault name, and then select Create.


Create a credentials object
The next step is to create a credentials object that you’ll use to authenticate to the SQL Server Azure VM:
On the Credentials pane, select +New.
On the New credential pane:
In the Name and Description text boxes, enter a name and description for the credential object.
From the Authentication method drop-down list, select the authentication method.
In the User name text box, enter a user name.
In the Password section:
- From the Key Vault connection drop-down list, select a Key Vault connection.
- In the Secret name text box, enter the name of the secret that contains the password for SQL authentication or Windows authentication.
- Optionally, in the Secret version text box, enter the version of the secret.

Register a data source from the Azure portal
When you meet all the prerequisites, use the Azure portal to register your on-premises SQL Server data source by performing the following steps:
In Microsoft Purview Governance Portal, from the navigation pane, select Data map.
On the Sources pane, select Register.
On the Register sources pane, select SQL Server and then select Continue.

On the Register sources (SQL Server) pane, in the Name text box, enter a name for the source.
In the Server endpoint text box, enter an IP address or hostname for the server endpoint.
From the Select a collection drop-down list, select a collection, and then select Register.


Scan data from SQL Server on-premises
Now that your data source is integrated with your Microsoft Purview account, you’re ready to create scan rule sets, which are a group of scan rules that you associate with a scan.

You can create a custom scan rule set that includes different file types or classifications:
Microsoft Purview provides system scan rule sets for many data-source types.
You can create your own scan rule sets to accommodate different requirements.
To create a new scan rule set:
In Microsoft Purview, select Data map, select Scan rule sets, and then in the Scan rule sets pane, select +New.
In the Select classification rules pane, select one or more System rules.


The SQL Server scanning process captures metadata such as names and file sizes by extracting the schema from the SQL Server database.
Use the following steps to scan an on-premises SQL Server instance:
In Microsoft Purview Governance Portal, from the navigation pane, select Data map.
Select the SQL Server source that you registered previously and then select the New scan button.

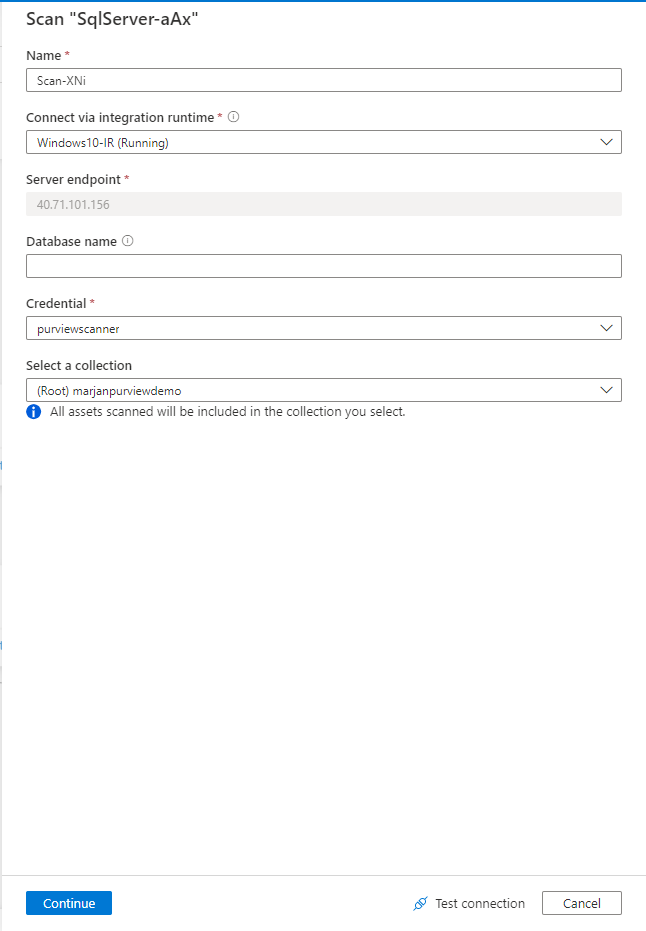
In the Scan pane, provide the following information:
In the Name text box, enter a name for the scan.
From the Connect via integration runtime drop-down list, select a Microsoft integration runtime.
In the Server endpoint text box, enter the IP address for the server endpoint that contains the SQL Server instance.
In the Database name box, enter a name.
From the Credential drop-down list, select a credential to connect to your data source via integration runtime.
From the Select a collection drop-down list, select a collection, and then select Continue.
In the Scope your scan text box, enter your SQL database name, and then select Continue.
On the Select a scan rule set pane, select either existing or create a new scan rule set, and then select Continue.
On the Set a scan trigger pane, select the schedule to run the scan. Choose to scan once or create a recurring scan that runs at specific times.
In the final step, review your selections, and then select Save and run.


Govern and manage data from SQL Server in an Azure VM by using Microsoft Purview
The procedures for governing the data from SQL Server in an Azure VM are similar to the procedures to govern data from SQL Server that were described previously:
Create and manage self-hosted integration runtime.
Register the Microsoft integration runtime on an Azure VM that has connectivity with your SQL Server running in Azure VM.
Prepare credentials in Azure Key Vault to access a data source from SQL Server in Azure VM.
Register a SQL Server data source in Microsoft Purview.
Scan data from SQL server in an Azure VM.
Use the Data map tab to examine, manage, or delete scans
The Data map tab in Microsoft Purview Governance Portal contains existing scans and all previous scans that occurred. It also contains status and metrics for each scan that occurs.
After selecting the Data map tab, select the existing scan that you would like to manage and then select Edit scan to make changes to the scan. If you no longer want or need a scan, use a similar procedure to select and then delete the scan.
Troubleshooting common scan issues
To scan a data source, ensure that you provide an account that has the required permission to access the data source. The most common problem when you initiate a scan of the data source is a lack of permissions, either to the Key Vault that is hosting secrets or to the data source.
Use the following steps to resolve the issue:
Verify that you have all prerequisites and have followed all authentication steps for the source you're connecting to.
Verify that the permissions for the Microsoft Purview managed identity are set up correctly in Azure Key Vault. Ensure that you're using the right secret name and version.
Verify that Azure Role Based Access Control (RBAC) is granted at least Reader role on the resource or is inherited from a higher scope such as a resource group or a subscription.
If you're using private link to connect to your data source, ensure that self-hosted integration runtime is set up correctly.