Exercise - Create room resource accounts
Before creating the actual room accounts, you need to establish a naming schema. It makes sense to think about the physical room locations first, to design a naming schema that considers all the different locations of your company and benefits your operations team later to match logical devices and physical locations. That makes things a lot easier to locate physical teams room devices that have issues in the reporting dashboard or to find a physical device in the management backend, when you're working onsite.
Contoso has branch offices in different countries and in different cities. No city has more than one branch office, but they can consist of different buildings. Each building has multiple floors and lot's of rooms with teams room systems. So, to specify the exact and unique location of every physical device, you could use the following pattern as naming schema:
Based on this criteria, it's recommended you use this pattern:
CountryCode-City-Building-Floor-RoomName
You have already decided to use an MTR prefix to uniquely identify teams room systems. Therefore, you also need to add this unique prefix to your naming schema, which results in the following pattern:
MTR-CountryCode-City-Building-Floor-RoomNumber
In the following example, consider that we have three devices, distributed across three different buildings and different floors. Two of these devices can be used by any employee and the third is reserved for members of the management team and invites must be processed manually. The following table shows how the devices are distributed.
| County | Location | Building | Floor | RoomName | Capacity | Optional things | Resource (UserPrincipleName) |
|---|---|---|---|---|---|---|---|
| US | Seattle | 24 | 3 | 35 | 4 | MTR-US-Seattle-24-3-35@<tenant>.onmicrosoft.com | |
| US | Seattle | 36 | 5 | 23 | 8 | MTR-US-Seattle-36-5-23@<tenant>.onmicrosoft.com | |
| US | Seattle | 47 | 6 | 17 | 6 | Booking must be approved | MTR-US-Seattle-47-6-17@<tenant>.onmicrosoft.com |
Note
In real world deployments you should create this list before deciding on a specific naming schema to avoid inconsistencies in your pattern. For example, your company may have multiple branches in different city districts and want to use different naming schemas for each location.
From within the Microsoft 365 admin center, under Resources, you can create new accounts for Rooms & equipment. In here, you need to create three new resources from type Room, based on the earlier table.
In the textbox of Email, you need to make sure that there are no white spaces. It's recommended to use dashes instead of spaces.
Open the Microsoft 365 admin center and sign-in with the Global Administrator (globalAdmin@<tenant>.onmicrosoft.com).
On left navigation menu, select Resources, expand the menu and select Rooms & equipment
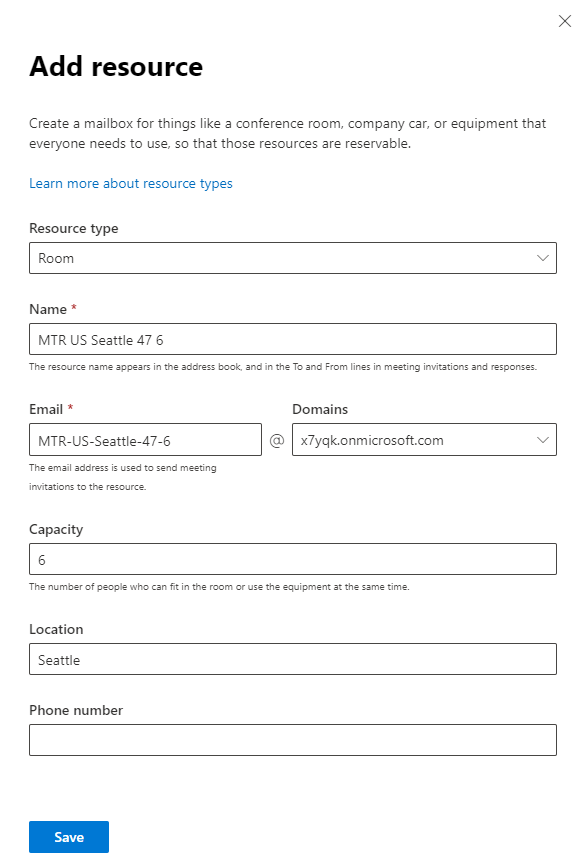
Select Add resource
Make sure Resource type is Room
In the field Name, type in the name MTR-US Seattle 47 6 17 which afterwards will be shown as the users name.
At Email, type in the first part of your mail address: MTR-US-Seattle-47-6-17
Make sure the given domain is correct to your domain.
Add the seat count of 4 in the Capacity field.
In the field Location type Seattle.
Leave the Phone number field empty and select Save.
Directly after the account was created you can edit the booking options. Make sure that the room for the management team doesn't auto accept invites. Instead, we want to specify our admin account that will manually process invites.
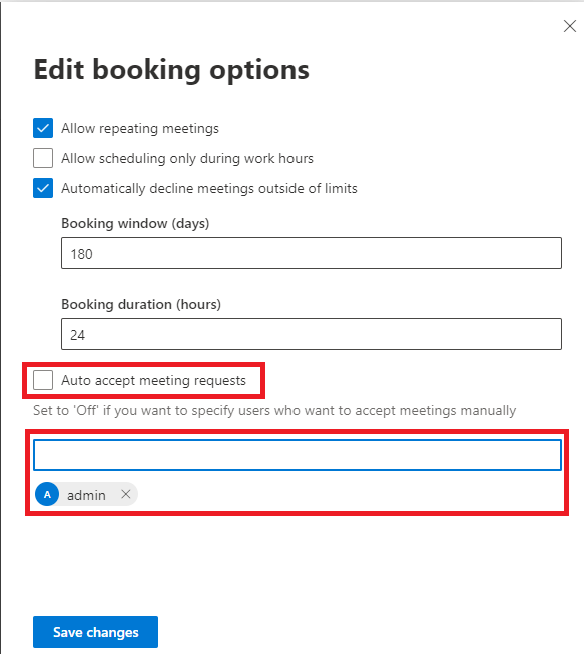
Because of the special requirement by the management for room US-Seattle-47-6-17, once it shows Ready, select Edit booking options.
Disable the Auto accept meeting request option. Type in the email address of your admin account, so these meeting invites can be manually processed by your admin account.
Repeat the process for the other two accounts (MTR-US-Seattle-24-3-35@<tenant>.onmicrosoft.com and MTR-US-Seattle-36-5-23<tenant>.onmicrosoft.com) and keep the default booking options.

After creation, your new room accounts should appear as a member in the previously created TeamsRoomsAccounts_dynamic group.


