Create and manage Data Loss Prevention policies
Organizations must protect sensitive information and prevent inadvertent disclosure. Regulations for data protection change from time to time. The goal of Data Loss Prevention (DLP) is to ensure that sensitive data isn't lost, misused, or accessed by unauthorized users.
With Microsoft Purview Data Loss Prevention policies, organizations can identify, monitor, and automatically protect sensitive information across their Microsoft 365 environment.
DLP policy can help you to:
Identify sensitive information across many locations (Exchange Online, SharePoint, OneDrive, and Microsoft Teams)
Prevent the sharing of sensitive information by accident
Monitor and protect sensitive information in the desktop versions of Excel, PowerPoint, and Word
View DLP reports (with content that matches your organization's DLP policies)
DLP policies for Microsoft Teams
If your organization has data loss prevention (DLP), you can define policies that prevent people from sharing sensitive information in a Microsoft Teams channel or chat session. DLP for Microsoft Teams blocks sensitive content when shared with Microsoft Teams users who have guest access or external access. Here are some examples of how this protection works:
Protecting sensitive information in messages: Suppose that someone attempts to share sensitive information in a Teams chat or channel with guests. If you have a DLP policy defined to prevent the situation, messages with sensitive information that are sent to guests are deleted. The deletion happens automatically, and within seconds, according to how your DLP policy is configured.
Protecting sensitive information in documents: Suppose that someone attempts to share a document with guests in a Microsoft Teams channel or chat, and the document contains sensitive information. If you have a DLP policy defined to prevent this, the document won't open for those users. Your DLP policy must include SharePoint and OneDrive in order for protection to be in place.
Example: Protect social security numbers in Teams chat and channel message
As the Teams administrator for Contoso, you have created and applied a DLP policy to protect social security numbers in Teams chat and channel message.
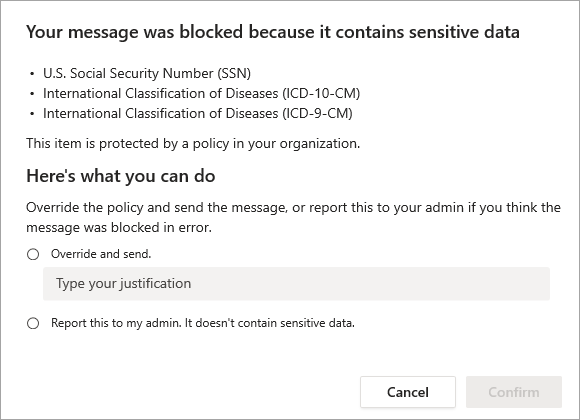
Later, a user tried to send a social security number in a Microsoft Teams channel. The message was blocked and there's a help link What can I do?. This link will open a dialog box that provides options for the sender to resolve the issue.
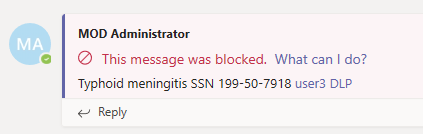
As an admin, you can choose to allow users to override a DLP policy in your organization. When you configure your DLP policies, you can use the default policy tips or customize policy tips. In the following example, the sender has the options to override the policy or notify an admin to review and resolve it.
The recipients are viewing different message on the screen, as in the following image:

You may notice that the recipients are receiving information that the message was blocked due to sensitive content, and there's a link right next to the message: What's this? which will open an article about DLP policies, where the users can find an explanation why the message was blocked.
DLP policy configuration overview
You have flexibility in how you create and configure your DLP policies. You can start from a predefined template and create a policy in just a few clicks or you can design your own from the ground up. No matter, which you choose, all DLP policies require the same information from you.
Choose what you want to monitor: Microsoft Purview comes with many predefined policy templates to help you get started or you can create a custom policy.
A predefined policy template: Financial data, Medical and health data, Privacy data all for various countries and regions. For more information, see DLP policy templates.
A custom policy that uses the available sensitive information types, retention labels, and sensitivity labels.
Choose administrative scoping: DLP supports assigning Administrative Units to policies. Administrators who are assigned to an administrative unit can only create and manage policies for the users, groups, distribution groups, and accounts that they're assigned to. So, policies can be applied to all users and groups by an unrestricted administrator, or they can be scoped to administrative units. See, Policy Scoping for more DLP specific details. See, Administrative units for the details on administrative units across Microsoft Purview Information Protection.
Choose where you want to monitor: You pick one or more locations that you want DLP to monitor for sensitive information. You can monitor:
Location Include/exclude by Exchange email distribution groups SharePoint sites sites OneDrive accounts accounts or distribution groups Teams chat and channel messages accounts Windows 10 devices user or group Microsoft Defender for Cloud Apps instance On-premises repositories repository file path Choose the conditions that must be matched for a policy to be applied to an item: You can accept pre-configured conditions or define custom conditions. Some examples are:
Item contains a specified kind of sensitive information that is being used in a certain context. For example, 95 social security numbers being emailed to recipient outside your org.
Item has a specified sensitivity label.
Item with sensitive information is shared either internally or externally.
Choose the action to take when the policy conditions are met: The actions depend on the location where the activity is happening. Some examples are:
SharePoint/Exchange/OneDrive - Block people who are outside your organization from accessing the content. Show the user a tip and send them an email notification that they're taking an action that is prohibited by the DLP policy.
Teams Chat and Channel - Block sensitive information from being shared in the chat or channel.
The conditions and the actions to take are defined in an object called a Rule. A rule is created to enforce a specific protection requirement. A DLP policy is used to group together common protection requirements.

Create a new DLP policy for Microsoft Teams
DLP policies can be managed in the Microsoft Purview compliance portal, beneath Data loss prevention. Follow these steps to create a new DLP policy for Teams locations:
From the the Microsoft Purview compliance portal, select Policies > Data loss prevention.
Select the Policies tab, and select + Create policy to start the wizard.
On the Start with a template or create a custom policy page, you can choose from different sensitive information type templates or you can choose the create a Custom policy. Make your choice and select Next.
On the Name your policy page, enter a meaningful Name and a Description, that explains the purpose of this DLP policy. Select Next.
On the Choose locations to apply the policy page, choose the locations that you want the DLP policy to protect. DLP policies can contain Teams and non-Teams locations at the same time.

On the Define policy settings page, select one of the radio buttons and then select Next.
Review and customize default settings from the template
Create or customize advanced DLP rules
Depending on the previous selection, you'll configure the Policy settings.
If you selected Create or customize advanced DLP rule, you'll configure new rules with the following settings:
Conditions
Exceptions
Actions
User notifications
User overrides
Incident reports
Additional options

After configuring the desired settings, select Next.
On the Test or turn on the policy page, you can select from different settings to enable the new DLP policy:
Test it out first - Doesn't enforce the policy. You can also choose to show policy tips while in test mode.
Turn it on right away - Activates the policy right after creation.
Keep it off - Leaves the policy deactivated.
Select Next and on the Review your settings page, select Submit.

