Create information barrier policy
Information barriers (IBs) are policies that an admin can configure to prevent individuals or groups from communicating with each other.
IB policies also prevent lookups and discovery. If you attempt to communicate with someone you shouldn't be communicating with, you won't find that user in the people picker. The information barriers can be used in some of the following cases:
- When a team must be prevented from communicating or sharing data with a specific other team.
- When a team must not communicate or share data with anyone outside of that team.
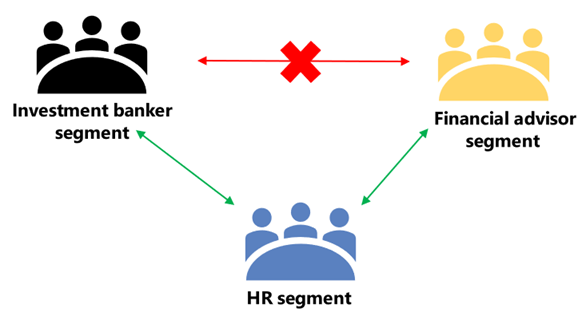
Here's an example. Alex belongs to the Banking segment and Bill belongs to the Financial advisor segment. Alex and Bill can't communicate with each other because the organization's IB policy blocks communication and collaboration between these two segments. However, Alex and Bill can communicate with Lee in HR.
How information barriers work in Teams
Information barriers are supported in Microsoft Teams, SharePoint, and OneDrive. In Microsoft Teams, IB policies are triggered when the following Teams events take place:
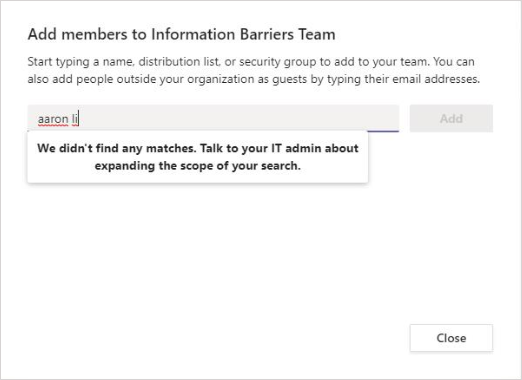
Members are added to a team: Whenever you add a user to a team, the user's policy must be evaluated against the IB policies of other team members. If the user's policy blocks them from being added to the team, the user won't show up in search.
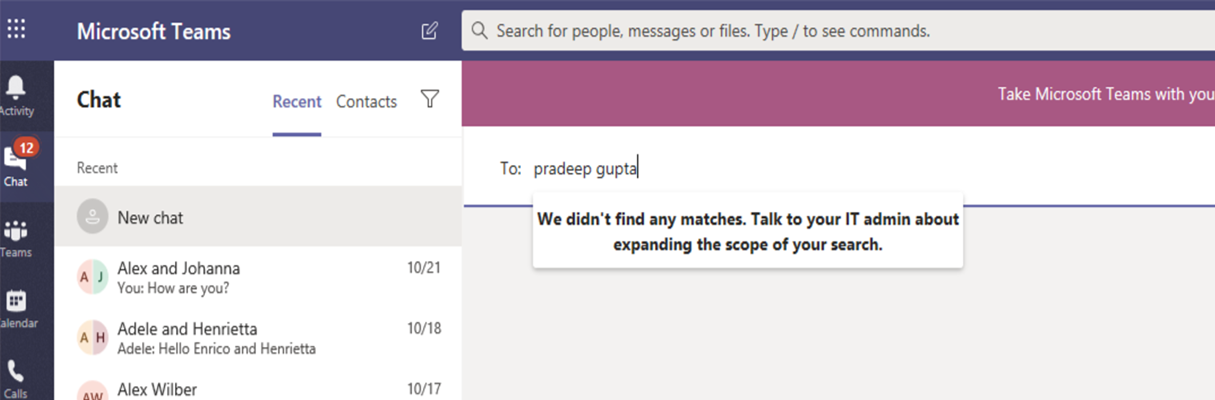
A new chat is requested: Each time that a user requests a new chat with one or more other users, the chat is evaluated to make sure that it isn't violating any IB policies. If the conversation violates an IB policy, then the conversation isn't started. Here's an example of a 1:1 chat.
A user is invited to join a meeting: When a user is invited to join a meeting, the IB policy that applies to the user is evaluated against the IB policies that apply to the other team members. If there's a violation, the user won't be allowed to join the meeting.
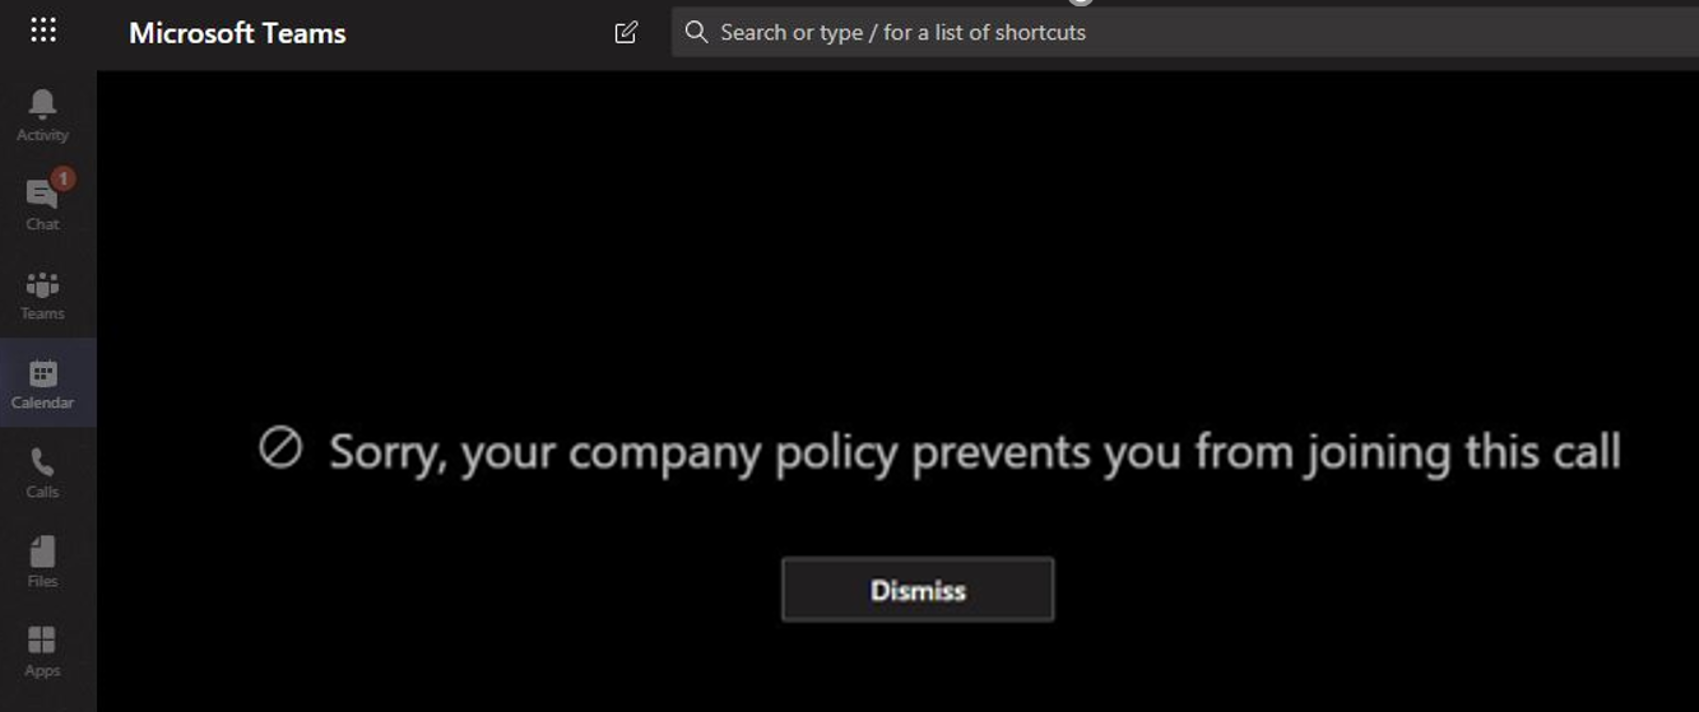
A screen is shared between two or more users: When a user shares a screen with other users, the sharing must be evaluated to make sure that it doesn't violate the IB policies of other users. If an IB policy is violated, the screen share won't be allowed. Here's an example of screen share after the policy is applied. The screen share and call icons aren't visible.

A user places a phone call in Teams: Whenever a user starts a voice call (via VOIP) to another user or group of users, the call is evaluated to make sure that it doesn't violate the IB policies of other team members. If there's any violation, the voice call is blocked.
Guests in Teams: IB policies apply to guests in Teams, too. You can define IB policies once guests are discoverable in your organization's global address list.

When admins create or update information barrier policies, the service automatically searches the members to ensure that the Team members are not violating any policies. If there are any new violations, the following actions are taken:
- 1:1 chat: If communication between two users is no longer allowed (because of application to one or both users of a policy that blocks communication), further communication is blocked. Their existing chat conversations become read-only.
- Group chat: If participants in a group chat violate a changed or new policy, the affected participants are removed from the chat and they can see the conversation history in read-only.
- Team: Any users who have been removed from the group are removed from the team and won't be able to see or participate in existing or new conversations.
Workflow
There are several steps to configuring information barrier policies for Microsoft Teams. When a team is created, a SharePoint site is provisioned and associated with Microsoft Teams for the files experience. Information barrier policies aren't honored on this SharePoint site and files by default. To enable information barriers in SharePoint and OneDrive, see Use information barriers with SharePoint.
| Phase | What's involved |
|---|---|
| Make sure prerequisites are met | - Verify that you have the required licenses and permissions - Verify that your directory includes data for segmenting users - Enable scoped directory search for Microsoft Teams - Make sure audit logging is turned on - Make sure no Exchange address book policies are in place - Use PowerShell - Provide admin consent for Microsoft Teams |
| Part 1: Segment users in your organization | - Determine what policies are needed - Make a list of segments to define - Identify which attributes to use - Define segments in terms of policy filters |
| Part 2: Define information barrier policies | - Define your policies (do not apply yet) - Choose from two kinds (block or allow) |
| Part 3: Apply information barrier policies | - Set policies to active status - Run the policy application - View policy status |
Prerequisites for information barriers
The following prerequisites must be in place to implement information barriers:
Required licenses for information barriers: Information barriers is an advanced compliance feature. The feature is available for users with one of the following licenses:
- Microsoft 365 E5/A5/G5
- Office 365 E5/A5/G5
- Microsoft 365 E5/A5/G5/F5 Compliance
- Microsoft 365 E5/A5/F5/G5 Insider Risk Management
Permissions for information barrier policies: To define or edit information barrier policies, administrators must be assigned to one of the following roles:
- Microsoft 365 Enterprise Global Administrator
- Office 365 Global Administrator
- Compliance Administrator
Directory data: Make sure that your organization's structure is reflected in directory data.
Scoped directory search: This setting must be turned on.
Audit logging: To look up the status of a policy application, audit logging must be turned on.
No address book policies: Make sure no Exchange address book policies are in place.
PowerShell with the Security & Compliance module: Information barriers can be configured using PowerShell and connecting the Security and Compliance module to your Microsoft 365 tenant.
Admin consent for information barriers in Microsoft Teams: Use the following procedure to enable information barrier policies to work as expected in Microsoft Teams.
- Run the following PowerShell cmdlets:
# Login with the Azure Resource Manager PowerShell to your tenant: Login-AzureRmAccount # Save the information barrier service app id to a variable: $appId="bcf62038-e005-436d-b970-2a472f8c1982" # Get a service principal in Azure for the app id: $sp=Get-AzureRmADServicePrincipal -ServicePrincipalName $appId # If a service principal could not be retrieved, create a new one: if ($sp -eq $null) { New-AzureRmADServicePrincipal -ApplicationId $appId } # Start the process to grant consent, by running: Start-Process https://login.microsoftonline.com/common/adminconsent?client_id=$appId- When prompted, sign in using your work or school account for Office 365.
- In the Permissions requested dialog box, review the information, and then select Accept.
Part 1: Segment users in your organization
During this phase, you determine what information barrier policies are needed, make a list of segments to define, and then define your segments. When segmenting users, there are two important rules:
- A user must be in only one segment.
- Each segment must have only one information barrier.
A segment is defined by certain directory attributes.
To assign users to a segment, you use the cmdlet New-OrganizationSegment with the UserGroupFilter parameter:
Open PowerShell and connect with the Security & Compliance PowerShell module to your tenant.
Run the following cmdlet and replace segment-name with a meaningful name and both attribute and attribute-value with the desired directory attribute to filter segment members for.
New-OrganizationSegment -Name "segment-name" -UserGroupFilter "attribute -eq 'attribute-value'"For example, to define a segment named Sales, using the Department attribute, use this command:
New-OrganizationSegment -Name "Sales" -UserGroupFilter "Department -eq 'Sales'"Repeat this process for each segment you want to define.
Part 2: Define information barrier policies
After creating segments, you can create the policies that restrict the segments from communication. There are two types of policies:
- Block policies block communications between segments.
- Allow policies allow a segment to communicate only with one other segment.
Scenario 1: Block communications between segments
To block segments from communicating with each other, you need two policies: one for each direction. Each policy blocks communication one way only. Use the New-InformationBarrierPolicy cmdlet with the SegmentsBlocked parameter:
New-InformationBarrierPolicy -Name "policyname" -AssignedSegment "segment1name" -SegmentsBlocked "segment2name"
For example, to block communications between Sales and Research departments, use this command:
## Prevent Sales from communicating with Research
New-InformationBarrierPolicy -Name "Sales-Research" -AssignedSegment "Sales" -SegmentsBlocked "Research" -State Inactive

## Prevent Research from communicating with Sales
New-InformationBarrierPolicy -Name "Research-Sales" -AssignedSegment "Research" -SegmentsBlocked "Sales" -State Inactive
Scenario 2: Allow a segment to communicate with other segment
To allow one segment to communicate with other segment, use the New-InformationBarrierPolicy cmdlet with the SegmentsAllowed parameter:
New-InformationBarrierPolicy -Name "policyname" -AssignedSegment "segment1name" -SegmentsAllowed "segment2name","segment1name"
For example, to allow the Research segment to communicate with only HR and Manufacturing, use this command:
New-InformationBarrierPolicy -Name "Research-HRManufacturing" -AssignedSegment "Research" -SegmentsAllowed "HR","Manufacturing","Research" -State Inactive
Part 3: Apply information barrier policies
Information barrier policies are not in effect until you set them to active status, and then apply the policies.
Use the
Get-InformationBarrierPolicycmdlet to see a list of policies that have been defined. Note the status and identity (GUID) of each policy.To set a policy to active status, use the
Set-InformationBarrierPolicycmdlet with anIdentityparameter, and set theStateparameter toActive:Set-InformationBarrierPolicy -Identity GUID -State ActiveRun the following cmdlet to start information barriers in your tenant:
Start-InformationBarrierPoliciesApplication
After you run Start-InformationBarrierPoliciesApplication, allow 30 minutes for the system to start applying the policies. The system applies policies user by user. The system processes about 5,000 user accounts per hour.
For more information, see: