Create and retrain a trainable classifier
A Microsoft 365 trainable classifier is a tool that an organization can "train" to recognize various types of content. The organization can do so by giving the tool different samples of data to look at. Once you finish training a classifier - that is, once you initially create and train it - an organization can continue to "retrain" it to improve its precision in identifying various types of data classifications.
This unit examines how to create a trainable classifier, and how to retrain an existing one.
How to create a trainable classifier
Complete the following steps to create, test, and publish a custom trainable classifier:
Collect between 50-500 seed content items. These content items must be samples only. They must also strongly represent the type of content you want the trainable classifier to positively identify as being in the classification category.
Important
You should verify the items in your seed set are strong examples of the category. The trainable classifier initially builds its model based on what you seed it with. The classifier assumes all seed samples are strong positive matches. It has no way of knowing if a sample is a weak or negative match to the category.
Place the seed content in a SharePoint Online folder that you dedicate to holding the seed content only. Make note of the site, library, and folder URL.
Tip
If you create a new site and folder for your seed data, allow at least an hour for the system to index that location before creating the trainable classifier that uses that seed data.
Sign in to the Microsoft Purview compliance portal with either Compliance administrator or Security administrator role access. Then select Data classification in the navigation pane to expand the group.
On the Data classification group, select Classifiers.
On the Classifiers page, the Trainable classifiers tab should display by default.
On the Trainable classifiers tab, select +Create trainable classifier on the menu bar.
Fill in appropriate values for the Name and Description fields of the category of items you want this trainable classifier to identify.
Select the SharePoint Online site, library, and folder URL for the seed content site from step 2. Select Add.
Review the settings and select Create trainable classifier.
It can take up to 24 hours for the trainable classifier to process the seed data and build a prediction model. The classifier status is In progress while it processes the seed data. When the classifier finishes processing of the seed data, the status changes to Need test items.
Once the classifier finishes processing the seed data, select the classifier to view its details page.
Collect at least 200 test content items for best results (10,000 maximum). These items should be a mix of items that are strong positives, strong negatives, and some that are a little less obvious in their nature.
Place the test content in a SharePoint Online folder that you dedicated to holding the test content only. Make note of the SharePoint Online site, library, and folder URL.
Tip
If you create a new site and folder for your test data, allow at least an hour for the system to index that location before creating the trainable classifier that uses that seed data.
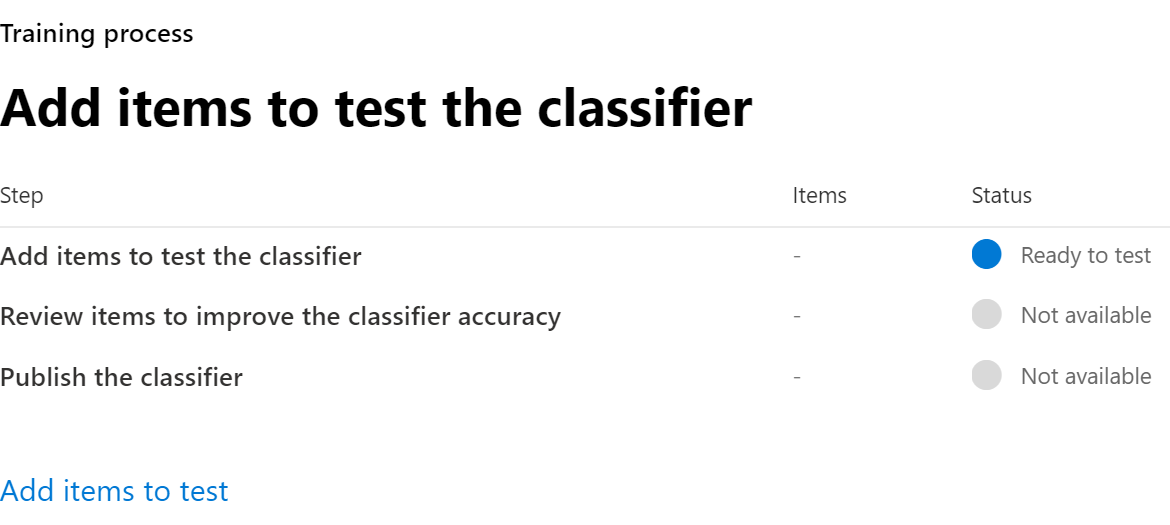
Select Add items to test.
Select the SharePoint Online site, library, and folder URL for the test content site from step 12. Select Add.
Complete the wizard by selecting Done. Your trainable classifier takes up to an hour to process the test files.
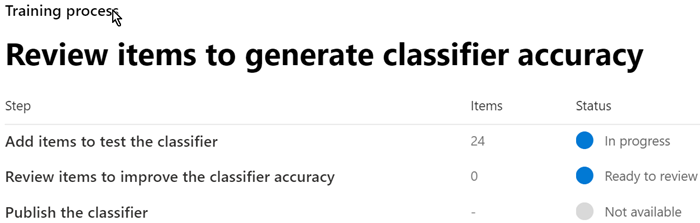
When the trainable classifier finishes processing your test files, the status on the details page changes to Ready to review. If you want to increase the test sample size, select Add items to test and allow the trainable classifier to process the extra items.
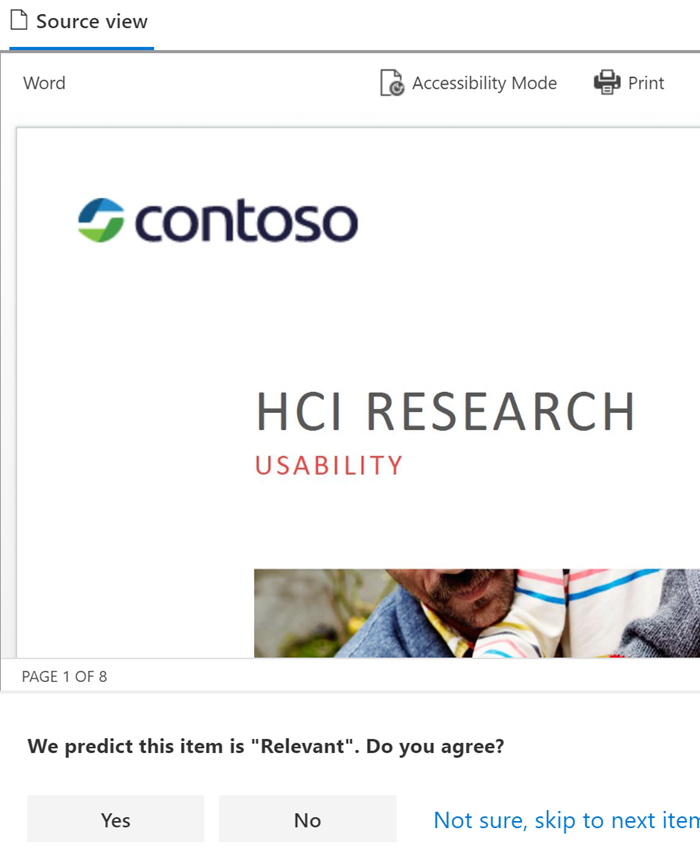
Select the Tested items to review tab to review the items.
Microsoft 365 displays 30 items at a time. Review each item. A dialog box appears for each item asking whether you agree with its assessment of the item. The following screenshot displays the We predict this item is "Relevant". Do you agree? assessment. You can respond by selecting either Yes, No, or Not sure, skip to next item. The system automatically updates the model's accuracy after every 30 items.
Review at least 200 items. Once the system stabilizes the accuracy score, the Publish option becomes available and the classifier status changes to Ready to use.
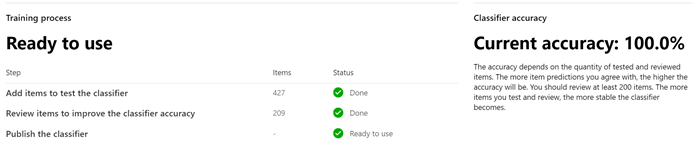
Select the Publish option to publish the classifier.
Once you publish the classifier, it becomes available as a condition in:
How to retrain a classifier
As an organization uses its custom trainable classifiers, it may want to increase the precision of the classifications the classifiers are making. You increase precision by evaluating the quality of the "match" and "not a match" classifications made by the classifier. After you make 30 evaluations for a classifier, it takes that feedback and automatically retrains itself.
An organization can improve the accuracy of custom trainable classifiers. Improving the accuracy of a trainable classifier is known as “retraining” the classifier. To retrain a trainable classifier, the organization must provide feedback on the accuracy of the classifications they performed.
Note
An organization can't retrain the pretrained classifiers provided with its Microsoft 365 tenant.
The following diagram shows the workflow process for retraining a trainable classifier.
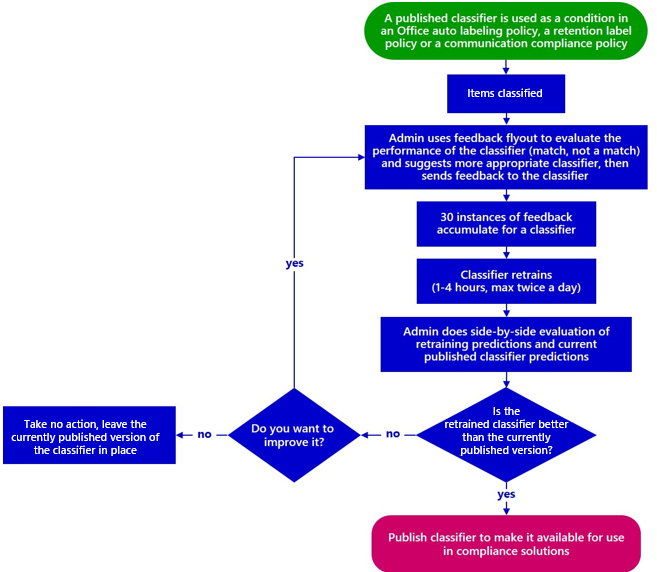
Organizations can retrain custom trainable classifiers in the Data classification section of the Microsoft Purview compliance portal. Organizations should complete the following steps to retrain a classifier:
In the Microsoft Purview compliance portal, select Data classification in the navigation pane to expand this group.
In the Data classification group, select Content explorer.
On the Content explorer page, under the Filter on labels, info types, or categories list, scroll down to the Trainable Classifiers section.
Important
It can take up to eight days for aggregated items to appear under the Trainable Classifiers section.
Select the trainable classifier you want to retrain.
Note
If an item has an entry in the Retention label column, it means the system classified the item as a match. If an item doesn't have an entry in the Retention label column, it means the system classified it as a close match. You can improve the classifier precision the most by providing feedback on close match items.
Choose an item and open it.
Select Provide feedback.
In the Detailed feedback pane, if the item is a true positive, select Match. If the item is a false positive, which means you incorrectly included it in the category, select Not a match.
If there's another classifier that would be more appropriate for the item, you can choose it from the Suggest other trainable classifiers list. Doing so triggers the other classifier to evaluate the item.
Select Send feedback to send your evaluation of the "match" and "not a match" classifications. You can also suggest other items for this trainable classifier. Once you provide 30 instances of feedback to a classifier, it automatically starts the retraining process. Retraining can take from one to four hours. You can only retrain classifiers twice per day.
Important
This information goes to the classifier in your tenant. It doesn't go back to Microsoft.
On the Classifiers page, select the Trainable classifiers tab.
The classifier that you used in your Communications compliance policy appears under the Retraining heading.
Once retraining completes, choose the classifier to open the retraining overview.
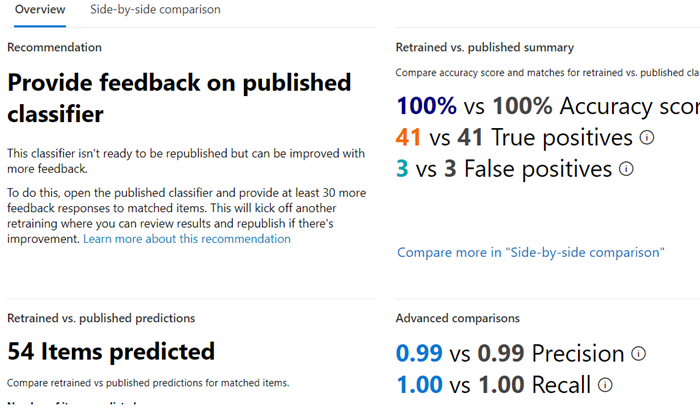
Review the recommended action and the prediction comparisons of the retrained and currently published versions of the classifier.
If you satisfied with the results of the retraining, select Republish.
If you aren't satisfied with the results of the retraining, you can choose to provide more feedback to the classifier in the Content explorer tab and start another retraining cycle. Or, you can choose to do nothing, in which case the system continues to use the currently published version of the classifier.