Deploy Conditional Access App Control with AD FS as the identity provider
In addition to PingOne, you can also configure session controls in Defender for Cloud Apps using other identity providers, including AD FS.
What is AD FS?
AD FS enables organizations to provide their users with the flexibility to sign in and authenticate to apps that exist in:
- An on-premises datacenter
- A partner organization
- An online app
By using AD FS, your organization can manage its own user accounts, and users can take advantage of SSO, saving them the need to remember multiple sets of credentials.
Note
Refer to the following document if you require more guidance on AD FS: Understanding Key AD FS Concepts.
Overview
Firstly, verify that you have a preconfigured AD FS environment. You'll also need a Microsoft Defender for Cloud Apps license. After you verify you meet the prerequisites, you'll need to complete the following steps:
- Obtain your app's SSO settings
- Configure Defender for Cloud Apps with the app's SSO information
- Create a new AD FS Relying Party Trust and App Single Sign-On configuration
- Configure Defender for Cloud Apps with the AD FS app's information
- Complete the configuration of the AD FS Relying Party Trust
- Get the app changes in Defender for Cloud Apps
- Complete the app changes
- Complete the configuration in Defender for Cloud Apps
Let's look more closely at this procedure using Salesforce as an example app.
Obtain the app's SSO settings
This process might vary depending on the specific app being configured. But for Salesforce, use this procedure:
Select Setup, select Settings, select Identity, and then select Single Sign-On Settings.
In the Single Sign-On Settings section, select the existing AD FS configuration.
On the SAML Single Sign-On Setting page, make a note of the Salesforce Login URL. You'll need this URL later when configuring Defender for Cloud Apps.
Note
If your app provides a SAML certificate, download it.
Configure Defender for Cloud Apps with the app's SSO settings
The next step is to enter the SSO details from your app into Defender for Cloud Apps. Use the following procedure:
In Defender for Cloud Apps, in the navigation pane, select Investigate, then select Connected apps.
On the Connected apps page, select the Conditional Access App Control apps tab.
To add the details for the new app, select the plus symbol.
In the Add a SAML application with your identity provider dialog box, in the search box, enter the app name and then select the app. In this example, enter and select Salesforce.
Select Start wizard.
On the APP INFORMATION page, select Fill in data manually.
In the Assertion consumer service URL, enter the Login URL you recorded earlier and then select Next. Pause at this point.
Note
If your app provides a SAML certificate, select Use <app_name> SAML certificate and upload the certificate file you downloaded earlier.
Create a new AD FS Relying Party Trust and App Single Sign-On configuration
To limit end-user downtime and preserve your existing known good configuration, it's a good idea to create a new Relying Party Trust and SSO configuration. However, that might not always be possible. For example, if the app you are configuring does not support creating multiple SSO configurations, then skip the following procedure.
Note
The relying party is the party where the app is located. The relying party functions as the reciprocal of the AD FS authentication process.
Open the AD FS management console.
In the Relying Party Trusts section, review the properties of your existing relying party trust for your app, and record the settings.
In Actions, select Add Relying Party Trust. Apart from the Identifier value (which must be a unique name), configure the new trust using the settings you just recorded. You'll need this trust later when configuring Defender for Cloud Apps.
Open the federation metadata file and record the AD FS SingleSignOnService Location value. You'll need this location later.
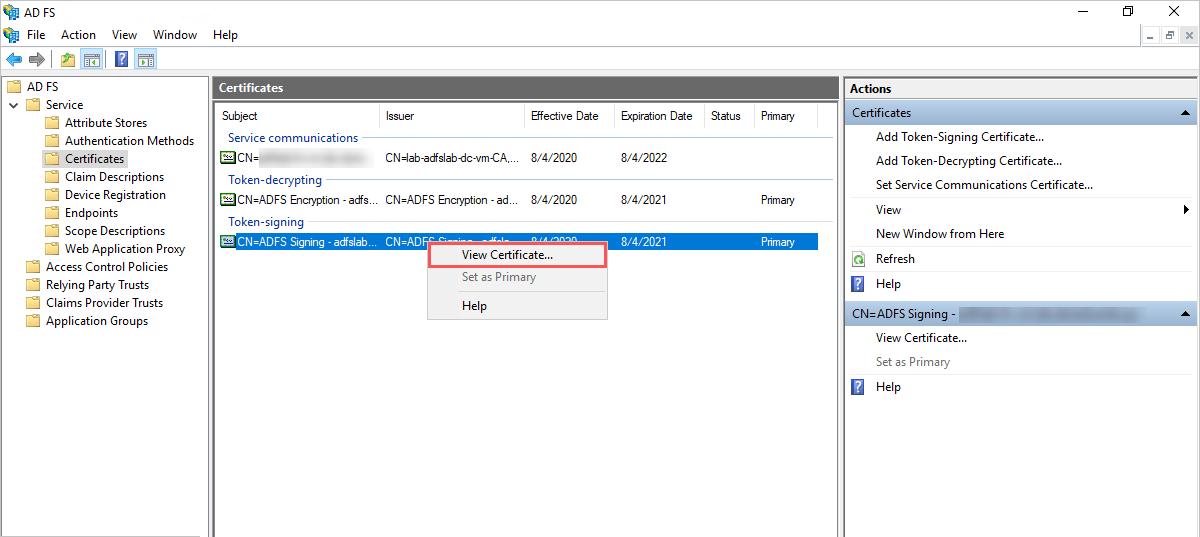
In the AD FS console, expand Service and then select Certificates. Right-click the AD FS signing certificate and select View Certificate.
In the Certificate dialog box, select the Details tab.
Select Copy to File to export the certificate as a Base-64 encoded X.509 (.CER) file.
Switch to Salesforce, and on the existing AD FS single sign-on settings page, record all settings.
Create a new SAML single sign-on configuration. Apart from the Entity ID value (which must match the relying party trust Identifier), configure the single sign-on using the settings you recorded earlier. This ID is needed later when you configure Defender for Cloud Apps.
Configure Defender for Cloud Apps with the AD FS app's information
Switch back to Defender for Cloud Apps. Then, complete the following procedure:
In the Add Salesforce with your identity provider wizard, on the IDENTITY PROVIDER page, select Next.
On the next page, select Fill in data manually.
In the Single sign-on service URL text box, enter the Salesforce Login URL you recorded earlier.
In the Upload identity provider's SAML certificate section, select Browse and upload the certificate file you downloaded earlier.
Select Next.
On the next page, record the following information for use later, and then select Next:
- Defender for Cloud Apps single sign-on URL
- Defender for Cloud Apps attributes and values
Complete the configuration of the AD FS Relying Party Trust
Switch back to the AD FS console. Then complete the following procedure:
Right-click the relying party trust, which you created earlier. Select Edit Claim Issuance Policy.
In the Edit Claim Issuance Policy dialog box, in the Issuance Transform Rules section, use the information from the following table to complete the steps to create custom rules.
Claim rule name Custom rule McasSigningCert => issue(type="McasSigningCert", value="<value>");where<value>is the McasSigningCert value from the Cloud App Security wizard you recorded earlierMcasAppId => issue(type="McasAppId", value="<value>");is the McasAppId value from the Defender for Cloud Apps wizard you recorded earlier- Select Add Rule, in the Claim rule template section, select Send Claims Using a Custom Rule, and then select Next.
- On the Configure Rule page, in addition to any claim rules or attributes required by the app you are configuring, enter the respective Claim rule name and Custom rule provided.
On the Relying Party Trust page, right-click on the relying party trust you created earlier, and then select Properties.
Select the Endpoints tab, select SAML Assertion Consumer Endpoint, select Edit, and replace the Trusted URL with the Defender for Cloud Apps single sign-on URL you noted earlier, and then select OK.
If you downloaded a Defender for Cloud Apps SAML certificate for the identity provider, then on the Signature tab, select Add and upload the certificate file, and then select OK.
Save your settings.
Get the app changes in Defender for Cloud Apps
Switch back to Defender for Cloud Apps and in the Add Salesforce with your identity provider wizard, on the APP CHANGES page, complete the following procedure:
- Copy the Defender for Cloud Apps SAML Single sign-on URL.
- Select the Defender for Cloud Apps SAML certificate link to download the certificate.
- Do NOT select Finish yet.
Complete the app changes
Switch back to Salesforce. The complete the following steps:
- Select Setup, select Settings, select Identity, and then select Single Sign-On Settings.
- It's recommended that you create a backup of your current settings.
- Then, replace the Identity Provider Login URL field value with the Defender for Cloud Apps SAML single sign-on URL you recorded earlier.
- Upload the Defender for Cloud Apps SAML certificate you previously downloaded.
- Select Save.
Complete the configuration in Defender for Cloud Apps
Switch to Defender for Cloud Apps. In the Add Salesforce with your identity provider wizard, on the APP CHANGES page, select Finish.
Note
After completing the wizard, all associated login requests to this app will be routed through Conditional Access App Control.