Understand StereoKit ink application
In the previous unit, we looked at the StereoKit Ink sample project. This unit will look at the three main code files used to build this application. The code strives to be very legible and easy to understand.
Program.cs
This file contains the application logic, the hand menu, and the application menu! It's a great place to start since the application menu ties everything together.
Initialization: The Program.cs script starts by initializing StereoKit. We can prepare a few settings during initialization, like the assetsFolder and appName. assetsFolder is the folder that StereoKit will look for assets when provided a relative folder name. Settings can also be told to make a flatscreen app or how to behave if the preferred initialization mode fails.
SKSettings settings = new SKSettings
{
    appName      = "StereoKit Ink",
    assetsFolder = "Assets",
};

if (!SK.Initialize(settings))
    Environment.Exit(1);
Radial hand menu: This is a simple radial hand menu where we'll store some quick actions! It's activated by a grip motion and is excellent for fast, gesture-like activation of menu items. It also can be used with multiple HandRadialLayers to nest commands in sub-menus.
The HandMenuRadial is an example of a stepper object. Steppers are classes that implement the IStepper interface. Once added to StereoKit's stepper list, they will have their Step method called each frame! This is a great way to add fire-and-forget objects or systems that need to update each frame.

SK.AddStepper(new HandMenuRadial(
    new HandRadialLayer("Root", -90,
        new HandMenuItem("Undo", null, ()=>activePainting?.Undo()),
        new HandMenuItem("Redo", null, ()=>activePainting?.Redo()))));
Step the application each frame: StereoKit applications are immersive 3D experiences, which generally work by redrawing the screen every time the display refreshes. Unfortunately, this can mean executing a good portion of your codebase anywhere between 60 and 120 times per second! You control this display loop by stepping StereoKit in a while loop until your app is complete. You will call all of the code that needs to be drawn or stepped for the frame during each step. Here, we're stepping the currently active painting object, the palette window, and an application menu window in each frame.
while (SK.Step(() =>
{
    activePainting.Step(Handed.Right, paletteMenu.PaintColor, paletteMenu.PaintSize);

    paletteMenu.Step();

    StepMenuWindow();
}));
Application's menu window: This menu is built using StereoKit's built-in immediate mode UI system. You can read more about StereoKit's UI system in the UI guide, but the basics are pretty easy to follow!
Here, we're creating a window panel enclosed by UI.WindowBegin and UI.WindowEnd calls. It can contain several UI elements and can be grabbed and moved around by the user. We can add different UI elements within the window, such as the UI.Image or UI.Button. These are automatically laid out within the window panel. Additional tools such as UI.SameLine, and UI.HSeparator is used to manipulate the layout of the window contents.
UI.Button returns true when pressed, so it's pretty easy to wrap in an 'if' statement and execute some code based on that! You can see several actions that are being performed here, but we'll call out the Platform.FilePicker calls as something a little more interesting. Platform.FilePicker will load up a platform-native file picker windows or a built-in fallback file picker if the platform doesn't provide an MR-compatible file picker. It calls your provided callback function with the resulting file name. This makes it trivial to work with content in the file system!

static void StepMenuWindow()
{
    UI.WindowBegin("Menu", ref menuPose, UIWin.Body);

    UI.Image(appLogo, V.XY(UI.LayoutRemaining.x, 0));

    if (UI.Button("Undo")) activePainting?.Undo();
    UI.SameLine();
    if (UI.Button("Redo")) activePainting?.Redo();

    if (UI.Button("Save"))
        Platform.FilePicker(PickerMode.Save, SavePainting, null, ".skp");

    UI.SameLine();
    if (UI.Button("Load"))
        Platform.FilePicker(PickerMode.Open, LoadPainting, null, ".skp");

    UI.HSeparator();

    if (UI.Button("Clear"))
        activePainting = new Painting();

    UI.SameLine();
    if (UI.Button("Quit"))
        SK.Quit();

    UI.WindowEnd();
}


PaletteMenu.cs script
This file is a menu that controls painting options. It's mainly composed of built-in UI elements and illustrates how to use StereoKit's layout and interaction tools to create your own.
Fields: These fields track the state of the PaletteMenu, a Pose for the window, color and size for the paint stroke, and hue saturation value variables used to drive the UI color sliders.
The Models here are assets used for the UI. One is a bottle used for decoration and will display the active color, and the other is a "splash of ink" that we'll turn into a pressable button that will allow users to pick colors with it.
 Model _model       = Model.FromFile("InkBottle.glb");
 Model _swatchModel = Model.FromFile("InkSplat.glb");

 Pose  _pose  = new Pose(-.4f, 0, -0.4f, Quat.LookDir(1,0,1));
 Color _color = Color.White;
 float _size  = 2 * U.cm;

 float _hue = 0;
 float _saturation = 0;
 float _value = 1;
The Window: In the Step function, we'll start a window to contain all the controls and start it off with an ink bottle to highlight the purpose of this area! The size provided here will auto-fill on the x-axis, which will center the Model, and we'll make it two lines tall.
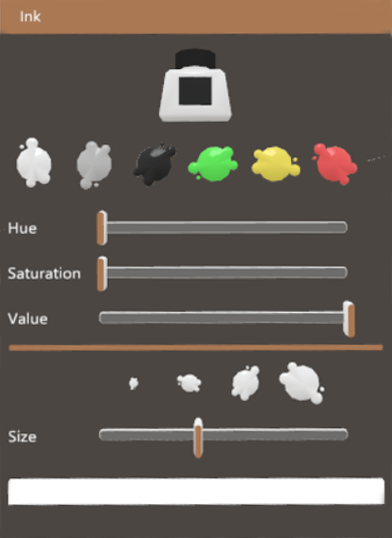
UI.WindowBegin("Ink", ref _pose);

UI.Model(_model, V.XY(0, UI.LineHeight*2));
Color swatches: Here, we'll display a list of pre-picked color swatches. These color swatches are custom buttons, so check out the SwatchColor method later.
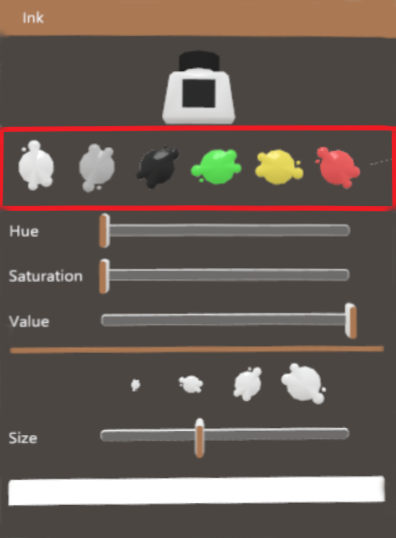
SwatchColor("White", _hue, 0, 1); UI.SameLine(); SwatchColor("Gray", _hue, 0, .6f); UI.SameLine(); SwatchColor("Blk", _hue, 0, SK.System.displayType == Display.Additive ? 0.25f : 0); UI.SameLine(); SwatchColor("Green", .33f, .9f, 1); UI.SameLine(); SwatchColor("Ylw", .14f, .9f, 1); UI.SameLine(); SwatchColor("Red", 0, .9f, 1); UI.Space(UI.LineHeight*0.5f);Sliders: Swatches are never enough by themselves! So here are some sliders to let the user HSV their color manually. We start with a fixed size label, and on the same line, add a fixed size slider. Fixing the sizes here helps them to line up in columns.
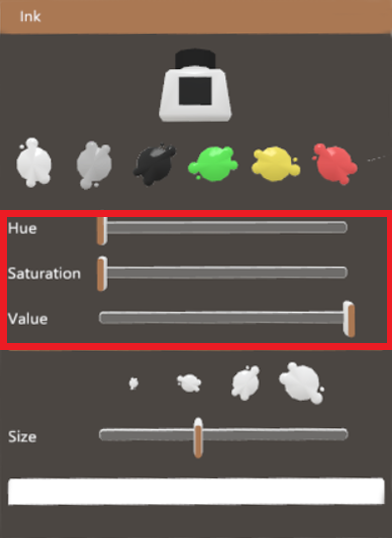
UI.Label("Hue", V.XY(8*U.cm, UI.LineHeight));
UI.SameLine();
if (UI.HSlider("Hue", ref _hue, 0, 1, 0, 22*U.cm, UIConfirm.Pinch))
    SetColor(_hue, _saturation, _value);

UI.Label("Saturation", V.XY(8*U.cm, UI.LineHeight));
UI.SameLine();
if (UI.HSlider("Saturation", ref _saturation, 0, 1, 0, 22*U.cm, UIConfirm.Pinch))
    SetColor(_hue, _saturation, _value);

UI.Label("Value", V.XY(8*U.cm, UI.LineHeight));
UI.SameLine();
if (UI.HSlider("Value", ref _value, 0, 1, 0, 22*U.cm, UIConfirm.Pinch))
    SetColor(_hue, _saturation, _value);

UI.HSeparator();
Size swatches: Now for brush sizes! We'll have some size swatches. First, these are similar to the color swatches, except they control how large the swatch looks.
We'll also display a preview of the brush stroke's size. We'll reserve a box that can hold the maximum size for the brush stroke and preview the stroke with an unlit cube scaled to the brush's size.
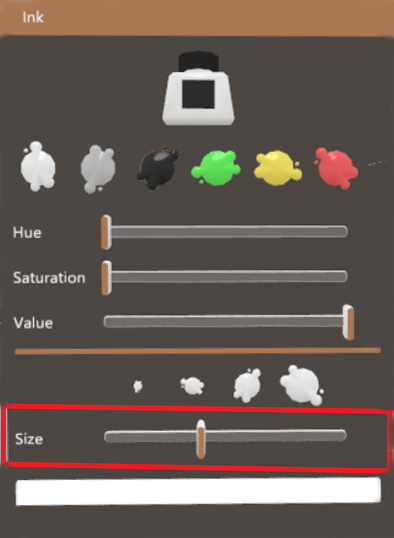
UI.LayoutReserve(V.XY(8*U.cm,0)); UI.SameLine(); if (SwatchSize("Small", 1*U.cm)) _size = 1 * U.cm; UI.SameLine(); if (SwatchSize("Med", 2*U.cm)) _size = 2 * U.cm; UI.SameLine(); if (SwatchSize("Lrg", 3*U.cm)) _size = 3 * U.cm; UI.SameLine(); if (SwatchSize("Xtra", 4*U.cm)) _size = 4 * U.cm; UI.Label("Size", V.XY(8 * U.cm, UI.LineHeight)); UI.SameLine(); UI.HSlider("Size", ref _size, 0.001f, 0.05f, 0, 22 * U.cm, UIConfirm.Pinch); Bounds linePreview = UI.LayoutReserve(V.XY(0, 0.05f)); linePreview.dimensions.y = _size; linePreview.dimensions.z = U.cm; Mesh.Cube.Draw(Material.Unlit, Matrix.TS(linePreview.center, linePreview.dimensions), _color);Colorize: This updates the active color we're painting. To visually indicate the active color, we also change the colors of the ink bottle's material and StereoKit's hand material.
void SetColor(float hue, float saturation, float value)
{
    _hue        = hue;
    _saturation = saturation;
    _value      = value;
    _color      = Color.HSV(hue,saturation,value);

    _model.RootNode.Material[MatParamName.ColorTint] = _color;

    Default.MaterialHand[MatParamName.ColorTint] = _color;
}


Painting.cs script
This class captures the entire concept of finger painting! It takes in hand input and turns it into three-dimensional lines. It's also in charge of loading and saving painting files.
Create a child of handle: We'll turn the entire painting into a child of a handle so that we can move it around while we work on it! Handles and Windows will push a transform onto the Hierarchy stack, making all subsequent locations relative to that transform.

public void Step(Handed handed, Color color, float thickness)
{
    UI.HandleBegin("PaintingRoot", ref _pose, new Bounds(Vec3.One * 5 * U.cm), true);

    UpdateInput(handed, color, thickness);
    Draw();

    UI.HandleEnd();
}
Undo stack: For Undo/Redo, we use a somewhat oversimplified undo stack. When we undo a paint stroke, we remove the last stroke from the painting and add it to the top of the undo stack. Likewise, to redo a paint stroke, we remove the top stroke on the undo stack and add it back to the painting. This is not a robust implementation but can be somewhat passable in simple interactions.
public void Undo()
{
    if (_strokeList.Count == 0)
        return;
    _undoStack.Push(_strokeList.Last());
    _strokeList.RemoveAt(_strokeList.Count-1);
}
public void Redo()
{
    if (_undoStack.Count == 0)
        return;
    _strokeList.Add(_undoStack.Pop());
}
Translate the fingertip coordinates into Hierarchy local coordinates: Here, we get the hand's fingertip, convert it to local space, and smooth it out to reduce any jagged noise! Of course, the hand's location data is always provided in world space. Still, since we're inside a Handle that uses the Hierarchy stack, we need to convert the fingertip's coordinates into Hierarchy local coordinates before working with it.

Hand hand      = Input.Hand(handed);
Vec3 fingertip = hand[FingerId.Index, JointId.Tip].position;
fingertip = Hierarchy.ToLocal(fingertip);
fingertip = Vec3.Lerp(_prevFingertip, fingertip, 0.3f);
Stroke gesture: Here, we're managing the paint stroke gesture itself. If the user just made a pinching motion and is not interacting with the UI, we'll begin a paint gesture. We'll update the stroke while the gesture is active and then end the gesture when the user has ceased pinching.
if (hand.IsJustPinched && !UI.IsInteracting(handed))
{
    BeginStroke(fingertip, color, thickness);
    _isDrawing = true;
}

if (_isDrawing)
    UpdateStroke(fingertip, color, thickness);
if (_isDrawing && hand.IsJustUnpinched)
{
    EndStroke();
    _isDrawing = false;
}
Creating the paint stroke: We'll begin the stroke gesture by adding two initial points to the stroke point list! The first one begins at the point provided, and the second one will constantly be updated to the current fingertip location. We add new points once we reach a certain distance from the last point, but a naive implementation can result in a popping effect when points are added at distance intervals. The extra point directly following the fingertip will nicely prevent this 'popping' artifact!
During UpdateStroke, we'll begin with calculating the current distance from the last point, as well as the speed at which the hand is traveling. Then we'll create a point at the current location, using speed as the thickness of the stroke!
If we're more than a centimeter away from our last point, we'll add a new point! This is simple but effective enough. A higher-quality implementation might use an error/change function that also factors in the change in angle. Otherwise, the last point in the stroke should always be at the current fingertip location to prevent 'popping' when adding a new point.
Then at the end of the gesture, we add the active stroke to the painting and clear it out for the next stroke!
void BeginStroke(Vec3 at, Color32 color, float thickness)
{
    _activeStroke.Add(new LinePoint(at, color, thickness));
    _activeStroke.Add(new LinePoint(at, color, thickness));
    _prevFingertip = at;
}
void UpdateStroke(Vec3 at, Color32 color, float thickness)
{
    Vec3  prevLinePoint = _activeStroke[_activeStroke.Count - 2].pt;
    float dist  = Vec3.Distance(prevLinePoint, at);
    float speed = Vec3.Distance(at, _prevFingertip) / Time.Elapsedf;

    LinePoint here = new LinePoint(at, color, Math.Max(1 - speed * 0.5f, 0.1f) * thickness);

    if (dist > 1 * U.cm)
        _activeStroke.Add(here);
    else
        _activeStroke[_activeStroke.Count - 1] = here;
}
void EndStroke()
{
    _strokeList.Add(_activeStroke.ToArray());
    _activeStroke.Clear();
}
Loading the paint file: We'll use a really simple text file format for our painting data. Each line is a paint stroke in this file, and a comma separates each point on that stroke. In addition, each item within a point is separated by spaces, which is taken care of in LinePointFromString.
For some context, here's a simple example of a file containing a two-stroke painting, with two points in the first stroke (white) and three points in the second stroke (red):
0 0 0 255 255 255 0.01, 0.1 0 0 255 255 255 0.01
0 0.1 0 255 0 0 0.02, 0.1 0.1 0 255 0 0 0.02, 0.2 0 0 255 0 0 0.02
public static Painting FromFile(string fileData) { Painting result = new Painting(); result._strokeList = fileData .Split('\n') .Select( textLine => textLine .Split(',') .Select(textPoint => LinePointFromString(textPoint)) .ToArray()) .ToList(); return result; } static LinePoint LinePointFromString(string point) { string[] values = point.Split(' '); LinePoint result = new LinePoint(); result.pt .x = float.Parse(values[0]); result.pt .y = float.Parse(values[1]); result.pt .z = float.Parse(values[2]); result.color.r = byte .Parse(values[3]); result.color.g = byte .Parse(values[4]); result.color.b = byte .Parse(values[5]); result.color.a = 255; result.thickness = float.Parse(values[6]); return result; }Saving the paint file: Converting this painting to a file is even simpler than loading it from one! First, we have LinePointToString, which we can use for each point, and then we have to combine all the data. Then, each paint stroke goes on its line using '\n,' and each point on that stroke is separated with a comma.
public string ToFileData()
{
    return string.Join('\n', _strokeList
        .Select(line => string.Join(',', line
            .Select(point => LinePointToString(point)))));
}

static string LinePointToString(LinePoint point)
{
    return string.Format("{0} {1} {2} {3} {4} {5} {6}",
    point.pt   .x, point.pt   .y, point.pt   .z,
    point.color.r, point.color.g, point.color.b,
    point.thickness);
}

