Install a package
Installing packages from GitHub Packages allows you to consume libraries, dependencies, and container images hosted on GitHub. You can install any package you have permission to view and use it as a dependency in your project.
Discovering packages
GitHub Packages provides multiple ways to discover packages:
Search options
- Global search: Search across all public packages on GitHub
- Organization search: Find packages within a specific organization
- Repository search: Browse packages published from a repository
- Package type filter: Filter by npm, NuGet, Maven, Docker, etc.
For details, see Searching for packages.
Package information
When you find a package, the package page provides essential information:
- Description: What the package does and its purpose
- Installation instructions: How to add the package to your project
- Version history: Available versions and release notes
- Dependencies: Required packages and version constraints
- Usage examples: Code samples showing common scenarios
- License: Legal terms for using the package
- Download statistics: How many times the package has been installed
Best practice: Always read the package's installation and description instructions before installing to understand requirements, breaking changes, and compatibility.
Installation workflow
Installing a package follows a consistent two-step process regardless of package type:
1. Authenticate to GitHub Packages
Configure your package client to authenticate with GitHub Packages using a personal access token (PAT) with the read:packages scope.
Authentication requirements:
- Public packages: Authentication is required even for public packages
- Private packages: Requires PAT with appropriate repository access
- Organization packages: May require organization membership
- Internal packages: Available only within GitHub Enterprise organizations
2. Install the package
Use your package client's native installation commands (npm install, dotnet add package, mvn install, etc.) to add the package to your project.
Installation checklist:
- Verify package name and version are correct
- Check compatibility with your project's framework version
- Review dependency tree for conflicts
- Test package functionality after installation
- Update documentation to reflect new dependency
Installing NuGet packages
NuGet packages can be installed using Visual Studio or the dotnet CLI.
Method 1: Visual Studio
Visual Studio provides a graphical interface for managing NuGet packages:
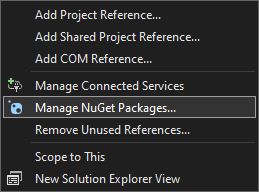
Open NuGet Package Manager:
- Expand Solution → Project
- Right-click on Dependencies
- Select Manage NuGet Packages...
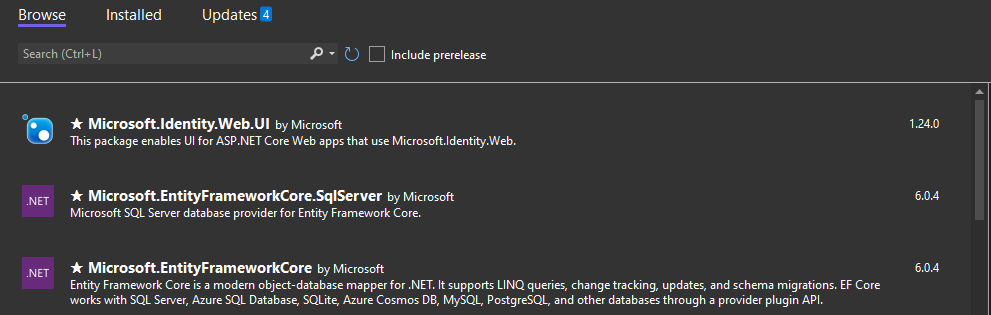
Browse and install:
- Click the Browse tab
- Search for your package name
- Select the version you want
- Click Install
You can browse, install, and update dependencies from multiple registries simultaneously. For more information, see Create and remove project dependencies.
Method 2: Editing .csproj directly
You can add package references directly to your project file:
Step 1: Authenticate to GitHub Packages
Create or update your nuget.config file (see Publishing section for authentication details).
Step 2: Add PackageReference
Add an ItemGroup with a PackageReference in your .csproj file:
<Project Sdk="Microsoft.NET.Sdk">

    <PropertyGroup>
        <OutputType>Exe</OutputType>
        <TargetFramework>net8.0</TargetFramework>
        <PackageId>OctocatApp</PackageId>
        <Version>1.0.0</Version>
        <Authors>Octocat</Authors>
        <Company>GitHub</Company>
        <PackageDescription>This package adds an Octocat!</PackageDescription>
        <RepositoryUrl>https://github.com/OWNER/REPOSITORY</RepositoryUrl>
    </PropertyGroup>

    <ItemGroup>
        <PackageReference Include="OctokittenApp" Version="12.0.2" />
    </ItemGroup>
</Project>
Note
Replace OctokittenApp with your package name and 12.0.2 with the version you want to use.
Step 3: Restore packages
Install the packages using the restore command:
dotnet restore
Method 3: Using dotnet CLI
You can install packages using the dotnet add command:
dotnet add package OctokittenApp --version 12.0.2 --source github
Best practices for NuGet installation:
- Pin versions: Specify exact versions for reproducible builds
- Use central package management: Consolidate versions in Directory.Packages.props
- Review vulnerabilities: Check for security advisories before installing
- Test compatibility: Ensure package works with your target framework
Installing npm packages
npm packages require configuring an .npmrc file to specify GitHub Packages as the registry.
Configure .npmrc file
Step 1: Authenticate to GitHub Packages
Create or update your ~/.npmrc file with your authentication token (see Publishing section for authentication details).
Step 2: Create project .npmrc
In the same directory as your package.json file, create or edit a .npmrc file:
@OWNER:registry=https://npm.pkg.github.com
Note
Replace OWNER with the name of the user or organization account that owns the package.
Step 3: Commit .npmrc to repository
Add the .npmrc file to your repository so all team members use the same configuration. See Adding a file to a repository.
Add dependency to package.json
Configure package.json to include the package as a dependency:
{
  "name": "@my-org/server",
  "version": "1.0.0",
  "description": "Server app that uses the @octo-org/octo-app package",
  "main": "index.js",
  "author": "",
  "license": "MIT",
  "dependencies": {
    "@octo-org/octo-app": "1.0.0"
  }
}
Dependency specification:
- Exact version:
"1.0.0"installs a specific version - Caret range:
"^1.0.0"installs compatible minor/patch updates - Tilde range:
"~1.0.0"installs compatible patch updates only - Latest:
"latest"installs the newest version (not recommended for production)
Install the package
Run the npm install command:
npm install
Or install a specific package:
npm install @octo-org/octo-app
Multiple organizations
If you need to install packages from multiple organizations, add additional lines to your .npmrc file:
@first-org:registry=https://npm.pkg.github.com
@second-org:registry=https://npm.pkg.github.com
@third-org:registry=https://npm.pkg.github.com
Best practices for npm installation:
- Use package-lock.json: Commit lockfile for consistent installs across environments
- Audit dependencies: Run
npm auditto check for vulnerabilities - Use npm ci: In CI/CD pipelines, use
npm cifor faster, more reliable installs - Version constraints: Use semantic version ranges to balance stability and updates
- Private registry first: Configure scopes to check GitHub Packages before public npm
Installing in CI/CD pipelines
You can install packages in GitHub Actions workflows using the same methods:
npm in GitHub Actions
- uses: actions/setup-node@v4
  with:
    node-version: "18"
    registry-url: "https://npm.pkg.github.com"
    scope: "@OWNER"
- run: npm ci
  env:
    NODE_AUTH_TOKEN: ${{ secrets.GITHUB_TOKEN }}
NuGet in GitHub Actions
- uses: actions/setup-dotnet@v4
  with:
    dotnet-version: "8.0.x"
    source-url: https://nuget.pkg.github.com/OWNER/index.json
  env:
    NUGET_AUTH_TOKEN: ${{ secrets.GITHUB_TOKEN }}
- run: dotnet restore
Benefits of GITHUB_TOKEN:
- No PAT required: Automatically available in workflows
- Scoped permissions: Limited to workflow's repository access
- Automatic rotation: Token is regenerated for each workflow run
- Secure: Never exposed in logs or artifacts
Troubleshooting installation issues
Common problems and solutions:
| Problem | Cause | Solution |
|---|---|---|
| 401 Unauthorized | Missing or invalid PAT | Verify token has read:packages scope |
| 404 Not Found | Package name or registry URL incorrect | Check package exists and owner is correct |
| 403 Forbidden | No permission to access package | Request access or verify organization membership |
| Version not found | Requested version doesn't exist | Check available versions on package page |
| Dependency conflicts | Incompatible package versions | Update other dependencies or use resolutions |
Additional resources
For more information, see:
- Working with a GitHub Packages registry - Complete guide to all supported registries.
- Working with the NuGet registry - Detailed NuGet installation guide.
- Working with the npm registry - Detailed npm installation guide.
- About permissions for GitHub Packages - Understanding package access control.