Create your own test codeunits with a test app
Let's have a look on how you can create code that will test your extensions. It does not really matter which approach you take in your development process; you will typically have an extension with your main code, and a test app, which is dependent on your main extension. You can start writing your regular code, and add test functions afterwards or you can use Test-Driven Development (TDD) where you start writing your test code first, which will fail in the beginning, and then develop your regular code until your test code succeeds. TDD is not something developers in the Business Central community are used to, but it makes your code better, because you have to think more upfront about all the scenarios where your code can fail.
To start with a test app, you first need to create a regular extension:
Open Visual Studio Code and use Ctrl+Shift+P to open the Command Palette and run AL: Go! This will create a new extension. Select the correct target and specify the necessary information in the launch.json.
Click the File menu in Visual Studio Code and select Save Workspace As... You need to provide a name for your workspace. A workspace is a file that Visual Studio Code can work with, and groups different folders (or different extensions). By using a workspace, dependent apps will automatically be updated and built if they are part of the same workspace. The workspace file can best be stored on a higher folder level than your extension app.
Next you need to do the same, but now for your test app. Use the AL: Go! command to create a new extension. Be sure to include the word Test in the name of your extension, so it is very clear afterwards which one will be the test application.
After creating your test application, you can select File, Open Workspace... in Visual Studio Code to open the workspace created earlier. When the workspace is loaded, you can use the File, Add Folder to Workspace menu item to select the folder of your test app.
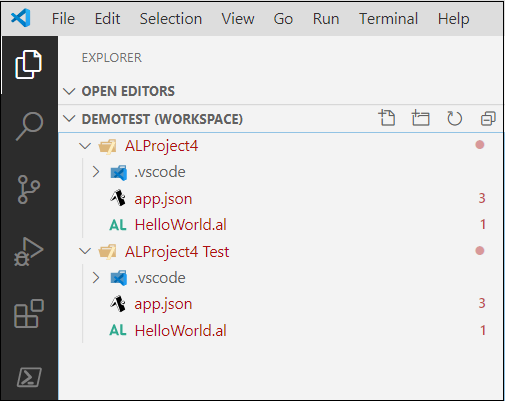
This will result in two projects grouped in the same workspace.
In the next example, we have created an extension ALProject4 and a corresponding ALProject4 Test application.
The next step is to set the correct configuration in the app.json files. Give your extension a decent name and set the Publisher to your company name. After that you can add some dependencies in the test app. It needs a dependency to the regular extension (the one you would like to test), and dependencies on the Microsoft Test libraries.
{
  "appId": "dd0be2ea-f733-4d65-bb34-a28f4624fb14",
  "publisher": "Microsoft",
  "name": "Library Assert",
  "version": "16.0.0.0"
},
{
  "appId": "00001111-aaaa-2222-bbbb-3333cccc4444",
  "publisher": "Microsoft",
  "name": "Any",
  "version": "16.0.0.0"
},
{
  "appId": "11112222-bbbb-3333-cccc-4444dddd5555",
  "publisher": "Microsoft",
  "name": "Test Runner",
  "version": "16.0.0.0"
}
The next step is to create multiple Test Codeunits which all contain Test methods to test the methods from the main extension.
It is recommended to follow the Acceptance Test-Drive Development (ATDD) design pattern when you create tests. In this design pattern you first describe what feature or features the tests are testing. A feature is a functional area or an application area that makes it very clear what the target of that test is. If you need to extend the sales functionality in Business Central by adding fields for storing social media information, a feature can be Social Media.
Next to features, you define a Scenario. The scenario is linked to one specific work item. You use the work item ID in the Scenario tag. The ATDD design pattern ends with the Given-When-Then tags.
The Given tag describes one step in setting up the test, so which data setup is needed. The When tag describes the action under test. There should only be one When in a test. The Then tag describes what is verified in by the test. All tests must have a verification part. You can add more than one Then tag.
Let's see this in an example.
codeunit 50111 SocialMediaCodeunit
{
    Subtype = Test;

    [Test]
    procedure CheckLinkedInUrlField()
    var
        Customer: Record Customer;
        LinkedInProfile: Text;
        ShouldStartMsg: Label 'Should start with https://www.linkedin.com';
    begin
        // [Feature] [Social Media]
        // [Scenario 545] LinkedIn URL's should start with
        //                https://www.linkedin.com
        Initialize();

        // [Given] Customer record with an empty LinkedIn
        CreateNewCustomer(Customer);

        // [Given] A LinkedIn Profile
        LinkedInProfile := 'profile/some-profile-15879';

        // [When] LinkedIn value provided
        AddLinkedInProfile(Customer, LinkedInProfile);

        // [Then] LinkedIn should start with https://www.linkedin.com
        Assert.IsTrue(VerifyLinkedIn(Customer), ShouldStartMsg);
    end;

    procedure Initialize()
    begin
        ...
    end;

    procedure CreateNewCustomer(var Customer: Record Customer)
    begin
        ...
    end;

    procedure AddLinkedInProfile(var Customer: Record Customer; ProfileLink: Text)
    begin
        Customer.Validate(LinkedIn, ProfileLink);
    end;

    procedure VerifyLinkedIn(Customer: Record Customer): Boolean
    begin
        exit(Customer.LinkedIn.StartsWith('https://www.linkedin.com'));
    end;

    var
        Assert: Codeunit "Library Assert";
}
A complete AL extension exercise with tests can be found on the Microsoft documentation website. The example is based on an older version of Business Central, but it gives more examples on the ATDD design pattern. The example uses a codeunit Assert, which is now replaced with the codeunit Library Assert.
Go to the Testing the Advanced Sample Extension topic for additional information.
