Design and implement Azure load balancer using the Azure portal

Completed

Azure Load Balancer operates at layer 4 of the Open Systems Interconnection (OSI) model. It's the single point of contact for clients. Azure Load Balancer distributes inbound flows that arrive at the load balancer's front end to backend pool instances. These flows are according to configured load-balancing rules and health probes. The backend pool instances can be Azure Virtual Machines or instances in a virtual machine scale set.

Choosing a load balancer type

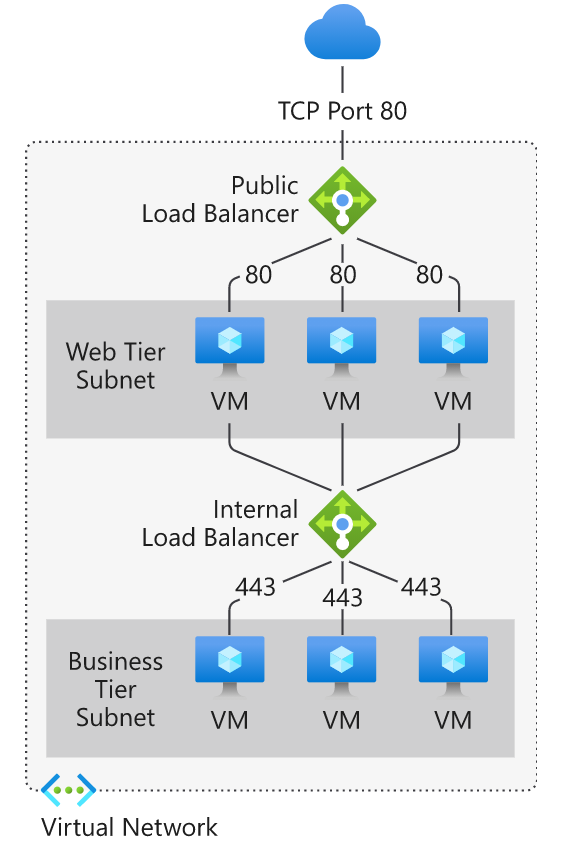
Load balancers can be public (external) or internal (private).

A public load balancer can provide outbound connections for virtual machines (VMs) inside your virtual network. These connections are accomplished by translating their private IP addresses to public IP addresses. External load balancers are used to distribute client traffic from the internet across your VMs. That internet traffic might come from web browsers, module apps, or other sources.

An internal load balancer is used where private IPs are needed at the frontend only. Internal load balancers are used to load balance traffic from internal Azure resources to other Azure resources inside a virtual network. A load balancer frontend can also be accessed from an on-premises network in a hybrid scenario.

Diagram that shows Internal and Public load balancers in Azure.

Azure load balancer and availability zones

Azure services that support availability zones fall into three categories:

  • Zonal services: Resources can be assigned to a specific zone. Specifying a zone allows for increased resilience.
  • Zone-redundant services: Resources are replicated or distributed across zones automatically. Azure replicates the data across three zones so that a zone failure doesn't impact its availability.
  • Nonregional services: Service is always available from Azure geographies and is resilient to zone-wide outages and region-wide outages.

Azure Load Balancer supports availability zones scenarios. You can use Standard Load Balancer to increase availability throughout your scenario by aligning resources with, and distribution across zones. Review this document to understand these concepts and fundamental scenario design guidance

A Load Balancer can either be zone redundant, zonal, or nonzonal. To configure the zone related properties for your load balancer, select the appropriate type of frontend needed.

Zone redundant

Diagram that shows Zone redundant load balancers in Azure.

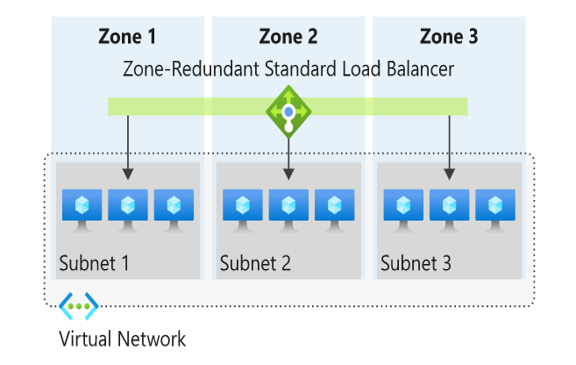
In a region with Availability Zones, a Standard Load Balancer can be zone-redundant.

A single frontend IP address survives zone failure. The frontend IP may be used to reach all (nonimpacted) backend pool members no matter the zone. One or more availability zones can fail and the data path survives as long as one zone in the region remains healthy.

Zonal

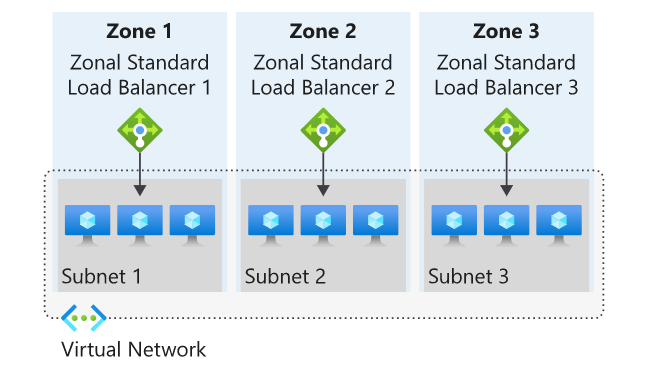
You can choose to have a frontend guaranteed to a single zone, which is known as a zonal. The data path is unaffected by failures in zones other than where it was guaranteed. You can use zonal frontends to expose an IP address per Availability Zone.

The use of zonal frontends directly for load balanced endpoints within each zone is supported. You can use this configuration to expose per zone load-balanced endpoints to individually monitor each zone. For public endpoints, you can integrate them with a DNS load-balancing product like Traffic Manager and use a single DNS name.

Diagram that shows Zonal load balancers in Azure.

For a public load balancer frontend, you add a zones parameter to the public IP. This public IP is the frontend IP configuration used by the respective rule.

For an internal load balancer frontend, add a zones parameter to the internal load balancer frontend IP configuration. A zonal frontend guarantees an IP address in a subnet to a specific zone.

Selecting an Azure load balancer SKU

Two SKUs are available when you create a load balancer in Azure: Basic load balancers and Standard load balancers. These SKUs differ in terms of their scenario scope and scale, features, and cost. Any scenario that is possible with the Basic load balancer can also be created with the Standard load balancer.

To compare and understand the differences, review this table.

Features

Standard Load Balancer

Basic Load Balancer

Backend pool size

Supports up to 1,000 instances.

Supports up to 300 instances.

Backend pool endpoints

Any virtual machines or virtual machine scale sets in a single virtual network.

Virtual machines in a single availability set or virtual machine scale set.

Health probes

TCP, HTTP, HTTPS

TCP, HTTP

Health probe down behavior

TCP connections stay alive on an instance probe down and on all probes down.

TCP connections stay alive on an instance probe down. All TCP connections end when all probes are down.

Availability Zones

Zone-redundant and zonal frontends for inbound and outbound traffic.

Not available

Diagnostics

Azure Monitor multi-dimensional metrics

HA Ports

Available for Internal Load Balancer

Not available

Secure by default

Closed to inbound flows unless allowed by a network security group. Internal traffic from the virtual network to the internal load balancer is allowed.

Open by default. Network security group optional.

Outbound Rules

Declarative outbound NAT configuration

Not available

TCP Reset on Idle

Available on any rule

Not available

Multiple front ends

Inbound and outbound

Inbound only

Management Operations

Most operations < 30 seconds

60-90+ seconds typical

SLA

Not available

Microsoft recommends Standard load balancer. Standalone VMs, availability sets, and virtual machine scale sets can be connected to only one SKU, never both. Load balancer and the public IP address SKU must match when you use them with public IP addresses.

SKUs aren't mutable; therefore, you cannot change the SKU of an existing resource.

Creating and configuring an Azure load balancer

There are several tasks you need to perform to successfully create and configure an Azure Load Balancer.

Create the load balancer

In this example, these tasks are required to create and configure a Public (external) load balancer in a Basic SKU. The first task is to create the load balancer itself.

From the Azure portal home page, navigate to the Global Search bar and search Load Balancer then select Load Balancer.

Choose Create to start the process.

On the Create load balancer page, you must supply the following required information:

  • Subscription - Select the Azure subscription that you want to create your new load balancer resource in.
  • Resource group - Select an existing resource group or create a new one.
  • Name - Provide a unique name for the instance.
  • Region - Select the region where the virtual machines were created.
  • Type - Select whether your load balancer is going to be Internal (private) or Public (external). If you choose Internal, you need to specify a virtual network and IP address assignment, but if you choose Public, you need to specify several Public IP address details.
  • SKU - Select either the Standard SKU or the Basic SKU. Choose Standard for production workloads. For testing and evaluation and training, choose Basic.
  • Tier - Select whether your load balancer is balancing within a region (Regional) or across regions (Global) - If you select the Basic SKU, this setting is greyed out.
  • Public IP address - Specify whether to create a new public IP address for your public-facing front-end, or use an existing one, and you also specify a name for your public IP address, and whether to use a dynamic or statically assigned IP address. You can optionally also assign an IPv6 address to your load balancer in addition to the default IPv4 one.

After you click Review + Create, the configuration settings for the new load balancer resource are validated. Then you can click Create to start creating it.

Screenshot of the configuration settings for the new load balancer page.

The resource is deployed.

Screenshot of the Created load balancer - deployment in progress page.

Screenshot of the Created load balancer - deployment complete page.

When it completes, you can click Go to resource to view the new load balancer resource in the portal.

Screenshot of the View load balancer resource Overview page in Azure portal page.

Add a backend pool

The next task is to create a backend pool in the load balancer.

From the Azure portal home page, select All resources.

Screenshot of the Select All resources page.

Select your load balancer from the list. Under the Settings section, choose Backend pools, and then Add to add a pool.

Screenshot of the Add backend pool page.

You need to enter the following information on the Add backend pool page.

  • Name: Enter a unique name for the backend pool.
  • Virtual network: Specify the name of the virtual network where the backend pool resources are located.
  • Associated to: You need to associate the backend pool with one or more virtual machines, or to a virtual machine scale set.
  • IP Version: Select either IPv4 or IPv6.

You could add existing virtual machines to the backend pool at this point, or you can create and add them later. You then click Add to add the backend pool.

Screenshot of the Add backend pool - Add page.

Add virtual machines to the backend pool

The next task is to add the virtual machines to the existing back-end pool.

On the Backend pools page, select the backend pool from the list.

Screenshot of the View backend pool in the load balancer page.

Enter the following information to add the virtual machine to the backend pool.

  • Virtual network: Specify the name of the virtual network where the backend resources are located.
  • Associated to: You need to associate the backend pool with one or more virtual machines, or to a virtual machine scale set.
  • IP Version: Select either IPv4 or IPv6.

Then under the Virtual machines section, click Add.

Screenshot of the Add VM to backend pool page.

Select the virtual machines you want to add to the backend pool and click Add.

Screenshot of the View list of VMs added to backend pool page.

Then click Save to add them to the backend pool.

Screenshot of the Save backend pool with VMs added page.

Screenshot of the View list of backend pools running in load balancer page.

Add health probes

The next task is to create a health probe to monitor the virtual machines in the back-end pool.

On the Backend pools page of the load balancer, under Settings, select Health probes, and then click Add.

Screenshot of the Added health probes page.

You need to enter the following information on the Add health probe page.

  • Name: Enter a unique name for the health probe
  • Protocol: Select either TCP or HTTP
  • Port: Specify the destination port number for the health signal. The default is port 80
  • Interval: Specify the interval time in seconds between probe attempts. The default is 5 seconds
  • Unhealthy threshold: Specify the number of consecutive probe failures that must occur before a virtual machine is considered to be in an unhealthy state. The default is 2 failures

You then click Add to add the health probe.

Screenshot of the health probe settings page.

Screenshot of the View list of added health probes in load balancer page.

Add a load balancer rule

The last task is to create a load balancing rule for the load balancer. A load balancing rule distributes incoming traffic across a group of backend pool instances. Only backend instances that the health probe considers healthy receive new traffic.

On the Health probe page of the load balancer, under Settings, select Load balancing rules, and then click Add.

Screenshot of the Added load balancing rule page.

You need to enter the following information on the Add load balancing rule page.

  • Name: Enter a unique name for the load balancing rule
  • IP Version: Select either IPv4 or IPv6
  • Frontend IP address: Select the existing public-facing IP address of the load balancer
  • Protocol: Select either the TCP or UDP protocol
  • Port: Specify the port number for the load balancing rule. The default is port 80
  • Backend port: You can choose to route traffic to the virtual machine in the backend pool using a different port than the one that clients use by default to communicate with the load balancer (port 80)
  • Backend pool: Select an existing backend pool. The virtual machines in this backend pool are the target for the load balanced traffic.
  • Health probe: Select an existing health probe or create a new one. The load balancing rule uses the health probe to determine which virtual machines in the backend pool are healthy and therefore can receive load balanced traffic.
  • Session persistence: You can choose None, or Client IP, or Client IP and protocol. Session persistence specifies that traffic is processed by the same virtual machine in the session. None specifies that successive requests from the same client may be handled by any virtual machine. Client IP specifies how successive requests from the same client IP address are processed. Client IP and protocol specifies that successive requests from the same client IP address and protocol combination are processed by the same virtual machine.
  • Idle timeout (minutes): Specify the time to keep a TCP or HTTP connection open without relying on clients to send keep-alive messages. The default idle timeout is 4 minutes, which is also the minimum setting. The maximum setting is 30 minutes.
  • Floating IP: Choose between Disabled or Enabled. With Floating IP set to Disabled, Azure exposes a traditional load balancing IP address mapping scheme for ease of use (the VM instances' IP). With Floating IP set to Enabled, it changes the IP address mapping to the Frontend IP of the load balancer to allow for more flexibility.

You then click Add to add the load balancing rule.

Screenshot of the Added load balancing rule - Add page.

Screenshot of the View list of added load balancing rules page.

Test the load balancer

Be sure to test your configuration to ensure it works successfully. Copy and paste the Public IP Address into a web browser. You should receive a response from one of the VMs in your load balancer. Keep refreshing the page to view other load balancer responses.

Check your knowledge

1.

Which of the following statement about external load balancers is correct?

2.

When deploying a new Azure Load Balancer that must support outbound traffic rules. Which SKU should be selected?