Define policy settings for your DLP policy
When creating a brand new DLP policy, you’re able to start with a template or create a custom policy. Policy templates are a starting point for building DLP policies that help you meet your specific regulatory and business policy needs. You can modify the templates to meet the specific needs of your organization.
There are two different workflows when you define policy settings: simple and advanced. The simple workflow starts if you choose the Review and customize default settings from the template option on the Define policy settings page. The more advanced flow is initiated if you choose Create or customize advanced DLP rules.
Simple workflow
The simple workflow lets you quickly:
- Specify the sensitive info types or labels you want to protect.
- Decide whether you want the policy to detect when the content is shared inside or outside your organization.
- Set up actions like access restrictions and user and admin notifications.
Select this option if you want to quickly set up a policy that protects content based only on the sensitive information types from the policy template selected earlier.
Advanced workflow
The advanced workflow uses a rule editor to extend the options offered in the simple flow. You can use the advanced flow to refine the policy using rules that include more conditions, exceptions, and actions. The advanced workflow branch is also the only option available if Custom is selected during the Choose locations to apply the policy step.
The image of the policy settings options shows the two workflow branches. Notice in the simple branch, listed first, the three sensitive information types that were inherited from the selection of the U.K. Financial Data policy template in the Choose information to protect step. We're going to use the advanced option in our examples, so the image shows Create or customize advanced DLP rules has been selected.
Customize advanced DLP rules
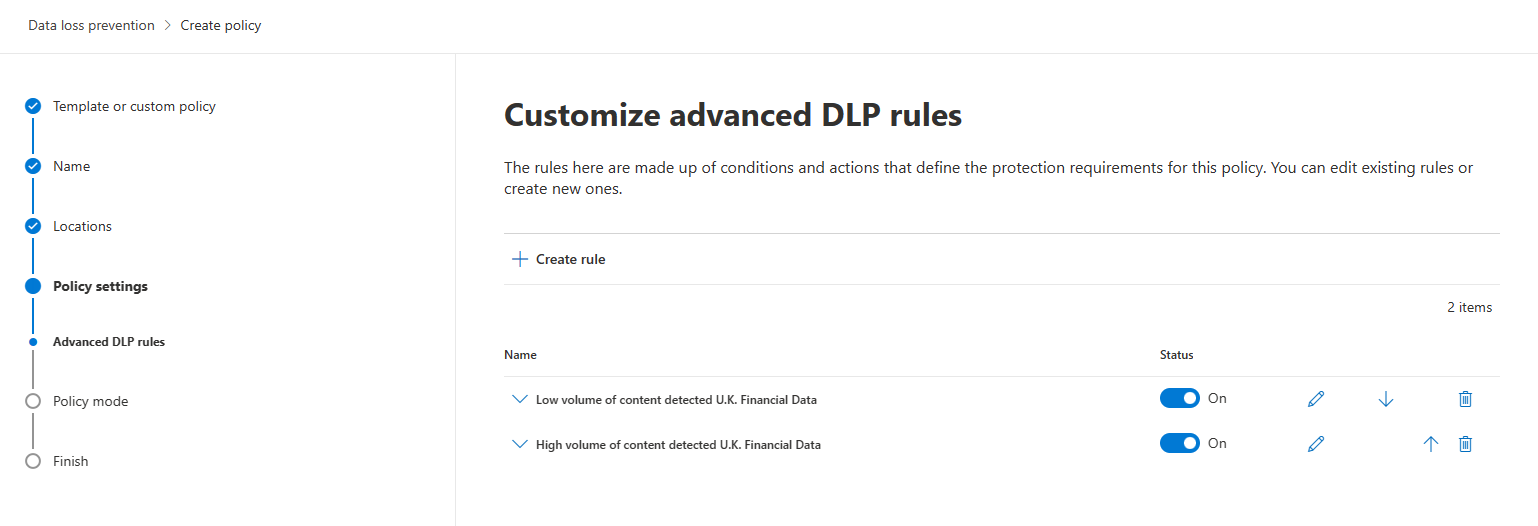
Two rules are defined by default when you use a policy template and follow the advanced DLP rules workflow branch. If you choose the Custom option, you must define your own rules. You can also edit any existing rules, delete them, or create new ones. The only requirement is you must define at least one rule before you can move to the next step in the process.
Using the U.K. Financial Data policy template we started with earlier, the image with the expanded DLP rules shows a summary of the two default rules associated with this DLP policy. One rule is for detecting a low volume of content, and a second rule is for detecting a high volume of content. Notice in the image the Actions listed in the two rules are different. One set of actions is defined for when a low volume of content is detected. A different set of actions is defined for when a high volume of data is detected. This choice allows you to respond differently based on the seriousness of the policy violation. For example, sending an email that includes one to two credit card numbers might be deemed acceptable and addressed with a simple warning to the user. Sending one with 1,000 credit card numbers may be considered a critical security breach and call for a different response entirely. It's up to your organization to decide how to respond and configure the DLP policy rules accordingly.
Review the U.K. Financial Data policy settings
You edit all of the rules included with the DLP policy template - you can edit all of the DLP policy rules. Even the default rules should be reviewed to determine they meet your requirements. Rules can include:
- Conditions - Determine what types of information you're looking for, and when to take an action.
- Exceptions - Prevents the application of a rule for content matching the exceptions.
- Actions - When content matches a condition in a rule, you can apply actions to automatically protect the content.
- User notifications - Use notifications to educate your users about DLP policies and help them remain compliant without blocking their work.
- User overrides - Allows the user to override the policy and share the content.
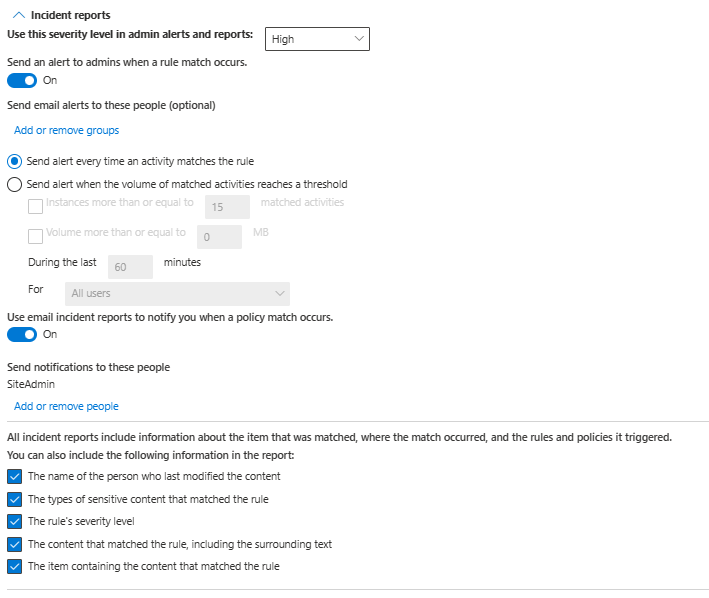
- Incident reports - When a rule is matched, you can send an incident report to your compliance officer (or any people you choose) with details of the event.
- Additional options - Provide more options to specify how the DLP policy is processed.
Now, let's look at the specific settings for the policy template we're using.
Conditions
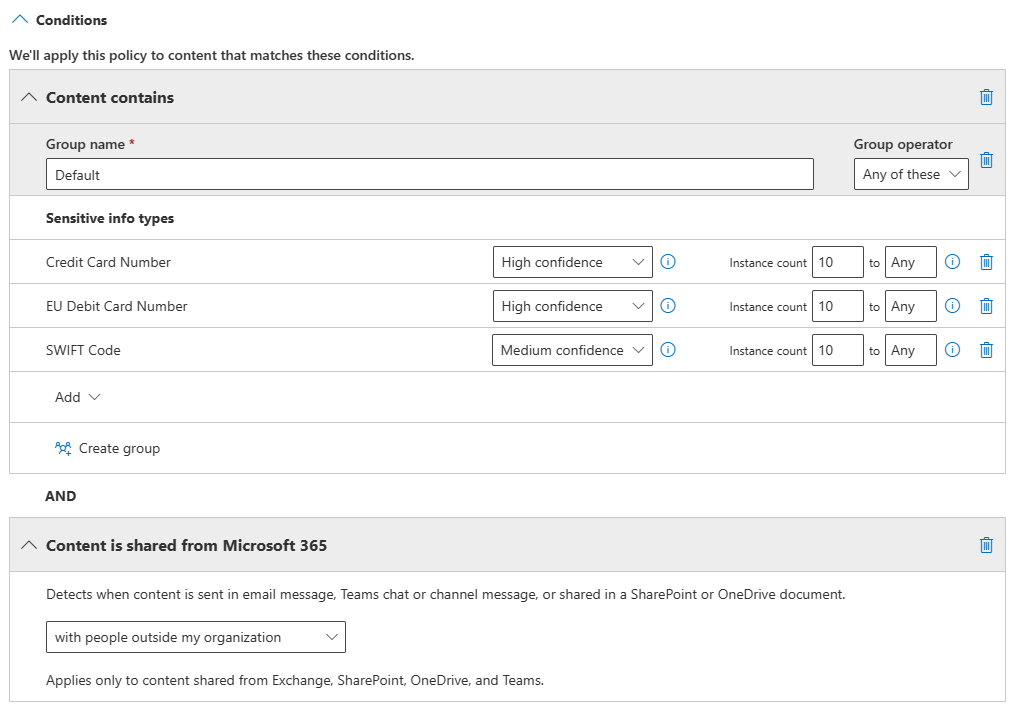
The image of the Conditions section of the DLP solution shows the conditions set in the High volume of content detected U.K. Financial rule. Each condition is currently using the default settings from the policy template:
- The Content contains condition is relevant to all locations. By default, it looks for any of the three sensitive info types listed that exceeds an instance count of 10. You can add extra sensitive info types and modify the lower and upper threshold for the instance count.
- The Content is shared from Microsoft 365 condition only applies to content shared from Exchange, SharePoint, OneDrive, and Microsoft Teams. It doesn't apply to the Endpoint Devices or Defender for Cloud Apps locations. We'll add the Endpoint Devices location in the next step.
Actions
By default, users are blocked from sending any email or Teams chats and channel messages that contain the type of content you're protecting by the actions in the High volume of content detected U.K. Financial rule.
The Restrict access or encrypt the content in Microsoft 365 locations action (enabled by default in this rule): By default, users are blocked from sending Teams chats and channel messages that contain the type of content you're protecting. You can choose who is blocked from receiving emails or accessing files shared from SharePoint, OneDrive, and Teams.
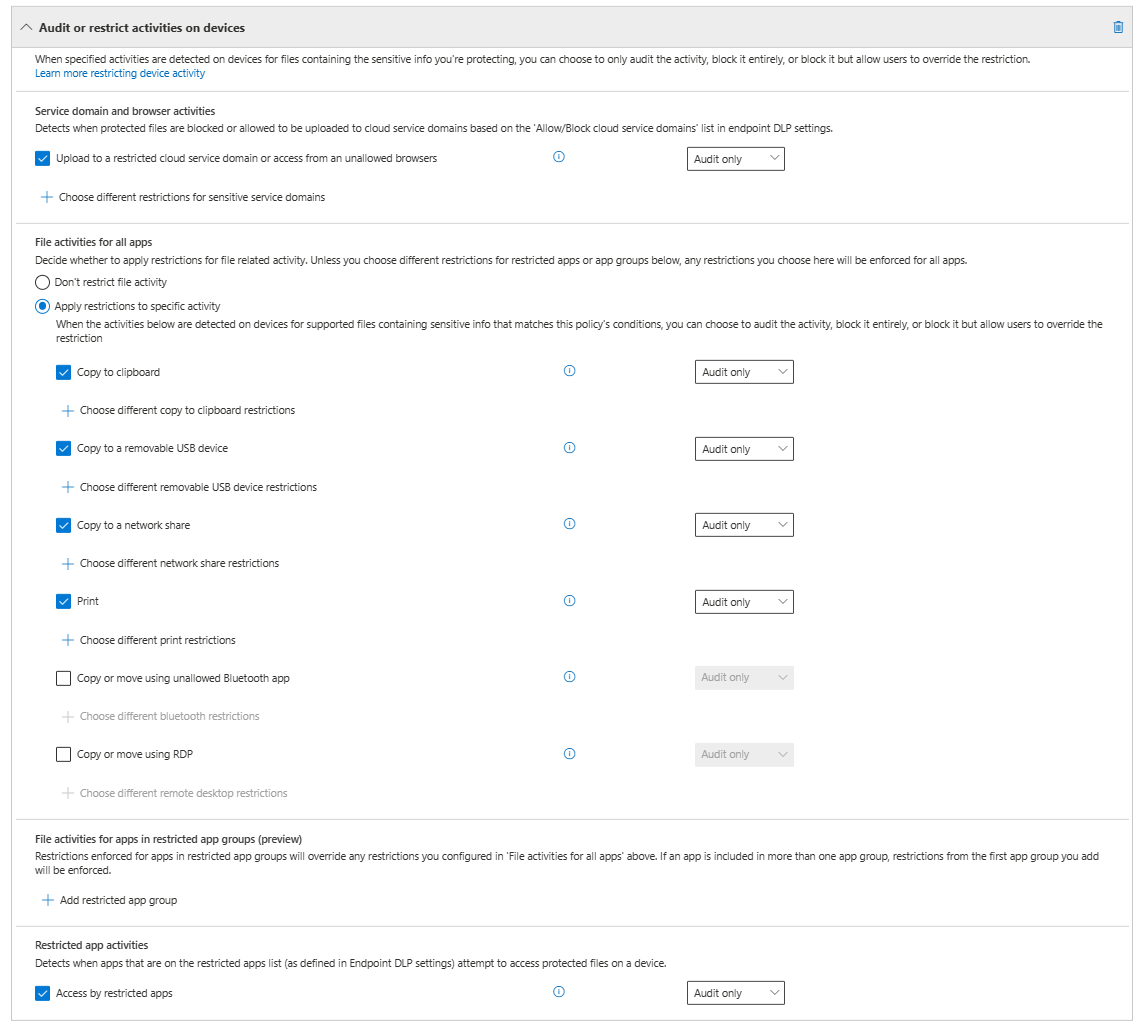
The Audit or restrict activities on Windows devices action isn't included by default. The action will only pop up if Devices is selected as a location under the initial Locations page. Select it to restrict activities on Endpoint devices. When the activities listed are detected on the devices for supported files containing sensitive info that matches this policy's conditions, you can choose to do any of these actions:
- Audit the activity only
- Block the activity entirely
- Block the activity but allow users to override the restriction
The ability to audit or restrict activities on the devices is part of the functionality referred to as "endpoint data loss prevention." In our example, we'll choose to block each type of endpoint activity, like printing and copying sensitive data to the clipboard, but allow users to override it.
In addition, you’re also able to select Audit or restricted activities when users access sensitive sites in Microsoft Edge browser on Windows Devices. This choice allows you to restrict activity on Windows devices in Microsoft Edge browser when users access a sensitive site. You can choose to audit the activity or block the user from completing operation.
User notifications and overrides
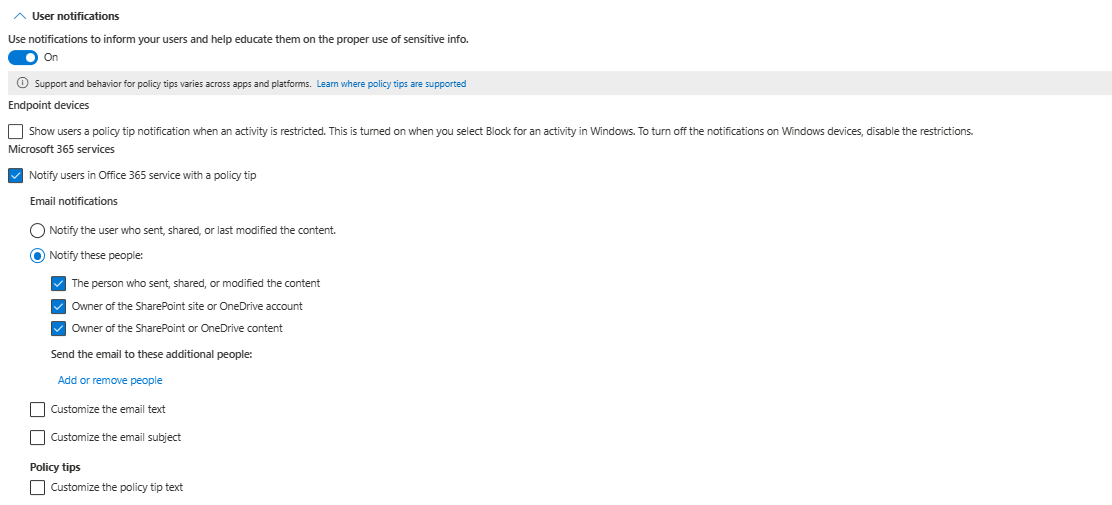
The image of the User Notifications section of the DLP solution shows the user notifications and overrides in the High volume of content detected U.K. Financial rule. User notifications take the form of emails and/or policy tips designed to educate users on the proper use of sensitive information. There may be occasions where you want to notify someone else besides the user and/or customize the message or policy tip that is displayed. You have flexibility in deciding who is informed about the incident and how they're notified.
User overrides are disabled by default for the High volume of content detected U.K. Financial rule. Enable them as shown in the image User overrides section of the DLP solution. Options include requiring the user to enter a business justification when overriding the policy and/or allowing the policy to be overridden if the user reports it as false positive. Select both. The settings in this section aren't relevant to Windows 10 devices as the override settings for Windows devices are configured under the Actions section in the rule editor.
Incident reports
When a rule is matched, different types of incident reports can be generated to make users with administrative or oversight responsibilities aware. You can send an incident report to your compliance officer, or anyone you choose, with details of the event. As with user notifications you have several options. In this example, select Send an alert to admins when a rule match occurs and Use email incident reports to notify you when a policy match occurs. Set the severity level of High. Also select the option to Send alert when the volume of matched activities reaches a threshold and then set an instance or volume threshold. (We've used 15 instances in the screenshot.)
Create advanced DLP policies
Use the Create advanced DLP policies interactive guide for a walkthrough on creating advanced DLP policies in Microsoft Purview.


