Prepare Endpoint DLP
Endpoint data loss prevention (Endpoint DLP) extends the activity monitoring and protection capabilities of DLP to sensitive items on Windows 10, Windows 11, and macOS. Activities (like copying to USB devices or printing) performed on sensitive items is visible to users who have access to the activity explorer after devices are onboarded into the Microsoft Purview compliance portal. You can also take the extra step of auditing or restricting those activities via data loss prevention policies.
This unit walks you through more steps required to use Endpoint DLP:
- Confirm your devices meet requirements
- Onboard devices
- Configure global Endpoint DLP settings
Confirm devices meet requirements
Windows devices that you plan on monitoring with Endpoint DLP must meet the system requirements. Review the requirements before you onboard devices.
Onboard devices
Before you can include endpoint devices in DLP policies, you need to onboard them, or enable data collection.
To enable data collection from a device, the account onboarding the device must be a member of any of these roles:
- Global admin
- Security admin
- Compliance admin
Use the following steps to add an account to a role:
- In the Microsoft 365 admin center, select Roles.
- In the Microsoft Entra ID tab, select Show all roles.
- Select one of the roles and add the user account.
Give users only the access they need by assigning the least-permissive role.
Onboarding options
Onboarding and offboarding are handled via scripts you download from the Device onboarding center. The center has custom scripts for each of these deployment methods (Windows 10 and 11 only):
- Local script
- Group policy
- Microsoft Endpoint Configuration Manager
- Mobile Device Management/Microsoft Intune
- VDI onboarding scripts for non-persistent machines
Use these options for onboarding with macOS:
| Onboarding option | Scenario |
|---|---|
| Intune | For macOS devices managed through Intune |
| Intune for Microsoft Defender for Endpoint customers | For macOS devices managed through Intune and have Microsoft Defender for Endpoint (MDE) deployed to them |
| JAMF Pro | For macOS devices that are managed through JAMF Pro |
| JAMF Pro for Microsoft Defender for Endpoint customers | For macOS devices managed through JAMF Pro and have Microsoft Defender for Endpoint (MDE) deployed to them |
In the Microsoft Purview compliance portal, select Settings, then select Device Onboarding to view a list of monitored devices and download the packages used to onboard or offboard devices using your preferred deployment method.

Onboarding using local script
We'll use the Local script (for up to 10 machines) script to onboard devices. The local script is meant for testing purposes - you can see how Endpoint DLP affects your devices and environments before you roll it out in your production environment.
Here are the instructions for onboarding a Windows device using a local script.
- Get the configuration package .zip file (DeviceComplianceOnboardingPackage.zip) package from Microsoft Purview compliance portal
- In the navigation pane, select Settings > Device onboarding.
- In the Deployment method field, select Local Script.
- Select Download package and save the .zip file.
- Extract the contents of the configuration package to a location on the device you want to onboard (for example, the Desktop). You should have a file named DeviceOnboardingScript.cmd.
- Open an elevated command-line prompt on the device and run the script:
- Go to Start and type cmd.
- Right-click Command prompt and select Run as administrator.
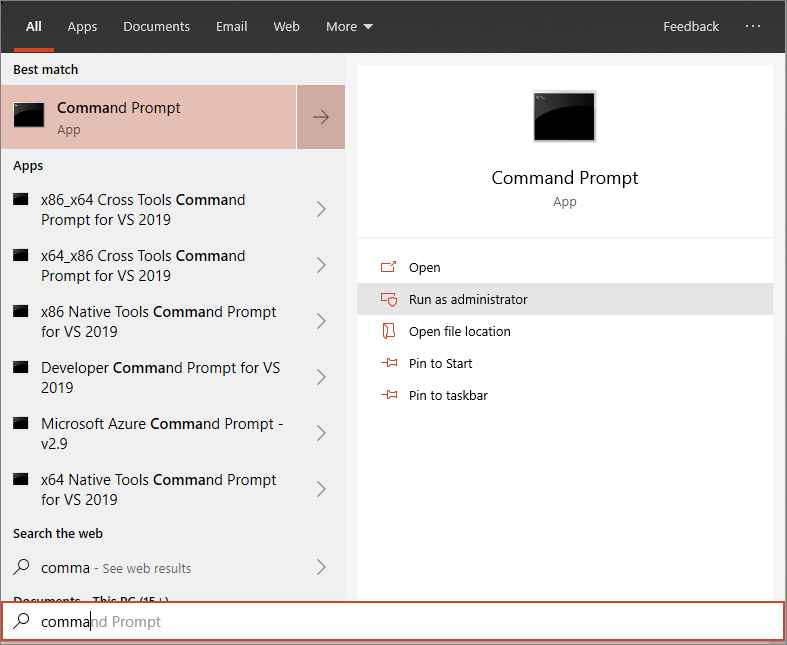
- Type the location of the script file. If you copied the file to the desktop, type: %userprofile%\Desktop\WindowsDefenderATPOnboardingScript.cmd
- Press the Enter key or select OK.

Configure global Endpoint DLP settings
Global Endpoint DLP settings apply to all existing and new DLP policies that protect content on Windows devices. But these settings only apply to content impacted by DLP policies, not every item in, for example, the user's Documents folder.
In the Microsoft Purview compliance portal left menu, go to Data loss prevention > Endpoint DLP settings to configure global settings.
The image shows the options that are available in the Endpoint DLP settings menu:

Endpoint DLP Windows 10/11 and macOS settings
| Setting | Windows 10, 1809 and later, Windows 11 | macOS (three latest released versions) | Notes |
|---|---|---|---|
| Restricted app groups | Supported | Not supported | |
| Unallowed Bluetooth apps | Supported | Not supported | |
| Browser and domain restrictions to sensitive items | Supported | Supported | |
| Additional settings for Endpoint DLP | Supported | Supported | Only the default business justifications are supported for macOS devices |
| Always audit file activity for devices | Supported | Supported | |
| Auto-quarantine file from unallowed apps | Supported | Not supported | |
| Advanced classification | Supported | Not supported | |
| Business justification in policy tips | Supported | Supported |
Advanced classification scanning and protection: allows the more advanced Microsoft Purview cloud based data classification service to scan items, classify them and return the results to the local machine. This setting means you can take advantage of classification techniques like exact data match classification, and named entities in your DLP policies.
File path exclusions: You may want to exclude certain paths from DLP monitoring, DLP alerting, and DLP policy enforcement on your devices. You may want to exclude certain paths because alerts are too noisy or don’t contain files you're interested in. Files in those locations aren't audited and any files that are created or modified in those locations aren't subject to DLP policy enforcement. You can configure path exclusions in DLP settings.
Restricted apps: (Previously called Unallowed apps) is a list of applications you create. You configure what actions DLP takes when a user uses an app on the list to access a DLP protected file on a device. It's available for Windows 10 and macOS devices.
Restricted app groups: are collections of apps that you create in DLP settings and then add to a rule in a policy. When you add a restricted app group to a policy, you can take the actions defined in this table.
| Restricted App group option | What it allows you to do |
|---|---|
| Don't restrict file activity | Tells DLP to allow users to access DLP protected items using apps in the app group and don't take any actions when the user attempts to Copy to clipboard, Copy to a USB removable drive, Copy to a network drive, and Print from the app. |
| Apply a restriction to all activity | Tells DLP to Audit only, Block with override, or Block when a user attempts to access a DLP protected item using an app that's in this app group. |
| Apply restrictions to a specific activity | This setting allows a user to access a DLP protected item using an app that is in the app group and allows you to select a default action (Audit only, Block, or Block with override) for DLP to take when a user attempts to Copy to clipboard, Copy to a USB removable drive, Copy to a network drive, and Print. |
Unallowed Bluetooth apps: Prevent people from transferring files protected by your policies via specific Bluetooth apps.
Browser and domain restrictions to sensitive data: Restrict sensitive files that match your policies from being shared with unrestricted cloud service domains.
Unallowed browsers: For Windows devices, you add browsers identified by their executable names that will be blocked from accessing files. These browsers match the conditions of an enforced a DLP policy where the upload to cloud services restriction is set to block or block override. When these browsers are blocked from accessing a file, the end users see a toast notification asking them to open the file through Microsoft Edge. For macOS devices, you must add the full file path. To find the full path of Mac apps: On the macOS device, open Activity Monitor. Find and double-click the process you want to restrict and choose the Open Files and Ports tab. For macOS apps, you need the full path name, including the name of the app.
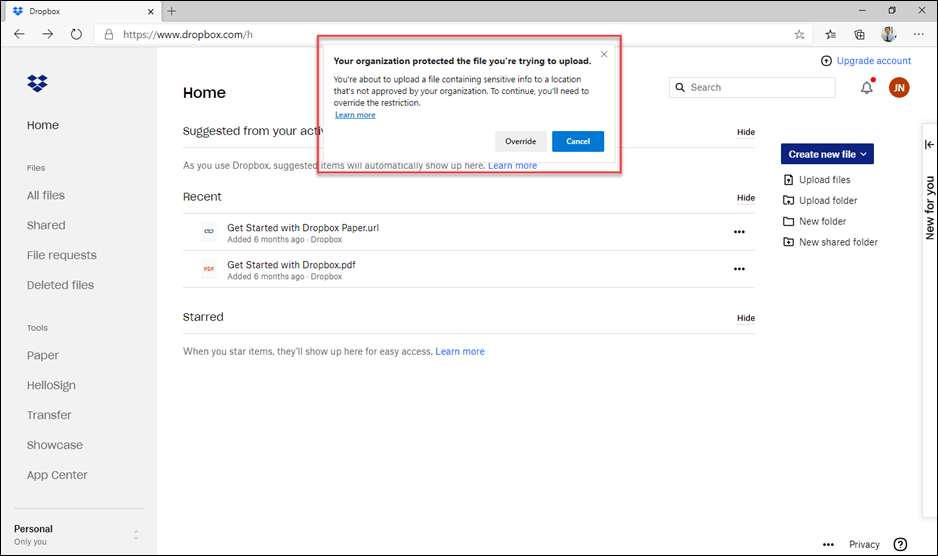
Service domain restrictions: Even if you've prevented all unsupported browsers from accessing sensitive data, sometimes you might also want to block supported browsers, like Microsoft Edge, from uploading protected content to specific web services. Service domain restrictions control whether sensitive files protected by your policies are allowed or blocked from accessing specific service domains from Microsoft Edge. Choose Block to prevent certain domains from accessing these files or Allow to specify safe domains. For example, the setting in the image below blocks users from uploading protected content to Dropbox even when using Microsoft Edge. The Service domains setting only applies to files uploaded using Microsoft Edge or Google Chrome with the Microsoft Purview Chrome Extension installed.
Sensitive service domains: When you list a website in Sensitive services domains, you can audit or block with override. You can also block users when they attempt to print from a website, copy data from a website, save a website as local files, or upload a sensitive file to an excluded website. This setting is configured in the policy.

This screenshot is the notification that a user gets when they try to upload protected content into Dropbox. Notice that the user can override the restriction because the policy was configured with the option to allow override. The policy could as easily have been configured to prevent it from being overridden.
Note
Unless you've added other browsers to the Unallowed browsers list, user can still upload the protected content by using a different browser. Be sure to add the other browsers in use in your organization to the unallowed browsers list if you want service domain restrictions to work correctly.


Experience an active Microsoft Purview Endpoint DLP policy
Use the Experience an active Microsoft Purview Endpoint DLP policy interactive guide to experience an active Microsoft Purview Endpoint DLP policy from a user's onboarded device.