Case study--Implementing privileged access management
Overview
The Contoso Corporation is a fictional organization that needs to configure privileged access policies to provide users with just-enough-access to perform elevated tasks, without risking exposure of sensitive data or critical configuration settings.
This case study will cover the basics for configuring a privileged access policy. This guidance includes four steps:
- Creating an approvers group
- Enabling privileged access
- Creating an access policy
- Submitting and approving access policy requests
Step 1 – Creating an approvers group
Contoso IT administrators attended online webinars about privileged access management in Office 365 and decided that access policies will help them meet the updated corporate policy requirements for mitigating risk in the organization. Their plan includes identifying:
- The users who need approval authority for incoming requests for access to elevated and privileged tasks.
- The users who will manage access requests.
Creating the approver's group
Contoso IT administrators sign into the Microsoft 365 Admin Center.
In the admin center, they select Groups > Groups > Add a group which opens the Choose a group type flyout page.
They select mail-enabled security group and then complete the Name, Group email address, and Description fields for the new group in the Add a group wizard.
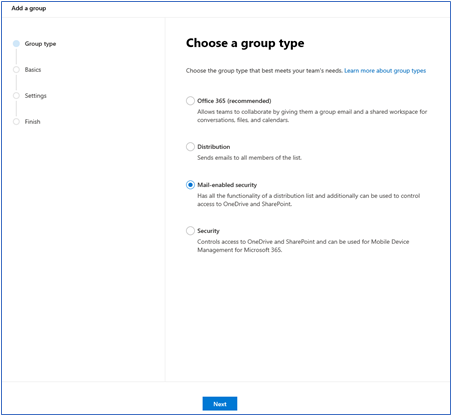
When finished, they click the Create group button at the end of the wizard. It may take a few minutes for the group to be fully configured and to appear in the Microsoft 365 admin center.

After the group is created, they select the new approvers group which opens the details page for that group.
To add users to the group, they navigate to the Members tab, select the View all and manage members link, then click Add members to add users to the group.


Step 2 – Enabling privileged access
After creating the approvers group, Contoso IT administrators must explicitly enable privileged access in Office 365 with the group you assign as the default approvers group. This procedure is also performed in the Microsoft 365 Admin Center.
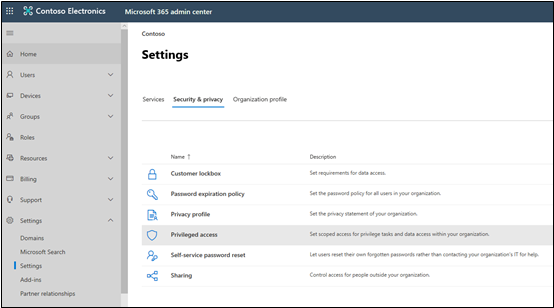
In the admin center, go to Settings > Settings > Security & Privacy > Privileged access.
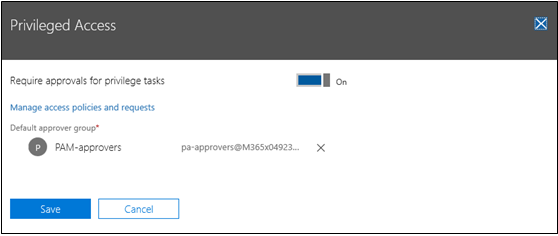
To enable privileged access they toggle the Require approvals for privileged tasks control to the On setting, assign the approver's group created in Step 1 as the default approvers group, then click Save.


Step 3 – Creating an access policy
With all the prerequisites completed, the IT administrators Contoso are ready to create privileged access policies. Note, you can create and configure up to 30 privileged access policies for your Office 365 organization.
The Contoso IT administrators sign into the Microsoft 365 Admin Center and go to Settings > Security & Privacy > Privileged access. This action opens the Privileged access flyout page.
On the Privileged access flyout page, they click on the Manage access policies and requests link which opens a new window where they select Configure policies, then Add a policy.
On the Create New Access Policy page, they complete the fields as required by their organization:
- Policy type: Task, Role, or Role Group
- Policy scope: Exchange
- Policy name: Select from the available policies
- Approval type: Manual or Auto
- Approval group: Select the approvers group created in Step 1
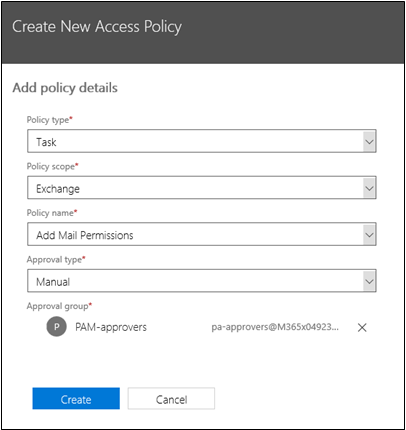
When finished, they click Create, then Close.

Step 4 – Submitting and approving access policy requests
Once enabled, privileged access requires approvals for any task that has an associated approval policy defined. For tasks included in an approval policy, users must request and be granted access approval to have permissions necessary to execute the task.
After approval is granted, the requesting user can execute the intended task and privileged access will authorize and execute the task on behalf of the user. The approval remains valid for the requested duration (default duration is 4 hours), during which the requester can execute the intended task multiple times. All such executions are logged and made available for security and compliance auditing.
Note
Requests for privileged access are valid for up to 24 hours after the request is submitted. If not approved or denied, the requests expire and access is not approved.
Requesting elevation authorization to execute privileged tasks
When users need to submit an access policy request, they sign in to the Microsoft 365 Admin Center with their administrator credentials and go to Settings > Security & Privacy > Privileged access.
On the Privileged access flyout page, they select the Manage access policies and requests link, then click New request.
On the New access request page, they complete the required fields:
- Request type: Task, Role, or Role Group
- Request scope: Exchange
- Request for: Select from the available policies
- Duration (hours): Number of hours of requested access. There is not a limit on the number of hours that can be requested.
- Comments: Text field to enter your reason for access.
View status of elevation requests
After an approval request is submitted, users can view the status of their request in the admin center by navigating to Settings > Security & Privacy > Privileged access and selecting the Manage access policies and requests link. The resulting page will display either Pending, Approved, Denied, or Customer Lockbox status.

Approving or denying an elevation authorization request
When an approval request is created, members of the approver group receive an email notification similar to the one below:

Members of the approver group can either approve or deny the request in the Microsoft 365 admin center by navigating to Settings > Security & Privacy > Privileged access and selecting the Manage access policies and requests link to view the list of pending requests. Selecting a request opens the Request details page for that request and the approver can either select Approve or Deny.

The requestor is subsequently notified of the request approval or denial via email.
