Manage MSIX app attach
You've learned about MSIX app attach and how it works. Let's find out how you can use it in Contoso's Azure Virtual Desktop environment.
Create an MSIX image for MSIX app attach
MSIX app attach requires an MSIX image, which is the expanded content of the MSIX file stored in a VHD, a VHDX, or CIM format. You already learned how to prepare the MSIX package. Now let's explore how to prepare the VHD.
First, download the msixmgr tool and save the msixmrg.zip file to a folder within a session host VM. Then, unzip the msixmgr.zip file and place the MSIX package in the same folder.
Create a VHD or VHDX disk
You must create and initialize a VHD or VHDX disk. You can create the disk by using either the Disk Management MMC console or PowerShell.
Note
If you haven't already, make sure you enable Hyper-V by following the instructions in Install HyperV on Windows 10.
Use the following steps to create and initialize the VHD or VHDX disk by using PowerShell:
Run the following cmdlet in PowerShell to create a VHD:
New-VHD -SizeBytes <size>MB -Path c:\temp\<name>.vhd -Dynamic -Confirm:$falseTo mount the newly created VHD, run:
$vhdObject = Mount-VHD c:\temp\<name>.vhd -PassthruTo initialize the VHD, run:
$disk = Initialize-Disk -Passthru -Number $vhdObject.NumberTo create a new partition, run:
$partition = New-Partition -AssignDriveLetter -UseMaximumSize -DiskNumber $disk.NumberTo format the partition, run:
Format-Volume -FileSystem NTFS -Confirm:$false -DriveLetter $partition.DriveLetter -ForceCreate a parent folder on the mounted VHD.
Expand the MSIX package
You now need to expand the MSIX package in the newly created VHD. To unpack the MSIX image:
Open a command prompt as an administrator and go to the folder where you downloaded and unzipped the msixmgr tool.
Run the following cmdlet to unpack the MSIX package into the VHD that you created and mounted in the previous section:
msixmgr.exe -Unpack -packagePath <package>.msix -destination "f:\<name of folder you created earlier>" -applyaclsGo to the mounted VHD, open the app folder, and confirm that the package content is present.
Unmount the VHD.
You can prepare the MSIX image by using the Composite Image File System (CimFS) format that's available in the Windows 10 2004 release. CimFS provides faster mounting and unmounting times and lower memory and CPU consumption than VHD. You can also create the MSIX image with CIM format that's similar to Windows Imaging Format (WIM), or read-only VHD.
Use MSIX app attach in Azure Virtual Desktop
The following sections describe how to use MSIX app attach in your Azure Virtual Desktop environment.
Set up a file share
You can use an SMB network share in your Azure Virtual Desktop environment to host the MSIX image. The network share can be on an IaaS file share, an Azure Files share, or Azure NetApp Files.
Note
Your host pool must be granted read permission on the file share that hosts the MSIX image.
Upload the MSIX image to the file share
MSIX images are separated from the main operating system and reside in the file share. You can upload your MSIX image by using tools such as the Azure portal, PowerShell, the Azure CLI, or AzCopy. You can also use Azure Storage Explorer, which provides an intuitive UI and better performance than the Azure portal.
Create an Azure Virtual Desktop host pool
Azure Virtual Desktop is a desktop and app virtualization service that runs on the cloud. You can deploy and manage virtual desktops by using the Azure portal, PowerShell, or REST interfaces.
To configure the host pools, create app groups, assign users, and publish resources, use the Create a host pool with the Azure portal tutorial.
Create an MSIX app
After your Azure Virtual Desktop environment is ready and has at least one running VM, you can proceed with the step to add the MSIX image to the host pool.
To add the MSIX image to the host pool, you need to obtain the UNC path of the MSIX image. If you're using an Azure file share, select the properties of the MSIX image and convert the URL of the file in the UNC structure.
For example, if your storage account is called contosostorage, your file share is msixfileshare, and your MSIX image is mymsix.vhd, use the following example:
URL
https://contosostorage.files.core.windows.net/msixfileshare/mymsix.vhd

UNC
\\contosostorage.files.core.windows.net\msixfileshare\mymsix.vhd
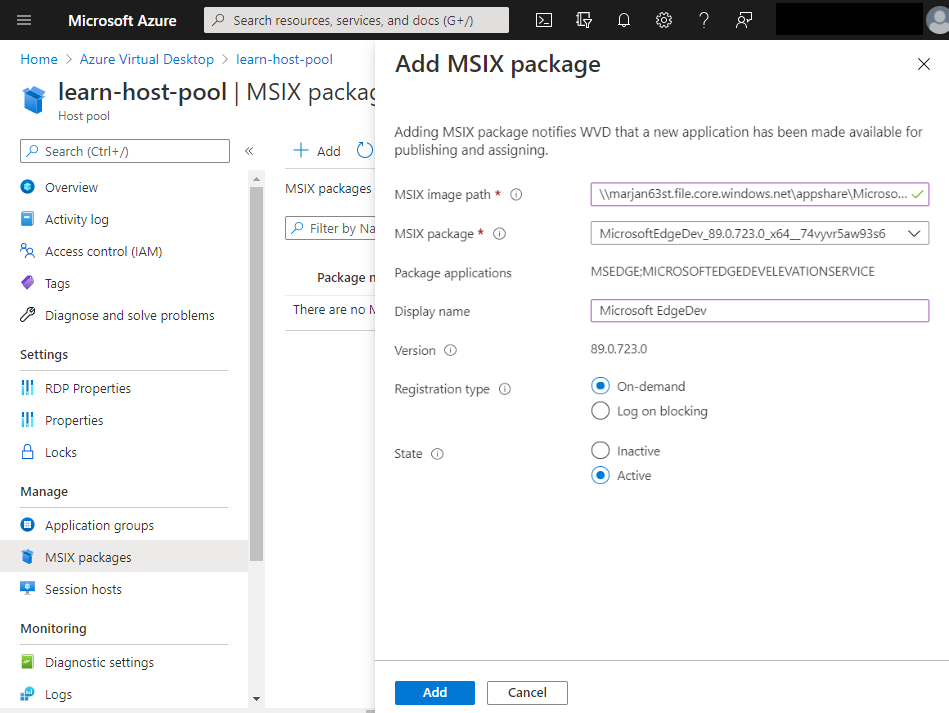
To add an MSIX image in the Azure Virtual Desktop environment:
In the Azure portal, select your Azure Virtual Desktop host pool, and then select the MSIX packages tab.
From the toolbar, select + Add.
Provide the following information:
Item Description MSIX image path UNC path of the MSIX image. MSIX package MSIX package, loaded from the MSIX image. Package applications List of MSIX applications available in an MSIX package. Display name Optional display name to be presented on the interface. Version MSIX package version automatically delivered from parsing the package. Registration type On-demand: Users start the MSIX application on demand.
Log on Blocking: Registration happens during the logon session.State Active: Users interact with active packages.
Inactive: Inactive packages are not delivered to users.
A remote desktop agent on a randomly selected VM from the host pool will access the MSIX image from the UNC path and will load it in the host pool.
Publish applications
To publish MSIX applications by using MSIX app attach, use the following procedure. The state of the app in the host pool should be Active.
In the Azure portal, go to your Azure Virtual Desktop environment and select Application Group.
If you're publishing MSIX app attach to remote desktops, select the existing desktop application group.
From the Application group menu in the Manage section, select Applications.
From the toolbar, select + Add.
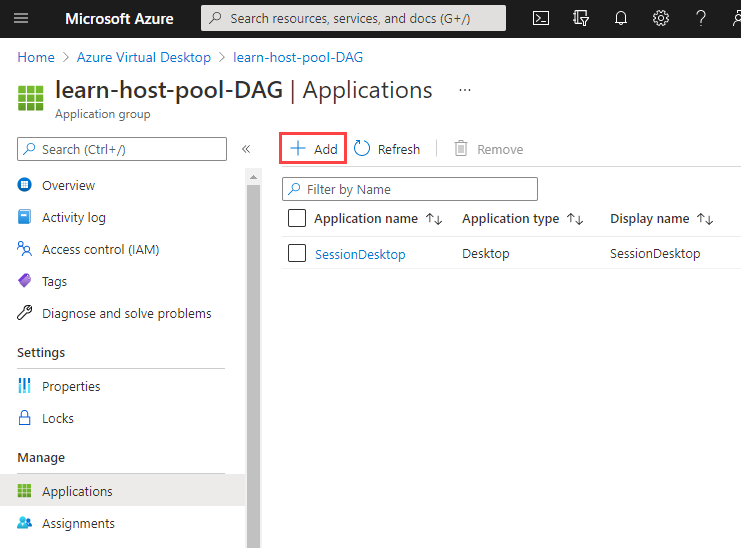
Select the application source MSIX package and add the existing MSIX application.
To publish MSIX applications to a RemoteApp group, follow a similar procedure. When you create a RemoteApp group, on the Applications tab, select the application source MSIX package and add the existing MSIX application. Or, on an existing RemoteApp group, select Applications to add the MSIX application.

Assign users or groups
To assign specific users or groups to receive MSIX apps, select them on the Assignments tab in the desktop or remote application group.
Maintain MSIX app attach with updates and removals
You can manage new versions of MSIX applications by uploading a new VHD on a file share. The process is similar to publishing a new MSIX application.
You can get the new version of an MSIX application by signing out and signing in again. After you sign in, the new application is staged and registered.
You can change the MSIX package registration type by opening the MSIX package. Then, in Registration Type, select On-demand or Log on blocking, as desired.
To remove the application by using MSIX app attach, remove the app from Azure Virtual Desktop and from the file share.