Volume encryption for Azure NetApp Files volumes
Customer-managed keys for Azure NetApp Files volume encryption enable you to use your own keys rather than a platform-managed key when creating a new volume. With customer-managed keys, you can fully manage the relationship between a key's life cycle, key usage permissions, and auditing operations on keys.
Key management in Azure
In Azure NetApp Files, encryption keys can be either platform managed, or customer managed.
- Platform-managed keys (PMKs)
- These are encryption keys generated, stored, and managed entirely by Azure. Customers don't interact with PMKs.
- By default key management for Azure NetApp Files is handled by the service, using platform-managed keys. A unique XTS-AES-256 data encryption key is generated for each volume.
- An encryption key hierarchy is used to encrypt and protect all volume keys.
- These encryption keys are never displayed or reported in an unencrypted format. When you delete a volume, Azure NetApp Files immediately deletes the volume's encryption keys.
- Customer-managed keys (CMK)
- Customer-managed keys for Azure NetApp Files volume encryption can be used where keys are stored in Azure Key Vault.
- These keys are read, created, deleted, updated, and/or administered by one or more customers. Keys stored in a customer-owned key vault or hardware security module (HSM) are CMKs.
- With customer-managed keys, you can fully manage the relationship between a key's life cycle, key usage permissions, and auditing operations on keys.
- Bring Your Own Key (BYOK) is a CMK scenario in which a customer imports (brings) keys from an outside storage location into an Azure key management service (see the Azure Key Vault: Bring your own key specification).
Customer-managed keys can be stored on-premises or, more commonly, in a cloud key management service.
Azure key management services
Azure offers several options for storing and managing your keys in the cloud, including Azure Key Vault, Azure Managed HSM, Azure Dedicated HSM, and Azure Payment HSM. These options differ in terms of their FIPS compliance level, management overhead, and intended applications.
Encryption-at-rest
Azure Key Vault and Azure Key Vault Managed HSM have integrations with Azure Services and Microsoft 365 for Customer Managed Keys, meaning customers may use their own keys in Azure Key Vault and Azure Key Managed HSM for encryption-at-rest of data stored in these services. Dedicated HSM and Payments HSM are Infrastructure-as-Service offerings and don't offer integrations with Azure Services.
How customer-managed keys work
The following diagram demonstrates how customer-managed keys work with Azure NetApp Files:
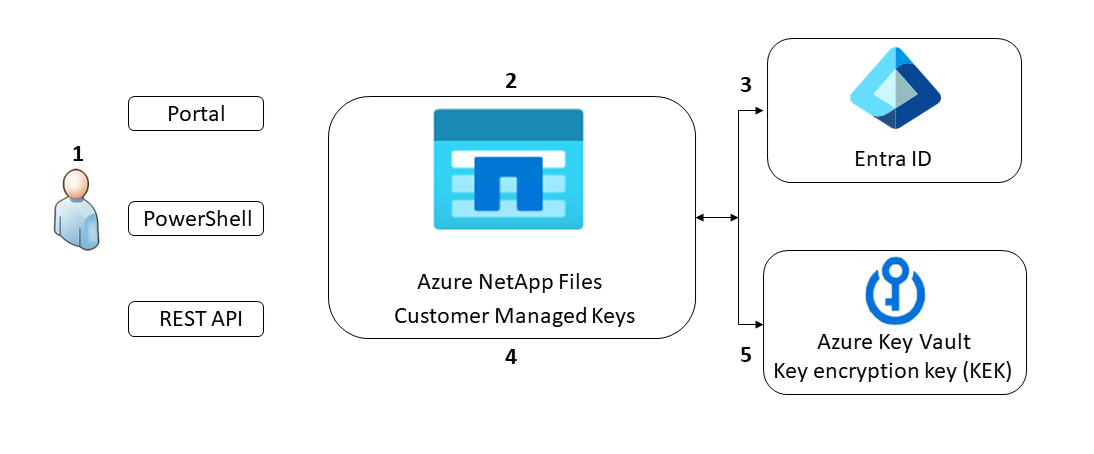
- Azure NetApp Files grants permissions to encryption keys to a managed identity. The managed identity is either a user-assigned managed identity that you create and manage, or a system-assigned managed identity associated with the NetApp account.
- You configure encryption with a customer-managed key for the NetApp account.
- You use the managed identity to which the Azure Key Vault admin granted permissions in step 1 to authenticate access to Azure Key Vault via Microsoft Entra ID.
- Azure NetApp Files wraps the account encryption key with the customer-managed key in Azure Key Vault.
- Customer-managed keys have no performance impact on Azure NetApp Files. Its only difference from platform-managed keys is how the key is managed.
- For read/write operations, Azure NetApp Files sends requests to Azure Key Vault to unwrap the account encryption key to perform encryption and decryption operations.
Requirements
Before creating your first customer-managed key volume, you must set up:
- An Azure Key Vault, containing at least one key.
- The key vault must have soft delete and purge protection enabled.
- The key must be of type RSA.
- The key vault must have an Azure Private Endpoint.
- The private endpoint must reside in a different subnet than the one delegated to Azure NetApp Files. The subnet must be in the same VNet as the one delegated to Azure NetApp.
Configure a NetApp account to use customer-managed keys
Using Azure portal
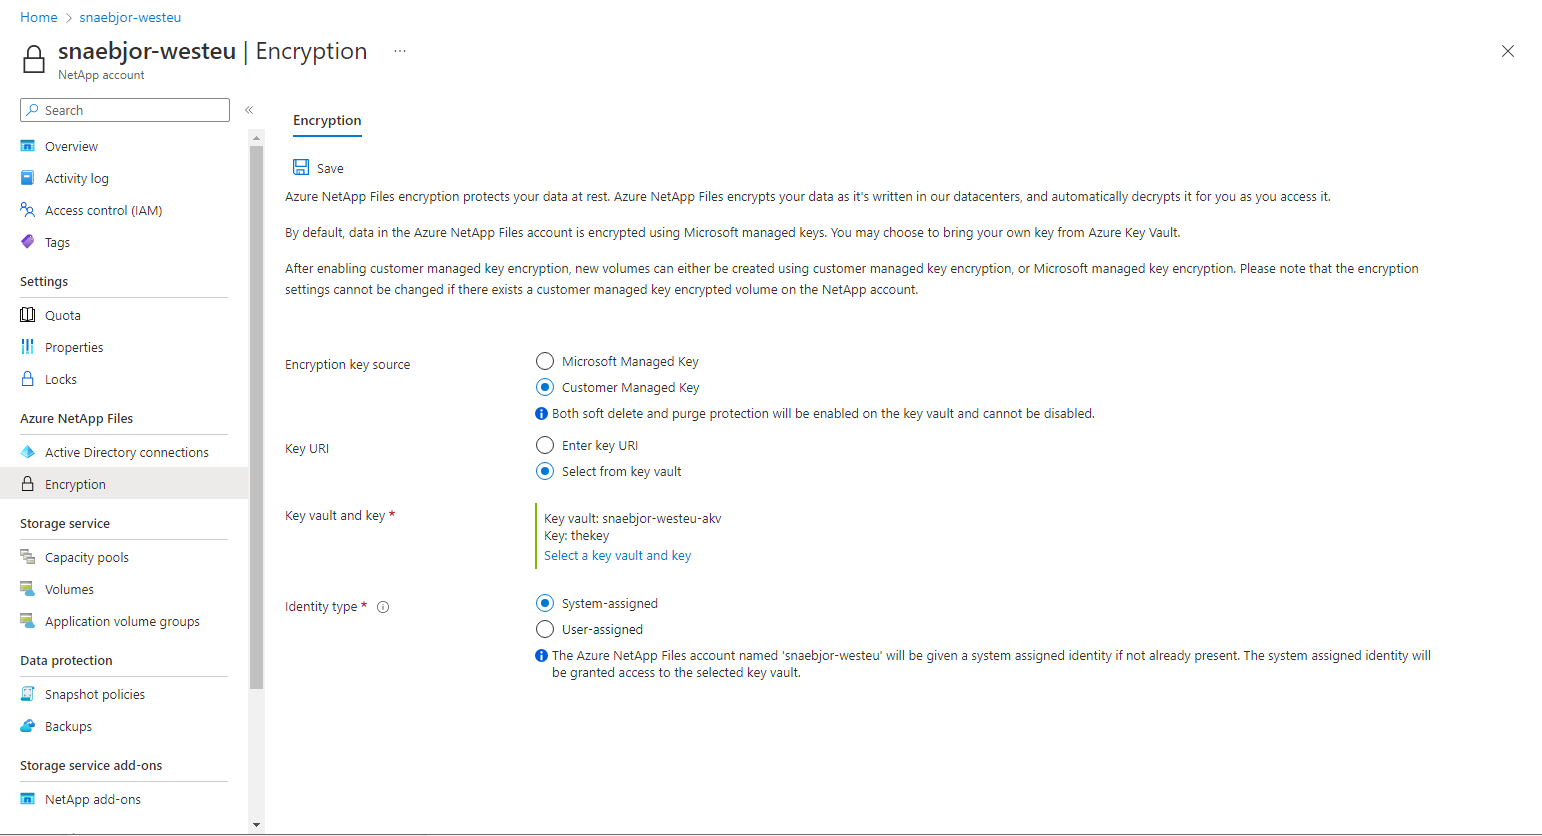
In the Azure portal and under Azure NetApp Files, select Encryption. The Encryption page enables you to manage encryption settings for your NetApp account.
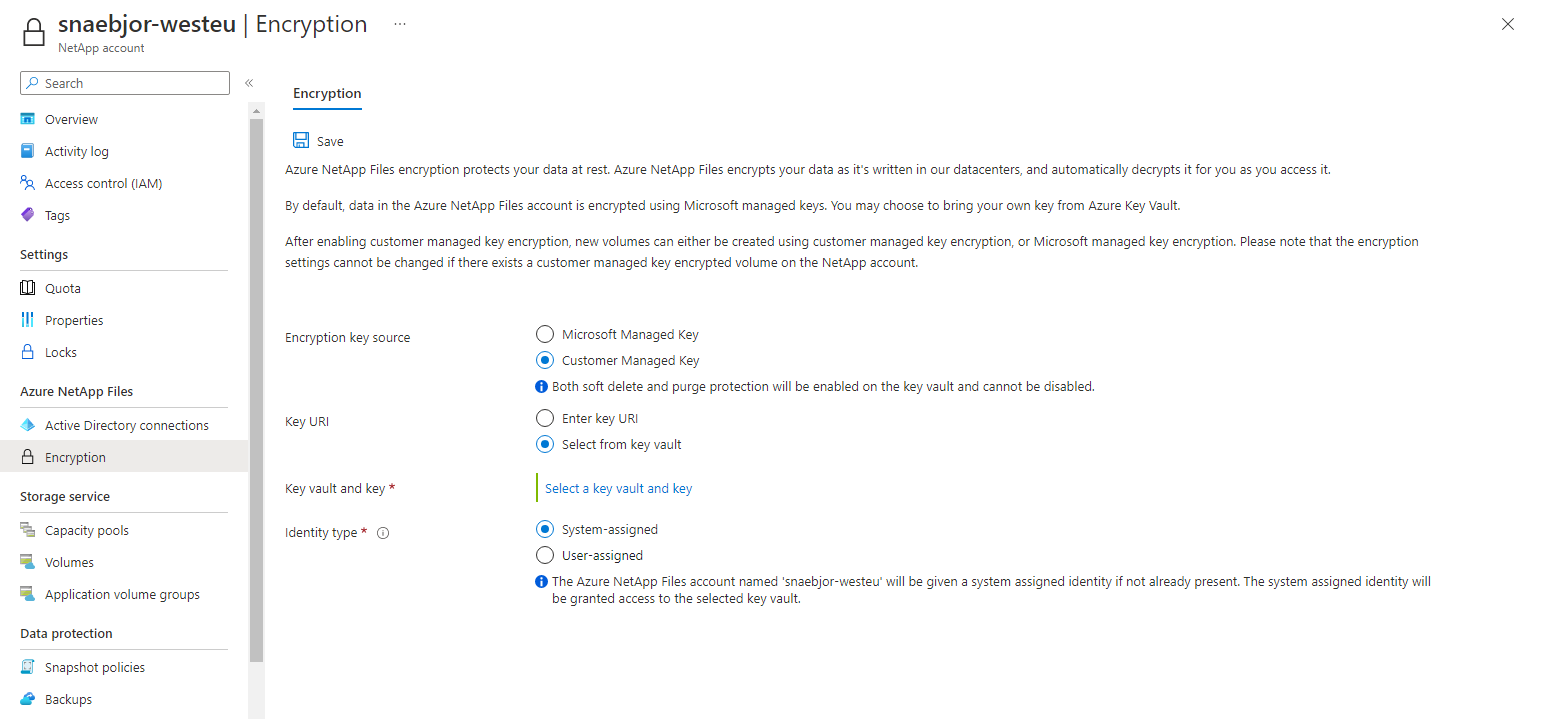
When you set your NetApp account to use customer-managed key, you have two ways to specify the Key URI:
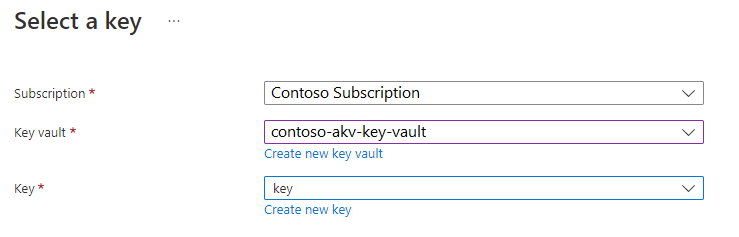
The Select from key vault option allows you to select a key vault and a key.
The Enter key URI option allows you to enter manually the key URI.
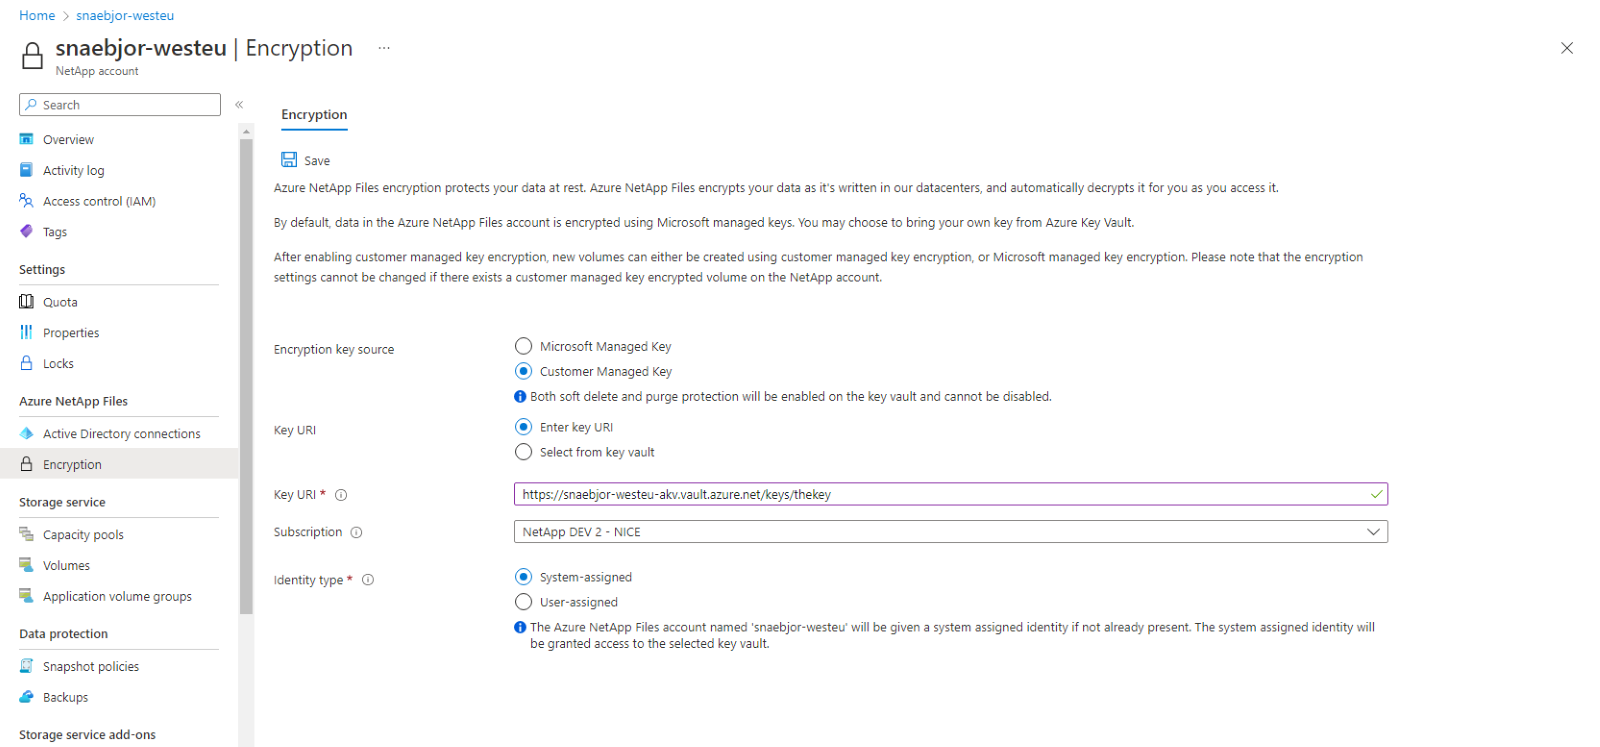
You select the identity type that you want to use for authentication to the Azure Key Vault. If your Azure Key Vault is configured to use Vault access policy as its permission model, both options are available.
If you choose System-assigned, select the Save button. The Azure portal configures the NetApp account automatically by adding a system-assigned identity to your NetApp account.
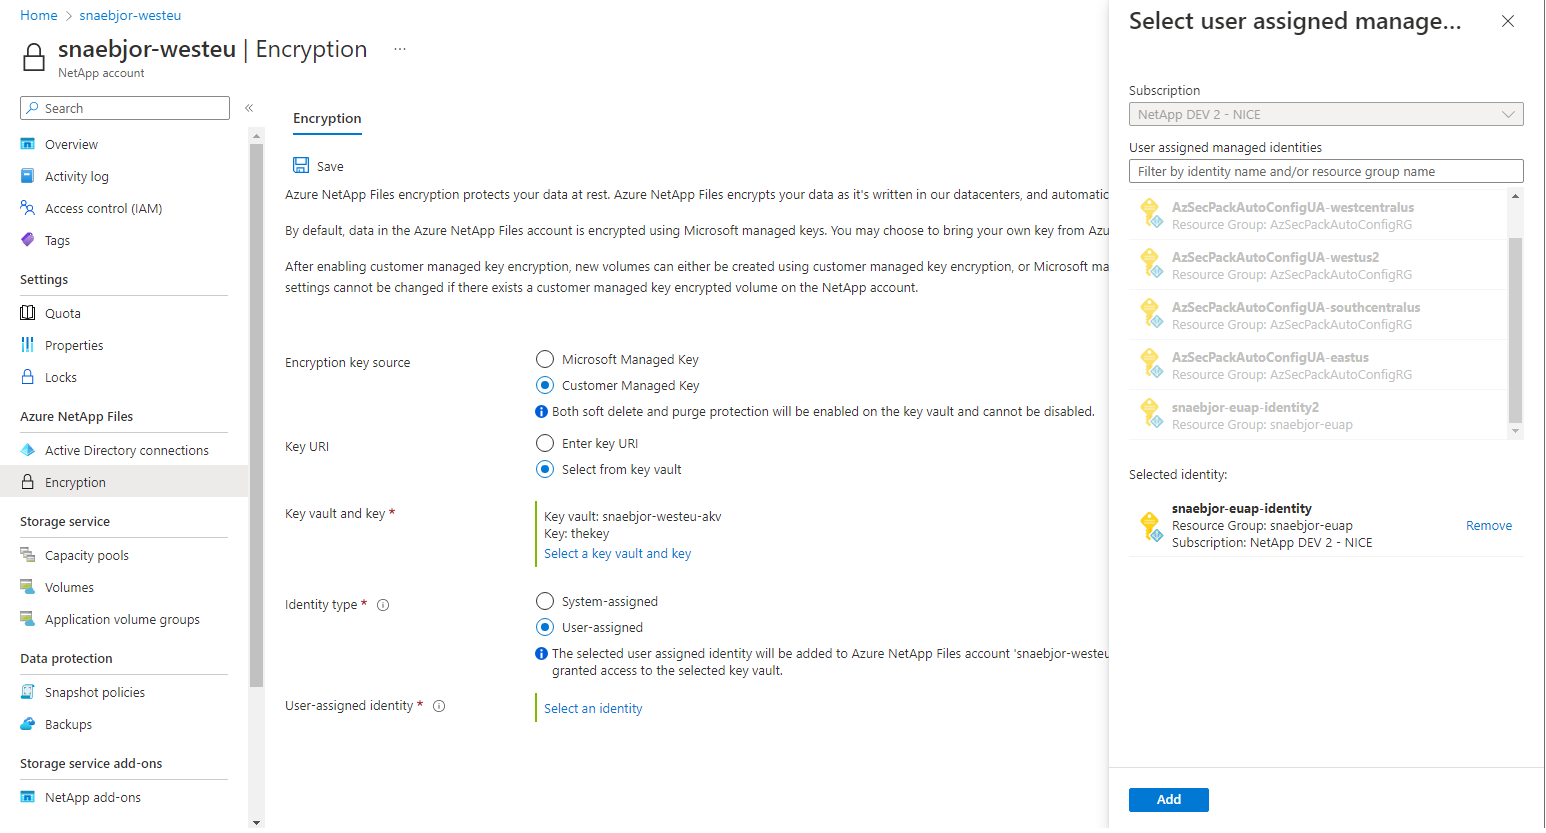
If you choose User-assigned, you must select an identity. Choose Select an identity to open a context pane where you select a user-assigned managed identity.
Using Azure CLI
Use a system-assigned identity
Update your NetApp account to use a system-assigned identity.
az netappfiles account update --name <account_name> --resource-group <resource_group> --identity-type SystemAssignedTo use an access policy, create a variable that includes the principal ID of the account identity, then run
az keyvault set-policyand assign permissions of "Get", "Encrypt", and "Decrypt".netapp_account_principal=$(az netappfiles account show --name <account_name> --resource-group <resource_group> --query identity.principalId --output tsv) az keyvault set-policy --name <key_vault_name> --resource-group <resource-group> --object-id $netapp_account_principal --key-permissions get encrypt decryptUpdate the NetApp account with your key vault.
key_vault_uri=$(az keyvault show --name <key-vault> --resource-group <resource_group> --query properties.vaultUri --output tsv)

az netappfiles account update --name <account_name> --resource-group <resource_group> --key-source Microsoft.Keyvault --key-vault-uri $key_vault_uri --key-name <key>
Use a new user-assigned identity
Create a new user-assigned identity.
az identity create --name <identity_name> --resource-group <resource_group>Set an access policy for the key vault.
user_assigned_identity_principal=$(az identity show --name <identity_name> --resource-group <resource_group> --query properties.principalId -output tsv)

az keyvault set-policy --name <key_vault_name> --resource-group <resource-group> --object-id $user_assigned_identity_principal --key-permissions get encrypt decrypt
Assign the user-assigned identity to the NetApp account and update the key vault encryption.
key_vault_uri=$(az keyvault show --name <key-vault> --resource-group <resource_group> --query properties.vaultUri --output tsv)

user_assigned_identity=$(az identity show --name <identity_name> --resource-group <resource_group> --query id -output tsv)

az netappfiles account update --name <account_name> --resource-group <resource_group> --identity-type UserAssigned --key-source Microsoft.Keyvault --key-vault-uri $key_vault_uri --key-name <key> --keyvault-resource-id <key-vault> --user-assigned-identity $user_assigned_identity
Using Azure PowerShell
Enable access for system-assigned identity
Update your NetApp account to use system-assigned identity.
$netappAccount = Update-AzNetAppFilesAccount -ResourceGroupName <resource_group> -Name <account_name> -AssignIdentityTo use an access policy, run
Set-AzKeyVaultAccessPolicywith the key vault name, the principal ID of the account identity, and the permissions "Get", "Encrypt", and "Decrypt".Set-AzKeyVaultAccessPolicy -VaultName <key_vault_name> -ResourceGroupname <resource_group> -ObjectId $netappAccount.Identity.PrincipalId -PermissionsToKeys get,encrypt,decryptUpdate your NetApp account with the key vault information.
Update-AzNetAppFilesAccount -ResourceGroupName $netappAccount.ResourceGroupName -AccountName $netappAccount.ResourceGroupName -KeyVaultEncryption -KeyVaultUri <keyVaultUri> -KeyName <keyName>
Enable access for user-assigned identity
Create a new user-assigned identity.
$userId = New-AzUserAssignedIdentity -ResourceGroupName <resourceGroupName> -Name $userIdNameAssign the access policy to the key vault.
Set-AzKeyVaultAccessPolicy -VaultName <key_vault_name> -ResourceGroupname <resource_group> -ObjectId $userId.PrincipalId -PermissionsToKeys get,encrypt,decrypt -BypassObjectIdValidationAssign the user-assigned identity to the NetApp account and update the key vault encryption.
$netappAccount = Update-AzNetAppFilesAccount -ResourceGroupName <resource_group> -Name <account_name> -IdentityType UserAssigned -UserAssignedIdentityId $userId.Id -KeyVaultEncryption -KeyVaultUri <keyVaultUri> -KeyName <keyName> -EncryptionUserAssignedIdentity $userId.Id
You can alternately use role-based access control to grant access to the key vault.
Configure customer-managed keys with managed Hardware Security Module (HSM)
Azure NetApp Files volume encryption with customer-managed keys with the managed Hardware Security Module (HSM) is an extension to customer-managed keys for Azure NetApp Files volumes encryption feature.
Configure customer-managed keys with managed HSM for system-assigned identity
When you configure customer-managed keys with a system-assigned identity, Azure configures the NetApp account automatically by adding a system-assigned identity. The access policy is created on your Azure Key Vault with key permissions of Get, Encrypt, and Decrypt.
To use a system-assigned identity, the Azure Key Vault must be configured to use Vault access policy as its permission model. Otherwise, you must use a user-assigned identity.
Configure customer-managed keys with managed HSM for user-assigned identity
When you select User-assigned, a context pane opens allowing you option to select the identity.
- If your Azure Key Vault is configured to use a Vault access policy, Azure configures the NetApp account automatically and adds the user-assigned identity to your NetApp account. The access policy is created on your Azure Key Vault with key permissions of Get, Encrypt, and Decrypt.
- If your Azure Key Vault is configured to use Azure role-based access control (RBAC), ensure the selected user-assigned identity has a role assignment on the key vault with permissions for data actions:
- "Microsoft.KeyVault/vaults/keys/read"
- "Microsoft.KeyVault/vaults/keys/encrypt/action"
- "Microsoft.KeyVault/vaults/keys/decrypt/action"
The user-assigned identity you select is added to your NetApp account. Due to RBAC being customizable, the Azure portal doesn't configure access to the key vault.