SIM management
After the deployment of a private mobile network, you need to manage the SIMs for attached user equipment (UE) on a routine basis. For example, you might need to provision a SIM for a newly attached UE, or you might need to adjust SIM groups due to application requirement changes.
This unit introduces you to the SIM management tasks, such as SIM provisioning and SIM group management.
Provision new SIMs
Azure Private 5G Core uses SIM resources to represent the physical SIMs or eSIMs that the UEs in a private mobile network use. For the UEs to communicate with the Data Networks (DNs) through the packet core instances, you need to provision their SIMs with the SIM resources.
You can provision SIMs either through the Azure portal or an Azure template.
Provision new SIMs through the Azure portal
You can use one of the following methods to provision SIMs:
- Manually enter each provisioning value into fields in the Azure portal. Use this method if you're provisioning one SIM.
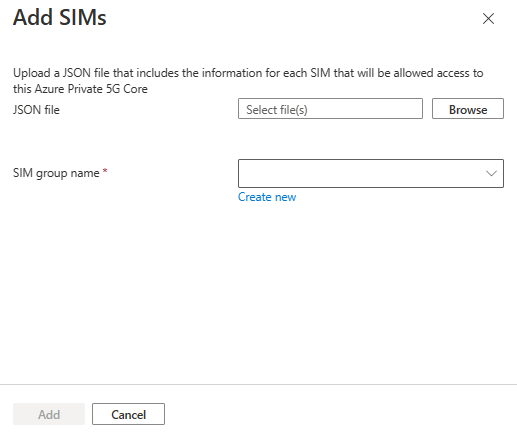
- Use a JSON file containing values for one or more SIM resources. Use this method if you're provisioning multiple SIMs.
Note
- If you want to assign a SIM policy to a SIM you provision, you must have already created the relevant SIM policy.
- You can create a new SIM group when provisioning the SIMs, or you can choose an existing SIM group.
If you want to use a JSON file to add SIM details, take these steps to create the file:
Prepare the required field values for each SIM.
For details about the fields, see Collect the required information for your SIMs.
Create the file with appropriate fields and their values.
For example, the following lines specify the details for a SIM:
{
   "simName": "SIM1",
   "integratedCircuitCardIdentifier": "8912345678901234566",
   "internationalMobileSubscriberIdentity": "001019990010001",
   "authenticationKey": "00112233445566778899AABBCCDDEEFF",
   "operatorKeyCode": "63bfa50ee6523365ff14c1f45f88737d",
   "deviceType": "Cellphone"
}
To provision the SIMs, take these steps:
Open the Mobile Network resource representing the private mobile network in which you want to provision the SIMs.
Select SIMs from the resource menu, and then select the Create button.
Select one of the following options:
If you want to manually enter each provisioning value of the SIM, select Add manually, and then add the SIM field values in Add SIMs on the right, as shown in the following screenshot:

If you want to use a JSON file, select Upload JSON from file, and then upload the JSON file in Add SIMs on the right, as shown in the following screenshot:
For detailed instructions on provisioning new SIMs through the Azure portal, see Provision new SIMs for Azure Private 5G Core - Azure portal.
Provision new SIMs through an ARM template
If you're familiar with ARM templates, you can create an ARM template that specifies the SIMs you want to provision, and then use the template to create all the SIMs at once.
From the Azure Private 5G Core REST API document, you can get a list of fields that you need to specify for each SIM. Because the Resource Manager converts a template into REST API operations when you deploy the template, the parameters in the API requests are the same as the fields in the ARM template. For example, for a SIM, you can find information about the integratedCircuitCardIdentifier field in the Azure REST API article SIMs - Create or update. For details about the fields you need to specify for a SIM, see SIMs.
The article Provision new SIMs for Azure Private 5G Core Preview - ARM template provides an ARM template example, with which you can deploy new SIMs.
Manage SIMs and SIM groups
Once SIMs are provisioned, you might need to make configuration changes to them. For example, for a SIM to communicate with a DN, you need to assign a SIM policy to it. Additionally, you might want to assign static IP addresses to the SIMs.
For easier management, you can categorize SIMs into SIM groups. Each SIM must be a member of a SIM group but can't be a member of more than one.
Assign SIM policies to SIMs
SIM policies help you to control the network traffic between the UEs that use the SIMs and relevant DNs. SIMs need an assigned SIM policy before they can use your private mobile network.
To assign a SIM policy to one or more SIMs, take these steps:
- Open the Mobile Network resource representing the private mobile network containing the SIMs.
- Select SIMs from the resource menu.
- For each SIM policy you want to assign to one or more SIMs, select the relevant SIMs, and then select the Assign SIM policy button.
- On the Assign SIM policy pane, select the SIM policy you want to assign, and then select Assign SIM policy.
For detailed instructions, see Manage existing SIMs.
Tip
- To change the SIM policy of a SIM, assign it a new SIM policy.
- To assign a SIM policy to the SIMs in a SIM group, select relevant SIMs in the group, and then select Assign SIM policy.
Assign static IP addresses to SIMs
If you configure static IP address allocation for your packet core instances, you can assign static IP addresses to the SIMs you provisioned. With a static IP address, a UE receives the same IP address every time it connects to the private mobile network. A static IP address is useful when you want applications to consistently connect to the same device with the same IP address.
Note
- Each IP address must come from the pool you assigned for static IP address allocation when you created the relevant data network.
- You can assign a different static IP address for each DN to the same SIM.
To assign static IP addresses to SIMs, take these steps:
Open the Mobile Network resource representing the private mobile network containing the SIMs.
Select SIMs from the resource menu.
Select the SIMs to which you want to assign static IP addresses, and then select Assign Static IPs.
On the right, the Assign static IP configurations box is displayed, as shown in the following screenshot:
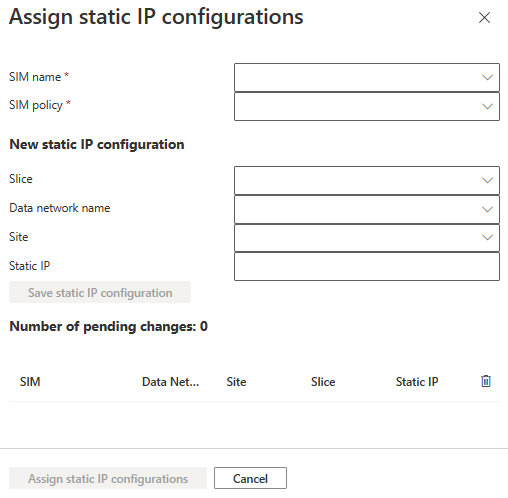
Continue with the following operations:
- Select each SIM and then specify appropriate values for each field.
- Select the Save static IP configuration button.
For detailed instructions, see Manage existing SIMs.
Tip
To assign static IP addresses to the SIMs in a SIM group, select relevant SIMs in the group, and then select Assign Static IPs.
Modify SIMs
You can edit the device type of a SIM after you provision it. If you want to modify other properties of the SIM, delete the SIM, and then provision it again.
To modify the device type of a SIM, take these steps:
- Open the Mobile Network resource representing the private mobile network containing the SIM.
- Select SIMs from the resource menu, and then select the SIM of which you want to modify the device type.
- Select the Edit device type button, and then edit the device type appropriately.
To delete SIMs, take these steps:
- Open the Mobile Network resource representing the private mobile network containing the SIM.
- Select SIMs from the resource menu, and then select the SIM that you want to delete.
- Select the Delete button.
For detailed instructions, see Manage existing SIMs.
Manage SIM groups
SIM groups allow you to sort SIMs into categories for easier management. For example, you might want to categorize the SIMs by their purpose or by their on-site location.
If you configured the customer-managed keys (CMK) encryption for a SIM group, you can modify the key URI and user-assigned identity.
Tip
You can optionally add SIMs when you create a SIM group.
To create a SIM group, take these steps:
- Open the Mobile Network resource representing the private mobile network in which you want to add the SIM group.
- Select SIM groups from the resource menu, and then select the Create button.
- Specify the value for each field appropriately.
To edit the encryption configuration of an existing SIM group, take these steps:
- Open the Mobile Network resource representing the private mobile network containing the SIM group.
- Select SIM groups from the resource menu, and then open the SIM group of which you want to edit the encryption configuration.
- Select Encryption from the resource menu, and then make appropriate changes.
To delete a SIM group, take these steps:
- Open the Mobile Network resource representing the private mobile network containing the SIM group.
- Select SIM groups from the resource menu, and then select the SIM group you want to delete.
- Select the Delete button.
For detailed instructions on managing SIM groups, see Manage SIM groups.