Exercise - Seed a storage account and database
You updated your workflow to build and deploy your website's application to the Azure App Service app defined in your Bicep file. But the smoke test job is failing because the database isn't working yet. In this unit, you'll deploy a new Azure SQL logical server and database, and you'll configure your workflow to build and deploy the database's schema. You'll also update your workflow to add some sample product data for your test environment so that your team can try out the website.
In the process, you'll:
- Add a blob container to the Azure storage account.
- Add an Azure SQL logical server and database.
- Update the build job to build the database project into a DACPAC file.
- Add new variables and secrets for the Azure SQL logical server and database.
- Update your workflow to use the new variables and secrets.
- Add new workflow steps to deploy your DACPAC file.
- Run the workflow and view the website.
Add a storage container
Your Bicep file already defines a storage account, but it doesn't define a blob container. Here, you add a blob container to your Bicep file. You also provide the name of the storage account and blob container to the application by using its configuration settings. That way, the app knows which storage account to access.
In Visual Studio Code, open the main.bicep file in the deploy folder.
Below the variables that define resource names (near line 27), add a new variable definition for the blob storage container's name:
var storageAccountImagesBlobContainerName = 'toyimages'Update the
storageAccountresource to define the blob container:resource storageAccount 'Microsoft.Storage/storageAccounts@2022-09-01' = { name: storageAccountName location: location kind: 'StorageV2' sku: environmentConfigurationMap[environmentType].storageAccount.sku resource blobService 'blobServices' = { name: 'default' resource storageAccountImagesBlobContainer 'containers' = { name: storageAccountImagesBlobContainerName properties: { publicAccess: 'Blob' } } } }Update the app's
appSettingsproperty to add two new application settings, one for the storage account name and one for the blob container name:resource appServiceApp 'Microsoft.Web/sites@2022-03-01' = { name: appServiceAppName location: location properties: { serverFarmId: appServicePlan.id httpsOnly: true siteConfig: { appSettings: [ { name: 'APPINSIGHTS_INSTRUMENTATIONKEY' value: applicationInsights.properties.InstrumentationKey } { name: 'APPLICATIONINSIGHTS_CONNECTION_STRING' value: applicationInsights.properties.ConnectionString } { name: 'ReviewApiUrl' value: reviewApiUrl } { name: 'ReviewApiKey' value: reviewApiKey } { name: 'StorageAccountName' value: storageAccount.name } { name: 'StorageAccountBlobEndpoint' value: storageAccount.properties.primaryEndpoints.blob } { name: 'StorageAccountImagesContainerName' value: storageAccount::blobService::storageAccountImagesBlobContainer.name } ] } } }At the end of the file contents, add new outputs to expose the names of the storage account and blob container:
output storageAccountName string = storageAccount.name
output storageAccountImagesBlobContainerName string = storageAccount::blobService::storageAccountImagesBlobContainer.name
Save your changes to the file.
Commit your changes to your Git repository, but don't push them yet. In the Visual Studio Code terminal, run the following commands:
git add .
git commit -m "Add storage container"
Add an Azure SQL logical server and database
Your Bicep file doesn't currently deploy an Azure SQL logical server or database. In this section, you add these resources to your Bicep file.
In the main.bicep file, add two new parameters below the
reviewApiKeyparameter near the top of the file:@description('The administrator login username for the SQL server.') param sqlServerAdministratorLogin string @secure() @description('The administrator login password for the SQL server.') param sqlServerAdministratorLoginPassword stringBelow the variables that define resource names, add new variables to define the names of your Azure SQL logical server and database:
var sqlServerName = 'toy-website-${resourceNameSuffix}'
var sqlDatabaseName = 'Toys'
Below the variables you just added, define a new variable that creates a connection string for the application to access the database:
// Define the connection string to access Azure SQL.
var sqlDatabaseConnectionString = 'Server=tcp:${sqlServer.properties.fullyQualifiedDomainName},1433;Initial Catalog=${sqlDatabase.name};Persist Security Info=False;User ID=${sqlServerAdministratorLogin};Password=${sqlServerAdministratorLoginPassword};MultipleActiveResultSets=False;Encrypt=True;TrustServerCertificate=False;Connection Timeout=30;'
Note
For simplicity, the application uses the administrator login and password to access the database. This isn't good practice for a production solution, though. It's better to use an App Service managed identity to access the database, and grant the managed identity the minimum permissions needed by the application. We link to more information in the Summary page at the end of the module.
Near the end of the file contents, above the outputs, add the Azure SQL logical server and database resources:
resource sqlServer 'Microsoft.Sql/servers@2022-05-01-preview' = {
  name: sqlServerName
  location: location
  properties: {
    administratorLogin: sqlServerAdministratorLogin
    administratorLoginPassword: sqlServerAdministratorLoginPassword
  }
}

resource sqlServerFirewallRule 'Microsoft.Sql/servers/firewallRules@2022-05-01-preview' = {
  parent: sqlServer
  name: 'AllowAllWindowsAzureIps'
  properties: {
    endIpAddress: '0.0.0.0'
    startIpAddress: '0.0.0.0'
  }
}

resource sqlDatabase 'Microsoft.Sql/servers/databases@2022-05-01-preview' = {
  parent: sqlServer
  name: sqlDatabaseName
  location: location
  sku: environmentConfigurationMap[environmentType].sqlDatabase.sku
}
Update the
environmentConfigurationMapvariable to define the SKUs to use for your database for each environment:var environmentConfigurationMap = { Production: { appServicePlan: { sku: { name: 'S1' capacity: 1 } } storageAccount: { sku: { name: 'Standard_LRS' } } sqlDatabase: { sku: { name: 'Standard' tier: 'Standard' } } } Test: { appServicePlan: { sku: { name: 'F1' } } storageAccount: { sku: { name: 'Standard_GRS' } } sqlDatabase: { sku: { name: 'Standard' tier: 'Standard' } } } }Add another app setting to your App Service app for the database connection string:
resource appServiceApp 'Microsoft.Web/sites@2022-03-01' = {
  name: appServiceAppName
  location: location
  properties: {
    serverFarmId: appServicePlan.id
    httpsOnly: true
    siteConfig: {
      appSettings: [
        {
          name: 'APPINSIGHTS_INSTRUMENTATIONKEY'
          value: applicationInsights.properties.InstrumentationKey
        }
        {
          name: 'APPLICATIONINSIGHTS_CONNECTION_STRING'
          value: applicationInsights.properties.ConnectionString
        }
        {
          name: 'ReviewApiUrl'
          value: reviewApiUrl
        }
        {
          name: 'ReviewApiKey'
          value: reviewApiKey
        }
        {
          name: 'StorageAccountName'
          value: storageAccount.name
        }
        {
          name: 'StorageAccountBlobEndpoint'
          value: storageAccount.properties.primaryEndpoints.blob
        }
        {
          name: 'StorageAccountImagesContainerName'
          value: storageAccount::blobService::storageAccountImagesBlobContainer.name
        }
        {
          name: 'SqlDatabaseConnectionString'
          value: sqlDatabaseConnectionString
        }
      ]
    }
  }
}
At the bottom of the file, add outputs to expose the host name of the Azure SQL logical server and the name of the database:
output appServiceAppName string = appServiceApp.name
output appServiceAppHostName string = appServiceApp.properties.defaultHostName
output storageAccountName string = storageAccount.name
output storageAccountImagesBlobContainerName string = storageAccount::blobService::storageAccountImagesBlobContainer.name
output sqlServerFullyQualifiedDomainName string = sqlServer.properties.fullyQualifiedDomainName
output sqlDatabaseName string = sqlDatabase.name
Save your changes to the file.
Add new build steps for the database project
Your website developers have prepared a Visual Studio database project that deploys and configures your website database table. Here, you update your workflow build called workflow to build the database project into a DACPAC file and upload it as a workflow artifact.
Open the build.yml file in the .github/workflows folder.
To build the Visual Studio database project and upload the generated DACPAC file as a workflow artifact, add the build-database job:
name: build-website

on:
  workflow_call:

jobs:
  build-application:
    name: Build application
    runs-on: ubuntu-latest
    steps:
    - uses: actions/checkout@v3

    - name: Install .NET Core
      uses: actions/setup-dotnet@v3
      with:
        dotnet-version: 3.1

    - name: Build publishable website
      run: |
        dotnet publish --configuration Release
      working-directory: ./src/ToyCompany/ToyCompany.Website

    - name: Zip publishable website
      run: |
        zip -r publish.zip .
      working-directory: ./src/ToyCompany/ToyCompany.Website/bin/Release/netcoreapp3.1/publish

    - name: Upload website as workflow artifact
      uses: actions/upload-artifact@v3
      with:
        name: website
        path: ./src/ToyCompany/ToyCompany.Website/bin/Release/netcoreapp3.1/publish/publish.zip

  build-database:
    name: Build database
    runs-on: windows-latest
    steps:
    - uses: actions/checkout@v3

    - name: Prepare MSBuild
      uses: microsoft/setup-msbuild@v1.1

    - name: Build database project
      working-directory: ./src/ToyCompany/ToyCompany.Database
      run: MSBuild.exe ToyCompany.Database.sqlproj -property:Configuration=Release

    - name: Upload website as workflow artifact
      uses: actions/upload-artifact@v3
      with:
        name: database
        path: ./src/ToyCompany/ToyCompany.Database/bin/Release/ToyCompany.Database.dacpac
The build-database job uses a Windows runner. Currently, Visual Studio database projects must be built on the Windows operating system.
Save your changes to the file.
Define the secrets
You need to securely store your Azure SQL logical server's administrator password for each environment. You decide to use GitHub secrets to protect the information.
In your browser, go to Settings > Secrets > Actions.
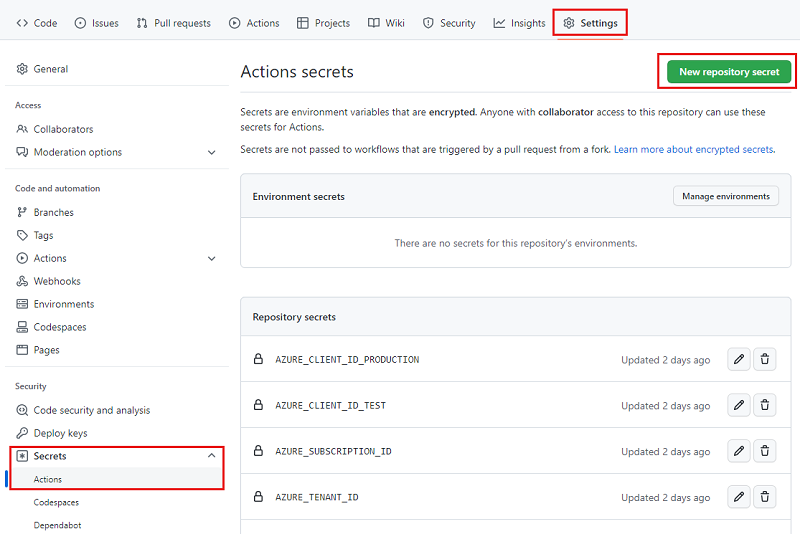
Select the New repository secret button.
Enter SQL_SERVER_ADMINISTRATOR_LOGIN_PASSWORD_TEST as the secret name, and SecurePassword!111 as the value.
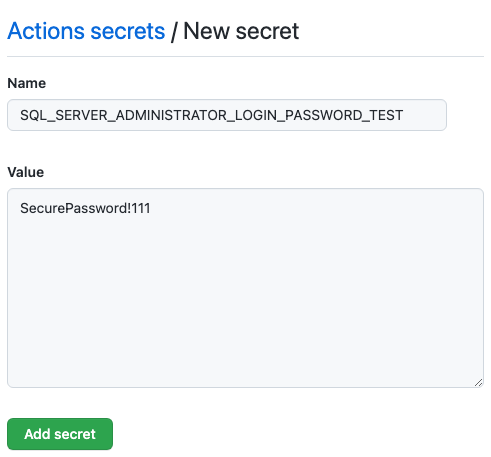
Select Add secret.
Repeat the process to add another secret named SQL_SERVER_ADMINISTRATOR_LOGIN_PASSWORD_PRODUCTION as the secret name, and SecurePassword!999 as the value. Select Add secret.
Add the secrets and inputs to your workflow
In Visual Studio Code, open the deploy.yml file in the .github/workflows folder.
At the top of the file, define a new input named
sqlServerAdministratorLogin, and a new secret namedsqlServerAdministratorLoginPassword:name: deploy on: workflow_call: inputs: environmentType: required: true type: string resourceGroupName: required: true type: string reviewApiUrl: required: true type: string sqlServerAdministratorLogin: required: true type: string secrets: AZURE_CLIENT_ID: required: true AZURE_TENANT_ID: required: true AZURE_SUBSCRIPTION_ID: required: true reviewApiKey: required: true sqlServerAdministratorLoginPassword: required: trueSave your changes to the file.
Open the workflow.yml file.
In the deploy-test definition, define a value for the
sqlServerAdministratorLogininput, and propagate the value for thesqlServerAdministratorLoginPasswordsecret:# Deploy to the test environment. deploy-test: uses: ./.github/workflows/deploy.yml needs: [build, lint] with: environmentType: Test resourceGroupName: ToyWebsiteTest reviewApiUrl: https://sandbox.contoso.com/reviews sqlServerAdministratorLogin: TestToyCompanyAdmin secrets: AZURE_CLIENT_ID: ${{ secrets.AZURE_CLIENT_ID_TEST }} AZURE_TENANT_ID: ${{ secrets.AZURE_TENANT_ID }} AZURE_SUBSCRIPTION_ID: ${{ secrets.AZURE_SUBSCRIPTION_ID }} reviewApiKey: ${{ secrets.REVIEW_API_KEY_TEST }} sqlServerAdministratorLoginPassword: ${{ secrets.SQL_SERVER_ADMINISTRATOR_LOGIN_PASSWORD_TEST }}Repeat the process in the deploy-production definition, with the production environment's values:
# Deploy to the production environment. deploy-production: uses: ./.github/workflows/deploy.yml needs: - lint - build - deploy-test with: environmentType: Production resourceGroupName: ToyWebsiteProduction reviewApiUrl: https://api.contoso.com/reviews sqlServerAdministratorLogin: ToyCompanyAdmin secrets: AZURE_CLIENT_ID: ${{ secrets.AZURE_CLIENT_ID_PRODUCTION }} AZURE_TENANT_ID: ${{ secrets.AZURE_TENANT_ID }} AZURE_SUBSCRIPTION_ID: ${{ secrets.AZURE_SUBSCRIPTION_ID }} reviewApiKey: ${{ secrets.REVIEW_API_KEY_PRODUCTION }} sqlServerAdministratorLoginPassword: ${{ secrets.SQL_SERVER_ADMINISTRATOR_LOGIN_PASSWORD_PRODUCTION }}Save your changes to the file.
Add parameter values and outputs
The Bicep file now has two new mandatory parameters: sqlServerAdministratorLogin and sqlServerAdministratorLoginPassword. Here, you propagate those parameter values from your workflow inputs and secrets, for the validate and deploy jobs. You also propagate the Bicep deployments's outputs to the job's outputs.
Open the deploy.yml file.
Update the validate job's Run preflight validation step to add the new parameters:
jobs: validate: runs-on: ubuntu-latest steps: - uses: actions/checkout@v3 - uses: azure/login@v1 name: Sign in to Azure with: client-id: ${{ secrets.AZURE_CLIENT_ID }} tenant-id: ${{ secrets.AZURE_TENANT_ID }} subscription-id: ${{ secrets.AZURE_SUBSCRIPTION_ID }} - if: inputs.environmentType != 'Production' uses: azure/arm-deploy@v1 name: Run preflight validation with: deploymentName: ${{ github.run_number }} resourceGroupName: ${{ inputs.resourceGroupName }} template: ./deploy/main.bicep parameters: > environmentType=${{ inputs.environmentType }} reviewApiUrl=${{ inputs.reviewApiUrl }} reviewApiKey=${{ secrets.reviewApiKey }} sqlServerAdministratorLogin=${{ inputs.sqlServerAdministratorLogin }} sqlServerAdministratorLoginPassword=${{ secrets.sqlServerAdministratorLoginPassword }} deploymentMode: ValidateUpdate the Run what-if step to add the new parameters:
- if: inputs.environmentType == 'Production' uses: azure/arm-deploy@v1 name: Run what-if with: failOnStdErr: false resourceGroupName: ${{ inputs.resourceGroupName }} template: ./deploy/main.bicep parameters: > environmentType=${{ inputs.environmentType }} reviewApiUrl=${{ inputs.reviewApiUrl }} reviewApiKey=${{ secrets.reviewApiKey }} sqlServerAdministratorLogin=${{ inputs.sqlServerAdministratorLogin }} sqlServerAdministratorLoginPassword=${{ secrets.sqlServerAdministratorLoginPassword }} additionalArguments: --what-ifUpdate the deploy job's Deploy Bicep file step to add the new parameters:
deploy: needs: validate environment: ${{ inputs.environmentType }} runs-on: ubuntu-latest outputs: appServiceAppName: ${{ steps.deploy.outputs.appServiceAppName }} appServiceAppHostName: ${{ steps.deploy.outputs.appServiceAppHostName }} steps: - uses: actions/checkout@v3 - uses: azure/login@v1 name: Sign in to Azure with: client-id: ${{ secrets.AZURE_CLIENT_ID }} tenant-id: ${{ secrets.AZURE_TENANT_ID }} subscription-id: ${{ secrets.AZURE_SUBSCRIPTION_ID }} - uses: azure/arm-deploy@v1 id: deploy name: Deploy Bicep file with: failOnStdErr: false deploymentName: ${{ github.run_number }} resourceGroupName: ${{ inputs.resourceGroupName }} template: ./deploy/main.bicep parameters: > environmentType=${{ inputs.environmentType }} reviewApiUrl=${{ inputs.reviewApiUrl }} reviewApiKey=${{ secrets.reviewApiKey }} sqlServerAdministratorLogin=${{ inputs.sqlServerAdministratorLogin }} sqlServerAdministratorLoginPassword=${{ secrets.sqlServerAdministratorLoginPassword }}In the deploy job's definition, add new outputs for the Bicep file's outputs:
deploy: needs: validate environment: ${{ inputs.environmentType }} runs-on: ubuntu-latest outputs: appServiceAppName: ${{ steps.deploy.outputs.appServiceAppName }} appServiceAppHostName: ${{ steps.deploy.outputs.appServiceAppHostName }} storageAccountName: ${{ steps.deploy.outputs.storageAccountName }} storageAccountImagesBlobContainerName: ${{ steps.deploy.outputs.storageAccountImagesBlobContainerName }} sqlServerFullyQualifiedDomainName: ${{ steps.deploy.outputs.sqlServerFullyQualifiedDomainName }} sqlDatabaseName: ${{ steps.deploy.outputs.sqlDatabaseName }}
Add database and data seed jobs
In this section, you define the steps that are required to deploy the database components of your website. First, you add a step to deploy the DACPAC file that the workflow previously built. Then, you add sample data to the database and storage account, but only for non-production environments.
Below the deploy-website job, add a new job to deploy the DACPAC file:
deploy-database: needs: deploy environment: ${{ inputs.environmentType }} runs-on: ubuntu-latest steps: - uses: actions/download-artifact@v3 - uses: azure/login@v1 name: Sign in to Azure with: client-id: ${{ secrets.AZURE_CLIENT_ID }} tenant-id: ${{ secrets.AZURE_TENANT_ID }} subscription-id: ${{ secrets.AZURE_SUBSCRIPTION_ID }} - uses: azure/sql-action@v1.2 name: Deploy DACPAC to database with: server-name: ${{ needs.deploy.outputs.sqlServerFullyQualifiedDomainName }} connection-string: ${{ format('Server={0};Initial Catalog={1};User Id={2};Password={3};', needs.deploy.outputs.sqlServerFullyQualifiedDomainName, needs.deploy.outputs.sqlDatabaseName, inputs.sqlServerAdministratorLogin, secrets.sqlServerAdministratorLoginPassword) }} dacpac-package: database/ToyCompany.Database.dacpacBelow the job you just added, and above the smoke-test job, define a new job to seed the database with sample data.
seed-database: needs: - deploy - deploy-database environment: ${{ inputs.environmentType }} runs-on: ubuntu-latest steps: - uses: actions/checkout@v3 - uses: azure/login@v1 name: Sign in to Azure with: client-id: ${{ secrets.AZURE_CLIENT_ID }} tenant-id: ${{ secrets.AZURE_TENANT_ID }} subscription-id: ${{ secrets.AZURE_SUBSCRIPTION_ID }} - if: inputs.environmentType != 'Production' uses: azure/sql-action@v1.2 name: Add test data to database with: server-name: ${{ needs.deploy.outputs.sqlServerFullyQualifiedDomainName }} connection-string: ${{ format('Server={0};Initial Catalog={1};User Id={2};Password={3};', needs.deploy.outputs.sqlServerFullyQualifiedDomainName, needs.deploy.outputs.sqlDatabaseName, inputs.sqlServerAdministratorLogin, secrets.sqlServerAdministratorLoginPassword) }} sql-file: 'deploy/sample-data/Toys.sql'Notice that the Add test data to database step has a condition applied to it. That is, it runs only for non-production environments. The condition is applied to the step, not to the whole job, so that later jobs can depend on this job regardless of the environment type.
Below the job you just added, and above the smoke-test job, define another job to upload some sample toy images to the blob container by using Azure CLI:
seed-storage-account: needs: deploy environment: ${{ inputs.environmentType }} runs-on: ubuntu-latest steps: - uses: actions/checkout@v3 - uses: azure/login@v1 name: Sign in to Azure with: client-id: ${{ secrets.AZURE_CLIENT_ID }} tenant-id: ${{ secrets.AZURE_TENANT_ID }} subscription-id: ${{ secrets.AZURE_SUBSCRIPTION_ID }} - if: inputs.environmentType != 'Production' uses: azure/CLI@v1 name: Upload sample images with: inlineScript: | az storage blob upload-batch \ --account-name ${{ needs.deploy.outputs.storageAccountName }} \ --destination ${{ needs.deploy.outputs.storageAccountImagesBlobContainerName }} \ --source 'deploy/sample-data/toyimages'Notice that this job uses an Ubuntu runner, because the
azure/cliaction requires Linux to run. But thebuild-databasejob you defined earlier uses a Windows runner to build the database project. This workflow is a good example of using various operating systems to achieve your requirements.
Update the dependencies for the smoke test job
Update the smoke-test job's dependencies to ensure it runs after all of the deployment steps are completed:
smoke-test: runs-on: ubuntu-latest needs: - deploy - deploy-website - deploy-database - seed-database - seed-storage-account steps: - uses: actions/checkout@v3 - run: | $container = New-PesterContainer ` -Path 'deploy/Website.Tests.ps1' ` -Data @{ HostName = '${{needs.deploy.outputs.appServiceAppHostName}}' } Invoke-Pester ` -Container $container ` -CI name: Run smoke tests shell: pwshSave your changes to the file.
Verify files and commit your changes
Verify that your main.bicep file looks like this:
@description('The location into which your Azure resources should be deployed.') param location string = resourceGroup().location @description('Select the type of environment you want to provision. Allowed values are Production and Test.') @allowed([ 'Production' 'Test' ]) param environmentType string @description('A unique suffix to add to resource names that need to be globally unique.') @maxLength(13) param resourceNameSuffix string = uniqueString(resourceGroup().id) @description('The URL to the product review API.') param reviewApiUrl string @secure() @description('The API key to use when accessing the product review API.') param reviewApiKey string @description('The administrator login username for the SQL server.') param sqlServerAdministratorLogin string @secure() @description('The administrator login password for the SQL server.') param sqlServerAdministratorLoginPassword string // Define the names for resources. var appServiceAppName = 'toy-website-${resourceNameSuffix}' var appServicePlanName = 'toy-website' var logAnalyticsWorkspaceName = 'workspace-${resourceNameSuffix}' var applicationInsightsName = 'toywebsite' var storageAccountName = 'mystorage${resourceNameSuffix}' var storageAccountImagesBlobContainerName = 'toyimages' var sqlServerName = 'toy-website-${resourceNameSuffix}' var sqlDatabaseName = 'Toys' // Define the connection string to access Azure SQL. var sqlDatabaseConnectionString = 'Server=tcp:${sqlServer.properties.fullyQualifiedDomainName},1433;Initial Catalog=${sqlDatabase.name};Persist Security Info=False;User ID=${sqlServerAdministratorLogin};Password=${sqlServerAdministratorLoginPassword};MultipleActiveResultSets=False;Encrypt=True;TrustServerCertificate=False;Connection Timeout=30;' // Define the SKUs for each component based on the environment type. var environmentConfigurationMap = { Production: { appServicePlan: { sku: { name: 'S1' capacity: 1 } } storageAccount: { sku: { name: 'Standard_LRS' } } sqlDatabase: { sku: { name: 'Standard' tier: 'Standard' } } } Test: { appServicePlan: { sku: { name: 'F1' } } storageAccount: { sku: { name: 'Standard_GRS' } } sqlDatabase: { sku: { name: 'Standard' tier: 'Standard' } } } } resource appServicePlan 'Microsoft.Web/serverfarms@2022-03-01' = { name: appServicePlanName location: location sku: environmentConfigurationMap[environmentType].appServicePlan.sku } resource appServiceApp 'Microsoft.Web/sites@2022-03-01' = { name: appServiceAppName location: location properties: { serverFarmId: appServicePlan.id httpsOnly: true siteConfig: { appSettings: [ { name: 'APPINSIGHTS_INSTRUMENTATIONKEY' value: applicationInsights.properties.InstrumentationKey } { name: 'APPLICATIONINSIGHTS_CONNECTION_STRING' value: applicationInsights.properties.ConnectionString } { name: 'ReviewApiUrl' value: reviewApiUrl } { name: 'ReviewApiKey' value: reviewApiKey } { name: 'StorageAccountName' value: storageAccount.name } { name: 'StorageAccountBlobEndpoint' value: storageAccount.properties.primaryEndpoints.blob } { name: 'StorageAccountImagesContainerName' value: storageAccount::blobService::storageAccountImagesBlobContainer.name } { name: 'SqlDatabaseConnectionString' value: sqlDatabaseConnectionString } ] } } } resource logAnalyticsWorkspace 'Microsoft.OperationalInsights/workspaces@2022-10-01' = { name: logAnalyticsWorkspaceName location: location } resource applicationInsights 'Microsoft.Insights/components@2020-02-02' = { name: applicationInsightsName location: location kind: 'web' properties: { Application_Type: 'web' Request_Source: 'rest' Flow_Type: 'Bluefield' WorkspaceResourceId: logAnalyticsWorkspace.id } } resource storageAccount 'Microsoft.Storage/storageAccounts@2022-09-01' = { name: storageAccountName location: location kind: 'StorageV2' sku: environmentConfigurationMap[environmentType].storageAccount.sku resource blobService 'blobServices' = { name: 'default' resource storageAccountImagesBlobContainer 'containers' = { name: storageAccountImagesBlobContainerName properties: { publicAccess: 'Blob' } } } } resource sqlServer 'Microsoft.Sql/servers@2022-05-01-preview' = { name: sqlServerName location: location properties: { administratorLogin: sqlServerAdministratorLogin administratorLoginPassword: sqlServerAdministratorLoginPassword } } resource sqlServerFirewallRule 'Microsoft.Sql/servers/firewallRules@2022-05-01-preview' = { parent: sqlServer name: 'AllowAllWindowsAzureIps' properties: { endIpAddress: '0.0.0.0' startIpAddress: '0.0.0.0' } } resource sqlDatabase 'Microsoft.Sql/servers/databases@2022-05-01-preview' = { parent: sqlServer name: sqlDatabaseName location: location sku: environmentConfigurationMap[environmentType].sqlDatabase.sku } output appServiceAppName string = appServiceApp.name output appServiceAppHostName string = appServiceApp.properties.defaultHostName output storageAccountName string = storageAccount.name output storageAccountImagesBlobContainerName string = storageAccount::blobService::storageAccountImagesBlobContainer.name output sqlServerFullyQualifiedDomainName string = sqlServer.properties.fullyQualifiedDomainName output sqlDatabaseName string = sqlDatabase.nameIf it doesn't, update it to match the file contents.
Verify that your deploy.yml file looks like this:
name: deploy on: workflow_call: inputs: environmentType: required: true type: string resourceGroupName: required: true type: string reviewApiUrl: required: true type: string sqlServerAdministratorLogin: required: true type: string secrets: AZURE_CLIENT_ID: required: true AZURE_TENANT_ID: required: true AZURE_SUBSCRIPTION_ID: required: true reviewApiKey: required: true sqlServerAdministratorLoginPassword: required: true jobs: validate: runs-on: ubuntu-latest steps: - uses: actions/checkout@v3 - uses: azure/login@v1 name: Sign in to Azure with: client-id: ${{ secrets.AZURE_CLIENT_ID }} tenant-id: ${{ secrets.AZURE_TENANT_ID }} subscription-id: ${{ secrets.AZURE_SUBSCRIPTION_ID }} - if: inputs.environmentType != 'Production' uses: azure/arm-deploy@v1 name: Run preflight validation with: deploymentName: ${{ github.run_number }} resourceGroupName: ${{ inputs.resourceGroupName }} template: ./deploy/main.bicep parameters: > environmentType=${{ inputs.environmentType }} reviewApiUrl=${{ inputs.reviewApiUrl }} reviewApiKey=${{ secrets.reviewApiKey }} sqlServerAdministratorLogin=${{ inputs.sqlServerAdministratorLogin }} sqlServerAdministratorLoginPassword=${{ secrets.sqlServerAdministratorLoginPassword }} deploymentMode: Validate - if: inputs.environmentType == 'Production' uses: azure/arm-deploy@v1 name: Run what-if with: failOnStdErr: false resourceGroupName: ${{ inputs.resourceGroupName }} template: ./deploy/main.bicep parameters: > environmentType=${{ inputs.environmentType }} reviewApiUrl=${{ inputs.reviewApiUrl }} reviewApiKey=${{ secrets.reviewApiKey }} sqlServerAdministratorLogin=${{ inputs.sqlServerAdministratorLogin }} sqlServerAdministratorLoginPassword=${{ secrets.sqlServerAdministratorLoginPassword }} additionalArguments: --what-if deploy: needs: validate environment: ${{ inputs.environmentType }} runs-on: ubuntu-latest outputs: appServiceAppName: ${{ steps.deploy.outputs.appServiceAppName }} appServiceAppHostName: ${{ steps.deploy.outputs.appServiceAppHostName }} storageAccountName: ${{ steps.deploy.outputs.storageAccountName }} storageAccountImagesBlobContainerName: ${{ steps.deploy.outputs.storageAccountImagesBlobContainerName }} sqlServerFullyQualifiedDomainName: ${{ steps.deploy.outputs.sqlServerFullyQualifiedDomainName }} sqlDatabaseName: ${{ steps.deploy.outputs.sqlDatabaseName }} steps: - uses: actions/checkout@v3 - uses: azure/login@v1 name: Sign in to Azure with: client-id: ${{ secrets.AZURE_CLIENT_ID }} tenant-id: ${{ secrets.AZURE_TENANT_ID }} subscription-id: ${{ secrets.AZURE_SUBSCRIPTION_ID }} - uses: azure/arm-deploy@v1 id: deploy name: Deploy Bicep file with: failOnStdErr: false deploymentName: ${{ github.run_number }} resourceGroupName: ${{ inputs.resourceGroupName }} template: ./deploy/main.bicep parameters: > environmentType=${{ inputs.environmentType }} reviewApiUrl=${{ inputs.reviewApiUrl }} reviewApiKey=${{ secrets.reviewApiKey }} sqlServerAdministratorLogin=${{ inputs.sqlServerAdministratorLogin }} sqlServerAdministratorLoginPassword=${{ secrets.sqlServerAdministratorLoginPassword }} deploy-website: needs: deploy environment: ${{ inputs.environmentType }} runs-on: ubuntu-latest steps: - uses: actions/download-artifact@v3 - uses: azure/login@v1 name: Sign in to Azure with: client-id: ${{ secrets.AZURE_CLIENT_ID }} tenant-id: ${{ secrets.AZURE_TENANT_ID }} subscription-id: ${{ secrets.AZURE_SUBSCRIPTION_ID }} - uses: azure/webapps-deploy@v2 name: Deploy website with: app-name: ${{ needs.deploy.outputs.appServiceAppName }} package: website/publish.zip deploy-database: needs: deploy environment: ${{ inputs.environmentType }} runs-on: ubuntu-latest steps: - uses: actions/download-artifact@v3 - uses: azure/login@v1 name: Sign in to Azure with: client-id: ${{ secrets.AZURE_CLIENT_ID }} tenant-id: ${{ secrets.AZURE_TENANT_ID }} subscription-id: ${{ secrets.AZURE_SUBSCRIPTION_ID }} - uses: azure/sql-action@v1.2 name: Deploy DACPAC to database with: server-name: ${{ needs.deploy.outputs.sqlServerFullyQualifiedDomainName }} connection-string: ${{ format('Server={0};Initial Catalog={1};User Id={2};Password={3};', needs.deploy.outputs.sqlServerFullyQualifiedDomainName, needs.deploy.outputs.sqlDatabaseName, inputs.sqlServerAdministratorLogin, secrets.sqlServerAdministratorLoginPassword) }} dacpac-package: database/ToyCompany.Database.dacpac seed-database: needs: - deploy - deploy-database environment: ${{ inputs.environmentType }} runs-on: ubuntu-latest steps: - uses: actions/checkout@v3 - uses: azure/login@v1 name: Sign in to Azure with: client-id: ${{ secrets.AZURE_CLIENT_ID }} tenant-id: ${{ secrets.AZURE_TENANT_ID }} subscription-id: ${{ secrets.AZURE_SUBSCRIPTION_ID }} - if: inputs.environmentType != 'Production' uses: azure/sql-action@v1.2 name: Add test data to database with: server-name: ${{ needs.deploy.outputs.sqlServerFullyQualifiedDomainName }} connection-string: ${{ format('Server={0};Initial Catalog={1};User Id={2};Password={3};', needs.deploy.outputs.sqlServerFullyQualifiedDomainName, needs.deploy.outputs.sqlDatabaseName, inputs.sqlServerAdministratorLogin, secrets.sqlServerAdministratorLoginPassword) }} sql-file: 'deploy/sample-data/Toys.sql' seed-storage-account: needs: deploy environment: ${{ inputs.environmentType }} runs-on: ubuntu-latest steps: - uses: actions/checkout@v3 - uses: azure/login@v1 name: Sign in to Azure with: client-id: ${{ secrets.AZURE_CLIENT_ID }} tenant-id: ${{ secrets.AZURE_TENANT_ID }} subscription-id: ${{ secrets.AZURE_SUBSCRIPTION_ID }} - if: inputs.environmentType != 'Production' uses: azure/CLI@v1 name: Upload sample images with: inlineScript: | az storage blob upload-batch \ --account-name ${{ needs.deploy.outputs.storageAccountName }} \ --destination ${{ needs.deploy.outputs.storageAccountImagesBlobContainerName }} \ --source 'deploy/sample-data/toyimages' smoke-test: runs-on: ubuntu-latest needs: - deploy - deploy-website - deploy-database - seed-database - seed-storage-account steps: - uses: actions/checkout@v3 - run: | $container = New-PesterContainer ` -Path 'deploy/Website.Tests.ps1' ` -Data @{ HostName = '${{needs.deploy.outputs.appServiceAppHostName}}' } Invoke-Pester ` -Container $container ` -CI name: Run smoke tests shell: pwshIf it doesn't, update it to match the file contents.
Save your changes to the file.
Commit and push your changes to your Git repository. In the Visual Studio Code terminal, run the following commands:
git add .
git commit -m "Add SQL database"
git push
Run the workflow
In your browser, go to your workflow runs.
Select the most recent run.
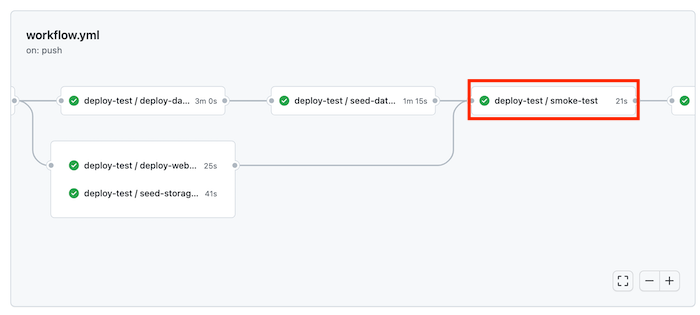
Wait until all the jobs for the test environment finish successfully. Notice that the smoke test now also succeeds.
Wait until the workflow completes successfully, including the production deployment.
View the website
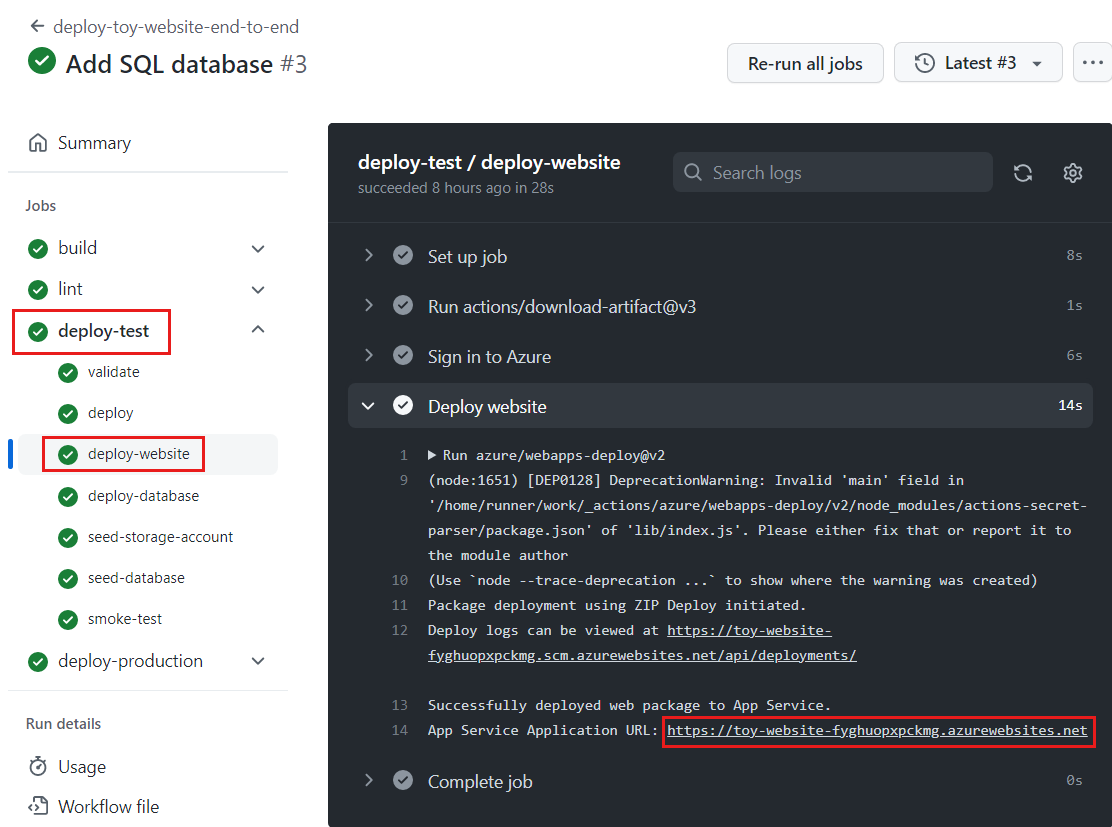
Select the deploy-test / deploy-website job to open the workflow log.
Select the Deploy website step.
Hold down the Ctrl key (⌘ on macOS) and select the URL of the App Service app to open it in a new browser tab.
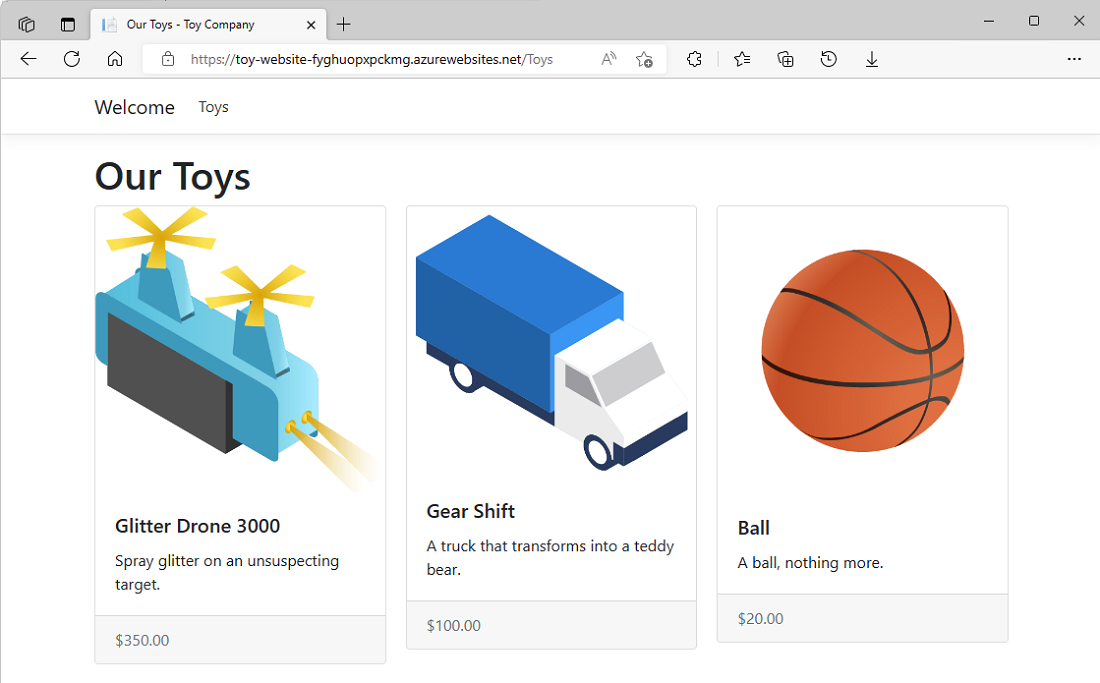
Select Toys.

Notice that sample data is displayed in the test environment.
Repeat the preceding process for the deploy-production / deploy-website job's app.
Notice that no sample data is displayed in the production environment.

Clean up resources
Now that you've completed the exercise, you'll want to remove the Azure resources so that you aren't billed for them.
In the Visual Studio Code terminal, run the following commands:
az group delete --resource-group ToyWebsiteTest --yes --no-wait
az group delete --resource-group ToyWebsiteProduction --yes --no-wait
The resource group is deleted in the background.
Remove-AzResourceGroup -Name ToyWebsiteTest -Force
Remove-AzResourceGroup -Name ToyWebsiteProduction -Force