Lead management lifecycle
Typically, while a lead is going through the qualification process, different tasks or actions determine whether it should be qualified or disqualified. Here are some examples:
- Assign the lead to the most appropriate account manager, based on where it came from or the territory where it's located.
- Identify potential stakeholders who have an interest in the project.
- Identify potential competitors who are also speaking or might be speaking with the lead.
- Research the lead to learn more about their organization, the organization's annual revenue, or the organization's position in its industry.
- Have several phone calls or in-person meetings to learn more about the lead's situation.
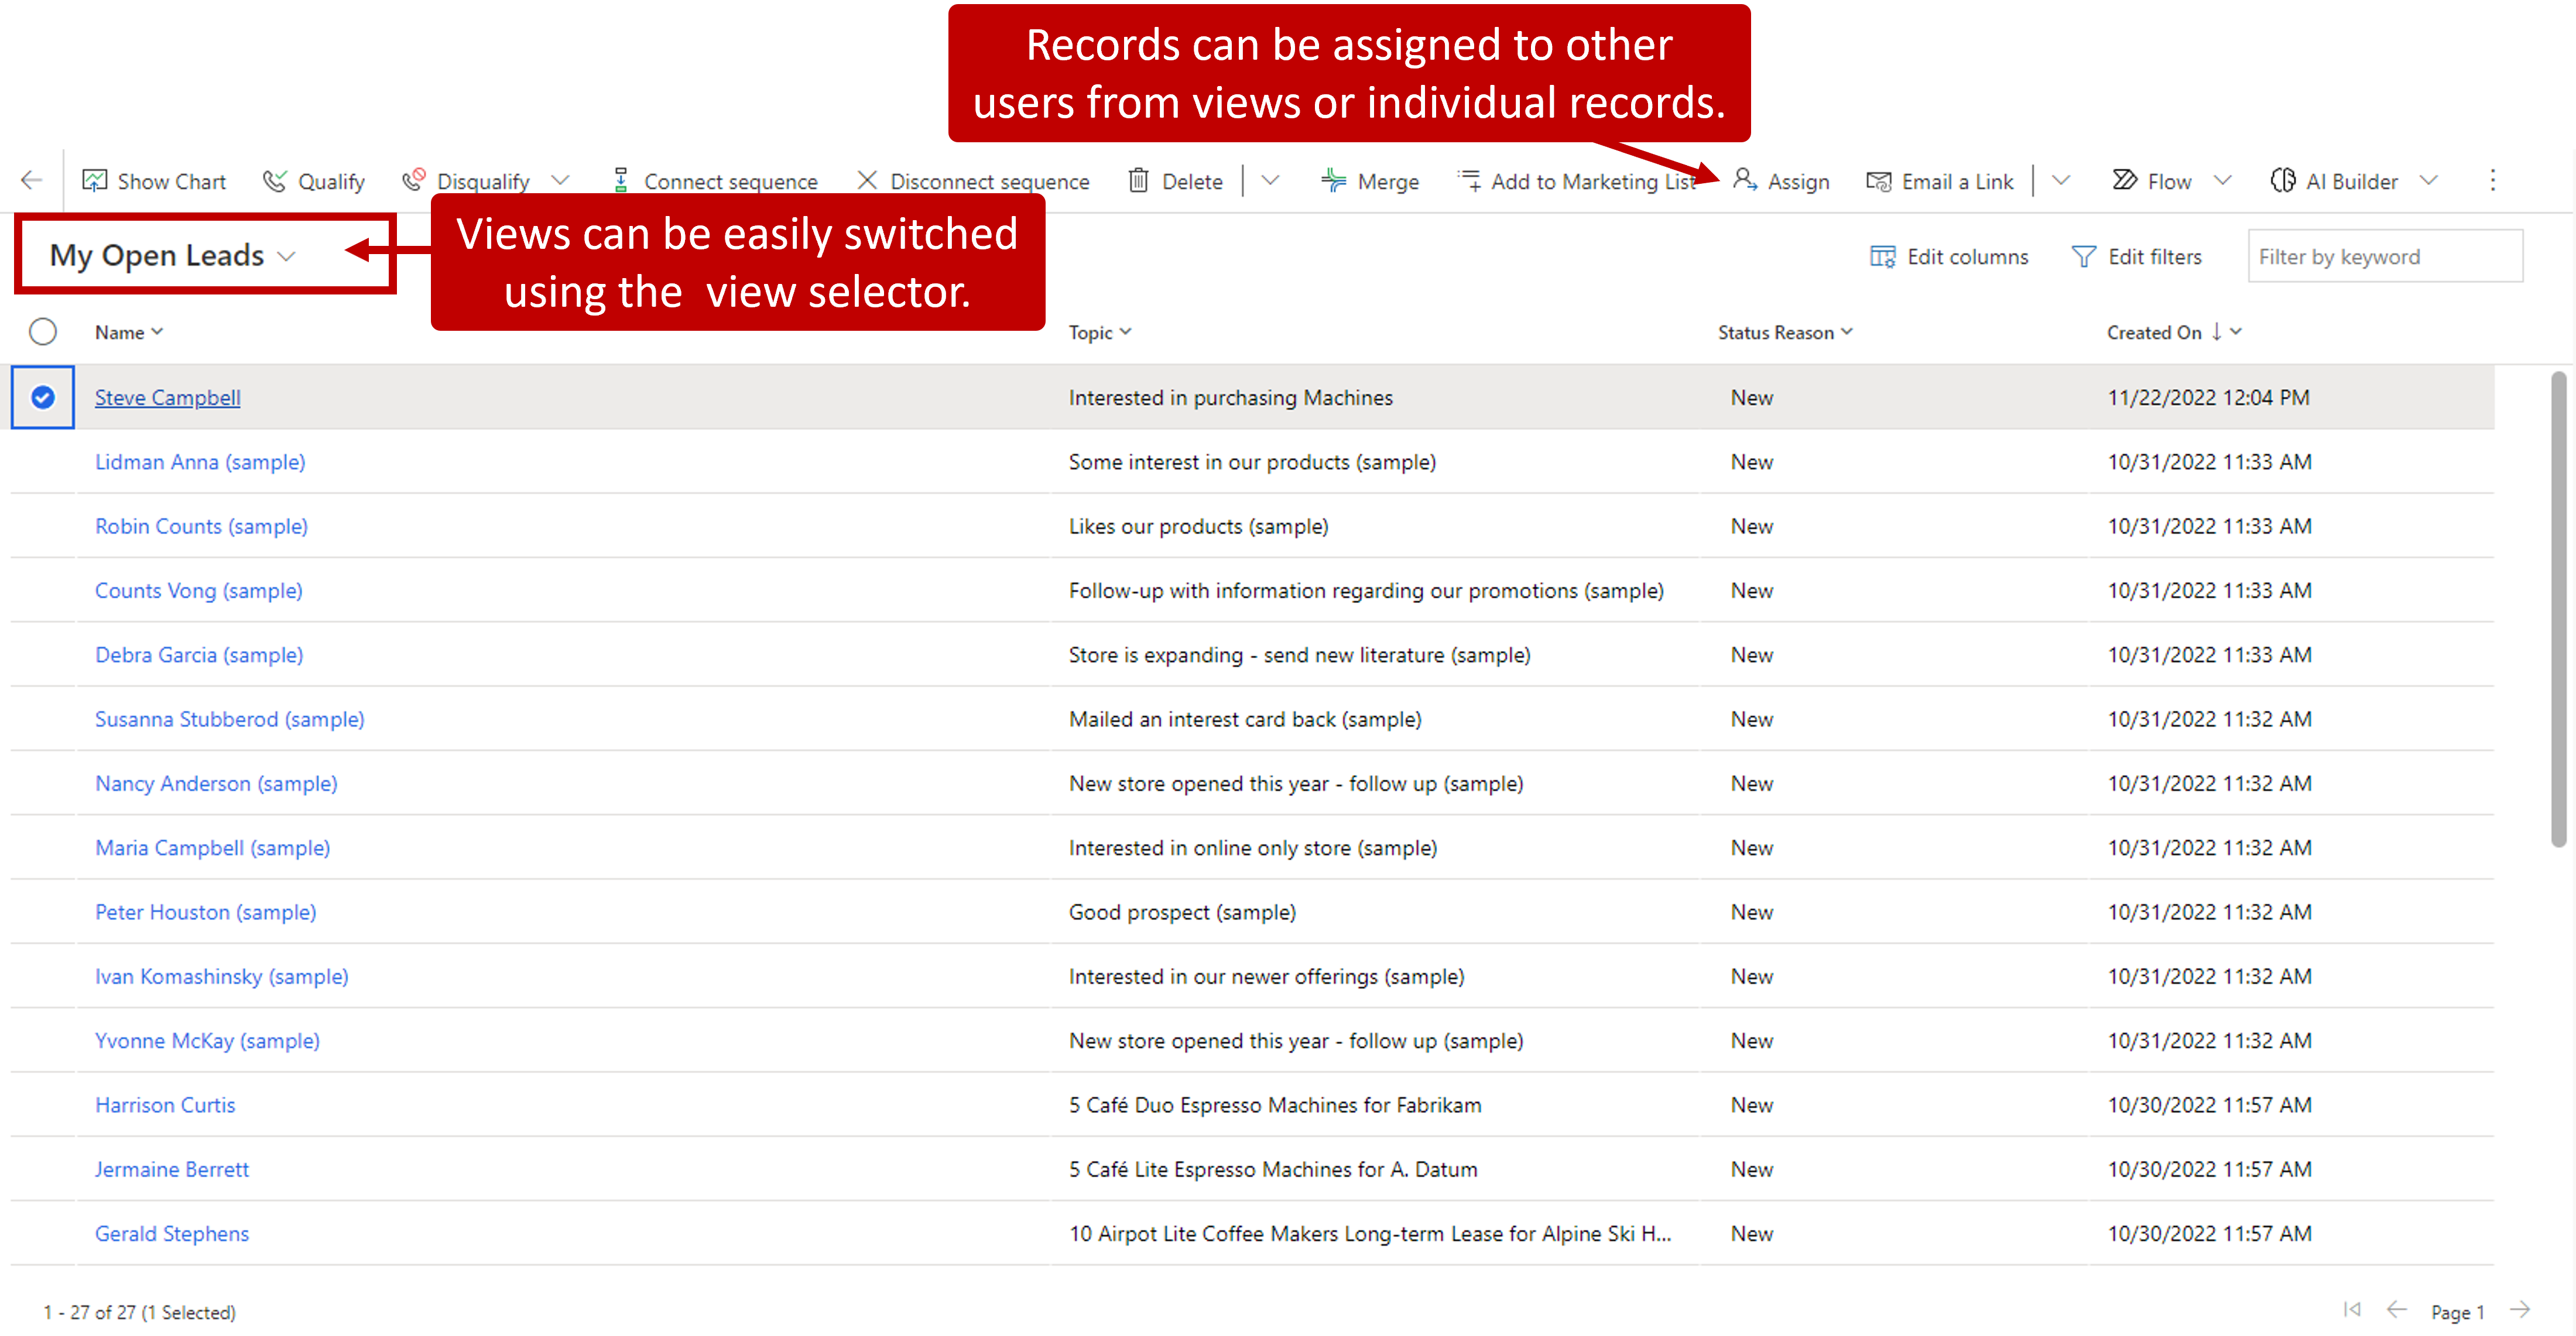
Microsoft Dynamics 365 Sales provides multiple tools and integrations with other solutions to help with this process. The tools include a series of dashboards, charts, and views, and data that's captured at the lead level. For example, a sales manager is reviewing newly created leads and identifies the best account managers to work with those leads. The sales manager can then assign one or more leads directly to a specific account manager from inside the application.
After account managers receive the leads that are assigned to them, they can use multiple tools to do some basic research about the leads before reaching out to them. Those tools might include social media and artificial intelligence. Then, when they reach out to the leads, the account managers can capture details from their phone calls or appointments to help make the final qualification decision.
Work with lead views
Microsoft Dynamics 365 provides multiple views that show lead data. You can use these views when the lead table is selected in the Sales Hub app. Each view is prefiltered to show leads in a different way. By default, agents see the leads that have been assigned to them. But agents can select different views to see different sets of leads.
Here are some of the lead-related views that Microsoft Dynamics 365 includes:
- Open Leads- All leads that are currently open, regardless of who the lead owner is.
- Closed Leads- All leads that have been closed. Both qualified and disqualified leads are included.
- All Leads- All open and closed leads.
- My Open Leads- All the open leads that are assigned to the signed-in user.
- Leads opened last week- All leads that were created last week.
- Leads opened this week- All new leads created during the current week.
Depending on their role, people can use these different views to help with their job functions. For example, sales managers might use the Leads opened this week view to see all the newest leads that have been added. After they identify one or more leads that should be assigned to a specific account manager, they can select those leads and then select Assign on the command bar to assign them to that account manager.
Account executives might use the My Open Leads view to see only the leads that have been assigned to them. They can then open a specific lead to view all the relevant data about that lead.
Lead focused view
Another way that you can work with Leads is by using the focused view. The focused view provides a centralized place where you can view all your open records that have activities that are due or pending, without having to navigate through multiple screens. You can access the focused view by selecting Show as > Focused view on the command bar.
The focused view consists of three sections.
Search, filter, sort, and switch view: Allows you to search, filter, and sort the records that you want to view in the list to quickly identify only the records that you want to work with. You can also switch between the focused view and the list view.
Records list: All leads, including leads with no associated activities, for the selected entity are displayed in a card format. From here, you can perform and complete activities, regardless of if they're manual or automated. Each record card displays information such as the name of the record, the primary contact’s name, and the next best action.
Record details: When you select a record in the work list, a detailed view of the record will open on the same page.
The following image is an example of the focused view for the Lead entity.

For more detailed information about working with the focused view, see View and manage records in focused view.
Once a lead record is opened, the information in individual lead records is divided among multiple sections. Here's a description of some of the main sections and the types of information that they include:
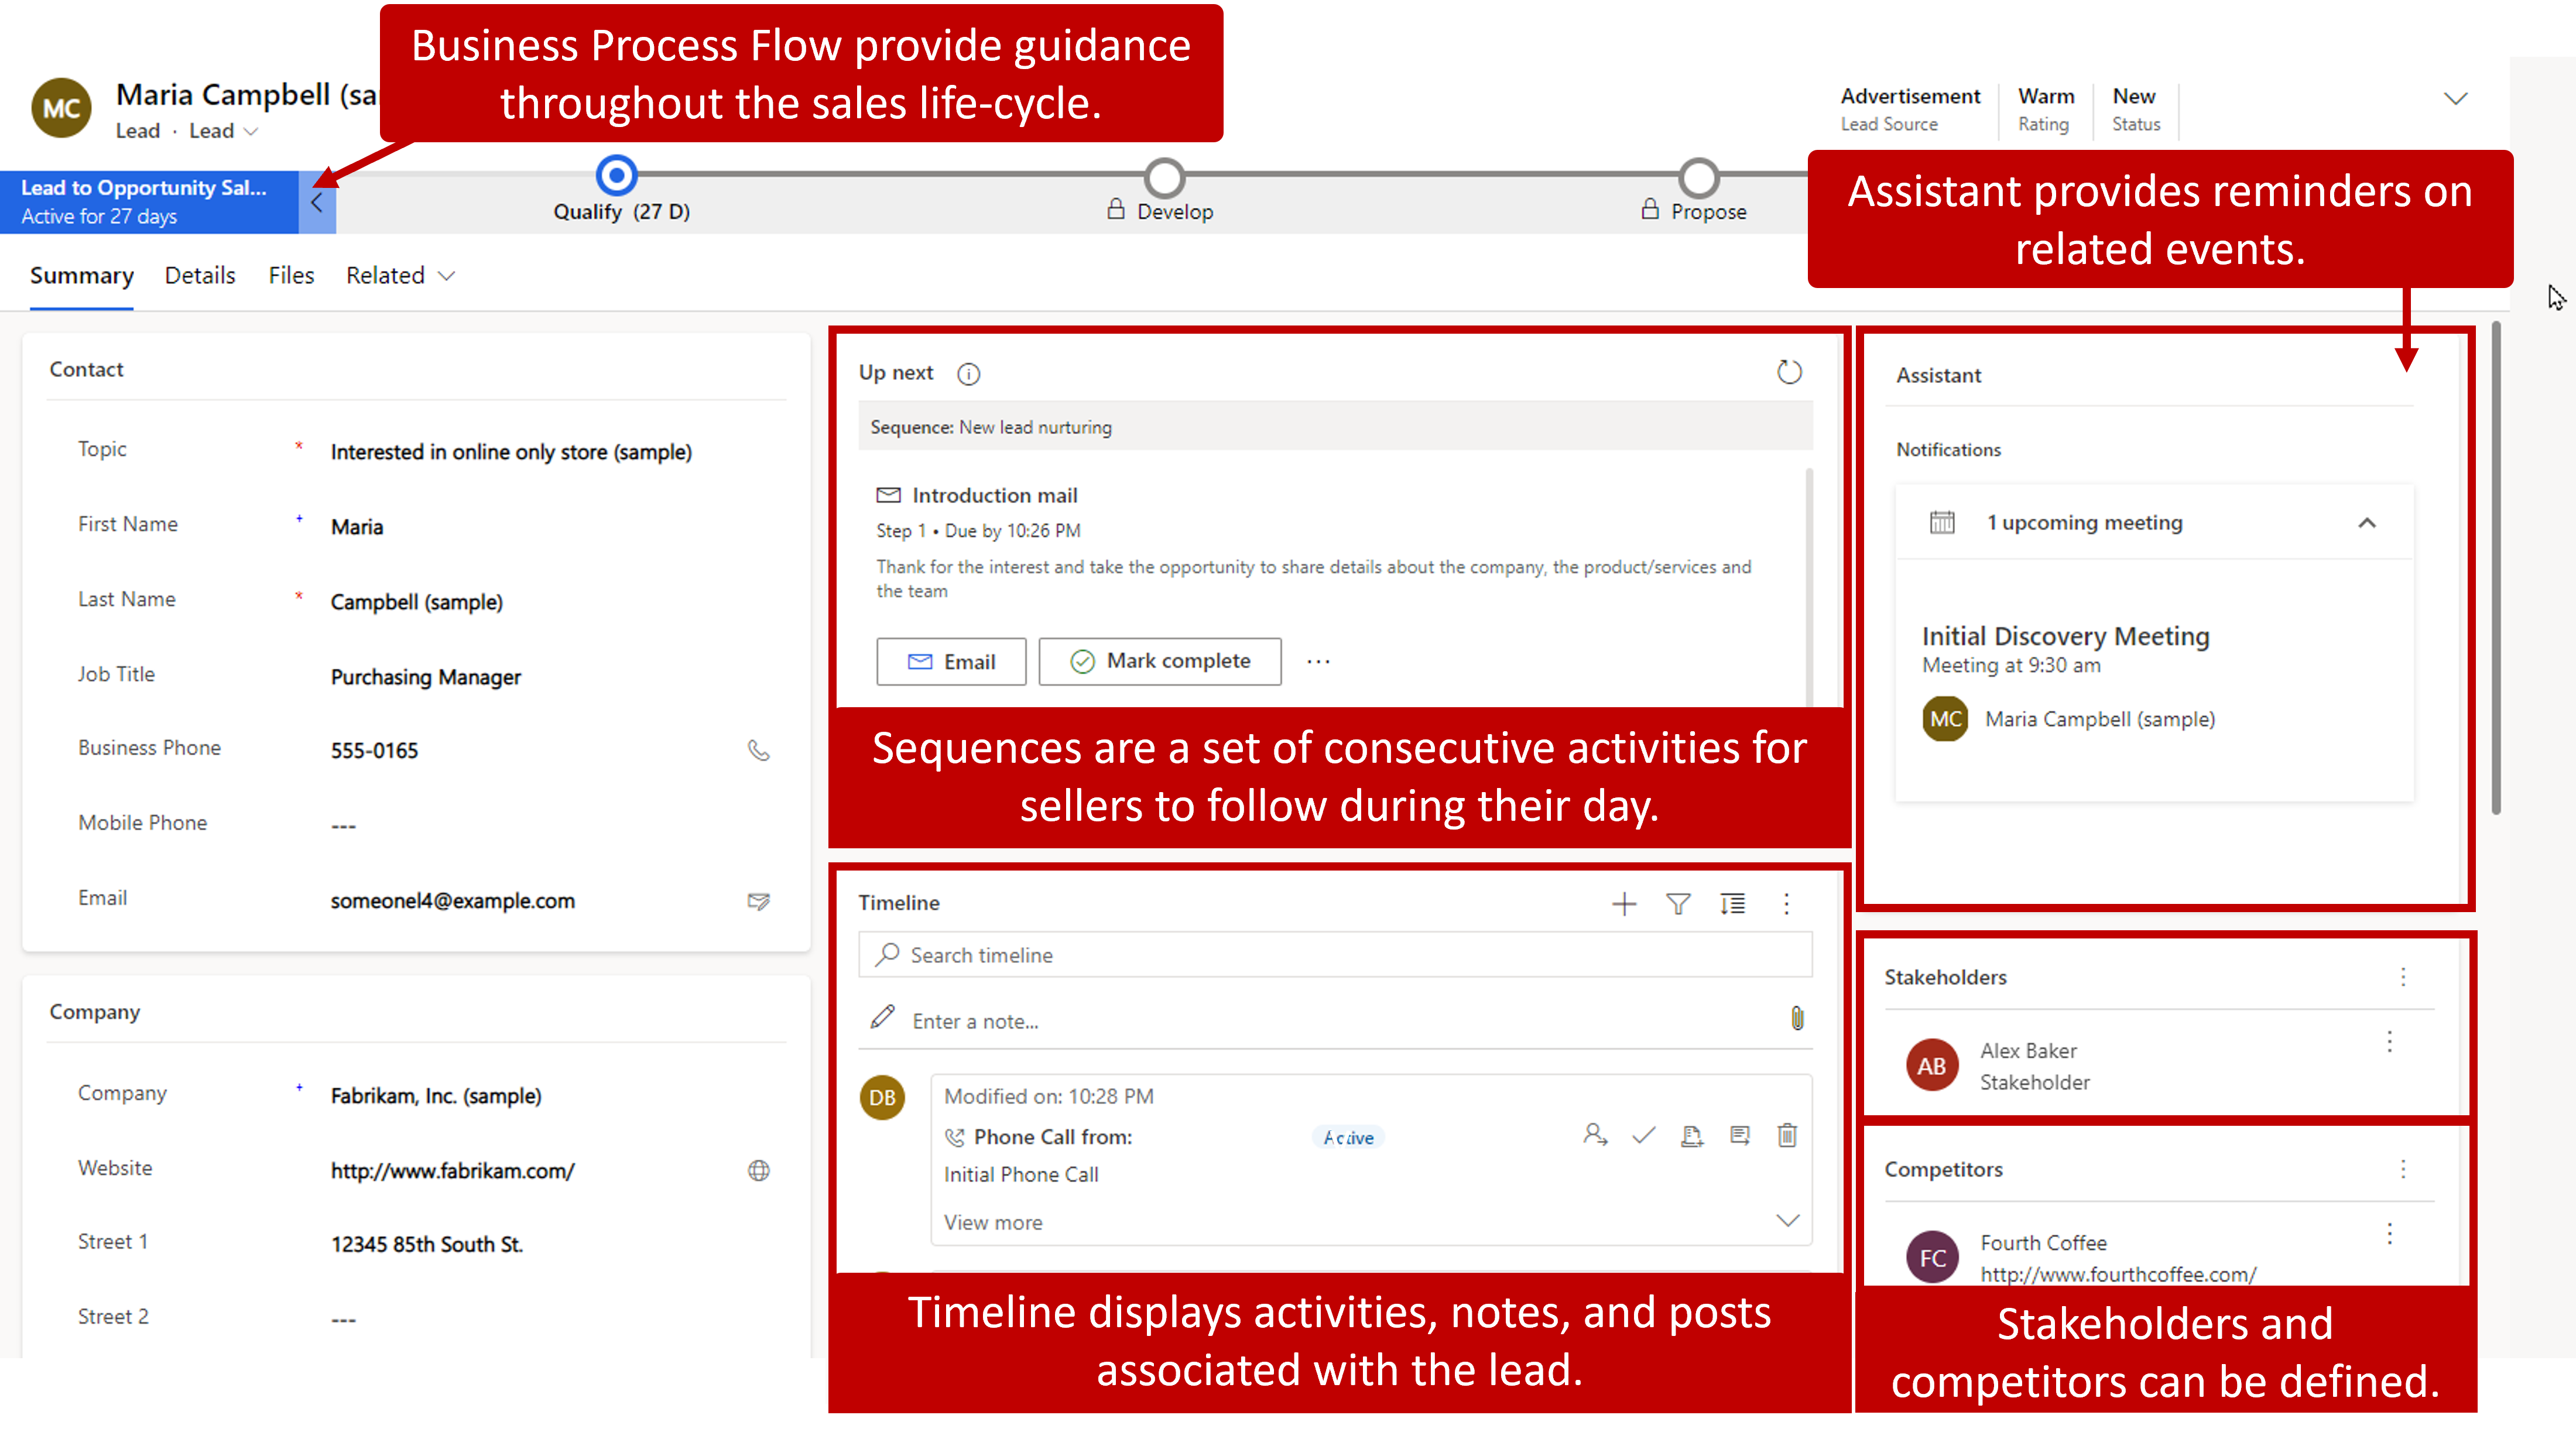
- Sequences - This pane displays any sequence associated with this lead. Sequences help sales managers enforce best practices by introducing a set of consecutive activities for sellers to follow during their day. A manager can connect sequences to leads and opportunities that appear in a seller's work queue, to help sellers prioritize activities to focus on selling, be more productive, and better align to business processes.
For example, an organization might create a lead nurturing sequence that includes different activities spaced out at different intervals to help nurture a lead to an opportunity.
- Timeline - This pane shows related lead activities. All activities appear in chronological order. Activities might include phone calls that were made to or received from the lead, appointments with the lead, internal posts that colleagues have made about the record, or notes that were added about the record.
For example, the timeline might list all the appointments that the account executive has had with the lead. The account executive can then open each appointment to gather additional information from that meeting.
- Assistant - This pane provides reminders or notifications about items that are related to the lead.
For example, the Assistant might provide a reminder about an upcoming appointment with the lead. The account executive can then view the appointment details by opening the record directly from the lead.
- Stakeholders - This grid identifies people who might have a vested interest in or be involved in the decision-making process. Typically, stakeholders are contact records that are noted in the record.
For example, a stakeholder might be a lawyer that the organization uses, a project lead, or board members who are involved in the decision-making process.
Competitors - This grid identifies any other vendors that your organization might be competing with for the lead's business.
Business process flow - Business process flows (BPFs) represent guided business processes that lead account executives through the whole sales lifecycle.
Depending on the type of lead, or company procedures, a lead might have multiple business processes that can be switched to, depending on specific details in the lead record. These details can include the lead source, estimated budget, purchase timeframe, or other business factors.
Let's look at an example to see how these different types of information can be used to qualify or disqualify a new lead who has been identified.
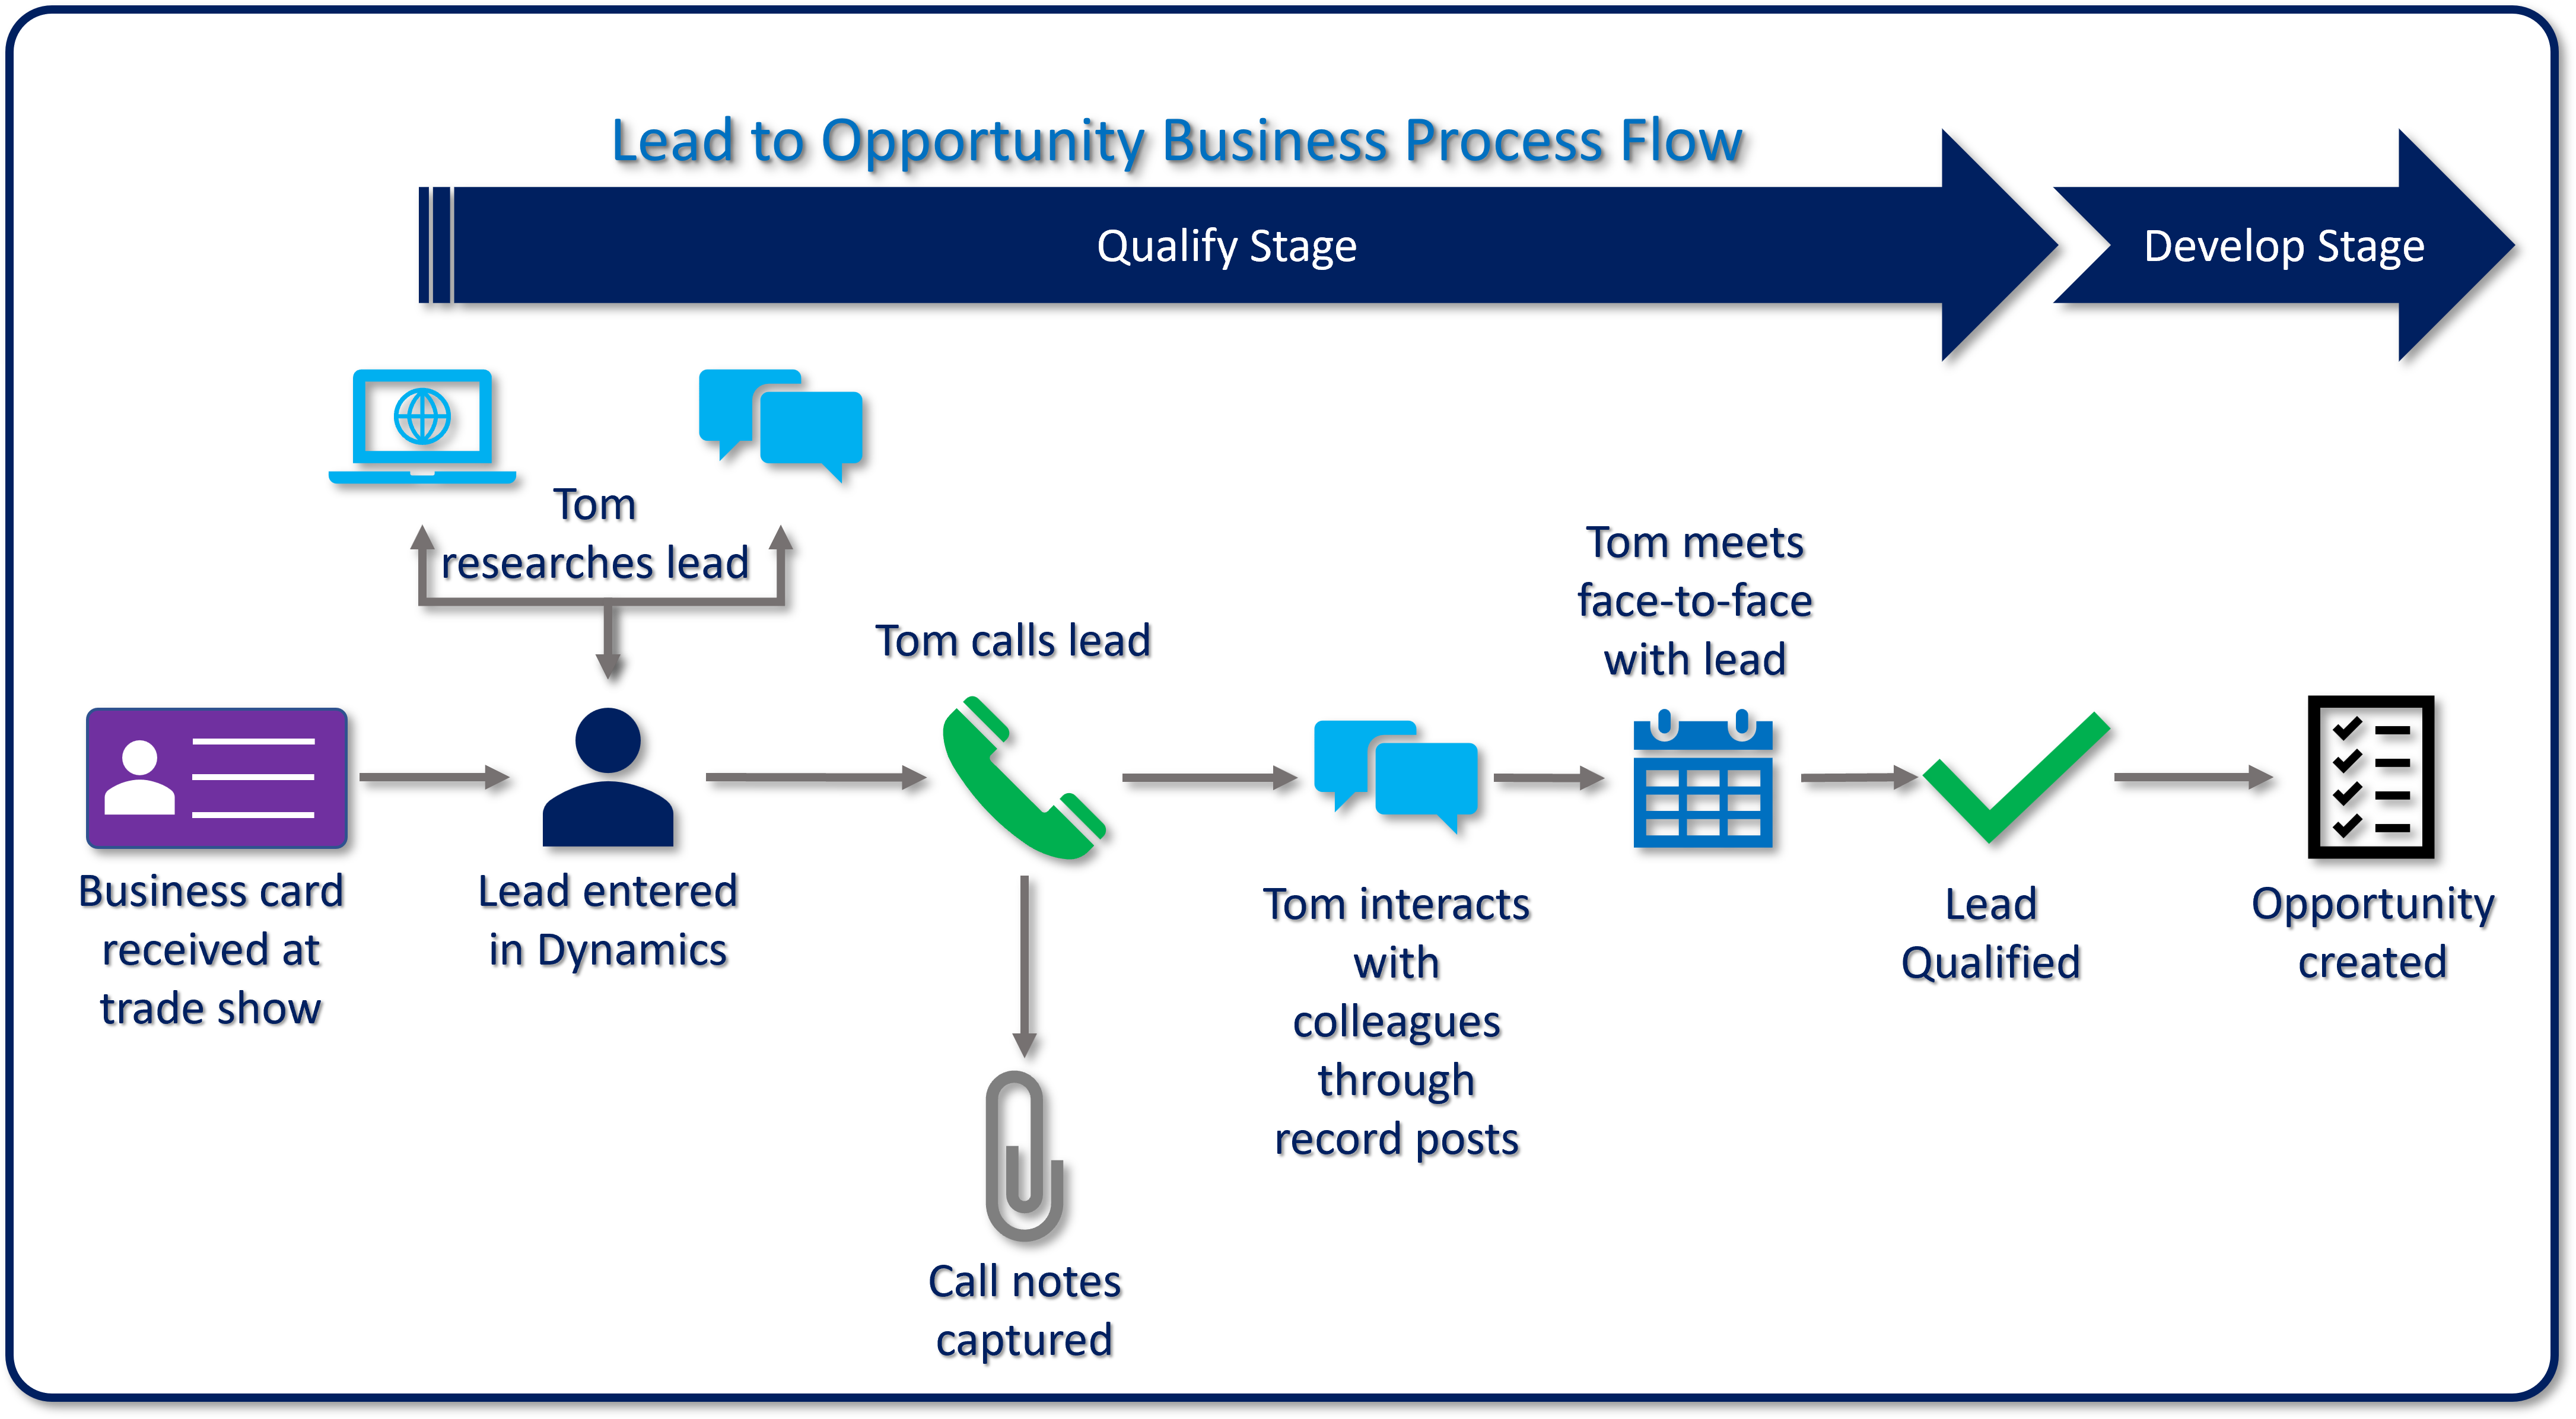
Tom, an account executive, meets a potential customer at a trade show. Tom and the potential customer exchange business cards, and Tom enters the lead in Dynamics 365. The application then starts the Lead to Opportunity Sales Process BPF.
During the Qualify phase of the BPF, the account executive determines the viability of the lead.
Tom checks whether the lead is an existing customer or a new customer. If the lead is an existing customer, Tom associates the lead with the existing account and contact records.
Tom uses internet searches and social networking websites to gather general information about the lead and enters it in the lead record. This information includes the industry, number of employees, and annual revenue of the lead's organization. Tom might also use optional integrations with applications like LinkedIn Sales Navigator to help with the research process.
Tom calls the lead to talk about their current situation and potential needs. During this conversation, Tom might identify information like project stakeholders, potential competitors, budget information, or the decision-making process.
Tom updates the relevant information in the lead record, based on the phone call. Other notes from the call are captured in a phone call activity that's associated with the lead.
Tom adds a post to the lead record asking whether any coworkers have experience with the lead. Coworker responses to this post are captured and appear in the lead's timeline.
Tom schedules a face-to-face meeting with key people in the lead's organization. The Relationship Assistant reminds Tom of the meeting.
Tom qualifies the lead.
- The lead record is closed.
- A new opportunity record is created.
- The Lead to Opportunity Sales Process BPF is advanced to the Develop phase.
At any point, lead information is available by selecting the Qualify phase in the Lead to Opportunity Sales Process BPF.