Lead data management tools
As Sales associates are working with customers, one of the easiest ways to ensure success is to ensure that the data you're capturing is good. For example, sometime multiple sales associates will enter the same customer into the system twice. Having duplicate entries can impact activities and could impact interactions with that customer. It's important to maintain the integrity of your data. Not only does this include duplicate data, but also things like simplifying how data is captured, and ensuring that data is valid.
Dynamics 365 provides multiple items that can be leveraged to help to ensure the integrity of your data. Let's look at some of those items.
Duplicate detection
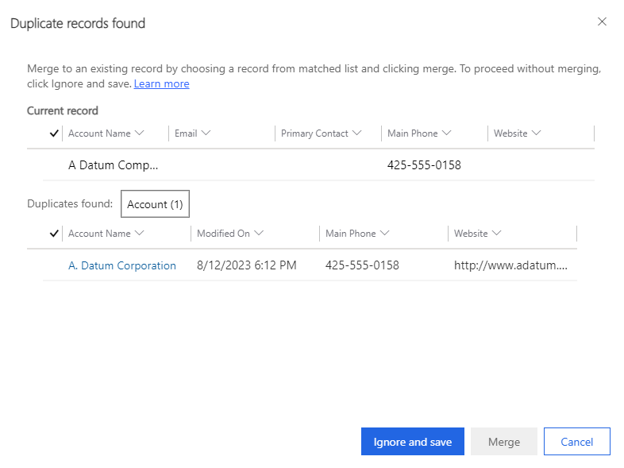
Dynamics 365 apps such as Sales and Customer Service include default duplicate detection rules for common records such as accounts and contacts. When you enter a potentially duplicate account or contact record, you'll be prompted that a duplicate record was found and provided with options for resolving the conflict.
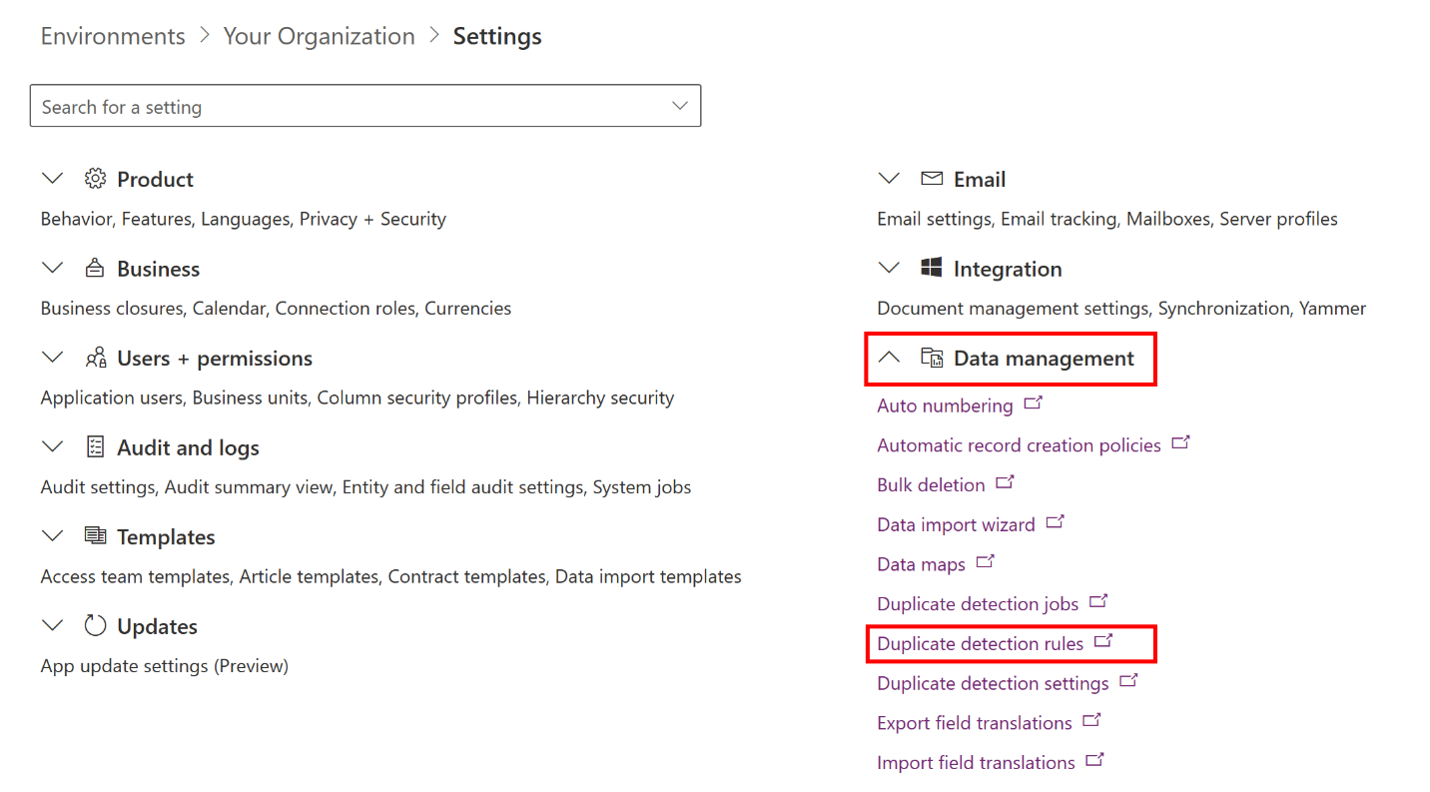
In addition to the out-of-the-box rules that are available, duplicate detection rules can be created for other records as well. Duplicate detection rules are created in the Power Platform admin center. Once you have selected the environment you want to use, go to Settings > Data management > Duplicate detection rules.
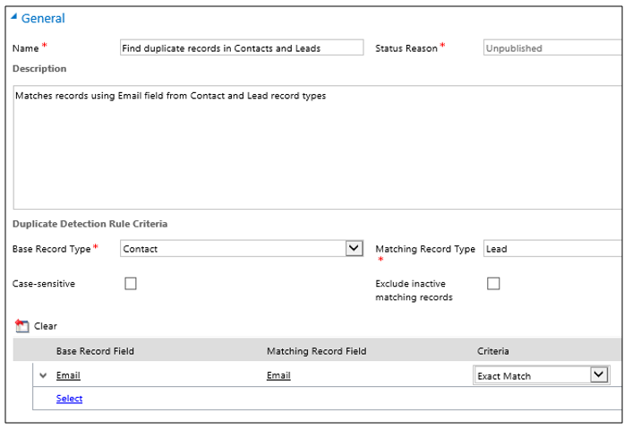
When creating a new rule, you'll need to select the criteria to be used to identify a record as a duplicate.
This includes specifying:
Base Record Type: Defines type of record that this rule applies to such as Contacts or Leads.
Matching Record Type: Defines the type of record to compare against. This will typically be the same record type you selected for Base Record Type, however there may be times when you select a different record type.
When you select different record types, for each new criterion, in the Base Record Field column, in the Select field, choose the field name you want to use. In the same row, in the Matching Record Field column, in the Select field, select a field name.
If you selected the same record types for the base and matching record types, for each new criterion, in the Field column, in the Select field, select a field.
Exclude inactive matching records: Defines that you want your rule to only look at active records.
Case-sensitive: Defines that you want the rule to be case-sensitive.
After you have created the rule, to make the new or changed duplicate detection rule usable, select the rule, and then select Publish. Once a rule is published, if you want to make changes to the rule you'll need to unpublish it first.
To learn more about duplicate detection rules, and step-by-steps, see Set up duplicate detection rules to keep your data clean.
Business card scanner
One common way that organizations get information about customers is through business cards. A customer may drop it into a drawing for a prize, or someone might provide their business card.
The integrated business card scanner in Dynamics 365 Sales helps salespeople quickly scan business cards of potential customers they've met in the field. It will read basic information from the card and populate data lead or contact records in Dynamics 365 Sales. This allows salespeople to focus on more important tasks.
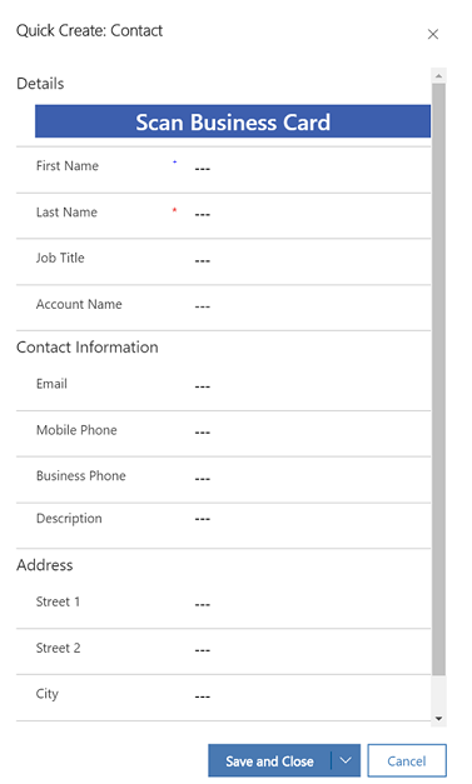
Scanning a business card is done from the Quick create form on a Contact or Lead record. Select the Scan Business Card button. Based on if you're working in the desktop app, or on a mobile device the experience will be as follows:
Desktop: In the Desktop app, browse to the folder where the business card picture is stored, select the business card picture, and then select Insert.
Mobile Phone: Use the mobile phone camera to capture the business card picture.
Details such as first name, last name, job title, and email will be automatically populated from the business card. The Account name won't be populated automatically as it's a lookup field. If you want to set it, you'll need to manually fill in the Account Name field.
To learn more about the business card scanner, see Scan business cards in Dynamics 365 Sales.
Email validation
Customer email addresses are important as they're often used in Dynamics 365 to communicate with customers. To ensure that customer email addresses are valid, Dynamics 365 includes email validation, which analyzes the primary email address in lead and contact records to identify the ones that can't receive email.
Email address validation looks for the following issues:
Incorrect syntax: An address that doesn't contain both a username and an email domain
Disposable domain: An address that contains a known disposable or temporary email domain
Test or spam email addresses: An address that contains known indicators of a test or spam address in the email header or metadata, IP address, HTML code of the email, and email content and formatting
Expired email addresses: An email account that has expired and can no longer receive or send email
Emails that bounce back: An address that can't receive a message for any reason
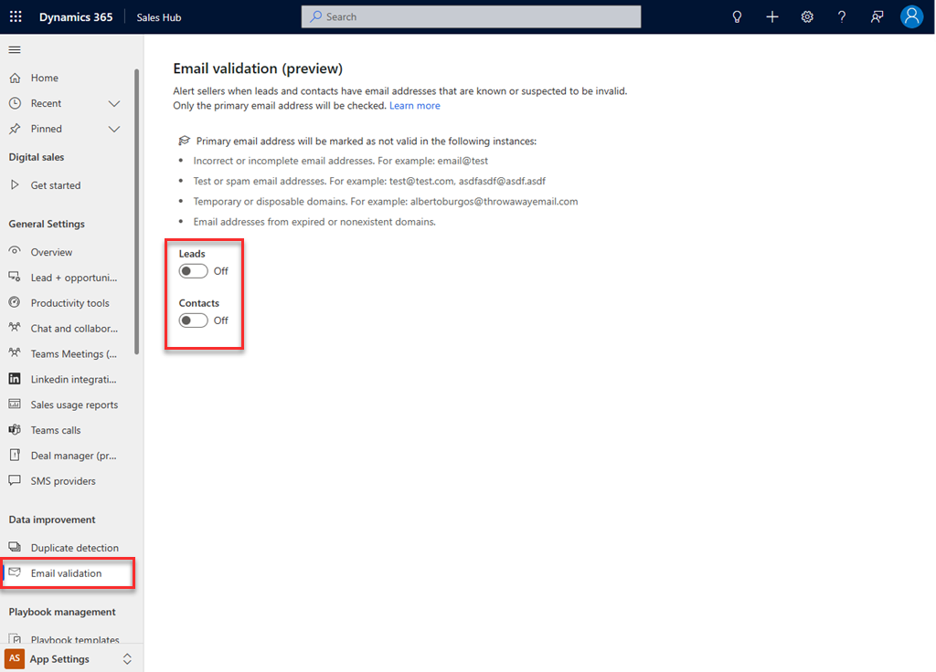
Initially, email address validation isn't enabled, it will need to be enabled. This is done in Sales Hub app. Go to App settings > Data improvement > Email validation.
Depending on your requirements, you can turn on email validation for Leads or Contacts. Once enabled, Email validation runs immediately on the primary email address in lead and contact records. A red envelope icon indicates an invalid email address.
To learn more about email validation, see Enable email validation.
