Implement Microsoft Purview eDiscovery (Premium)
Microsoft Purview eDiscovery (Premium) provides an end-to-end workflow to preserve, collect, review, analyze, and export data that's responsive to an organization's internal and external investigations. Nothing is needed to deploy eDiscovery (Premium). However, there are some prerequisite tasks that an IT admin and eDiscovery manager must complete before an organization can start to create and use eDiscovery (Premium) cases to manage its investigations.
This unit discusses the following steps necessary to set up eDiscovery (Premium).
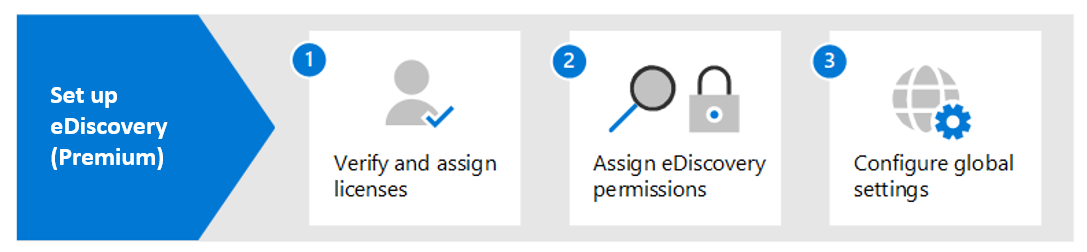
Step 1: Verify and assign appropriate licenses
Licensing for eDiscovery (Premium) requires the following organization subscription and per-user licensing:
Organization subscription. To access eDiscovery (Premium) in the Microsoft Purview compliance portal, an organization must have one of the following subscription plans:
- Microsoft 365 E5 or Office 365 E5 subscription
- Microsoft 365 E3 subscription with E5 Compliance add-on
- Microsoft 365 E3 subscription with E5 eDiscovery and Audit add-on
- Microsoft 365 Education A5 or Office 365 Education A5 subscription
Note
If an organization wants to try eDiscovery (Premium) even though it doesn't have an existing Microsoft 365 E5 plan, it can add Microsoft 365 to its existing subscription or sign up for a trial of Microsoft 365 E5.
Per-user licensing. To add a user as a custodian in an Advance eDiscovery case, that user must be assigned one of the following licenses, depending on their organization subscription:
- Microsoft 365: Users must be assigned one of the following licenses:
- Microsoft 365 E5 license, an E5 Compliance add-on license, or an E5 eDiscovery and Audit add-on.
- Microsoft 365 Frontline users must be assigned an F5 Compliance or F5 Security and Compliance add-on.
- Microsoft 365 Education users must be assigned an A5 license.
- Office 365: Users must be assigned an Office 365 E5 or Office 365 Education A5 license.
- Microsoft 365: Users must be assigned one of the following licenses:
Additional reading. For more information about licensing, download and see the "eDiscovery and auditing" section in the Microsoft 365 Comparison table.
Note
Users only need an E5 or A5 license (or the appropriate add-on license) to be added as custodians to an eDiscovery (Premium) case. IT admins, eDiscovery managers, lawyers, paralegals, or investigators who use eDiscovery (Premium) to manage cases and review case data don't need an E5, A5, or add-on license.
Step 2: Assign eDiscovery permissions
A user must be assigned the appropriate permissions to access Microsoft Purview eDiscovery (Premium) or to be added as a member of an eDiscovery (Premium) case. Specifically, a user must be added as a member of the eDiscovery Manager role group in the Microsoft Purview compliance portal.
Members of this role group can:
- Create and manage eDiscovery (Premium) cases.
- Add and remove members.
- Place custodians and content locations on hold.
- Manage legal hold notifications.
- Create and edit searches associated in a case.
- Add search results to a review set.
- Analyze data in a review set.
- Export and download search results from an eDiscovery (Premium) case.
Complete the following steps to add users to the eDiscovery Manager role group:
- On the Microsoft Purview compliance portal, select Permissions on the navigation pane.
- On the Permissions page, under the Microsoft Purview solutions group, select Roles.
- On the Role groups for Microsoft Purview solutions page, select the eDiscovery Manager role group.
- On the eDiscovery Manager detail pane that appears, select Edit next to the eDiscovery Manager section.
- On the Choose eDiscovery Manager page in the edit role group wizard, select Choose Discovery Manager.
- On the Choose eDiscovery Manager page, select the +Add button. Doing so displays the list of users.
- Select the checkbox for all users you want to add to the role group, and then select the Add button at the bottom of the pane.
- You can select the Add or Remove button to modify the selected users, if necessary. Once the list is correct, select Done.
- Select Save to add the users to the role group, and then select Close to complete the process.
More information about the eDiscovery Manager role group
There are two subgroups in the eDiscovery Manager role group. The difference between these subgroups is based on scope.
eDiscovery Manager. Users who are assigned this role can view and manage the eDiscovery (Premium) cases they create or are a member of. If another eDiscovery Manager creates a case but doesn't add a second eDiscovery Manager as a member of that case, the second eDiscovery Manager won't be able to view or open the case on the eDiscovery (Premium) page in the Microsoft Purview compliance portal. In general, most people in an organization can be added to the eDiscovery Manager subgroup.
eDiscovery Administrator. Users who are assigned this role can perform the same case management tasks as an eDiscovery Manager. However, an eDiscovery Administrator can also:
- View all cases that are listed on the eDiscovery (Premium) page.
- Manage any case in the organization after they add themselves as a member of the case.
- Access and export case data for any case in the organization.
- Remove members from an eDiscovery case. Only an eDiscovery Administrator can remove members from a case. Users who are members of the eDiscovery Manager subgroup can't remove members from a case, even if the user created the case.
Important
Because of the broad scope of access, an organization should only have a few administrators who are members of the eDiscovery Administrators subgroup.
Step 3: Configure global settings for eDiscovery (Premium)
The last step to complete before users in an organization start to create and use cases is to configure global settings. These settings apply to all cases in an organization. At this time, the only global setting is attorney-client privilege detection (more global settings will be available in the future). This setting enables the attorney-client privilege model to run when an organization analyzes data in a review set. The model uses machine learning to determine the likelihood that a document contains content that's legal in nature. It also compares the participants of documents with an attorney list (that an organization submits when setting up the model). This comparison determines whether a document has at least one participant who's an attorney.
Additional reading. For more information about setting up and using the attorney-client privilege detection model, see Set up attorney-client privilege detection in eDiscovery (Premium).
Note
This step is optional and can be performed at any time. Not implementing the attorney-client privilege detection model doesn't prevent an organization from creating and using eDiscovery (Premium) cases.
Manage the workflow
The following diagram is designed to help organizations get started using eDiscovery (Premium) once they've created a case. A brief summary of each step included in this diagram is provided below. Each summary highlights some extended eDiscovery (Premium) functionality that organizations can explore.
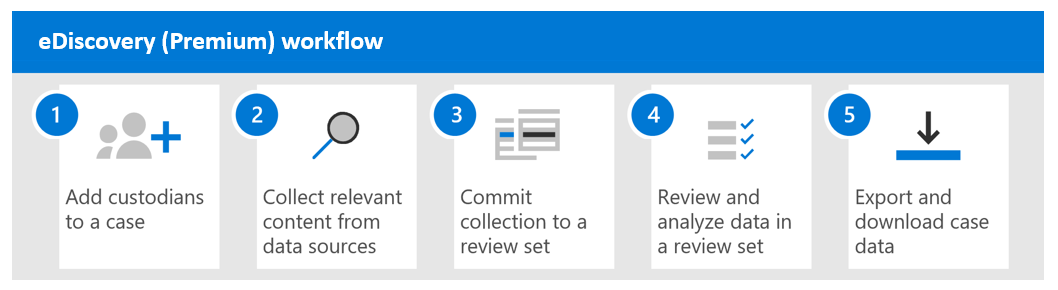
Add custodians and non-custodial data sources to the case. The first step after creating a case is to add custodians. A custodian is a person having administrative control of a document or electronic file that may be relevant to the case. Additionally, you can add data sources that aren't associated with a specific user but may be relevant to the case.
Organizations should keep in mind the following considerations when adding custodians to a case:
- Data in the custodian's Exchange mailbox, OneDrive account, and any Microsoft Teams or Yammer groups that the custodian is a member of can be "marked" as custodial data in the case.
- Custodian data is reindexed (by a process called Advanced indexing). This process enables custodial content such as images, unsupported file types, and other potentially unindexed content to be fully searchable when you run searches to collect data for the case. This process helps to optimize searching of custodian data in the next step.
- Custodian data can be placed on hold. Doing so preserves data that may be relevant to the case during the investigation.
- Other data sources can be associated with a custodian. For example, you can associate a SharePoint site or Microsoft 365 Group with a custodian. Doing so enables the data in these other sources to be reindexed, placed on hold, and searched, just like the data in the custodian's mailbox or OneDrive account.
- Organizations can use the communications workflow in eDiscovery (Premium) to send a legal hold notification to custodians.
Collect relevant content from data sources. After an organization adds custodians and non-custodial data sources to a case, it can use the built-in collections tool to search these data sources for content that may be relevant to the case. Keywords, properties, and conditions can be used to build search queries. These queries will generate search results with the data that's most likely relevant to the case. You can also:
- View collection statistics that may help you refine a collection to narrow the results.
- Preview a sample of the collection to quickly verify whether the relevant data is being found.
- Revise a query and rerun the collection.
Commit collection to a review set. Once an organization has configured and verified that a search returns the desired data, the next step is to add the search results to a review set. When you add data to a review set, items are copied from their original location to a secure Azure Storage location. The data is reindexed again to optimize it for thorough and fast searches when reviewing and analyzing items in the review set. Additionally, you can also add non-Office 365 data into a review set.
There's also a special type of review set to which you can add data. This review set is called a conversation review set. These types of reviews sets provide conversation reconstruction capabilities to reconstruct, review, and export threaded conversations like those in Microsoft Teams. For more information, see Review conversations in eDiscovery (Premium).
Review and analyze data in a review set. Now that data is in a review set, an organization can use a wide-variety of tools and capabilities to view and analyze the case data with the goal of reducing the data set to what is most relevant to the case being investigated. The following list describes common tools and capabilities that an organization can use during this process.
- View documents. This task includes viewing the metadata for each document in a review set, and viewing the document in its native version or text version.
- Create queries and filters. Search queries are created using various search criteria to further refine and cull the case data to what is most relevant to the case. Search criteria include the ability to search all file metadata properties. An organization can also use review set filters to quickly apply other conditions to the results of a search query to further refine those results.
- Create and use tags. An organization can apply tags to documents in a review set to identify which are responsive or non-responsive to the case. It can then use those tags when creating search queries to include or exclude the tagged documents. Tagging can also determine which documents to export.
- Annotate and redact documents. An organization can use the annotation tool during a review to annotate documents and redact content in documents as work product. A PDF version of an annotated or redacted document is generated during review to reduce the risk of exporting the unredacted native version of the document.
- Analyze case data. The analytics functionality in eDiscovery (Premium) is powerful. After an organization runs analytics on the data in a review set, eDiscovery (Premium) performs analysis such as near duplicate detection, email threading, and themes. This analysis can help reduce the volume of documents that must be reviewed. Analytics reports are also generated that summarize the results of the data analysis. As previously mentioned, running analytics also runs the attorney-client privilege detection model.
Export and download case data. A final step after collecting, reviewing, and analyzing case data is to export it out of eDiscovery (Premium). The data can be exported for external review or for review by people outside of the investigation team. Exporting data is a two-step process.
- Export the search results out of Microsoft 365. This step is accomplished by copying the search results to a Microsoft-provided Azure Storage location.
- Download the export package to a local computer. Use the eDiscovery Export tool to download the content to a local computer. In addition to the exported data files, the export package contains an export report, a summary report, and an error report.
Explore how to establish permissions and create a case
View a video version of the interactive guide (captions available in more languages).
Be sure to select the full screen option in the video player.
Knowledge check
Choose the best response for the following question. Then select “Check your answers.”