Exercise: Migrate Cassandra workloads to Cosmos DB
In this exercise, you'll migrate two datasets from Cassandra to Cosmos DB. You'll move the data in two ways. First, you'll export the data from Cassandra and use the CQLSH COPY command to import the database into Cosmos DB. Then, you'll migrate the data using Spark. You'll verify that migration was successful by running queries against the data held in the Cosmos DB database.
The scenario for this lab concerns an ecommerce system. The customer and order details are recorded in a Cassandra database.
Important
You can perform these steps in your own personal subscription, or just follow along to understand how to migrate your database.
Create a Resource Group and Virtual Network
Using a web browser, open a new tab and navigate to the Azure portal.
In the Azure portal, select Resource groups, and then select +Add.
On the Create a resource group page, enter the following details:
Property Value Subscription <your-subscription> Resource Group cassandradbrg Region Select your nearest location Select Review + Create and then select Create. Wait for the resource group to be created.
In the top left menu on the Azure portal, select + Create a resource.
On the New page, in the Search the Marketplace box, type Virtual Network, and press Enter.
On the Virtual Network page, select Create.
On the Basics page, enter the following details, and then select Next:IP Addresses:
Property Value Resource Group cassandradbrg Name databasevnet Region Select the same location that you specified for the resource group On the IP Addresses page, set the IPv4 address space to 10.0.0.0/24.
Select the default subnet, and then select Remove subnet.
Select + Add subnet. In the Add subnet pane, set the Subnet name to default, set the Subnet address range to 10.0.0.0/28, and then select Add.
On the IP Addresses page, select Next: Security.
On the Security page, enter the following details, and then select Review + create:
Property Value Enable Azure Bastion Disabled Enable Azure Firewall Disabled Enable Azure DDoS Network Protection Disabled On the Review + create page, select Create and then wait for the virtual network to be created before continuing.
Create a Cassandra database server
In the top left menu on the Azure portal, select + Create a resource.
In the Search the Marketplace box, type Cassandra Certified by Bitnami, and then press Enter.
On the Cassandra Certified by Bitnami page, select Create.
On the Create a virtual machine page, enter the following details, and then select Next: Disks >.
Property Value Resource Group cassandradbrg Virtual machine name cassandraserver Region Select the same location that you specified for the resource group Availability options No infrastructure redundancy required Image Cassandra Certified by Bitnami - Gen1 Size Standard_D2_v2 Authentication type Password Username azureuser Password Pa55w.rdPa55w.rd Confirm password Pa55w.rdPa55w.rd On the Disks page, accept the default settings, and then select Next: Networking >.
On the Networking page, enter the following details, and then select Next: Management >.
Property Value Virtual network databasevnet Subnet default (10.0.0.0/28) Public IP (new) cassandraserver-ip NIC network security group Advanced Configure network security group (new) cassandraserver-nsg Accelerated networking Off Load balancing No On the Management page, accept the default settings, and then select Next: Advanced >.
On the Advanced page, accept the default settings, and then select Next: Tags >.
On the Tags page, accept the default settings, and then select Next: Review + create >.
On the Review + create page, confirm you agree to the terms by entering your contact details.
On the validation page, select Create.
Wait for the virtual machine to be deployed before continuing.
In the top left menu on the Azure portal, select All resources.
On the All resources page, select cassandraserver-nsg.
On the cassandraserver-nsg page, under Settings, select Inbound security rules.
On the cassandraserver-nsg - Inbound security rules page, select + Add.
In the Add inbound security rule pane, enter the following details, and then select Add:
Property Value Source Any Source port ranges * Destination Any Destination port ranges 9042 Protocol Any Action Allow Priority 1020 Name Cassandra-port Description Port that clients use to connect to Cassandra
Download the sample code
In the top left menu on the Azure portal, select All resources.
On the All resources page, select cassandraserver-ip.
On the cassandraserver-ip page, make a note of the IP address.
In the toolbar at the top of the Azure portal, select Cloud Shell.
If the You have no storage mounted message box appears, select Create storage.
When the Cloud Shell starts, in the drop-down list above the Cloud Shell window, select Bash.
In the Cloud Shell, run the following command to download the sample code and data:
Bashgit clone https://github.com/MicrosoftLearning/DP-160T00A-Migrating-your-Database-to-Cosmos-DB migration-workshop-appsMove to the migration-workshop-apps/Cassandra folder:
Bashcd ~/migration-workshop-apps/CassandraEnter the following commands to copy the setup scripts and data to the cassandraserver virtual machine. Replace <ip address> with the value of the cassandraserver-ip IP address:
Bashscp *.* azureuser@<ip address>:~At the prompt, type yes to continue connecting.
At the Password prompt, enter the password Pa55w.rdPa55w.rd
Populate the Cassandra database
Type the following command to connect to the cassandraserver virtual machine. Specify the IP address of the cassandraserver virtual machine:
Bashssh azureuser@<ip address>At the Password prompt, enter the password Pa55w.rdPa55w.rd
Run the following command to connect to the Cassandra database, create the tables required by this lab, and populate them.
Bashbash upload.shThe script creates two keyspaces named customerinfo and orderinfo. The script creates a table named customerdetails in the customerinfo keyspace, and two tables named orderdetails and orderline in the orderinfo keyspace.
Run the following command, and make a note of the default password in this file:
Bashcat bitnami_credentialsStart the Cassandra Query Shell as the user cassandra (this is the name of the default Cassandra user created when the virtual machine was set up). Replace <password> with the default password from the previous step:
Bashcqlsh -u cassandra -p <password>At the cassandra@cqlsh prompt, run the following command. This command displays the first 100 rows from the customerinfo.customerdetails table:
SQLselect * from customerinfo.customerdetails limit 100;Note that the data is clustered by the stateprovince column, and then ordered by customerid. This grouping enables applications to quickly find all customers located in the same region.
Run the following command. This command displays the first 100 rows from the orderinfo.orderdetails table:
SQLselect * from orderinfo.orderdetails limit 100;The orderinfo.orderdetails table contains a list of orders placed by each customer. The data recorded includes the date the order was placed, and the value of the order. The data is clustered by the customerid column, so that applications can quickly find all orders for a specified customer.
Run the following command. This command displays the first 100 rows from the orderinfo.orderline table:
SQLselect * from orderinfo.orderline limit 100;This table contains the items for each order. The data is clustered by the orderid column, and sorted by orderline.
Quit the Cassandra Query Shell:
Bashexit;At the bitnami@cassandraserver prompt, type the following command to disconnect from the Cassandra server and return to the Cloud Shell:
BashexitYou can close the Cloud Shell.
Create a Cosmos Account and Database
In the top left menu on the Azure portal, click + Create a resource.
On the New page, in the Search the Marketplace box, type Azure Cosmos DB, end then press Enter.
On the Azure Cosmos DB page, click Create.
On the Create Azure Cosmos DB Account page, enter the following settings, and then click Review + create:
Property Value Subscription Select your subscription Resource group cassandradbrg Account Name cassandrannn, where nnn is a random number selected by you API Cassandra Notebooks Off Location Specify the same location that you used for the Cassandra server and virtual network Capacity mode Provisioned throughput Apply Free Tier Discount Apply Account Type Non-Production Geo-Redundancy Disable Multi-region Writes Disable Availability Zones Disable On the validation page, click Create, and wait for the Cosmos DB account to be deployed.
In the left-hand pane, click All resources.
On the All resources page, click your Cosmos DB account (cassandrannn).
On the left under Settings, click Connection String, and make a note of the following items:
- Contact Point
- Port
- Username
- Primary Password
Note
If you don't see these options for the connection, check that you have created your Cosmos DB account to use the Cassandra API.
Migrate data from Cassandra to Cosmos DB using Spark
In the next steps you'll migrate the same data you just created. You'll use Spark from an Azure Databricks notebook.
Create a Spark cluster
In the top left menu on the Azure portal, select + Create a resource.
In the New pane, in the Search the Marketplace box, type Azure Databricks, and then press Enter.
On the Azure Databricks page, select Create.
On the Azure Databricks Service page, enter the following details, and then select Review + create:
Property Value Resource Group Use existing, cassandradbrg Workspace name CassandraMigration Location Select the same location that you specified for the resource group Pricing Tier Standard On the Review + create page, select Create and then wait for the Databricks Service to be deployed.
In the top left menu on the Azure portal, select Resource groups, select cassandradbrg, and then select the CassandraMigration Databricks Service.
On the CassandraMigration page, select Launch Workspace.
On the Azure Databricks page, under Common Tasks, select New Cluster.
On the New Cluster page, enter the following settings, and then select Create Cluster:
Property Value Cluster Name MigrationCluster Cluster Mode Standard Pool None Databrick Runtime Version Runtime: 5.5 LTS (Scala 2.11, Spark 2.4.3) Python Version 3 Enable autoscaling Selected Terminate after 60 Worker Type Accept the default settings Driver Type Same as worker Wait for the cluster to be created; the state of the MigrationCluster is reported as Running when the cluster is ready. This process will take several minutes.
Create a Notebook for migrating data
In the pane to the left, select Clusters, then MigrtationCluster.
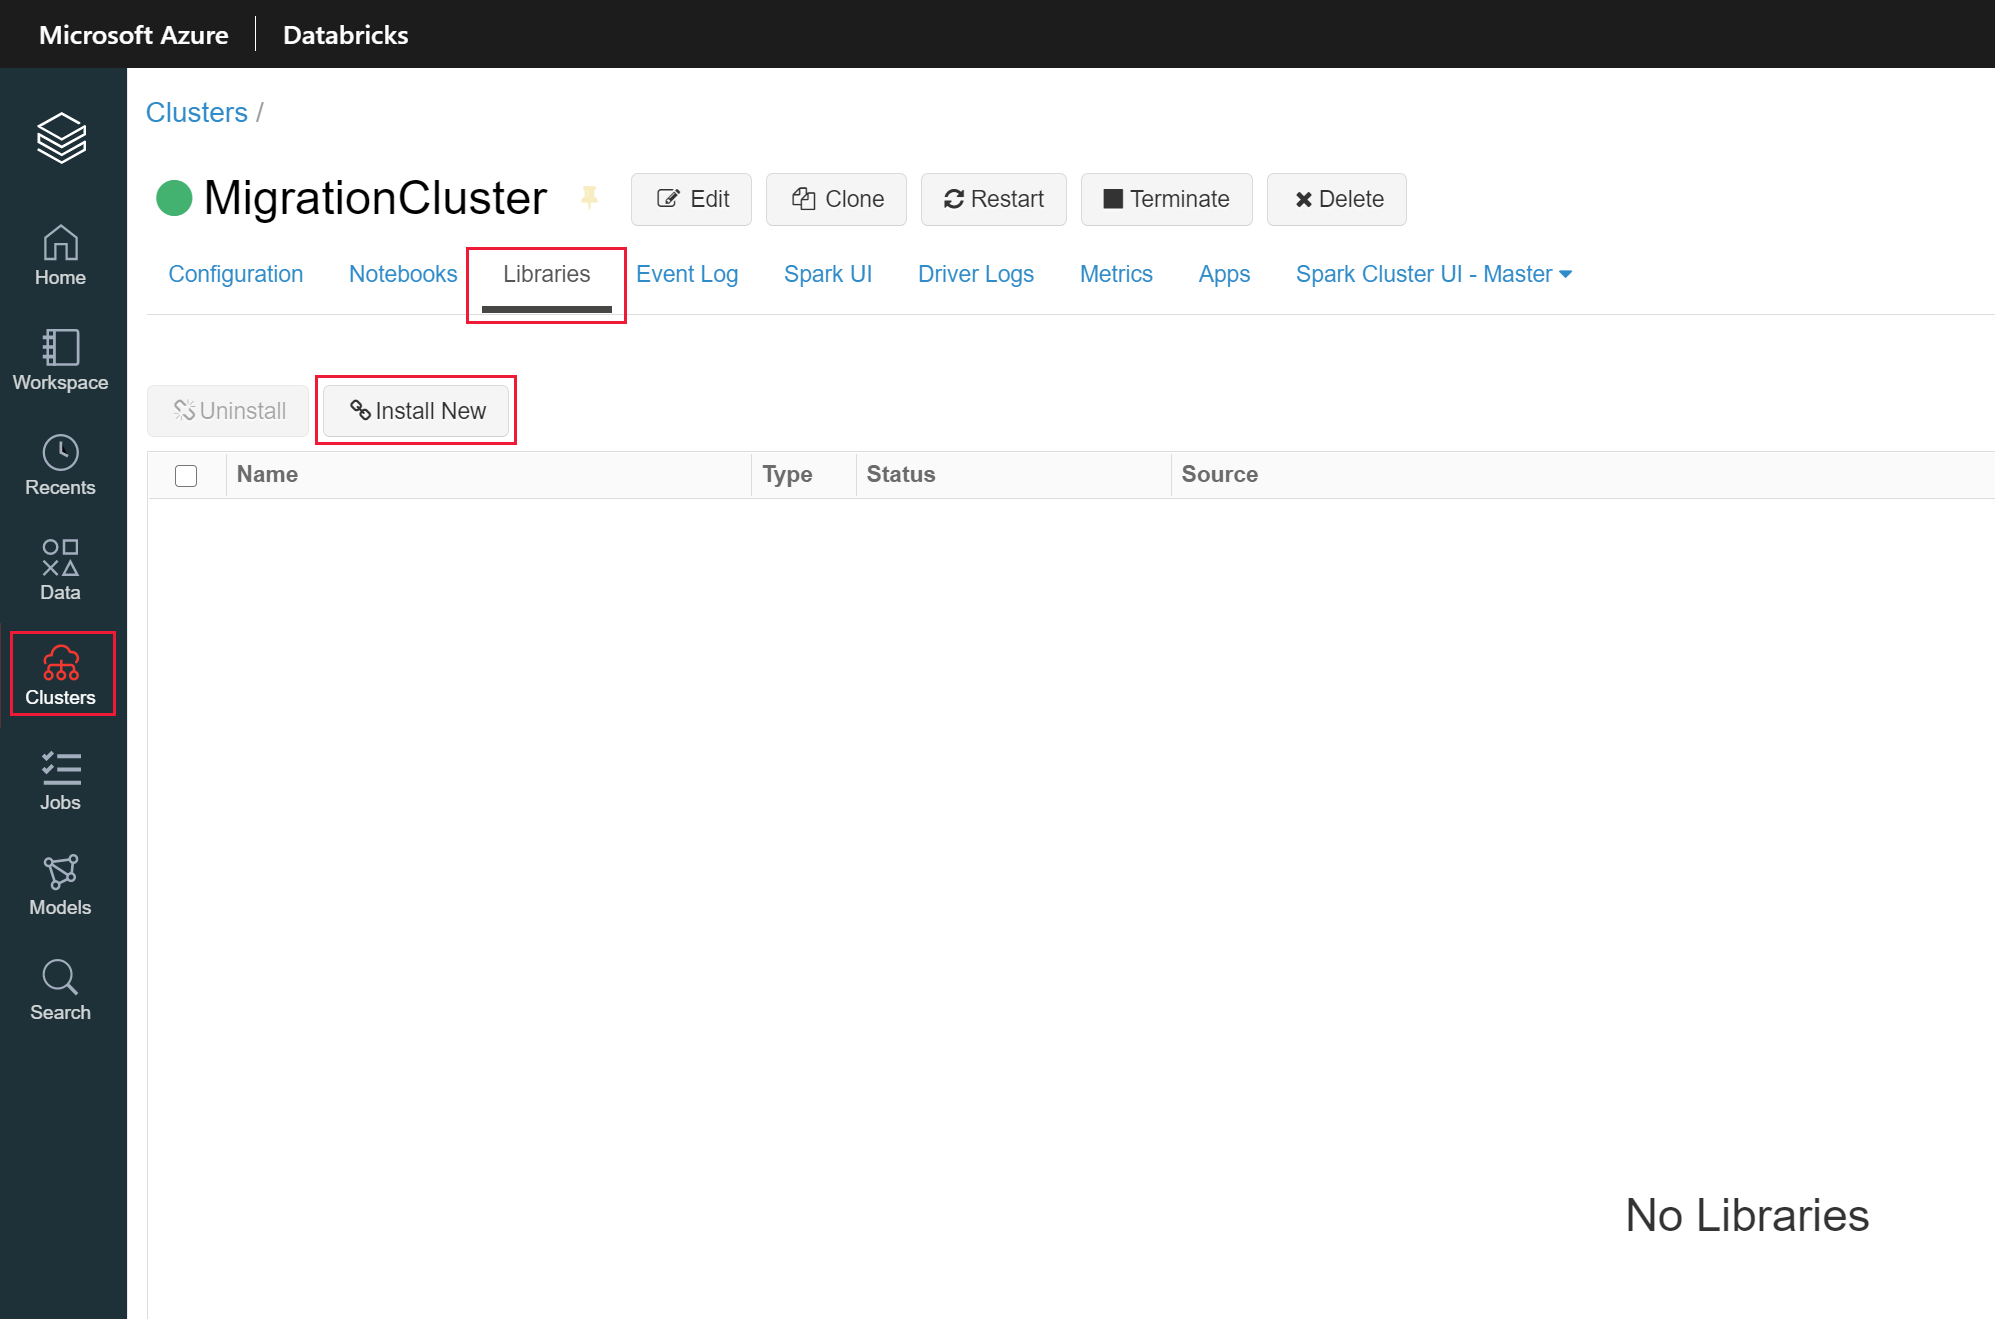
In the menu at the top select the Libraries tab, and then select Install New.
In the Install Library dialog, enter the following settings, and then select Install:
Property Value Library Source Maven Coordinates com.datastax.spark:spark-cassandra-connector_2.11:2.4.3 Repository Leave blank Exclusions Leave blank This library contains the classes for connecting to Cassandra from Spark.
When the connector library is installed, select Install Library.
In the Install Library dialog, enter the following settings, and then select Install:
Property Value Library Source Maven Coordinates com.microsoft.azure.cosmosdb:azure-cosmos-cassandra-spark-helper:1.2.0 Repository Leave blank Exclusions Leave blank This library contains the classes for connecting to Cosmos DB from Spark.
In the pane to the left, select Azure Databricks.
On the Azure Databricks page, under Common Tasks, select New Notebook.
In the Create Notebook dialog box, enter the following settings, and then select Create:
Property Value Name MigrateData Language Scala Cluster MigrationCluster
Connect to Cosmos DB and create tables
In the first cell of the notebook, enter the following code:
Scala// Import libraries import org.apache.spark.sql.cassandra._ import org.apache.spark.sql._ import org.apache.spark._ import com.datastax.spark.connector._ import com.datastax.spark.connector.cql.CassandraConnector import com.microsoft.azure.cosmosdb.cassandraThis code imports the types required to connect to Cosmos DB and Cassandra from Spark.
In the toolbar on the right of the cell, select the drop-down arrow, and then select Add Cell Below.
In the new cell, enter the following code. Specify the Contact Point, Username, and Primary Password with the values for your Cosmos DB account (you recorded these values in the previous exercise):
Scala// Configure connection parameters for Cosmos DB val cosmosDBConf = new SparkConf() .set("spark.cassandra.connection.host", "<contact point>") .set("spark.cassandra.connection.port", "10350") .set("spark.cassandra.connection.ssl.enabled", "true") .set("spark.cassandra.auth.username", "<username>") .set("spark.cassandra.auth.password", "<primary password>") .set("spark.cassandra.connection.factory", "com.microsoft.azure.cosmosdb.cassandra.CosmosDbConnectionFactory") .set("spark.cassandra.output.batch.size.rows", "1") .set("spark.cassandra.connection.connections_per_executor_max", "1") .set("spark.cassandra.output.concurrent.writes", "1") .set("spark.cassandra.concurrent.reads", "1") .set("spark.cassandra.output.batch.grouping.buffer.size", "1") .set("spark.cassandra.connection.keep_alive_ms", "600000000")This code sets the Spark session parameters to connect to your Cosmos DB account
Add another cell below the current one, and enter the following code:
Scala// Create keyspaces and tables val cosmosDBConnector = CassandraConnector(cosmosDBConf) cosmosDBConnector.withSessionDo(session => session.execute("CREATE KEYSPACE customerinfo WITH replication = {'class': 'SimpleStrategy', 'replication_factor': 1}")) cosmosDBConnector.withSessionDo(session => session.execute("CREATE TABLE customerinfo.customerdetails (customerid int, firstname text, lastname text, email text, stateprovince text, PRIMARY KEY ((stateprovince), customerid)) WITH cosmosdb_provisioned_throughput=10000")) cosmosDBConnector.withSessionDo(session => session.execute("CREATE KEYSPACE orderinfo WITH replication = {'class': 'SimpleStrategy', 'replication_factor': 1}")) cosmosDBConnector.withSessionDo(session => session.execute("CREATE TABLE orderinfo.orderdetails (orderid int, customerid int, orderdate date, ordervalue decimal, PRIMARY KEY ((customerid), orderdate, orderid)) WITH cosmosdb_provisioned_throughput=10000")) cosmosDBConnector.withSessionDo(session => session.execute("CREATE TABLE orderinfo.orderline (orderid int, orderline int, productname text, quantity smallint, orderlinecost decimal, PRIMARY KEY ((orderid), productname, orderline)) WITH cosmosdb_provisioned_throughput=10000"))These statements rebuild the orderinfo and customerinfo keyspaces, together with the tables. Each table is provisioned with 10000 RU/s of throughput.
Connect to the Cassandra database and retrieve data
In the notebook, add another cell, and enter the following code. Replace <ip address> with the IP address of the virtual machine, and specify the password you retrieved earlier from the bitnami_credentials file:
Scala// Configure connection parameters for the source Cassandra database val cassandraDBConf = new SparkConf() .set("spark.cassandra.connection.host", "<ip address>") .set("spark.cassandra.connection.port", "9042") .set("spark.cassandra.connection.ssl.enabled", "false") .set("spark.cassandra.auth.username", "cassandra") .set("spark.cassandra.auth.password", "<password>") .set("spark.cassandra.connection.connections_per_executor_max", "10") .set("spark.cassandra.concurrent.reads", "512") .set("spark.cassandra.connection.keep_alive_ms", "600000000")Add another cell, and enter the following code:
Scala// Retrieve the customer and order data from the source database val cassandraDBConnector = CassandraConnector(cassandraDBConf) var cassandraSparkSession = SparkSession .builder() .config(cassandraDBConf) .getOrCreate() val customerDataframe = cassandraSparkSession .read .format("org.apache.spark.sql.cassandra") .options(Map( "table" -> "customerdetails", "keyspace" -> "customerinfo")) .load println("Read " + customerDataframe.count + " rows") val orderDetailsDataframe = cassandraSparkSession .read .format("org.apache.spark.sql.cassandra") .options(Map( "table" -> "orderdetails", "keyspace" -> "orderinfo")) .load println("Read " + orderDetailsDataframe.count + " rows") val orderLineDataframe = cassandraSparkSession .read .format("org.apache.spark.sql.cassandra") .options(Map( "table" -> "orderline", "keyspace" -> "orderinfo")) .load println("Read " + orderLineDataframe.count + " rows")This block of code retrieves the data from the tables in the Cassandra database into Spark DataFrame objects. The code displays the number of rows read from each table.
Insert data into Cosmos DB tables and run the Notebook
Add a final cell, and enter the following code:
Scala// Write the customer data to Cosmos DB val cosmosDBSparkSession = SparkSession .builder() .config(cosmosDBConf) .getOrCreate() // Connect to the existing table from Cosmos DB var customerCopyDataframe = cosmosDBSparkSession .read .format("org.apache.spark.sql.cassandra") .options(Map( "table" -> "customerdetails", "keyspace" -> "customerinfo")) .load // Merge the results from the Cassandra database into the DataFrame customerCopyDataframe = customerCopyDataframe.union(customerDataframe) // Write the results back to Cosmos DB customerCopyDataframe.write .format("org.apache.spark.sql.cassandra") .options(Map( "table" -> "customerdetails", "keyspace" -> "customerinfo")) .mode(org.apache.spark.sql.SaveMode.Append) .save() // Write the order data to Cosmos DB, using the same strategy var orderDetailsCopyDataframe = cosmosDBSparkSession .read .format("org.apache.spark.sql.cassandra") .options(Map( "table" -> "orderdetails", "keyspace" -> "orderinfo")) .load orderDetailsCopyDataframe = orderDetailsCopyDataframe.union(orderDetailsDataframe) orderDetailsCopyDataframe.write .format("org.apache.spark.sql.cassandra") .options(Map( "table" -> "orderdetails", "keyspace" -> "orderinfo")) .mode(org.apache.spark.sql.SaveMode.Append) .save() var orderLineCopyDataframe = cosmosDBSparkSession .read .format("org.apache.spark.sql.cassandra") .options(Map( "table" -> "orderline", "keyspace" -> "orderinfo")) .load orderLineCopyDataframe = orderLineCopyDataframe.union(orderLineDataframe) orderLineCopyDataframe.write .format("org.apache.spark.sql.cassandra") .options(Map( "table" -> "orderline", "keyspace" -> "orderinfo")) .mode(org.apache.spark.sql.SaveMode.Append) .save()This code creates another DataFrame for each of the tables in the Cosmos DB database. Each DataFrame will be empty, initially. The code then uses the union function to append the data from the corresponding DataFrame for each of the Cassandra tables. Finally, the code writes the appended DataFrame back to the Cosmos DB table.
The DataFrame API is a very powerful abstraction provided by Spark, and is a highly efficient structure for transporting large volumes of data very quickly.
In the toolbar at the top of the notebook, select Run All. You will see messages indicating that the cluster is starting up. When the cluster is ready, the notebook runs the code in each cell in turn. You will see further messages appearing below each cell. The data transfer operations that read and write DataFrames are executed as Spark jobs. You can expand the job to view the progress. The code in each cell should complete successfully, without displaying any error messages.
Verify that the data migration was successful
- Return to your Cosmos DB account in the Azure portal.
- Select Data Explorer.
- In the Data Explorer pane, expand the customerinfo keyspace, expand the customerdetails table, and then select Rows. The first 100 rows should be displayed. If the keyspace does not appear in the Data Explorer pane, select Refresh to update the display.
- Expand the orderinfo keyspace, expand the orderdetails table, and then select Rows. The first 100 rows should be displayed for this table as well.
- Finally, expand the orderline table, and then select Rows. Verify that the first 100 rows for this table appear.
You have successfully migrated a Cassandra database to Cosmos DB by using Spark from a Databricks notebook.
Clean up the resources you've created
Important
If you've performed these steps in your own personal subscription, you can delete the resources individually or delete the resource group to delete the entire set of resources. Resources left running incur costs.
- Using the Cloud Shell run this command to delete the resource group:
az group delete --name cassandradbrg