Teach: Build a Simple House challenge
Remember, we'll be modeling an actual lesson you can use with your students. You'll build just as your students might and then we'll come together to assess and reflect on your work. The last step will be to use the lesson planner and apply to your own classroom. The first portion of our lesson is Teach—we'll spend some time demonstrating the skills before you go off on your own to build in a Minecraft world.

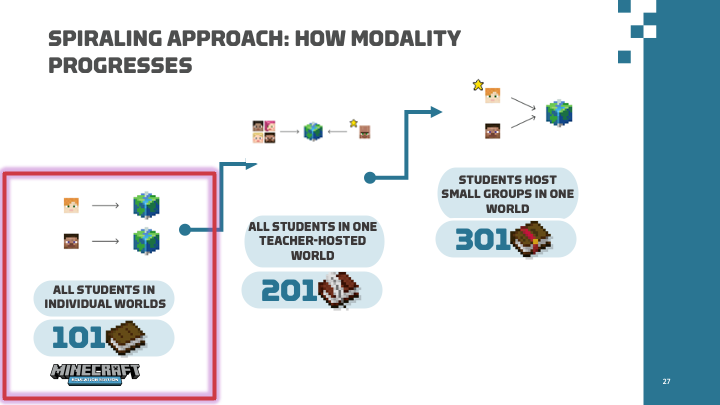
Today, we’re going to be playing Minecraft individually in our own worlds. This is easiest when you want students creating by themselves to build or experience a world without others. In the Minecraft 201 and 301 modules, we'll demonstrate, and you'll learn how to play collaboratively with others.
Follow the rubric
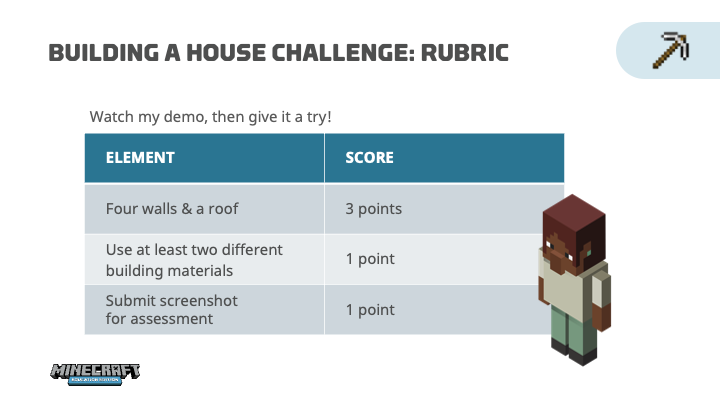
Rubrics are helpful to ground your students in what they need to do to master a lesson. We'll have a rubric for Minecraft 101, 201, and 301. For this module we'll use:
- Four walls and a roof, 3 points
- Use at least two different building materials, 1 point
- We'll Submit a screenshot for assessment, 1
As you design your first lesson with your students, you'll want to think of what your rubric will be. We'll demonstrate how to use Minecraft to move and build a house—think of what kind of house you might like to live in if you could build anything! You'll explore all of the different blocks (materials to build with) and use at least two to build your house. At the end, you'll submit a screenshot of your build showing mastery of the house build task.
Open our world
The first step is open a world where we can practice how to move and build.
Go to Play, and then select View Library, find How to Play, select Additional Tutorials, and open the Build a Simple House Challenge world. Later, we'll explore the different kinds of worlds available and how you can use them in the classroom, but for now, let's use this one.
Watch and do: Open the Build a Simple House Challenge world from the library (30 seconds)
Other ways to share a world
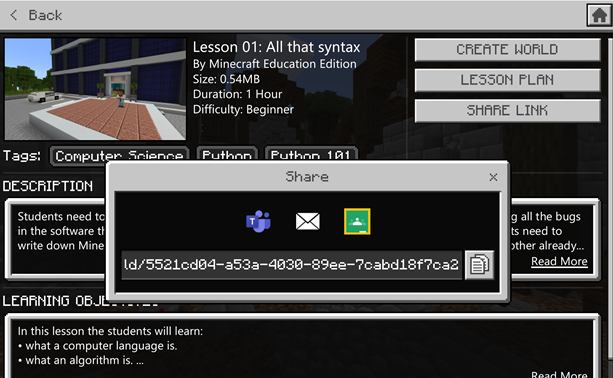
In this case, we asked you to directly navigate to a world so you could see how to find one in the library. You can also share a link to a world directly to your students! Check out the three options currently in each lesson when you go to Share Link. You can just get a direct link or share directly via Teams or Google Classroom. This video explains how to create a Teams assignment for a Minecraft project.
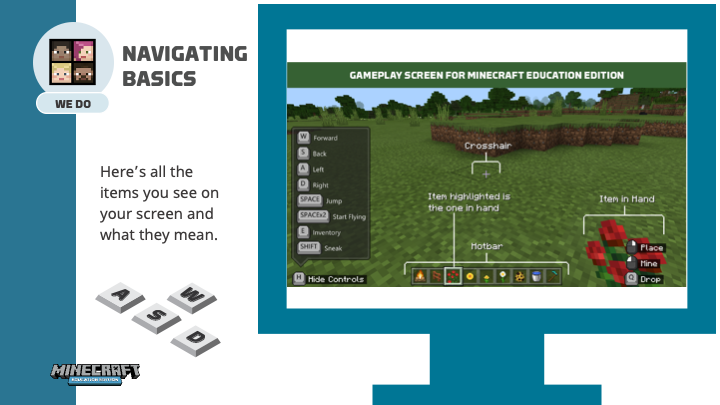
Gameplay screen
Before we start building, a quick recap on what you see on your screen: In Minecraft Education, you see on screen features such as a crosshair in the center of the screen which is where actions take place from mouse button selections.
- Crosshair (+ in the center of the screen): The crosshair is moved with the mouse and is where a block will be destroyed or placed. If you don't see the word Place on your mouse picture, you'll know that your crosshair isn't pointed to a place where you can build.
- Hotbar (9 boxes at the bottom of the screen): The hotbar is the inventory. It'is accessed by using the number keys (1-9) on the keyboard, or by using the rolling wheel on the mouse to scroll across the hotbar. Consider this a toolbelt with all your items you can quickly access. Whichever item is highlighted, you'll see in your right hand on the screen.
Keyboard controls are along the left side of the screen while mouse controls are on the right side. Mouse controls change as your crosshair moves.
Keyboard controls
Take a moment to familiarize yourself with the buttons you'll be using to move around in Minecraft. Remember, put yourself in your students' shoes. They'll need to learn this movement in order to successfully create learning outcomes for your class, so it's important you learn it just as they might, and you may want to teach them this same way!
Movement with the mouse:
Consider the mouse as your head and the keys your body. If you need to look left, move your mouse to the left. Follow the same steps when looking right, looking down, and looking up.
Place and break with the mouse(controls on the bottom left of the screen):
The picture on the bottom left of the screen is the mouse. It shows you that if you right-click, you'll place a block and if you left-click, you'll break a block.
The left mouse button is used to mine or break blocks. This is how we build. The right is to talk to characters as you come close to them with your crosshair point, or to place or use whatever is in hand.
If you’re using a trackpad on a laptop, the same controls apply with your trackpad as you move your finger across the trackpad controlling your head/eyes and selecting the right-click vs left-click buttons.
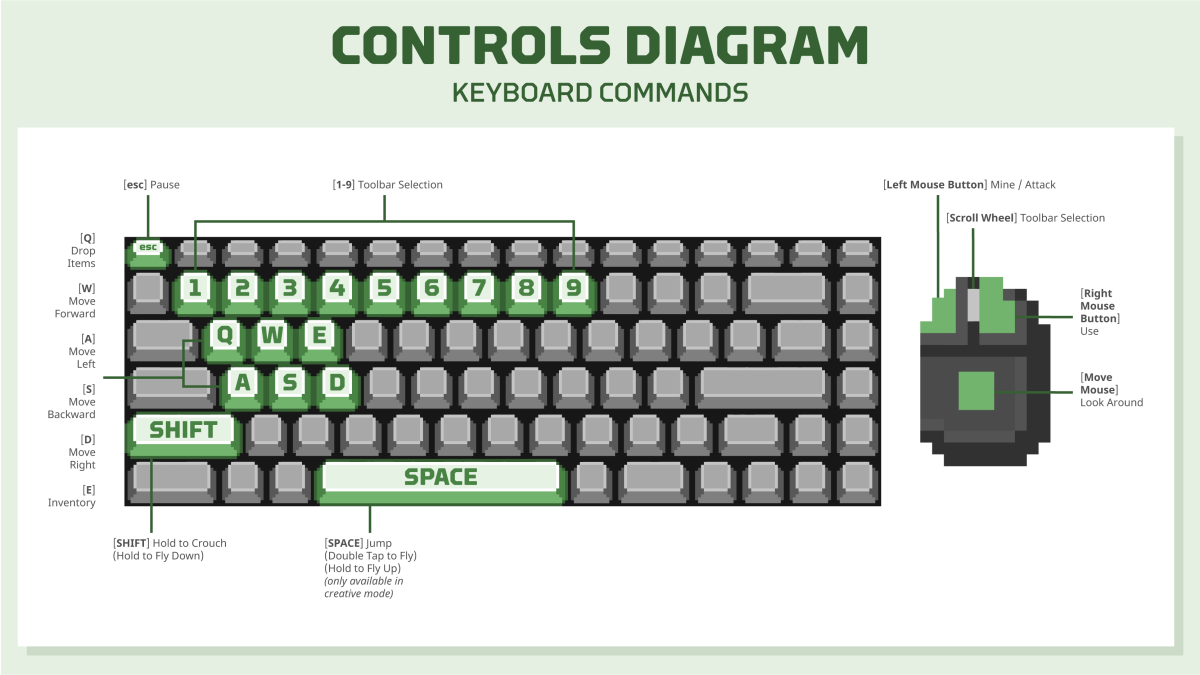
Physically moving your player, use the keyboard’s W A S D keys.
W – Press and hold to walk forward.
S – Press and hold to walk backward.
A – Press and hold to move left.
D – Press and hold to move right.
Jumping can be accomplished by pressing the spacebar, twice for flying.
E - Inventory (gathering items for building)
C - Engages Code Builder (learn how to code in Minecraft 301)
Shift - Sneak
Combine these keyboard buttons to zigzag, jump while moving in a direction, or move your mouse at the same time to navigate in a more natural motion.
Pressing the escape key (Esc) on your keyboard gives you access to the game menu and computer mouse pointer to complete other tasks with your device.
In Settings and Controls, these button options can be adjusted to the user’s needs.
Additional Practice can be found in-game:
- Navigate to the View Library
- Select the How to Play library
- Select Start Here
- Select tutorial 1. Movement and 2. Place and Break.
- Select the link to view a video for further support in where to locate the in-game tutorials.
- Select the link to view a video for further support in basic controls within the game.
Move your head
Navigating in Minecraft Education is like real life navigation. You visually take in your surroundings with your eyes while physically moving through the world with your body.
On screen, you’ll see navigation guidance along the left side while mouse selection options are found on the right side of the screen. As the mouse moves up, we look up, as the mouse moves down, left, and right, we look that way too. If you continue to move your mouse to the right, your character will do the same in a 360-degree rotation. Go ahead and move your mouse and watch as your character follows along.
The navigation with your mouse can also be done using a laptop trackpad.
Watch and do: Move your head (50 seconds)
Move your body
On screen, you’ll see navigation guidance along the left side while mouse selection options are found on the right side of the screen. Physically moving your player, use the keyboard’s W A S D keys.
W – Press and hold to walk forward.
S – Press and hold to walk backward.
A – Press and hold to move left
D – Press and hold to move right.
Jumping can be accomplished by pressing the spacebar.
Combine these keyboard buttons to zigzag, jump while moving in a direction, or move your mouse at the same time to navigate in a more natural motion.
Pressing F5 on your keyboard will shuffle through point of view as default is set to first person perspective.
Additional Practice can be found in-game:
- Navigate to the View Library
- Select the How to Play library
- Select Start Here
- Select tutorial 1. Movement and 2. Place and Break.
- Select the link to view a video for further support in where to locate the in-game tutorials.
- Select the link to view a video for further support in basic controls within the game.
Watch and do: Move your body (50 seconds)
Open your inventory
One of the keyboard controls is to press E. This opens your Inventory. If you find that you need an item that is in your Inventory but not in your hotbar, press E on your keyboard to open your Inventory—or you might think of it as your Everything-tory. You’ll be able to select, drag, and swap items to be used in your hotbar. Explore all the different kinds of materials you have at your disposal and begin to imagine the kinds of creations your students can build for you!
Watch and do: Open your inventory (2 minutes 12 seconds)
Place and mine your blocks
In order to build in Minecraft, we must place the items in our inventory. Notice where the crosshairs are, that's where your block is placed. If you place it incorrectly, you must mine it to get rid of it. That's the heart of Minecraft—get it?
There's no undo button or action. In Minecraft Education, we learn from making mistakes. When mistakes occur, we'll need to mine or replace blocks to correct a mistake. This allows improvements to be made as we learn how to avoid making the same error moving forward. This is a great lesson to teach your students!
Watch and do: Place and mine blocks (34 seconds)
Next step
Phew! That was a lot of work—thanks for letting us teach for a bit. We're now ready to dive into the next phase—RELEASE, where you'll get a chance to build your house finally.