Teach: Recreate the World challenge

Remember, we're modeling a lesson you can use with your students, and then let you build just as your students might. You'll assess and reflect on your work as well as apply to your own classroom using our lesson planner. The first portion of our lesson is teach—we'll spend some time demonstrating the skills to you before you go off on your own to build in a Minecraft world.
So far, you've seen how Minecraft can be used easily by students in a blank starter world to build anything they want that relates to your curriculum. You’ve also seen how you can use pre-made learning experiences that guide your students through content and build. Finally, we'll see what it’s like if you, as a teacher, want to start creating your own custom learning experiences in Minecraft as a world builder. Don’t worry—if this isn’t for you, you can have your students know and understand these tools to make powerful experiences as a learning product.
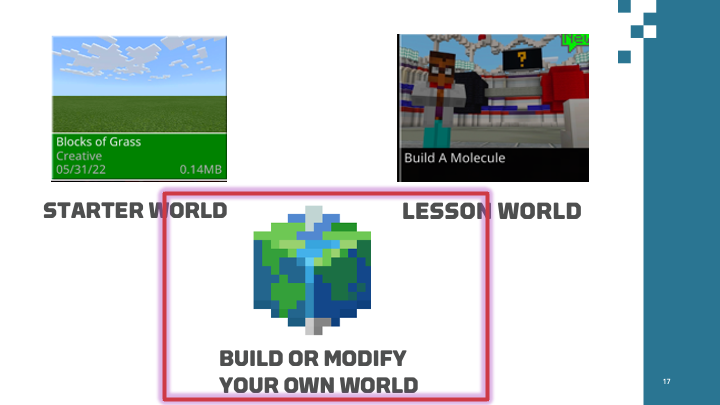
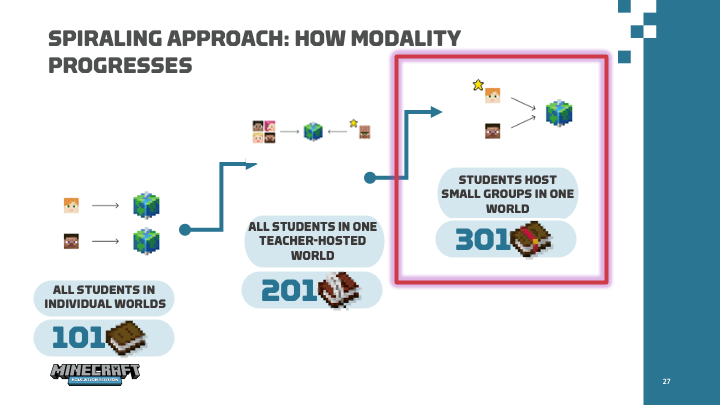
Before we begin the build, we want to share something about how Minecraft works with you. In Minecraft 101 and 201, you were essentially students, consuming a pre-created world we had created for you. This means you interacted with our NPC, were able to create Boards and Signs, and you experienced the effects of our allow/deny/border blocks that kept you in your place.
Now, in Minecraft 301, we're going to put on a different hat. We're going to turn on worldbuilder mode in Minecraft. This gives you special powers to create immersive learning experiences for your students. Don’t worry—if this isn’t for you, and you would rather spend time having your students do the building, that’s okay too. We want to expose you to it to put in your toolkit and also to make students aware that they can use these powerful tools.
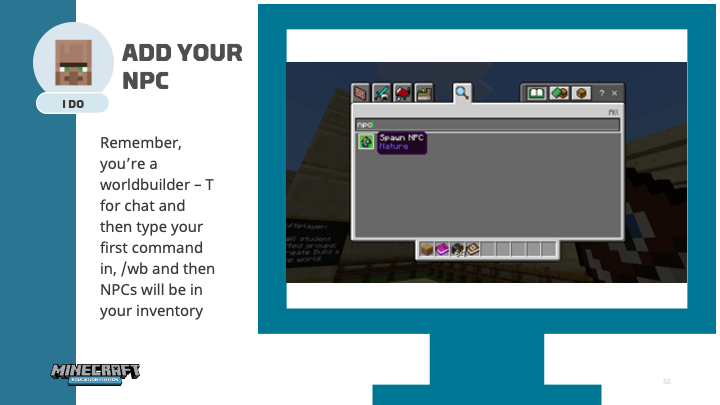
The default mode for any world is worldbuilder OFF, so you'll always need to press the T key to open the chat, and then enter /wb to turn it on or off.
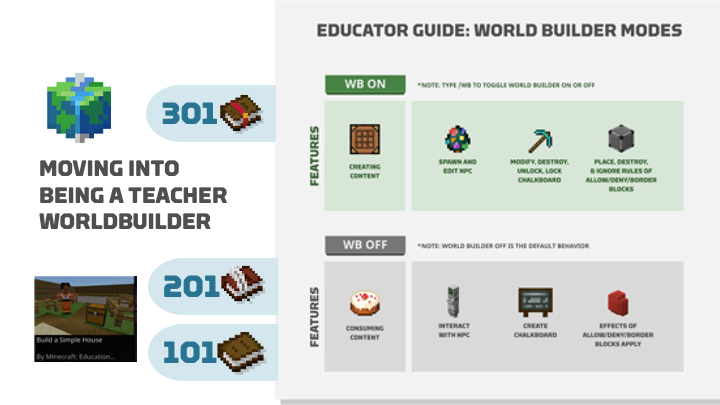
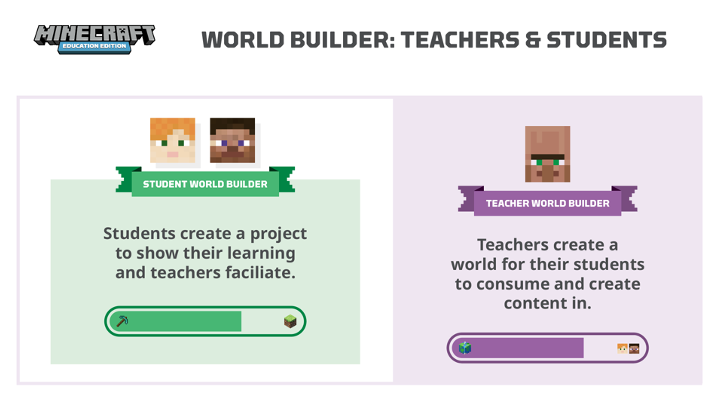
Many teachers spend most of their time in Minecraft facilitating their students as world builders, creating a project to demonstrate their learning. Some teachers want to go deeper and be teacher world builders, creating or modifying worlds for students to consume and create content in.
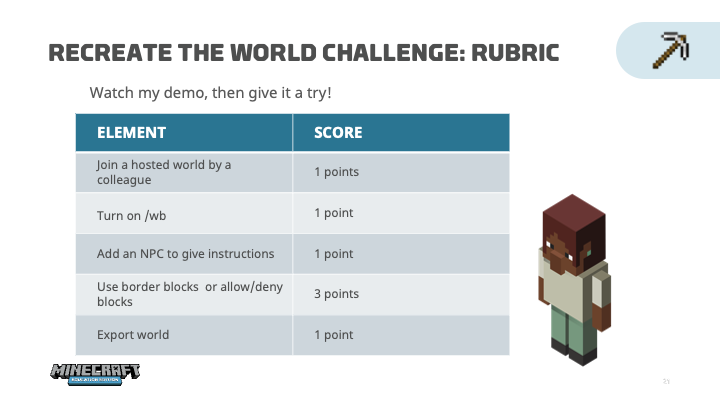
Follow the rubric
Rubrics are helpful to ground your students in what they need to do to ace the lesson. We'll first demonstrate what the lesson looks like using this rubric:
- Join a world hosted by a colleague, 1 point
- Turn on worldbuilder mode, 1 point
- Add a Non Player Character (NPC) to give instructions, 1 point
- Use Border blocks or Allow/Deny blocks, 3 points
- Export the world, 1 point
To earn the full seven points, you'll need to host or join a world hosted by a colleague, turn on worldbuilder mode, add a Non Player Character to give instructions, use Border or Allow/Deny blocks, and export your entire world. There’s lots to do, so let’s get going!
Get into the world
In Minecraft 201, we moved into the world of multiplayer to experience what it’s like to have a full class in one world hosted by a teacher. In Minecraft 301, we explore another common hosting strategy—when a student hosts the group for other students. We commonly see teachers assign group leaders, who then open and host a world and invite three or four classmates to have a small group build. This is conducive for the same reasons you might have students group together to work on a PowerPoint deck—collaboration, problem-solving, and communication skills are rich in this scenario. It’s also a bit easier to manage as you don’t have 40 students in one world. Small and whole group play gives learners a unique opportunity to practice both communication and collaboration skills—working together to reach a goal while sharing thoughts, questions, ideas, and solutions. Learners solve problems together while practicing negotiation skills—co-play is a skill that research shows helps learners deepen understanding.
Different pairings
Just like you might do different groupings of students for collaborative work, you can also pair students in different ways depending on your learning objective.
Pairs: Two students
Multiplayer can be used with pairs or partners. In this scenario, one student takes on the role of host. The host opens the game and begins the world. The other student in the pair joins the host’s world. Together, the pair works in the same world, each on their own device. One example of a challenge that can be done in pairs is The Labyrinth. In this challenge, after researching labyrinths, students create a maze in creative mode in 20-30 minutes. Once the time is up, partners switch spots, change the settings to survival mode and see if they can get out of their partner’s maze alive! This is a fun way to incorporate collaborative play where students still maintain an element of personal choice during building.
Small group: Three or more students
In groups of three or more, multiplayer can be used in a similar manner. One student takes on the role of host and the other members of the group join the host’s world using a join code. Again, each student is working on their own device, but all are participating in the same world. As groups get larger, the challenge to work collaboratively becomes harder. Communication is key when having small groups work together on a lesson activity. For example, in the activity Build a Tree House, students work together in small groups—but on their own devices—to build a tree house in under 30 minutes. This requires students to talk with one another throughout the activity, either in person or using the in-game chat feature.
Add structure to your multiplayer world
As with any new classroom activity, using Minecraft Education in a collaborative gameplay mode is most successful for students and educators if basic management techniques are in place before entering a multiplayer world. This helps players avoid griefing (the act of irritating another player or destroying their work) and students can work harmoniously in collaborative groups.
Class contract
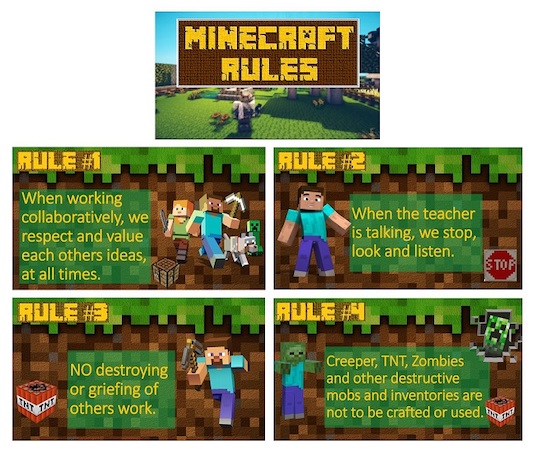
It's recommended that, when first introducing Minecraft Education to the class, a class contract or charter is created. The contract or charter should have agreed upon ways of work within the Minecraft Education collaborative game environment.
As educators begin to explore ways to use Minecraft Education to create richer and deeper learning experiences, it's important that classroom management techniques are used when asking students to work collaboratively in a digital world. Consider these tips from Global Minecraft Mentors on classroom management when implementing collaborative gameplay.
- Create a list of classroom community guidelines with your students. Providing students with the opportunity to understand and practice classroom community norms and help create those guidelines is a powerful way to set a good foundation when using digital tools. Additionally, your norms for players in a Minecraft world should mirror your norms for students in the classroom.
- Take the time to prepare your world before you use it with your students. It's recommended you prepare your worlds before students connect. Consider adjusting the game settings, plan how you want students to work, establish working spaces for students, and prepare class groups offline. Think clearly about what you want your students to achieve and how the Minecraft Education world you'll use serves this purpose.
- Support your online work with offline documentation/instructions and tasks. Support students by having a paper copy of the activity instructions, math problems, questions, or prompts that students can use as an offline record to show their work. This helps to connect your classroom to the Minecraft Education classroom. In the lesson Rockets Away!, students begin with a hands-on activity in which they build a plastic bottle rocket ship. This sets them up for understanding the best way to build a rocket ship before doing so in Minecraft. Then, once they've solved the problem of how to best build a real-life rocket, they participate in the Spaceships Challenge. In this challenge, students build their rocket ship using blocks in Minecraft, and then they share their work with peers in a gallery walk. Another idea to reduce frustration and encourage collaboration is to take a break every 30 minutes. Ask students to share with the class one example of how they’re successfully completing the task and/or where they're struggling.
- Build unstructured time into your lesson. Allowing students to have a portion of the class period just to play significantly reduces or eliminates negative behaviors during the lesson. Providing five to ten minutes for students to play may also be rich with opportunities for teachable moments.
- Teach students how to play. If a student doesn't know how to use the tools required to complete the learning task, then that student is more likely to misbehave and distract other students. Spending time to make sure every student acquires the skills necessary to succeed will pay off, just like teaching students classroom routines. Consider pairing novice players with more experienced players for continued collaboration. Also, consider using My First Lesson as a starting point for your beginning students to understand the game. This is an easy way to give students the opportunity to learn about Minecraft while exploring and building.
- Create alternative assignments. Develop assignments that accomplish the same learning goal but don't require Minecraft Education. This strategy is useful as a consequence for students who misbehave in the game, but it's also a useful tool for differentiation. Some students may not want to play, so students can be offered a choice which will subsequently limit misbehavior.
- Balance structured activities with choice. It's important to let the game be a game to retain student engagement while maximizing the potential of the tool. This moves Minecraft Education from a gimmick to a legitimately enjoyable learning experience. Educators may want to assign a strict step-by-step process or place the students in a pre-built map, so it's important to balance these activities with activities in which students are offered more in-game choices and control over the learning experience. The Small South Africa world offers teachers a wonderful template for problem-based learning. Initially, students can explore the world (Tip #4), then they can address a problem posed by the teacher (this can be a variety of things, it just depends on the content), and finally students can take control and personalize the experience by using this world to demonstrate understanding of the problem as well as a solution.
- Use classroom settings. Classroom settings offer educators the tools that are essential to managing a digital Minecraft class. Features include being able to toggle the access to commands, mobs, destructive items, player vs. player damage, etc. on and off for students. These options can be found under Settings once a world, including a new world, is selected in View My Worlds. Both Game Settings and Classroom Settings are on the left side of the menu.
- Try, reflect, reset. These tips may or may not work for your classroom. Be open to trying different strategies for management and eventually you’ll find what works for you and your students. Just like teaching anything else, it may take some trial and error before you find the solutions that work best for you and your students.
One way to set up small groups is to assign student groups and leaders to host a world.
Having a structure for collaborative work is necessary in order to engage all learners and encourage equitable learning experiences. One way to encourage all learners in collaboration and communication during game play, is to create classroom roles. Roles will ensure that each learner has a part to play in the learning process. They also help to bring clarity to learning experiences and can reduce chaos and off-task behaviors. Roles can be changed depending on the lesson, giving learners the opportunity to try out different ones.
Classroom roles might include:
- Team leader has world launched first and named on their computer. Guides group with decisions and directions.
- Timekeeper reminds team of benchmark times needed to complete the stages of the task: planning, researching, and building.
- Recorder notes aspects to include with details.
- Encourager supports the team by encouraging problem solving in a positive manner.
- Researcher uses digital tools to research for the group.
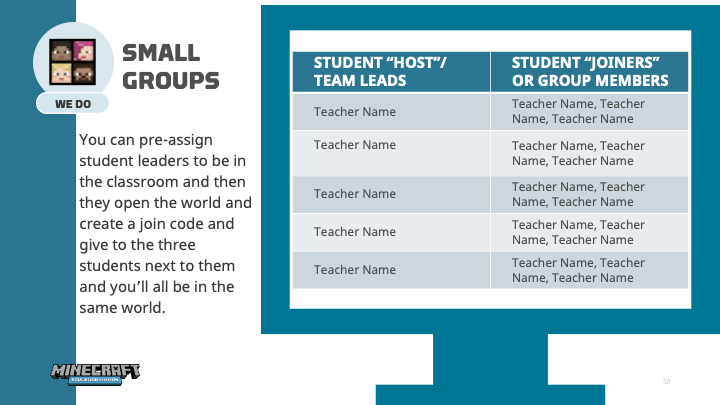
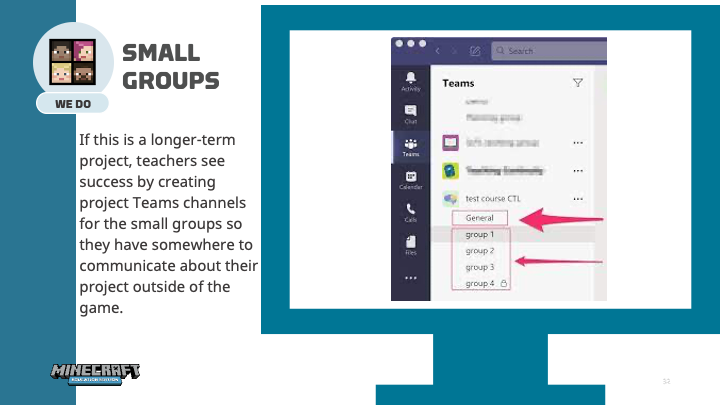
If you're doing a longer-term project, you can create groups in Teams or your learning management system (LMS) of choice. You can pre-set channels in Teams and students can collaborate when they aren't playing on their plan, and bonus—they can easily turn their work directly into a Teams assignment.
Just like we saw how teachers can host a game for the whole class, you'll want to teach your students how to host for their teammates. Students give their join code to their classmates, and then they join the same world and begin their build.
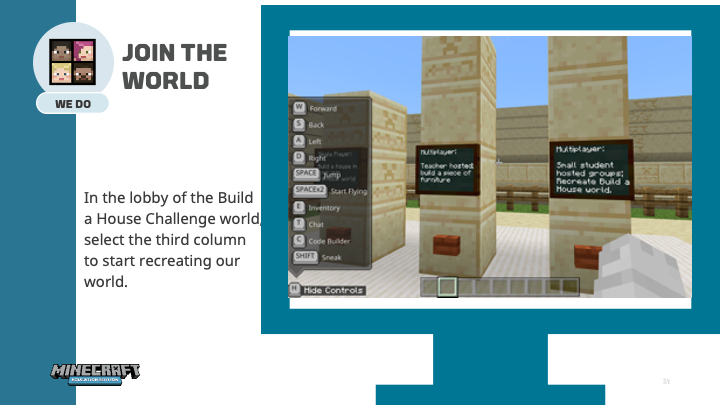
For the purposes of this module, we'll still build in individual worlds, but now you know the process for having student small groups play multiplayer. You'll want to open the same Build a House Challenge world in the library and select the button to be teleported to a new building space. In the lobby of the Build a House Challenge world, select the third column to start recreating our world.
Add an NPC to your world
Part of being a world builder is adding things like NPCs to the experience to interact with students. NPCs interact with visitors to the world, and provide additional lesson information, hints, or instructions for students to discover. You can use them as a teacher to modify or create a world to give students directions or more resources. NPCs can also be used by students when using Minecraft Education for projects. Students can use NPCs to relay content or guide visitors to important information on a topic of study.
Key features of NPCs include:
- NPCs stay where you put them.
- NPCs can be named.
- NPCs can display dialog text when interacted with.
- URLs and commands can be assigned to buttons with NPCs.
Remember, if an NPC can't be spawned into a world, it means the worldbuilder mode isn't on, or not true. To turn on worldbuilder mode from within the game, a command needs to be used. From the keyboard, enter the command /wb and select Enter. This command sets worldbuilder mode to true, or on. After customizing your NPC, you'll need to exit, or make false, worldbuilder mode in order to interact with the NPC. Use the same command, /wb, to exit worldbuilder mode, or to make world builder mode false.
Using NPCs in your classroom Minecraft worlds can be looked at akin to having a co-teacher! NPCs guide students through worlds, give them information, and direct them to links or important coordinates in the world. An example of how NPCs can be helpful is in the Sustainability City world. Here, NPCs direct students through various sections of a city. Students have the choice to follow the lessons embedded in the first NPC they meet, or they can simply explore the land and talk to the NPCs along the way; learning vocabulary, facts, and suggestions for how THEY can live a more sustainable life.
Add specialty blocks
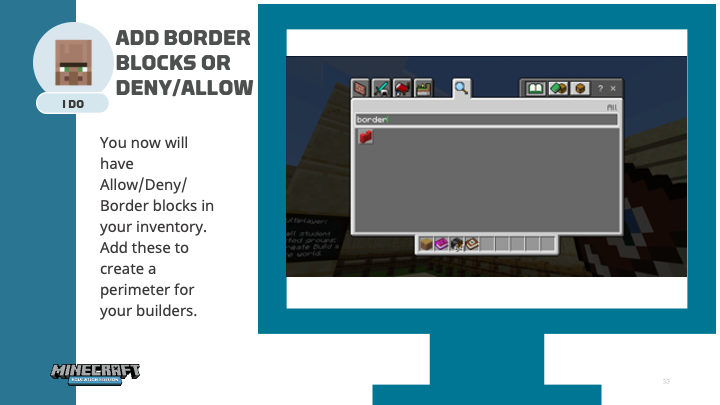
Another aspect of being a world builder is adding specialty blocks. These specialty blocks are exclusive to Minecraft Education and designed to help you preserve structures you wish to keep, prevent world visitors from wandering too far, and section off designated areas to build. As a teacher world builder, these blocks help you design and manage students interacting with your world (and likewise, if students are creating worlds for others to explore, these help them keep things under control.)
You must be in worldbuilder mode to access specialty blocks.
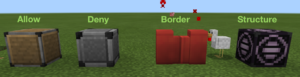
Border blocks
Border blocks look like bright, red walls and emit tiny, red particles. They're placed like a wall, but act more like a force field that extends upwards and downwards forever! You may recognize this—in your first Build a House Challenge and Build Furniture worlds, you were feeling the effects of Border blocks and couldn't leave your designated space. This is helpful for controlling players in a certain world.
What this item blocks:
- Jumping over
- Climbing over
- Walking through
- Flying over
- Building over
- Tunneling under
- Destruction by players without world builder permission
Allow and Deny blocks
Allow blocks permit the player to build or destroy. These permissions don't affect using items such as doors, levers, or chests.
Deny blocks stop the ability to place or destroy things. You can still interact with items that are restrained by deny blocks.
You can place specialty blocks underground and they'll still continue to provide the effect you need. This works when the blocks don’t fit the design you have in mind.
Test your specialty blocks by toggling off worldbuilder mode and trying them out.
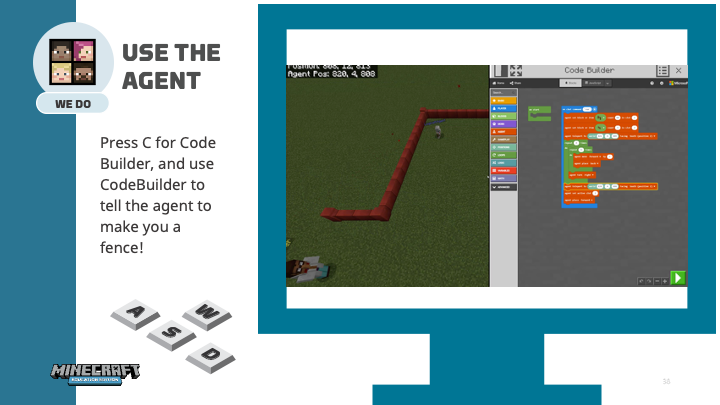
Use code to speed up builds
Coding in Minecraft Education is easy through the use of the Code Builder. The Code Builder allows players to create and build quickly and easily.
When coding in Minecraft Education a new character called the Agent will appear in the world near your player when Code Builder is launched. This new Agent shares your player's name such as: JohnD.Agent. This Agent helps complete routine and repetitive tasks such as building walls and farming in Minecraft through the use of coding. For example, in the lesson Coding Your Agent, students are challenged to code their agent to build four different shapes in various locations of the world. What’s great about this particular lesson is that it's expected that students will have to make changes and debug—this is all part of the failure dynamic! Coding can still occur within the Minecraft Education game without utilizing the Agent.
Launch Code Builder with these steps:
- Once in the world, press the C key if using a mouse/keyboard OR press the icon next to pause/chat on the top center of the screen while on touch.
- Select Microsoft MakeCode as your coding option for the purposes of this module.
- Select a tutorial to build a wall.
- Code Builder can be turned on or off in the Classroom Settings for each world before it’s opened.
Next step
Thanks for working through all of the teach portion of the module—you're ready to be released to start Recreating the World.