Use the action center
Action center
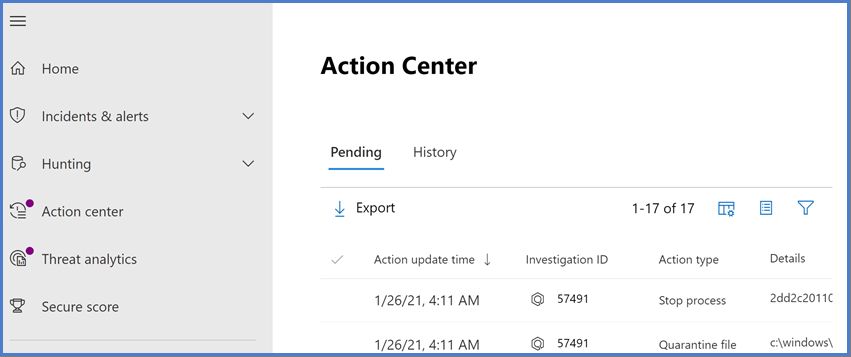
The unified Action center of the Microsoft Defender portal lists pending and completed remediation actions for your devices, email & collaboration content, and identities in one location.
The unified Action center brings together remediation actions across Defender for Endpoint and Defender for Office 365. It defines a common language for all remediation actions and provides a unified investigation experience. Your security operations team has a "single pane of glass" experience to view and manage remediation actions.
The Action Center consists of pending and historical items:
Pending displays a list of ongoing investigations that require attention. Recommended actions are presented that your security operations team can approve or reject. The Pending tab appears only if there are pending actions to be approved (or rejected).
History as an audit log for all of the following items:
Remediation actions that were taken as a result of an automated investigation
Remediation actions that were approved by your security operations team (some actions, such as sending a file to quarantine, can be undone)
Commands that were run and remediation actions that were applied in Live Response sessions (some actions can be undone)
Remediation actions that were applied by Microsoft Defender Antivirus (some actions can be undone)
Select Automated Investigations, then Action center.
When an automated investigation runs, a verdict is generated for each piece of evidence investigated. Verdicts can be Malicious, Suspicious, or No threats found depending on:
Type of threat
Resulting verdict
How your organization's device groups are configured
Remediation actions can occur automatically or only upon approval by your organization’s security operations team.
Review pending actions
To approve or reject a pending action:
Select any item on the Pending tab.
Select an investigation from any of the categories to open a panel where you can approve or reject remediation actions.
Other details, such as file or service details, investigation details, and alert details are displayed. From the panel, you can select the Open investigation page link to see the investigation details. You can also select multiple investigations to approve or reject actions on multiple investigations.
Review completed actions
To review completed actions:
Select the History tab. (If need be, expand the time period to display more data.)
Select an item to view more details about that remediation action.
Undo completed actions
You’ve determined that a device or a file isn't a threat. You can undo remediation actions that were taken, whether those actions were taken automatically or manually. You can undo any of the following actions:
Source
Automated investigation
Microsoft Defender Antivirus
Manual response actions
Supported Actions
Isolate device
Restrict code execution
Quarantine a file
Remove a registry key
Stop a service
Disable a driver
Remove a scheduled task
Remove a file from quarantine across multiple devices
To remove a file from quarantine across multiple devices:
On the History tab, select a file that has the Action type Quarantine file.
In the pane on the right side of the screen, select Apply to X more instances of this file, and then select Undo.
Viewing action source details
The Action center includes an Action source column that tells you where each action came from. The following table describes possible Action source values:
| Action source value | Description |
|---|---|
| Manual device action | A manual action taken on a device. Examples include device isolation or file quarantine. |
| Manual email action | A manual action taken on email. An example includes soft-deleting email messages or remediating an email message. |
| Automated device action | An automated action taken on an entity, such as a file or process. Examples of automated actions include sending a file to quarantine, stopping a process, and removing a registry key. |
| Automated email action | An automated action taken on email content, such as an email message, attachment, or URL. Examples of automated actions include soft-deleting email messages, blocking URLs, and turning off external mail forwarding. |
| Advanced hunting action | Actions taken on devices or email with advanced hunting. |
| Explorer action | Actions taken on email content with Explorer. |
| Manual live response action | Actions taken on a device with live response. Examples include deleting a file, stopping a process, and removing a scheduled task. |
| Live response action | Actions taken on a device with Microsoft Defender for Endpoint APIs. Examples of actions include isolating a device, running an antivirus scan, and getting information about a file. |
Submissions
In Microsoft 365 organizations with Exchange Online mailboxes, admins can use the Submissions portal in the Microsoft Defender portal to submit email messages, URLs, and attachments to Microsoft for scanning.
When you submit an email message for analysis, you'll get:
- Email authentication check: Details on whether email authentication passed or failed when it was delivered.
- Policy hits: Information about any policies that may have allowed or blocked the incoming email into your tenant, overriding our service filter verdicts.
- Payload reputation/detonation: Up-to-date examination of any URLs and attachments in the message.
- Grader analysis: Review done by human graders in order to confirm whether or not messages are malicious.
Important
Payload reputation/detonation and grader analysis are not done in all tenants. Information is blocked from going outside the organization when data is not supposed to leave the tenant boundary for compliance purposes.
What do you need to know before you begin?
To submit messages and files to Microsoft, you need to have one of following roles:
Security Administrator or Security Reader in the Microsoft Defender portal.
Admins can submit messages as old as 30 days if it's still available in the mailbox and not purged by the user or another admin.
Admin submissions are throttled at the following rates:
Maximum submissions in any 15-minutes period: 150 submissions
Same submissions in a 24 hour period: Three submissions
Same submissions in a 15-minute period: One submission
Report suspicious content to Microsoft
On the Submissions page, verify that the Emails, Email attachments, or URLs tab is selected based on the type of content you want to report. And then select the Submit to Microsoft for analysis icon. Submit to Microsoft for analysis.
Use the Submit to Microsoft for analysis flyout that appears to submit the respective type of content (email, URL, or email attachment).
Note
File and URL submissions are not available in the clouds that do not allow for data to leave the environment. The ability to select File or URL will be greyed out.
Notify users from within the portal
On the Submissions page, select User reported messages tab, and then select the message you want to mark and notify.
Select the Mark as and notify drop-down, and then select No threats found > Phishing or Junk.
The reported message will be marked as a false positive or a false negative. An email notification is sent automatically from within the portal to the user who reported the message.
Submit a questionable email to Microsoft
In the Select the submission type box, verify that Email is selected in the dropdown list.
In the Add the network message ID or upload the email file section, use one of the following options:
Add the email network message ID: The ID is a GUID value that's available in the X-MS-Exchange-Organization-Network-Message-Id header in the message or in the X-MS-Office365-Filtering-Correlation-Id header in quarantined messages.
Upload the email file (.msg or .eml): Select Browse files. In the dialog that opens, find and select the .eml or .msg file, and then select Open.
In the Choose a recipient who had an issue box, specify the recipient that you would like to run a policy check against. The policy check will determine if the email bypassed scanning due to user or organization policies.
In the Select a reason for submitting to Microsoft section, select one of the following options:
- Shouldn't have been blocked (False positive)
- Should have been blocked (False negative): In the, "The email should have been categorized as" section that appears, select one of the following values (if you're not sure, use your best judgment): Phish, Malware, or Spam
When you're finished, select Submit.
Send a suspect URL to Microsoft
In the Select the submission type box, select URL from the dropdown list.
In the URL box that appears, enter the full URL. For example,
https://www.fabrikam.com/marketing.html.In the Select a reason for submitting to Microsoft section, select one of the following options:
- Shouldn't have been blocked (False positive)
- Should have been blocked (False negative): In the, "This URL should have been categorized as" section that appears, select one of the following values (if you're not sure, use your best judgment): Phish, Malware
When you're finished, select Submit.
Submit a suspected email attachment to Microsoft
In the Select the submission type box, select Email attachment from the dropdown list.
In the File section that appears, select Browse files. In the dialog that opens, find and select the file, and then select Open.
In the Select a reason for submitting to Microsoft section, select one of the following options:
- Shouldn't have been blocked (False positive)
- Should have been blocked (False negative): In the, "This file should have been categorized as" section that appears, select one of the following values (if you're not sure, use your best judgment): Phish, Malware
When you're finished, select Submit.
Note
If malware filtering has replaced the message attachments with the Malware Alert Text.txt file, you need to submit the original message from quarantine that contains the original attachments. For more information on quarantine and how to release messages with malware false positives, see Manage quarantined messages and files as an admin.
View admin submissions to Microsoft
On the Submissions page, verify that the Emails, URL, or Email attachment tab is selected.
You can sort the entries by clicking on an available column header. Select Customize columns to show a maximum of seven columns. The default values are marked with an asterisk (*):
- Submission name*
- Sender*
- Recipient
- Date submitted*
- Reason for submitting*
- Status*
- Result*
- Filter verdict
- Delivery/Block reason
- Submission ID
- Network Message ID/Object ID
- Direction
- Sender IP
- Bulk compliant level (BCL)
- Destination
- Policy action
- Submitted by
- Phish simulation
- Tags*
- Allow
When you're finished, select Apply.
Admin submission result details
Messages that are submitted in admin submissions are reviewed and results shown in the submissions detail flyout:
- If there was a failure in the sender's email authentication at the time of delivery.
- Information about any policy hits that could have affected or overridden the verdict of a message.
- Current detonation results to see if the URLs or files contained in the message are malicious or not.
- Feedback from graders.
If an override was found, the result should be available in several minutes. If there wasn't a problem in email authentication or delivery wasn't affected by an override, then the feedback from graders could take up to a day.
View user submissions to Microsoft
If you've deployed the Report Message add-in, the Report Phishing add-in, or people use the built-in reporting in Outlook on the web, you can see what users are reporting on the User reported message tab.
On the Submissions page, select the User reported messages tab.
You can sort the entries by clicking on an available column header. Select Customize columns to show the options. The default values are marked with an asterisk (*):
- Email subject*
- Reported by*
- Date reported*
- Sender*
- Reported reason*
- Result*
- Message reported ID
- Network Message ID
- Sender IP
- Reported from
- Phish simulation
- Converted to admin submission
- Tags*
- Marked as*
- Marked by
- Date marked
When you're finished, select Apply.
Note
If organizations are configured to send user reported messages to the custom mailbox only, reported messages will appear in User reported messages but their results will always be empty (as they would not have been rescanned).
Undo user submissions
Once a user submits a suspicious email to the custom mailbox, the user and admin don't have an option to undo the submission. If the user would like to recover the email, it will be available for recovery in the Deleted Items or Junk Email folders.
Converting user reported messages from the custom mailbox into an admin submission
If you've configured the custom mailbox to intercept user-reported messages without sending the messages to Microsoft, you can find and send specific messages to Microsoft for analysis.
On the User reported messages tab, select a message in the list, select Submit to Microsoft for analysis, and then select one of the following values from the dropdown list:
- Report clean
- Report phishing
- Report malware
- Report spam
- Trigger investigation