Exercise - Deploy an IoT Edge device
You'll perform the following steps in Azure Cloud Shell. Before you start, you need an Azure account for this learning module. If you don't have an Azure account, then create a free account. If you are a student, then sign up for a free Azure for Students account (no credit card required). Otherwise, sign up for a free Azure account.
From your web browser, navigate to https://portal.azure.com and sign in.
Create cloud resources
Add the Azure IoT extension to the Cloud Shell instance.
az extension add --name azure-iotNote
This module uses the newest version of the Azure IoT extension, called
azure-iot. You should only have one version installed at a time. You can use the commandaz extension listto validate the currently installed extensions. To remove the legacy version of the extension, useaz extension remove --name azure-cli-iot-ext.Create a resource group to manage all the resources you use for this module. Give a name to your resource group.
az group create --name {resource_group_name} --location westus2
Create an IoT hub
Create a free F1 hub in the resource group. Replace {hub_name} with a unique name for your IoT hub. It might take a few minutes to create an IoT Hub.
az iot hub create --resource-group {resource_group_name} --name {hub_name} --sku F1 --partition-count 2
Note
If you get an error because there's already one free hub in your subscription, change the SKU to S1. Each subscription can only have one free IoT hub. If you get an error that the IoT Hub name isn't available, it means that someone else already has a hub with that name. Try a new name.
Register an IoT Edge device
Register an IoT Edge device with your newly created IoT hub.
Create a device named myEdgeDevice in your hub.
az iot hub device-identity create --device-id myEdgeDevice --edge-enabled --hub-name {hub_name}Note
If you get an error about iothubowner policy keys, make sure that your Cloud Shell is running the latest version of the azure-iot extension.
View the connection string for your device, which links your physical device with its identity in IoT Hub. It contains the name of your IoT hub, the name of your device, and then a shared key that authenticates connections between the two. We'll refer to this connection string again in the next section when you set up your IoT Edge device.
az iot hub device-identity connection-string show --device-id myEdgeDevice --hub-name {hub_name} --output tableMake a note of the device connection string, which looks like:
HostName={YourIoTHubName}.azure-devices.net;DeviceId=myEdgeDevice;SharedAccessKey={YourSharedAccessKey}
Configure your IoT Edge device
You'll need to create ssh key for your deployment using Cloud Shell. The following command creates an SSH key pair using RSA encryption and a bit length of 4096:
ssh-keygen -m PEM -t rsa -b 4096You can display your public key with the following cat command, replacing ~/.ssh/id_rsa.pub with the path and filename of your public key file if needed:
cat ~/.ssh/id_rsa.pubA typical public key value looks like this example:
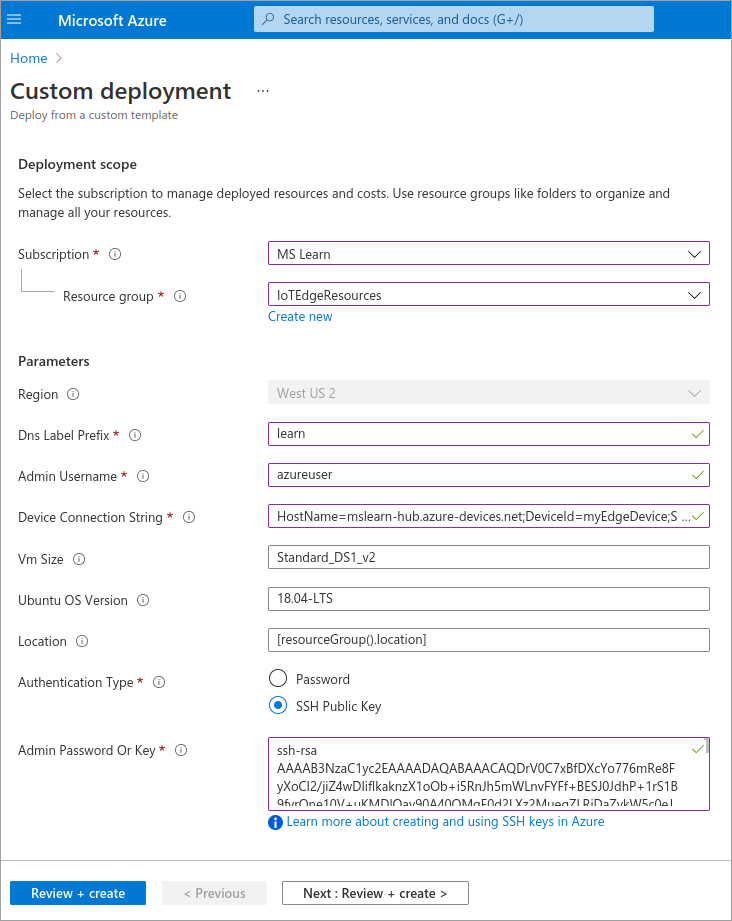
ssh-rsa AAAAB3NzaC1yc2EAABADAQABAAACAQC1/KanayNr+Q7ogR5mKnGpKWRBQU7F3Jjhn7utdf7Z2iUFykaYx+MInSnT3XdnBRS8KhC0IP8ptbngIaNOWd6zM8hB6UrcRTlTpwk/SuGMw1Vb40xlEFphBkVEUgBolOoANIEXriAMvlDMZsgvnMFiQ12tD/u14cxy1WNEMAftey/vX3Fgp2vEq4zHXEliY/sFZLJUJzcRUI0MOfHXAuCjg/qyqqbIuTDFyfg8k0JTtyGFEMQhbXKcuP2yGx1uw0ice62LRzr8w0mszftXyMik1PnshRXbmE2xgINYg5xo/ra3mq2imwtOKJpfdtFoMiKhJmSNHBSkK7vFTeYgg0v2cQ2+vL38lcIFX4Oh+QCzvNF/AXoDVlQtVtSqfQxRVG79Zqio5p12gHFktlfV7reCBvVIhyxc2LlYUkrq4DHzkxNY5c9OGSHXSle9YsO3F1J5ip18f6gPq4xFmo6dVoJodZm9N0YMKCkZ4k1qJDESsJBk2ujDPmQQeMjJX3FnDXYYB182ZCGQzXfzlPDC29cWVgDZEXNHuYrOLmJTmYtLZ4WkdUhLLlt5XsdoKWqlWpbegyYtGZgeZNRtOOdN6ybOPJqmYFd2qRtb4sYPniGJDOGhx4VodXAjT09omhQJpE6wlZbRWDvKC55R2d/CSPHJscEiuudb+1SG2uA/oik/WQ== username@domainnameClick on the Deploy button to create a virtual machine with Azure IoT Edge runtime pre-installed (via cloud-init) using ARM template. During the runtime configuration, you provide a device connection string. This is the string that you retrieved from the Azure CLI. This string associates your physical device with the IoT Edge device identity in Azure.

During the runtime configuration, you provide a device connection string. This is the string that you retrieved from the Azure CLI. This string associates your physical device with the IoT Edge device identity in Azure.

Open network port 8181
Go to the "IoTEdgeResources" resource group and click on the virtual machine you created in the previous step.
Go to Networking and click on 'Add Inbound Port Rule'.

Fill out 'Destination port ranges' and 'Name.' After this, you'll see a pop-up telling you that it's creating the security rule 'Port_8181'.

Finally, you'll see Port 8181 will be added.


