Work with Excel worksheets and Excel add-in commands
In this unit, you'll learn how to work with worksheets in Excel workbooks. You'll also learn how to create and use add-in commands for your custom solutions.
Worksheets and a workbook
A workbook is the root object when working with the Excel APIs.
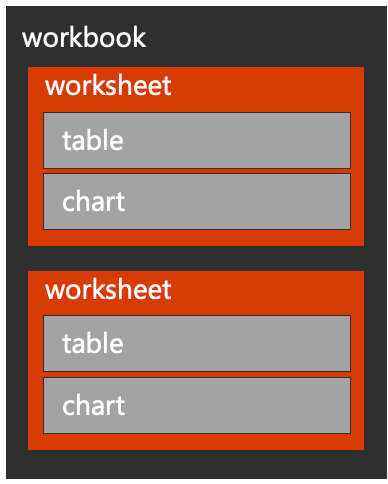
A workbook is a property of the Excel add-in context, context.workbook, and contains a collection of worksheets.
A worksheet contains collections for charts, tables, and pivotTables among other properties.
Basic worksheets operations
Interacting with worksheets is a fundamental operation of building an Excel add-in.
The Office.js API can iterate worksheets in a workbook object or you can select specific worksheets based on the worksheet's name, ID, or active status.
Developers can create worksheets using the workbook.worksheets.add() method.
Advanced worksheets operations
There are many advanced worksheet operations, including worksheet events for onActivated, onAdded, onDeactivated, and onDeleted.
Developers can also freeze worksheet panes and protect or unprotect worksheets.
The following code examples demonstrate common operations developers can do from custom Excel add-ins using the Office.js API:
Get the active worksheet
const worksheet = context.workbook.worksheets.getActiveWorksheet();Get worksheet by name
const worksheet = context.workbook.worksheets.getItem("MyNewWorksheet");Set the active worksheet
someWorksheet.activate();Create a worksheet
const worksheet = context.workbook.worksheets.add("MyNewWorksheet");Delete a worksheet
someWorksheet.delete();Wire into the
onDeactivatedeventcurrWorksheet.onDeactivated.add((args) => { console.log("Worksheet " + args.worksheetId + " deactivated"); });Freeze first row of worksheet
currWorksheet.freezePanes.freezeRows(1);Toggle worksheet protection
currWorksheet.load("protection/protected");
return context.sync().then(() => {
  if (currWorksheet.protection.protected)
    currWorksheet.protection.unprotect();
  else
    currWorksheet.protection.protect();
}).then(context.sync);
Add-in commands
Add-in commands provide an easy way to customize the default Office user interface (UI) with specified UI elements that do actions.
Add-in commands are configured in the VersionOverrides element of an add-in manifest.
Add-in commands can extend existing context menus, ribbon tabs and groups, or create new custom ribbon tabs and groups.
ExtensionPoint element
The ExtensionPoint element defines where add-in commands should appear in the Office UI, including in an existing ribbon tab (OfficeTab), a custom tab (CustomTab), or in a context menu available by right-clicking in the Office UI (OfficeMenu).
Add-in commands support button and menu controls. Buttons do a single action and menus provide a submenu of actions.
Commands actions
The ShowTaskpane() action is the most common for an add-in command. It's used to launch the add-in in a task pane. Using an add-in command to launch an add-in is considered a best practice and is incorporated in most Office Add-in templates and generators.
The ExecuteFunction action allows an add-in command to execute some script in the background without displaying any UI. This type of command requires a FunctionFile to be defined in the manifest.
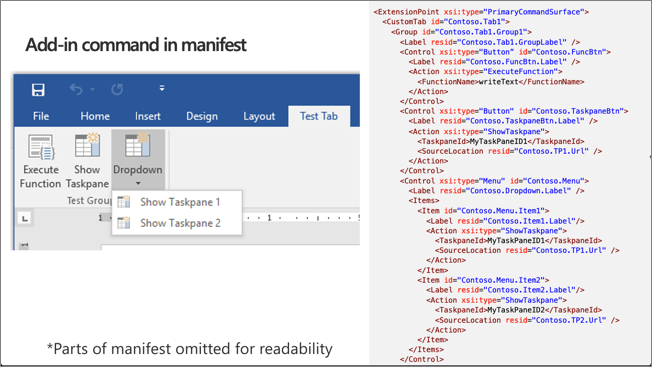
Add-in command in manifest
Let's explore how the different elements in the add-in manifest map to the rendered elements in the Excel user experience.
The following image is a screenshot of an Office client application on the left and a condensed version of an add-in manifest file on the right:
The manifest starts with the ExtensionPoint element that contains all customizations defined for the Office ribbon:
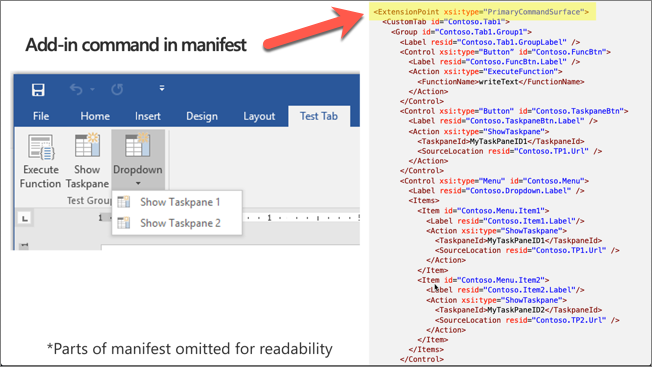
The entire contents of the ExtensionPoint element define the custom tab in the ribbon and all buttons in the tab:
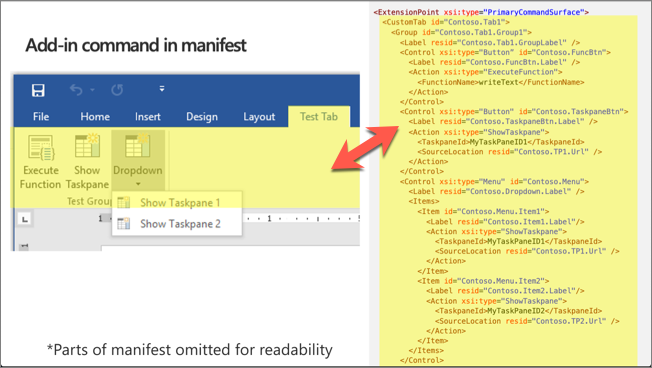
Each button in the ribbon is defined using a Control element. A control can be different types, defined in the xsi:type property. All the controls in this ribbon are buttons:
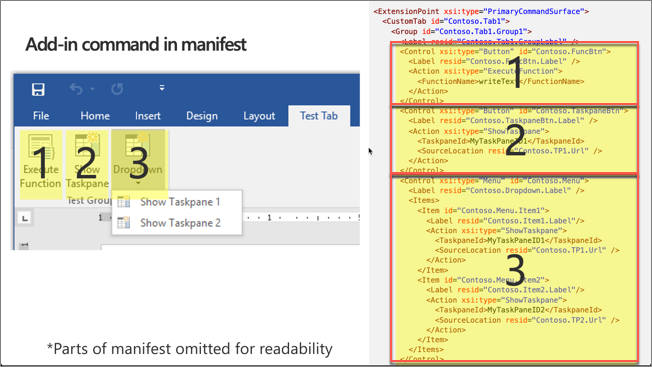
Within a control, developers can define actions or items. An Action element is used to do an action, such as showing a task pane or executing a custom function.
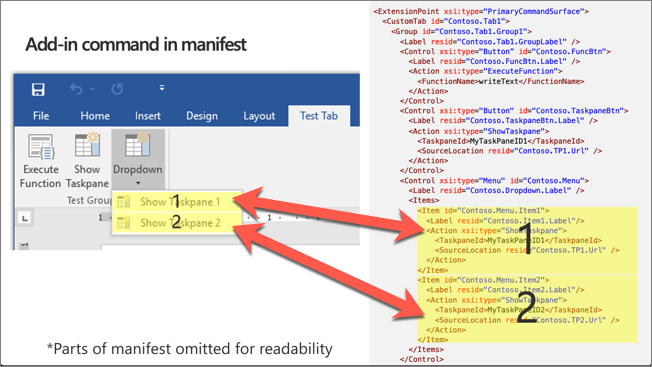
The Items collection allows developers to add more menu items to the ribbon button as shown in the following image. Notice each sub menu item also has a Action element as well:
ExecuteFunction add-in command
The ExecuteFunction add-in command action enables developers to create custom functions, defined in JavaScript, to execute when a button is selected in the ribbon.
First, define the function in a script file. For example, add the following code to a new file in your add-in named fnFile.html:
<script>
(function () {
  // must call Office.initialize
  Office.initialize => (reason) {
    // Initialize add-in
  };
})();
// function must be global
function doStuff(event) {
  // do stuff with Office.js
}
</script>
To call the function, use the ExecuteFunction action type in the add-in manifest to call the function when the custom button is selected:
<FunctionFile resid="Contoso.FnFile.Url" />
...
<Control xsi:type="Button" id="Contoso.FnBtn">
  <Label resid="Contoso.FnBtn.Label" />
  <Icon>
    <bt:Image size="16" resid="Contoso.FnBtn.Icon" />
    <bt:Image size="32" resid="Contoso.FnBtn.Icon" />
    <bt:Image size="80" resid="Contoso.FnBtn.Icon" />
  </Icon>
  <Action xsi:type="ExecuteFunction">
    <FunctionName>doStuff</FunctionName>
  </Action>
  </Control>
...
<Resources>
  <bt:Urls>
    <bt:Url id="Contoso.FnFile.Url"
            DefaultValue="https://REPLACE_ADD-IN_APP_URL/FnFile.html" />
      ...
Summary
In this unit, you learned how to work with worksheets in Excel workbooks. You also learned how to create and use add-in commands for your custom solutions.