Exercise - Add buttons and commands
In this exercise, you'll add extra functionality to the add-in you created in a previous exercise. You'll create two new buttons that insert a specific gist or a default gist into a message. You'll also implement a first-run experience, where you'll be prompted for your GitHub username to retrieve your gists.
Important
This exercise assumes you have created the Office Outlook add-in project with the Yeoman generator and tested it works in Outlook in a previous exercise in this module.
Define buttons
By default, the add-in manifest only defines buttons for the read message window. Let's update the manifest to remove the buttons from the read message window and define two new buttons for the compose message window:
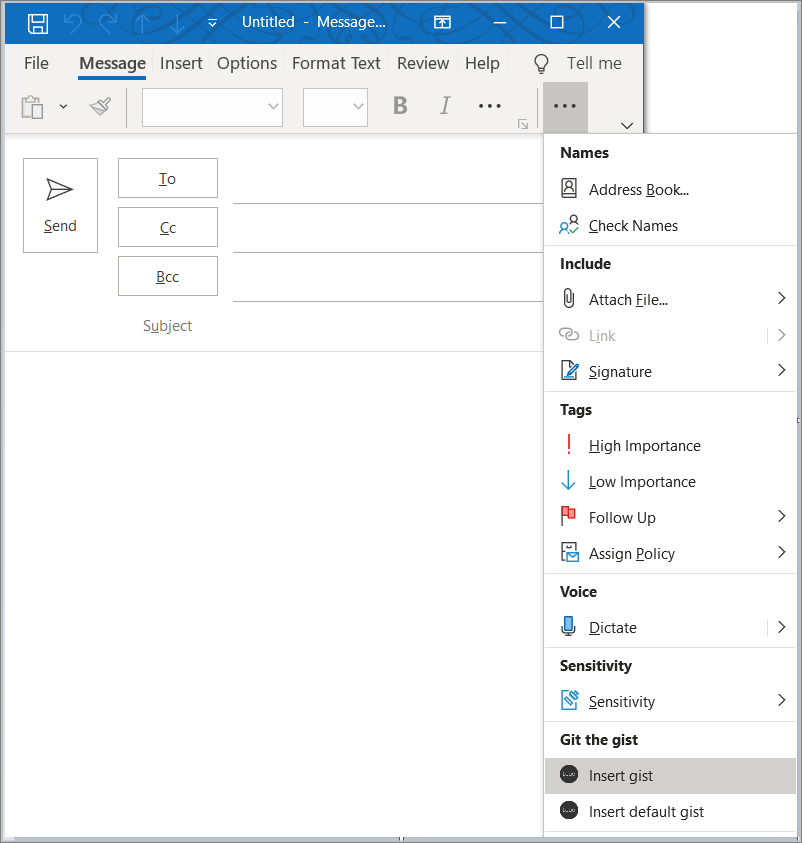
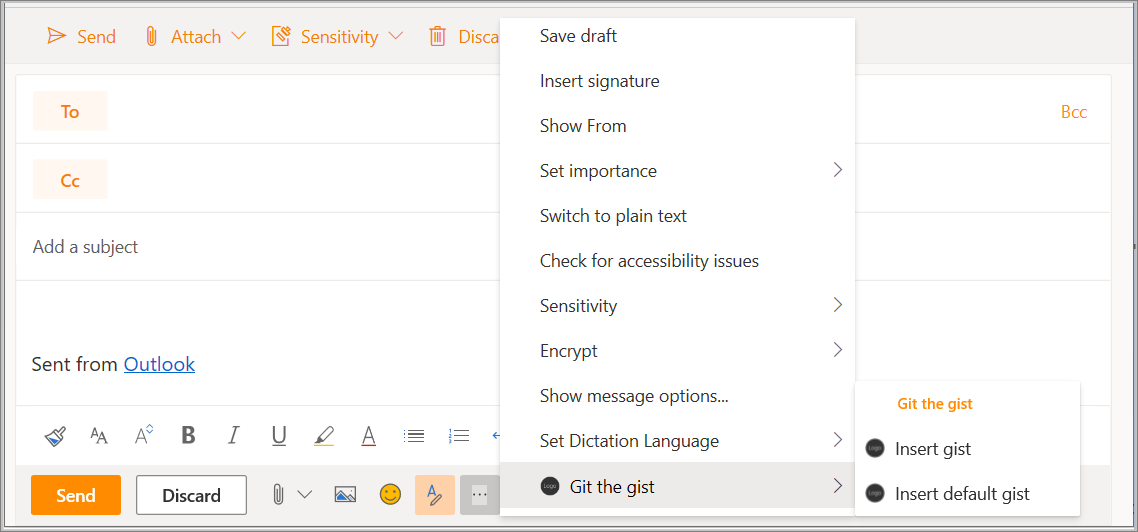
- Insert gist: a button that opens a task pane
- Insert default gist: a button that invokes a function
Remove the MessageReadCommandSurface extension point
Open the manifest.xml file and locate the ExtensionPoint element with type MessageReadCommandSurface. Delete this ExtensionPoint element (including its closing tag) to remove the buttons from the read message window.
Add the MessageComposeCommandSurface extension point
Locate the line in the manifest that reads </DesktopFormFactor>. Immediately before this line, insert the following XML markup.
<!-- Message Compose -->
<ExtensionPoint xsi:type="MessageComposeCommandSurface">
  <OfficeTab id="TabDefault">
    <Group id="msgComposeCmdGroup">
      <Label resid="GroupLabel"/>
      <Control xsi:type="Button" id="msgComposeInsertGist">
        <Label resid="TaskpaneButton.Label"/>
        <Supertip>
          <Title resid="TaskpaneButton.Title"/>
          <Description resid="TaskpaneButton.Tooltip"/>
        </Supertip>
        <Icon>
          <bt:Image size="16" resid="Icon.16x16"/>
          <bt:Image size="32" resid="Icon.32x32"/>
          <bt:Image size="80" resid="Icon.80x80"/>
        </Icon>
        <Action xsi:type="ShowTaskpane">
          <SourceLocation resid="Taskpane.Url"/>
        </Action>
      </Control>
      <Control xsi:type="Button" id="msgComposeInsertDefaultGist">
        <Label resid="FunctionButton.Label"/>
        <Supertip>
          <Title resid="FunctionButton.Title"/>
          <Description resid="FunctionButton.Tooltip"/>
        </Supertip>
        <Icon>
          <bt:Image size="16" resid="Icon.16x16"/>
          <bt:Image size="32" resid="Icon.32x32"/>
          <bt:Image size="80" resid="Icon.80x80"/>
        </Icon>
        <Action xsi:type="ExecuteFunction">
          <FunctionName>insertDefaultGist</FunctionName>
        </Action>
      </Control>
    </Group>
  </OfficeTab>
</ExtensionPoint>
Note
- The
ExtensionPointwithxsi:type="MessageComposeCommandSurface"indicates that you're defining buttons to add to the compose message window. - By using an
OfficeTabelement withid="TabDefault", you're indicating you want to add the buttons to the default tab on the ribbon. - The
Groupelement defines the grouping for the new buttons, with a label set by thegroupLabelresource. - The first
Controlelement contains anActionelement withxsi:type="ShowTaskPane", so this button opens a task pane. - The second
Controlelement contains anActionelement withxsi:type="ExecuteFunction", so this button invokes a JavaScript function contained in the function file.
Update resources in the manifest
The previous code references labels, tooltips, and URLs that you must define before the manifest is valid. Specify this information in the Resources section of the manifest.
Locate the
Resourceselement in the manifest file and delete the entire element (including its closing tag).In that same location, add the following markup to replace the
Resourceselement you removed:<Resources> <bt:Images> <bt:Image id="Icon.16x16" DefaultValue="https://localhost:3000/assets/icon-16.png"/> <bt:Image id="Icon.32x32" DefaultValue="https://localhost:3000/assets/icon-32.png"/> <bt:Image id="Icon.80x80" DefaultValue="https://localhost:3000/assets/icon-80.png"/> </bt:Images> <bt:Urls> <bt:Url id="Commands.Url" DefaultValue="https://localhost:3000/commands.html"/> <bt:Url id="Taskpane.Url" DefaultValue="https://localhost:3000/taskpane.html"/> </bt:Urls> <bt:ShortStrings> <bt:String id="GroupLabel" DefaultValue="Git the gist"/> <bt:String id="TaskpaneButton.Label" DefaultValue="Insert gist"/> <bt:String id="TaskpaneButton.Title" DefaultValue="Insert gist"/> <bt:String id="FunctionButton.Label" DefaultValue="Insert default gist"/> <bt:String id="FunctionButton.Title" DefaultValue="Insert default gist"/> </bt:ShortStrings> <bt:LongStrings> <bt:String id="TaskpaneButton.Tooltip" DefaultValue="Displays a list of your gists and allows you to insert their contents into the current message."/> <bt:String id="FunctionButton.Tooltip" DefaultValue="Inserts the content of the gist you mark as default into the current message."/> </bt:LongStrings> </Resources>Save your changes to the manifest.
Reinstall the add-in
Because you made changes to the manifest, reinstall the add-in for these changes to take effect.
If the web server is running, close the node command window.
Run the following command to start the local web server and automatically sideload your add-in.
npm start
After you've reinstalled the add-in, you can verify that it installed successfully by checking for the commands Insert gist and Insert default gist in a compose message window. Nothing will happen if you select either of these items, because you haven't yet finished building this add-in.
If you're running this add-in in Outlook 2016 or later on Windows, you should see two new buttons in the ribbon of the compose message window: Insert gist and Insert default gist.
If you're running this add-in in Outlook on the web, you should see a new button at the bottom of the compose message window. Select that button to see the options Insert gist and Insert default gist.
Implement a first-run experience
This add-in needs to read gists from the user's GitHub account and identify which one the user has chosen as the default gist. To achieve these goals, the add-in must prompt the user to provide their GitHub username and choose a default gist from their collection of existing gists. Complete the steps in this section to implement a first-run experience that will display a dialog to collect this information from the user.
Collect data from the user
Let's start by creating the UI for the dialog itself. Within the ./src folder, create a new subfolder named settings. In the ./src/settings folder, create a file named dialog.html, and add the following markup to define a basic form with a text input for a GitHub username and an empty list for gists that will be populated via JavaScript.
<!DOCTYPE html>
<html>
<head>
<meta charset="UTF-8" />
<meta http-equiv="X-UA-Compatible" content="IE=Edge" />
<title>Settings</title>
<!-- Office JavaScript API -->
<script type="text/javascript" src="https://appsforoffice.microsoft.com/lib/1.1/hosted/office.js"></script>
<!-- For more information on Fluent UI, visit https://developer.microsoft.com/fluentui. -->
<link rel="stylesheet" href="https://static2.sharepointonline.com/files/fabric/office-ui-fabric-core/9.6.1/css/fabric.min.css"/>
<!-- Template styles -->
<link href="dialog.css" rel="stylesheet" type="text/css" />
</head>
<body class="ms-font-l">
<main>
<section class="ms-font-m ms-fontColor-neutralPrimary">
<div class="not-configured-warning ms-MessageBar ms-MessageBar--warning">
<div class="ms-MessageBar-content">
<div class="ms-MessageBar-icon">
<i class="ms-Icon ms-Icon--Info"></i>
</div>
<div class="ms-MessageBar-text">
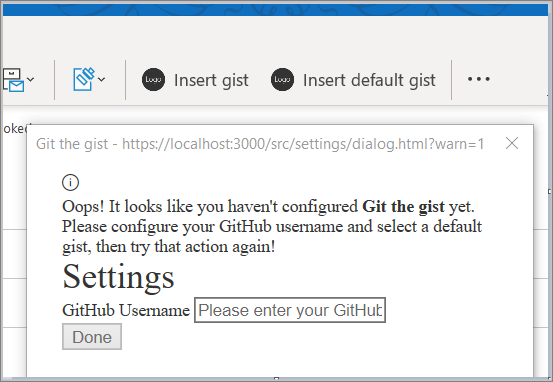
Oops! It looks like you haven't configured <strong>Git the gist</strong> yet.
<br/>
Please configure your GitHub username and select a default gist, then try that action again!
</div>
</div>
</div>
<div class="ms-font-xxl">Settings</div>
<div class="ms-Grid">
<div class="ms-Grid-row">
<div class="ms-TextField">
<label class="ms-Label">GitHub Username</label>
<input class="ms-TextField-field" id="github-user" type="text" value="" placeholder="Please enter your GitHub username">
</div>
</div>
<div class="error-display ms-Grid-row">
<div class="ms-font-l ms-fontWeight-semibold">An error occurred:</div>
<pre><code id="error-text"></code></pre>
</div>
<div class="gist-list-container ms-Grid-row">
<div class="list-title ms-font-xl ms-fontWeight-regular">Choose Default Gist</div>
<form>
<div id="gist-list">
</div>
</form>
</div>
</div>
<div class="ms-Dialog-actions">
<div class="ms-Dialog-actionsRight">
<button class="ms-Dialog-action ms-Button ms-Button--primary" id="settings-done" disabled>
<span class="ms-Button-label">Done</span>
</button>
</div>
</div>
</section>
</main>
<script type="text/javascript" src="../../node_modules/jquery/dist/jquery.js"></script>
<script type="text/javascript" src="../helpers/gist-api.js"></script>
<script type="text/javascript" src="dialog.js"></script>
</body>
</html>
You may have noticed that the HTML file references a JavaScript file, gist-api.js, that doesn't yet exist. This file will be created in the Fetch data from GitHub section below.
Next, create a file in the ./src/settings folder named dialog.css, and add the following code to specify the styles that are used by dialog.html.
section {
  margin: 10px 20px;
}

.not-configured-warning {
  display: none;
}

.error-display {
  display: none;
}

.gist-list-container {
  margin: 10px -8px;
  display: none;
}

.list-title {
  border-bottom: 1px solid #a6a6a6;
  padding-bottom: 5px;
}

ul {
  margin-top: 10px;
}

.ms-ListItem-secondaryText,
.ms-ListItem-tertiaryText {
  padding-left: 15px;
}
Now that you've defined the dialog UI, you can write the code that makes it actually do something. Create a file in the ./src/settings folder named dialog.js and add the following code. This code uses jQuery to register events and uses the messageParent function to send the user's choices back to the caller.
(function(){
  'use strict';

  // The Office initialize function must be run each time a new page is loaded.
  Office.initialize = function(reason){
    jQuery(document).ready(function(){
      if (window.location.search) {
        // Check if warning should be displayed.
        const warn = getParameterByName('warn');
        if (warn) {
          $('.not-configured-warning').show();
        } else {
          // See if the config values were passed.
          // If so, pre-populate the values.
          const user = getParameterByName('gitHubUserName');
          const gistId = getParameterByName('defaultGistId');

          $('#github-user').val(user);
          loadGists(user, function(success){
            if (success) {
              $('.ms-ListItem').removeClass('is-selected');
              $('input').filter(function() {
                return this.value === gistId;
              }).addClass('is-selected').attr('checked', 'checked');
              $('#settings-done').removeAttr('disabled');
            }
          });
        }
      }

      // When the GitHub username changes,
      // try to load gists.
      $('#github-user').on('change', function(){
        $('#gist-list').empty();
        const ghUser = $('#github-user').val();
        if (ghUser.length > 0) {
          loadGists(ghUser);
        }
      });

      // When the Done button is selected, send the
      // values back to the caller as a serialized
      // object.
      $('#settings-done').on('click', function() {
        const settings = {};

        settings.gitHubUserName = $('#github-user').val();

        const selectedGist = $('.ms-ListItem.is-selected');
        if (selectedGist) {
          settings.defaultGistId = selectedGist.val();

          sendMessage(JSON.stringify(settings));
        }
      });
    });
  };

  // Load gists for the user using the GitHub API
  // and build the list.
  function loadGists(user, callback) {
    getUserGists(user, function(gists, error){
      if (error) {
        $('.gist-list-container').hide();
        $('#error-text').text(JSON.stringify(error, null, 2));
        $('.error-display').show();
        if (callback) callback(false);
      } else {
        $('.error-display').hide();
        buildGistList($('#gist-list'), gists, onGistSelected);
        $('.gist-list-container').show();
        if (callback) callback(true);
      }
    });
  }

  function onGistSelected() {
    $('.ms-ListItem').removeClass('is-selected').removeAttr('checked');
    $(this).children('.ms-ListItem').addClass('is-selected').attr('checked', 'checked');
    $('.not-configured-warning').hide();
    $('#settings-done').removeAttr('disabled');
  }

  function sendMessage(message) {
    Office.context.ui.messageParent(message);
  }

  function getParameterByName(name, url) {
    if (!url) {
      url = window.location.href;
    }
    name = name.replace(/[\[\]]/g, "\\$&");
    const regex = new RegExp("[?&]" + name + "(=([^&#]*)|&|#|$)"),
      results = regex.exec(url);
    if (!results) return null;
    if (!results[2]) return '';
    return decodeURIComponent(results[2].replace(/\+/g, " "));
  }
})();
Update webpack config settings
Finally, open the file webpack.config.js file in the root directory of the project and complete the following steps.
Locate the
entryobject within theconfigobject and add a new entry fordialog.dialog: "./src/settings/dialog.js"After you've done this, the new
entryobject will look like this:entry: { polyfill: ["core-js/stable", "regenerator-runtime/runtime"], taskpane: "./src/taskpane/taskpane.js", commands: "./src/commands/commands.js", dialog: "./src/settings/dialog.js" },Locate the
pluginsarray within theconfigobject. In thepatternsarray of thenew CopyWebpackPluginobject, add new entries for taskpane.css and dialog.css.{ from: "./src/taskpane/taskpane.css", to: "taskpane.css", }, { from: "./src/settings/dialog.css", to: "dialog.css", },After you've done this, the
new CopyWebpackPluginobject will look like this:new CopyWebpackPlugin({ patterns: [ { from: "./src/taskpane/taskpane.css", to: "taskpane.css", }, { from: "./src/settings/dialog.css", to: "dialog.css", }, { from: "assets/*", to: "assets/[name][ext][query]", }, { from: "manifest*.xml", to: "[name]." + buildType + "[ext]", transform(content) { if (dev) { return content; } else { return content.toString().replace(new RegExp(urlDev, "g"), urlProd); } }, }, ]}),In the same
pluginsarray within theconfigobject, add this new object to the end of the array.new HtmlWebpackPlugin({ filename: "dialog.html", template: "./src/settings/dialog.html", chunks: ["polyfill", "dialog"] })After you've done this, the new
pluginsarray will look like this:plugins: [ new HtmlWebpackPlugin({ filename: "taskpane.html", template: "./src/taskpane/taskpane.html", chunks: ["polyfill", "taskpane"], }), new CopyWebpackPlugin({ patterns: [ { from: "./src/taskpane/taskpane.css", to: "taskpane.css", }, { from: "./src/settings/dialog.css", to: "dialog.css", }, { from: "assets/*", to: "assets/[name][ext][query]", }, { from: "manifest*.xml", to: "[name]." + buildType + "[ext]", transform(content) { if (dev) { return content; } else { return content.toString().replace(new RegExp(urlDev, "g"), urlProd); } }, }, ]}), new HtmlWebpackPlugin({ filename: "commands.html", template: "./src/commands/commands.html", chunks: ["polyfill", "commands"], }), new HtmlWebpackPlugin({ filename: "dialog.html", template: "./src/settings/dialog.html", chunks: ["polyfill", "dialog"] }) ],
Fetch data from GitHub
The dialog.js file you created specifies that the add-in should load gists when the change event fires for the GitHub username field. To retrieve the user's gists from GitHub, you'll use the GitHub Gists API.
Within the ./src folder, create a new subfolder named helpers. In the ./src/helpers folder, create a file named gist-api.js, and add the following code to retrieve the user's gists from GitHub and build the list of gists.
function getUserGists(user, callback) {
const requestUrl = 'https://api.github.com/users/' + user + '/gists';
$.ajax({
url: requestUrl,
dataType: 'json'
}).done(function(gists){
callback(gists);
}).fail(function(error){
callback(null, error);
});
}
function buildGistList(parent, gists, clickFunc) {
gists.forEach(function(gist) {
const listItem = $('<div/>')
.appendTo(parent);
const radioItem = $('<input>')
.addClass('ms-ListItem')
.addClass('is-selectable')
.attr('type', 'radio')
.attr('name', 'gists')
.attr('tabindex', 0)
.val(gist.id)
.appendTo(listItem);
const desc = $('<span/>')
.addClass('ms-ListItem-primaryText')
.text(gist.description)
.appendTo(listItem);
const desc = $('<span/>')
.addClass('ms-ListItem-secondaryText')
.text(' - ' + buildFileList(gist.files))
.appendTo(listItem);
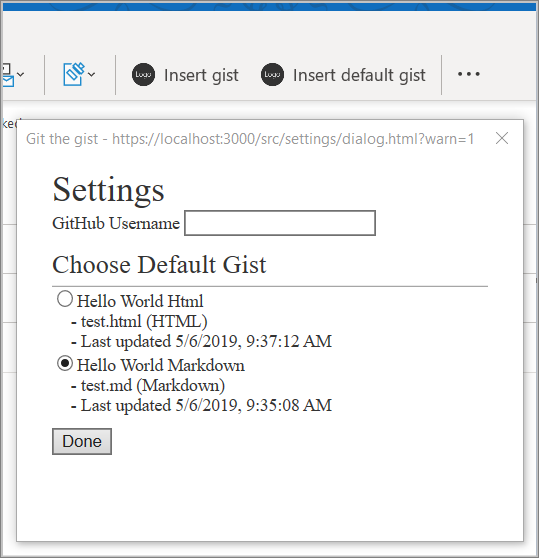
const updated = new Date(gist.updated_at);
const desc = $('<span/>')
.addClass('ms-ListItem-tertiaryText')
.text(' - Last updated ' + updated.toLocaleString())
.appendTo(listItem);
listItem.on('click', clickFunc);
});
}
function buildFileList(files) {
let fileList = '';
for (let file in files) {
if (files.hasOwnProperty(file)) {
if (fileList.length > 0) {
fileList = fileList + ', ';
}
fileList = fileList + files[file].filename + ' (' + files[file].language + ')';
}
}
return fileList;
}
Run the following command to rebuild the project.
npm run build
Implement a UI-less button
This add-in's Insert default gist button is a UI-less button that will invoke a JavaScript function, rather than open a task pane like many add-in buttons do. When the user selects the Insert default gist button, the corresponding JavaScript function will check whether the add-in has been configured.
- If the add-in has already been configured, the function will load the content of the gist that the user has selected as the default and insert it into the body of the message.
- If the add-in hasn't yet been configured, then the settings dialog will prompt the user to provide the required information.
Update the function file (HTML)
A function that's invoked by a UI-less button must be defined in the file that's specified by the FunctionFile element in the manifest for the corresponding form factor. This add-in's manifest specifies https://localhost:3000/commands.html as the function file.
Open the file ./src/commands/commands.html and replace the entire contents with the following markup.
<!DOCTYPE html>
<html>

<head>
  <meta charset="UTF-8" />
  <meta http-equiv="X-UA-Compatible" content="IE=Edge" />

  <!-- Office JavaScript API -->
  <script type="text/javascript" src="https://appsforoffice.microsoft.com/lib/1.1/hosted/office.js"></script>

  <script type="text/javascript" src="../../node_modules/jquery/dist/jquery.js"></script>
  <script type="text/javascript" src="../../node_modules/showdown/dist/showdown.min.js"></script>
  <script type="text/javascript" src="../../node_modules/urijs/src/URI.min.js"></script>
  <script type="text/javascript" src="../helpers/addin-config.js"></script>
  <script type="text/javascript" src="../helpers/gist-api.js"></script>
</head>

<body>
  <!-- NOTE: The body is empty by design. Since functions in commands.js are invoked using a button, there is no UI to render. -->
</body>

</html>
You may have noticed that the HTML file references a JavaScript file, addin-config.js, that doesn't yet exist. This file will be created in the Create a file to manage configuration settings section later in this exercise.
Update the function file (JavaScript)
Open the file ./src/commands/commands.js and replace the entire contents with the following code. If the insertDefaultGist() function determines the add-in hasn't yet been configured, it adds the ?warn=1 parameter to the dialog URL. Doing so makes the settings dialog render the message bar that's defined in ./settings/dialog.html, to tell the user why they're seeing the dialog.
let config;
let btnEvent;

// The initialize function must be run each time a new page is loaded.
Office.initialize = function (reason) {
};

// Add any UI-less function here.
function showError(error) {
  Office.context.mailbox.item.notificationMessages.replaceAsync('github-error', {
    type: 'errorMessage',
    message: error
  }, function(result){
  });
}

let settingsDialog;

function insertDefaultGist(event) {

  config = getConfig();

  // Check if the add-in has been configured.
  if (config && config.defaultGistId) {
    // Get the default gist content and insert.
    try {
      getGist(config.defaultGistId, function(gist, error) {
        if (gist) {
          buildBodyContent(gist, function (content, error) {
            if (content) {
              Office.context.mailbox.item.body.setSelectedDataAsync(content,
                {coercionType: Office.CoercionType.Html}, function(result) {
                  event.completed();
              });
            } else {
              showError(error);
              event.completed();
            }
          });
        } else {
          showError(error);
          event.completed();
        }
      });
    } catch (err) {
      showError(err);
      event.completed();
    }

  } else {
    // Save the event object so we can finish up later.
    btnEvent = event;
    // Not configured yet, display settings dialog with
    // warn=1 to display warning.
    const url = new URI('../src/settings/dialog.html?warn=1').absoluteTo(window.location).toString();
    const dialogOptions = { width: 20, height: 40, displayInIframe: true };

    Office.context.ui.displayDialogAsync(url, dialogOptions, function(result) {
      settingsDialog = result.value;
      settingsDialog.addEventHandler(Microsoft.Office.WebExtension.EventType.DialogMessageReceived, receiveMessage);
      settingsDialog.addEventHandler(Microsoft.Office.WebExtension.EventType.DialogEventReceived, dialogClosed);
    });
  }
}

// Register the function.
Office.actions.associate("insertDefaultGist", insertDefaultGist);

function receiveMessage(message) {
  config = JSON.parse(message.message);
  setConfig(config, function(result) {
    settingsDialog.close();
    settingsDialog = null;
    btnEvent.completed();
    btnEvent = null;
  });
}

function dialogClosed(message) {
  settingsDialog = null;
  btnEvent.completed();
  btnEvent = null;
}
Create a file to manage configuration settings
The HTML function file references a file named addin-config.js, which doesn't yet exist. In the ./src/helpers folder, create a file named addin-config.js and add the following code. This code uses the RoamingSettings object to get and set configuration values.
function getConfig() {
  const config = {};

  config.gitHubUserName = Office.context.roamingSettings.get('gitHubUserName');
  config.defaultGistId = Office.context.roamingSettings.get('defaultGistId');

  return config;
}

function setConfig(config, callback) {
  Office.context.roamingSettings.set('gitHubUserName', config.gitHubUserName);
  Office.context.roamingSettings.set('defaultGistId', config.defaultGistId);

  Office.context.roamingSettings.saveAsync(callback);
}
Create new functions to process gists
Open the ./src/helpers/gist-api.js file and add the following functions.
function getGist(gistId, callback) {
  const requestUrl = 'https://api.github.com/gists/' + gistId;

  $.ajax({
    url: requestUrl,
    dataType: 'json'
  }).done(function(gist){
    callback(gist);
  }).fail(function(error){
    callback(null, error);
  });
}

function buildBodyContent(gist, callback) {
  // Find the first non-truncated file in the gist
  // and use it.
  for (let filename in gist.files) {
    if (gist.files.hasOwnProperty(filename)) {
      const file = gist.files[filename];
      if (!file.truncated) {
        // We have a winner.
        switch (file.language) {
          case 'HTML':
            // Insert as-is.
            callback(file.content);
            break;
          case 'Markdown':
            // Convert Markdown to HTML.
            const converter = new showdown.Converter();
            const html = converter.makeHtml(file.content);
            callback(html);
            break;
          default:
            // Insert contents as a <code> block.
            let codeBlock = '<pre><code>';
            codeBlock = codeBlock + file.content;
            codeBlock = codeBlock + '</code></pre>';
            callback(codeBlock);
        }
        return;
      }
    }
  }
  callback(null, 'No suitable file found in the gist');
}
Note
- If the gist contains HTML, the add-in inserts the HTML as-is into the body of the message.
- If the gist contains Markdown, the add-in uses the Showdown library to convert the Markdown to HTML, and inserts the resulting HTML into the body of the message.
- If the gist contains anything other than HTML or Markdown, the add-in inserts it into the body of the message as a code snippet.
Test the Insert default gist button
If the server isn't already running, save all of your changes, and run npm start from the command prompt. To test the Insert default gist button, complete the following steps.
Open Outlook and compose a new message.
In the compose message window, select the Insert default gist button. You should be prompted to configure the add-in.
In the settings dialog, enter your GitHub username and then either Tab or select elsewhere in the dialog to invoke the change event, which should load your list of gists. Select a gist to be the default, and select Done.
Select the Insert default gist button again. This time, you should see the contents of the gist inserted into the body of the email.
Note
Outlook on Windows: To pick up the latest settings, you may need to close and reopen the compose message window.
Summary
In this exercise, you added extra functionality to the add-in you created in a previous exercise. You created two new buttons that inserted a specific gist or a default gist into a message. You also implemented a first-run experience, where you were prompted for your GitHub username to retrieve your gists.