Exercise - Insert and format a range of text
In this exercise, you'll build a Word add-in that inserts text ranges and paragraphs and format this text.
Prerequisites
Developing Office Add-ins for Microsoft Word requires Word 2016, version 1711 (Build 8730.1000 Click-to-Run) or later. You might need to be an Office Insider to get this version. For more information, see Be an Office Insider.
You'll use Node.js to create the custom Word add-in in this module. The exercises in this module assume you have the following tools installed on your developer workstation.
Important
In most cases, installing the latest version of the following tools is the best option. The versions listed here were used when this module was published and last tested.
- Node.js - (the active LTS version)
- npm (installed with Node.js)
- Yeoman - v4.x (or higher)
- Yeoman Generator for Microsoft Office - v1.9.5
- Visual Studio Code
Create your add-in project
Run the following command to create an add-in project using the Yeoman generator:
yo office
Note
When you run the yo office command, you may receive prompts about the data collection policies of Yeoman and the Office Add-in CLI tools. Use the information that's provided to respond to the prompts as you see fit.
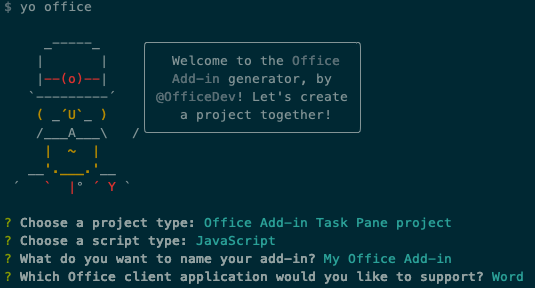
When prompted, provide the following information to create your add-in project:
- Select a project type: Office Add-in Task Pane project
- Select a script type: JavaScript
- What do you want to name your add-in? My Office Add-in
- Which Office client application would you like to support? Word
After you complete the wizard, change to the project folder created by the generator (My Office Add-in) and install the npm modules by running npm install.
Tip
When installing dependencies, you can ignore any warnings or errors the Yeoman generator displays. The remainder of this unit include all the steps you'll need to follow.
Insert a range of text
In this section, you'll programmatically test that your add-in supports the user's current version of Word, and then insert a paragraph into the document.
Code the add-in
Open the project in your code editor.
Open the file ./src/taskpane/taskpane.html. This file contains the HTML markup for the task pane.
Locate the
<main>element and delete all lines that appear after the opening<main>tag and before the closing</main>tag.Add the following markup immediately after the opening
<main>tag:<button class="ms-Button" id="insert-paragraph">Insert Paragraph</button><br/><br/>Open the file ./src/taskpane/taskpane.js. This file contains the Office JavaScript API code that enables interaction between the task pane and the Office host application.
Remove all references to the run button and the
run()function by doing the following steps:- Locate and delete the line
document.getElementById("run").onclick = run;. - Locate and delete the entire
run()function.
- Locate and delete the line
Within the
Office.onReady()method call, locate the lineif (info.host === Office.HostType.Word) {and add the following code immediately after that line:// Determine if the user's version of Office supports all the Office.js APIs that are used in the tutorial. if (!Office.context.requirements.isSetSupported('WordApi', '1.3')) { console.log('Sorry. The tutorial add-in uses Word.js APIs that are not available in your version of Office.'); } // Assign event handlers and other initialization logic. document.getElementById("insert-paragraph").onclick = insertParagraph;Note
- The first part of this code determines whether the user's version of Word supports a version of Word.js that includes all the APIs used in this tutorial. In a production add-in, use the body of the conditional block to hide or disable the UI that calls unsupported APIs. This will enable the user to use the parts of the add-in that are supported by their version of Word.
- The second part of this code adds an event handler for the insert-paragraph button.
Add the following function to the end of the file:
async function insertParagraph() {
  await Word.run(async (context) => {

    // TODO1: Queue commands to insert a paragraph into the document.

    await context.sync();
  })
  .catch(function (error) {
    console.log("Error: " + error);
    if (error instanceof OfficeExtension.Error) {
      console.log("Debug info: " + JSON.stringify(error.debugInfo));
    }
  });
}
Note
- Your Word.js business logic will be added to the function that is passed to
Word.run. This logic doesn't execute immediately. Instead, it's added to a queue of pending commands. - The
context.syncmethod sends all queued commands to Word for execution. - The
Word.runis followed by acatchblock. This is a best practice that you should always follow.
- Your Word.js business logic will be added to the function that is passed to
Within the
insertParagraph()function, replaceTODO1with the following code:const docBody = context.document.body; docBody.insertParagraph("Office has several versions, including Office 2016, Microsoft 365 Click-to-Run, and Office on the web.", "Start");Note
- The first parameter to the
insertParagraphmethod is the text for the new paragraph. - The second parameter is the location within the body where the paragraph will be inserted. Other options for insert paragraph, when the parent object is the body, are "End" and "Replace".
- The first parameter to the
Save all changes to the taskpane.html and taskpane.js files.
Test the add-in
Complete the following steps to start the local web server and sideload your add-in:
Note
Office Add-ins should use HTTPS, not HTTP, even when you are developing. If you are prompted to install a certificate after you run one of the following commands, accept the prompt to install the certificate that the Yeoman generator provides.
Tip
If you're testing your add-in on macOS, run the following command in the root directory of your project before proceeding. When you run this command, the local web server starts.
npm run dev-serverTo test your add-in in Word, run the following command in the root directory of your project. This starts the local web server (if it's not already running) and opens Word with your add-in loaded.
npm startTo test your add-in in Word on the web, run the following command in the root directory of your project. When you run this command, the local web server will start (if it's not already running).
npm run start:webTo use your add-in, open a new document in Word on the web and then sideload your add-in by following the instructions in Sideload Office Add-ins in Office on the web.
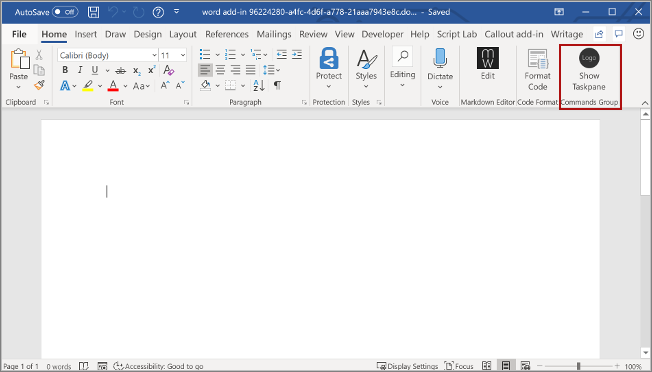
In Word, select the Home tab, and then select the Show Taskpane button in the ribbon to open the add-in task pane.
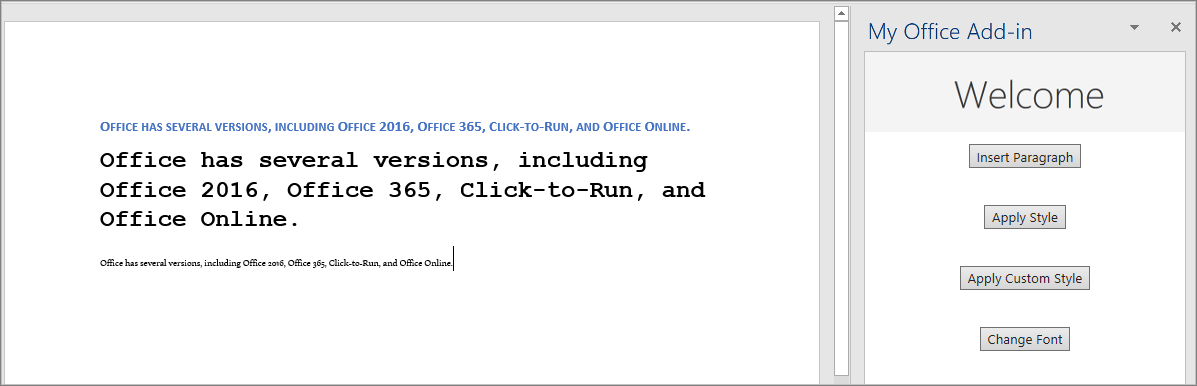
In the task pane, select Insert Paragraph.
Make a change in the paragraph.
Select the Insert Paragraph button again. The new paragraph appears above the previous one because the
insertParagraph*()method is inserting at the start of the document's body.
Format text
In this section, you'll apply a built-in style to text, apply a custom style to text, and change the font of text.
Apply a built-in style to text
Open the file ./src/taskpane/taskpane.html.
Locate the
<button>element for the insert-paragraph button, and add the following markup after that line:<button class="ms-Button" id="apply-style">Apply Style</button><br/><br/>Open the file ./src/taskpane/taskpane.js.
Within the
Office.onReady()method call, locate the following line in theOffice.onReady()method:document.getElementById("insert-paragraph").onclick = insertParagraph;Add the following code immediately after it:
document.getElementById("apply-style").onclick = applyStyle;Add the following function to the end of the file:
async function applyStyle() {
  await Word.run(async (context) => {

    // TODO1: Queue commands to style text.

    await context.sync();
  })
  .catch(function (error) {
    console.log("Error: " + error);
    if (error instanceof OfficeExtension.Error) {
      console.log("Debug info: " + JSON.stringify(error.debugInfo));
    }
  });
}
Within the
applyStyle()function, replaceTODO1with the following code. The code applies a style to a paragraph, but styles can also be applied to ranges of text.const firstParagraph = context.document.body.paragraphs.getFirst(); firstParagraph.styleBuiltIn = Word.Style.intenseReference;
Apply a custom style to text
Open the file ./src/taskpane/taskpane.html.
Locate the
<button>element for the apply-style button, and add the following markup after that line:<button class="ms-Button" id="apply-custom-style">Apply Custom Style</button><br/><br/>Open the file ./src/taskpane/taskpane.js.
Within the
Office.onReady()method call, locate the following line in theOffice.onReady()method:document.getElementById("apply-style").onclick = applyStyle;Add the following code immediately after it:
document.getElementById("apply-custom-style").onclick = applyCustomStyle;Add the following function to the end of the file:
async function applyCustomStyle() {
  await Word.run(async (context) => {

    // TODO1: Queue commands to apply the custom style.

    await context.sync();
  })
  .catch(function (error) {
    console.log("Error: " + error);
    if (error instanceof OfficeExtension.Error) {
      console.log("Debug info: " + JSON.stringify(error.debugInfo));
    }
  });
}
Within the
applyCustomStyle()function, replaceTODO1with the following code. The code applies a custom style that doesn't exist yet. You'll create a style with the name MyCustomStyle in a later step.const lastParagraph = context.document.body.paragraphs.getLast(); lastParagraph.style = "MyCustomStyle";Verify that you've saved all of the changes you've made to the project.
Change the font of text
Open the file ./src/taskpane/taskpane.html.
Locate the
<button>element for the apply-custom-style button, and add the following markup after that line:<button class="ms-Button" id="change-font">Change Font</button><br/><br/>Open the file ./src/taskpane/taskpane.js.
Within the
Office.onReady()method call, locate the following line in theOffice.onReady()method:document.getElementById("apply-custom-style").onclick = applyCustomStyle;Add the following code immediately after it:
document.getElementById("change-font").onclick = changeFont;Add the following function to the end of the file:
async function changeFont() {
  await Word.run(async (context) => {

    // TODO1: Queue commands to apply a different font.

    await context.sync();
  })
  .catch(function (error) {
    console.log("Error: " + error);
    if (error instanceof OfficeExtension.Error) {
      console.log("Debug info: " + JSON.stringify(error.debugInfo));
    }
  });
}
Within the
changeFont()function, replaceTODO1with the following code. The code gets a reference to the second paragraph by using theParagraphCollection.getFirst()method chained to theParagraph.getNext()method.const secondParagraph = context.document.body.paragraphs.getFirst().getNext(); secondParagraph.font.set({ name: "Courier New", bold: true, size: 18 });Verify that you've saved all of the changes you've made to the project.
Test the add-in
If the local web server is already running and your add-in is already loaded in Word, continue to step 2. Otherwise, start the local web server and sideload your add-in:
To test your add-in in Word, run the following command in the root directory of your project. This starts the local web server (if it's not already running) and opens Word with your add-in loaded.
npm startTo test your add-in in Word on the web, run the following command in the root directory of your project. When you run this command, the local web server will start (if it's not already running).
npm run start:webTo use your add-in, open a new document in Word on the web and then sideload your add-in by following the instructions in Sideload Office Add-ins in Office on the web.
If the add-in task pane isn't already open in Word, go to the Home tab and select Show Taskpane.
Be sure there are at least three paragraphs in the document. You can select the Insert Paragraph button three times. Check carefully that there's no blank paragraph at the end of the document. If there is, delete it.
In Word, create a custom style named MyCustomStyle. It can have any formatting that you want.
Select the Apply Style button. The first paragraph will be styled with the built-in style Intense Reference.
Select the Apply Custom Style button. The last paragraph will be styled with your custom style. (If nothing seems to happen, the last paragraph might be blank. If so, add some text to it.)
Select the Change Font button. The font of the second paragraph changes to 18 pt., bold, Courier New.
Summary
In this exercise, you built a Word add-in that inserts text ranges and paragraphs and format this text.