Configure Azure Cache for Redis
Your sports-statistics development team has decided that caching could dramatically improve performance for recently requested data. Your next step is to create and configure an Azure Cache for Redis instance.
Create and configure the Azure Cache for Redis instance
You can create a Redis cache using the Azure portal, the Azure CLI, or Azure PowerShell. There are several parameters you'll need to decide in order to configure the cache properly for your purposes.
Name
Your Redis cache needs a globally unique name. The name has to be unique within Azure, because it's used to generate a public-facing URL to connect and communicate with the service.
The name must be between 1 and 63 characters, composed of numbers, letters, and the - character. The cache name can't start or end with the - character, and consecutive - characters aren't valid.
Resource group
The Azure Cache for Redis is a managed resource and needs a resource group owner. You can either create a new resource group or use an existing one in a subscription to which you have access.
Location
You'll need to decide where the Redis cache will be physically located by selecting an Azure region. You should always place your cache instance and your application in the same region. Connecting to a cache in a different region can significantly increase latency and reduce reliability. If you're connecting to the cache outside of Azure, then select a location close to where the application consuming the data is running.
Important
Put the Redis cache as close to the data consumer as you can.
Pricing tier
As mentioned in the preceding unit, there are three pricing tiers available for an Azure Cache for Redis.
- Basic: The Basic cache is ideal for development/testing. It's limited to a single server, 53 GB of memory, and 20,000 connections. There's no SLA for this service tier.
- Standard: This is the Production cache, which supports replication and includes a 99.99% SLA. It supports two servers (primary/secondary), and has the same memory/connection limits as the Basic tier.
- Premium: This is the Enterprise tier, which builds on the Standard tier and includes persistence, clustering, and scale-out cache support. Premium is the highest performing tier, with up to 530 GB of memory and 40,000 simultaneous connections.
You can control the amount of cache memory available on each tier by choosing a cache level from C0-C6 for Basic/Standard and P0-P4 for Premium. Check the pricing page for full details.
Tip
Microsoft recommends you always use the Standard or Premium tier for production systems. The Basic tier is a single-node system with no data replication and no SLA. Also, use at least a C1 cache. C0 caches are really meant for simple dev/test scenarios, because they have a shared CPU core and very little memory.
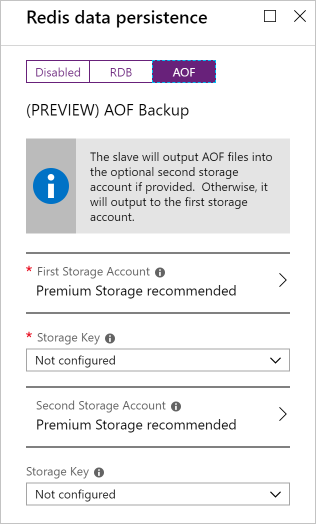
The Premium tier allows you to persist data in two ways to provide disaster recovery:
RDB persistence takes a periodic snapshot and can rebuild the cache using the snapshot if there's a failure.
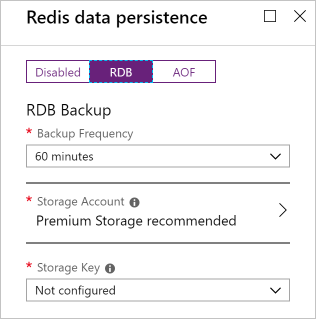
AOF persistence saves every write operation to a log that is saved at least once per second. AOF creates bigger files than RDB, but has less data loss.
There are several other settings that are only available to the Premium tier.
Virtual Network support
If you create a premium-tier Redis cache, you can deploy it to a virtual network in the cloud. Your cache will only be available to other virtual machines and applications in the same virtual network. Deploying to a virtual network provides a higher level of security when your service and cache are both hosted in Azure or are connected through an Azure virtual network VPN.
Clustering support
With a premium tier Redis cache, you can implement clustering to automatically split your dataset among multiple nodes. To implement clustering, you specify the number of shards to a maximum of 10. The cost incurred is the cost of the original node multiplied by the number of shards.
Access the Redis instance
Redis supports a set of known commands. A command is typically issued as COMMAND parameter1 parameter2 parameter3.
Here are some common commands you can use:
| Command | Description |
|---|---|
ping |
Pings the server. Returns "PONG". |
set [key] [value] |
Sets a key/value in the cache. Returns "OK" on success. |
get [key] |
Gets a value from the cache. |
exists [key] |
Returns "1" if the key exists in the cache, "0" if it doesn't. |
type [key] |
Returns the type associated to the value for the given key. |
incr [key] |
Increment the given value associated with key by one. The value must be an integer or double value. Returns the new value. |
incrby [key] [amount] |
Increment the given value associated with key by the specified amount. The value must be an integer or double value. Returns the new value. |
del [key] |
Deletes the value associated with the key. |
flushdb |
Delete all keys and values in the database. |
Redis has a command-line tool (redis-cli) you can use to experiment directly with these commands. Here are some examples.
> set somekey somevalue
OK
> get somekey
"somevalue"
> exists somekey
(string) 1
> del somekey
(string) 1
> exists somekey
(string) 0
Here's an example of working with the INCR commands. These commands are convenient because they provide atomic increments across multiple applications that are using the cache.
> set counter 100
OK
> incr counter
(integer) 101
> incrby counter 50
(integer) 151
> type counter
(integer)
Add an expiration time to values
Caching is important because it allows us to store commonly used values in memory. However, we also need a way to expire values when they're stale. Redis handles expiration by applying a time to live (TTL) to a key.
When the TTL elapses, the key is automatically deleted, exactly as if the DEL command was issued. Here are some notes on TTL expirations.
- Expirations can be set using seconds or milliseconds precision.
- The expire time resolution is always one millisecond.
- The time passes virtually, even when your Redis server remains stopped.
- Expiration information is replicated and persisted on disk.
- Redis saves the date at which a key will expire.
Here's an example of an expiration:
> set counter 100
OK
> expire counter 5
(integer) 1
> get counter
100
... wait ...
> get counter
(nil)
Access a Redis cache from a client
To connect to an Azure Cache for Redis instance, you'll need several pieces of information. Clients need the host name, port, and an access key for the cache. You can retrieve this information in the Azure portal through the Settings > Access Keys page.
The host name is the public Internet address of your cache, which was created using the name of the cache; for example,
sportsresults.redis.cache.windows.net.The access key acts as a password for your cache. There are two keys created: primary and secondary. You can use either key, and two are provided in case you need to change the primary key. You can switch all of your clients to the secondary key and regenerate the primary key. However, any applications using the original primary key would be blocked. Microsoft recommends periodically regenerating the keys, much like you would your personal passwords.
Warning
Your access keys should be considered confidential information; treat them like you would a password. Anyone who has an access key can perform any operation on your cache!