Enable backup for Azure Stack Hub
You can enable the Infrastructure Backup Service from the administrator portal so that Azure Stack Hub can generate infrastructure backups.
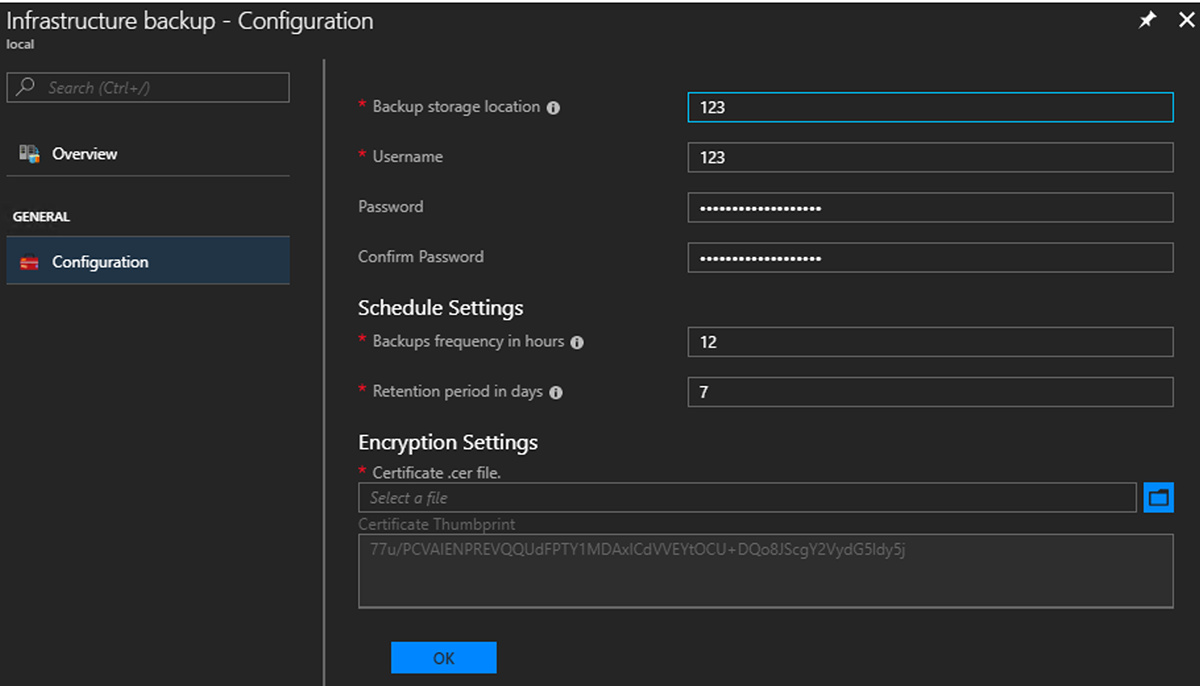
Below is the procedure for configuring the Backup Service.
- Open the Azure Stack Hub administrator portal.
- Select All services, and then under the ADMINISTRATION category select Infrastructure backup. Choose Configuration in the Infrastructure backup blade.
- Type the path to the Backup storage location. Use a Universal Naming Convention (UNC) string for the path to a file share hosted on a separate device. A UNC string specifies the location of resources such as shared files or devices. For the service, you can use an IP address. To ensure availability of the backup data after a disaster, the device should be in a separate location.
- Type the Username using the domain and username with sufficient access to read and write files. For example, Contoso\backupshareuser.
- Type the Password for the user.
- Type the password again to Confirm Password.
- The frequency in hours determines how often backups are created. The default value is 12. Scheduler supports a maximum of 12 and a minimum of 4.
- The retention period in days determines how many days of backups are preserved on the external location. The default value is 7. Scheduler supports a maximum of 14 and a minimum of 2. Backups older than the retention period are automatically deleted from the external location.
- In Encryption Settings, provide a certificate in the Certificate .cer file box. Backup files are encrypted using this public key in the certificate. Provide a certificate that only contains the public key portion when you configure backup settings. Once you set this certificate for the first time or rotate the certificate in the future, you can only view the thumbprint of the certificate. You can't download or view the uploaded certificate file. To create the certificate file, run the following PowerShell command to create a self-signed certificate with the public and private keys and export a certificate with only the public key portion. You can save the certificate anywhere that can be accessed from admin portal.
$cert = New-SelfSignedCertificate `
      -DnsName "www.contoso.com" `
      -CertStoreLocation "cert:\LocalMachine\My"

  New-Item -Path "C:\" -Name "Certs" -ItemType "Directory"
  Export-Certificate `
      -Cert $cert `
      -FilePath c:\certs\AzSIBCCert.cer
Azure Stack Hub accepts a certificate to encrypt infrastructure backup data. Make sure to store the certificate with the public and private key in a secure location.
Select OK to save your backup controller settings.
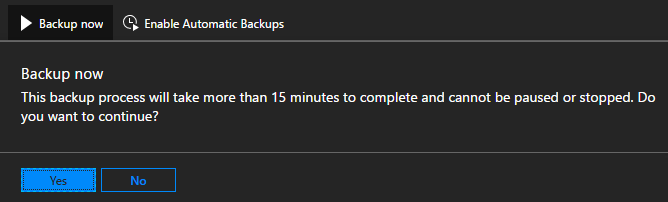
Start backup
To start a backup, click on Backup now to start an on-demand backup. An on-demand backup won't modify the time for the next scheduled backup. After the task completes, you can confirm the settings in Essentials:
You can also run the PowerShell cmdlet Start-AzsBackup on your Azure Stack Hub admin computer.