Register IoT devices
Lab overview
Dynamics 365's Connected Field Service solution provides the ability to register both simulated and physical IoT devices with Azure IoT Hub or IoT Central and using device twin, communicate information back into the Connected Field Service solution.
The purpose of this hands-on-lab is to introduce how simulated and physical devices can be registered with Azure IoT Hub and associated with customer assets in Connected Field Service.
Scenario
You work for a company that sells and services smart home devices. Since many of the devices that you service are smart devices, information from those devices can be captured remotely to aid in the servicing of that equipment. Your organization has several defined scenarios and processes that they use when servicing equipment. These processes can vary depending on several factors including:
The type of device in need of service
The severity of the issue detected
The age of the device
The location of the device
The availability of resources to work on a specific device.
The above items represent only a small portion of factors that your organization uses to determine the process for servicing equipment.
The first critical component in your company moving to a connected IoT solution is to register devices with an Azure IoT hub (both simulated and physical) and relate them to a corresponding customer asset in Connected Field Service.
Exercise 1: Register and work with a simulated device
Task 1: Register a simulated device
Navigate to Power Apps and make sure you are in the correct environment that has Connected Field Service configured.
Select Apps and click to open the Connected Field Service application.
Select Customer Assets and click the + New.
Enter Smart Thermostat for Name, select Adventure Works for Account, and click Save. Wait for the other sections to load after saving the details.
Locate the Device ID field, enter smt-9876 and click Save.
On the Command bar,**, click Register Devices.
Click OK.
In your web browser, select a new tab and navigate to Azure portal (Sign into Azure if prompted. You need an Azure subscription associated with the account you are using).
Select Resource Groups.
Open the IoT Hub that you are using with your Connected Field Service installation.
Click on IoT devices. All currently registered devices with the IoT hub will appear.

Select the smt-9876 device to open it. (Notice the Device ID, Primary & Secondary Keys, and the Primary and Secondary Connection strings. These can be beneficial when you are working with physical devices.)
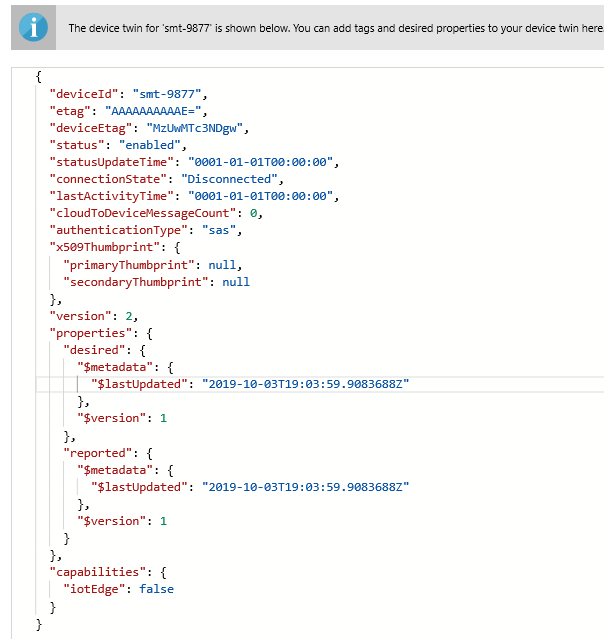
Click on Device Twin.
This will display the device twin JSON document for this device.
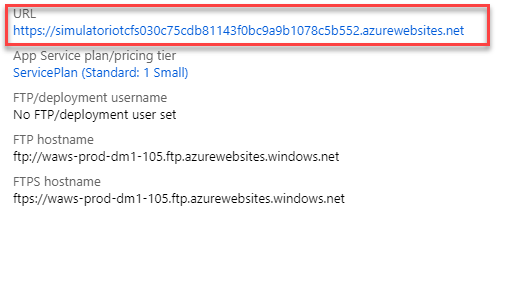
On your IoT Hub select and open the SimulatorIoTCFSXXX resource of type App Service.
Click the Simulator URL to open the Thermostat Simulator. (The simulator should open in a new tab)
On the simulator click Connection.
Switch back to your Azure subscription, close the simulator App Service screen and move back to all the resource group view.
Open the IoT Hub resource.
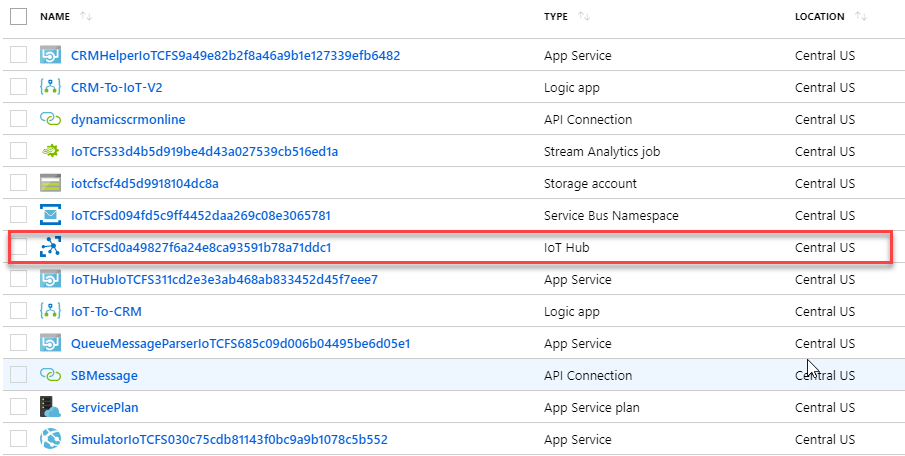
Highlight the IoT Hub name and Copy it.
Switch back to your simulator screen and paste the IoT hub name into the Host field.
Switch back to your Azure subscription, select Shared Access Policies.
Open the iothubowner policy and copy the Primary key.
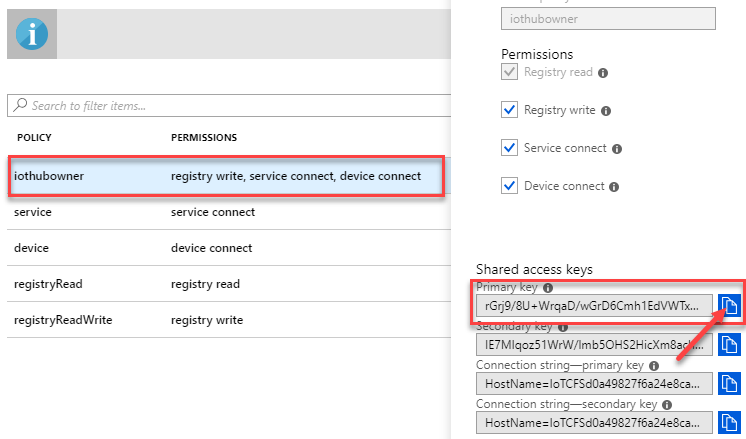
Switch back to your simulator screen and paste the Primary Key into the Key field.
Click the Connect button. (Your simulator is now connected to your Azure IoT Hub)
Click the Refresh button to ensure all registered devices are available.
From the Select a device dropdown, select the smt-9876 device. (A green dot should appear next to the refresh button, and after a few seconds it should start transmitting information.)
On the Temperature Slider, set it to 75 Degrees and wait for the temperature status to register on in the Messages Sent window.
Switch to the browser tab that has Connected Field Service loaded.
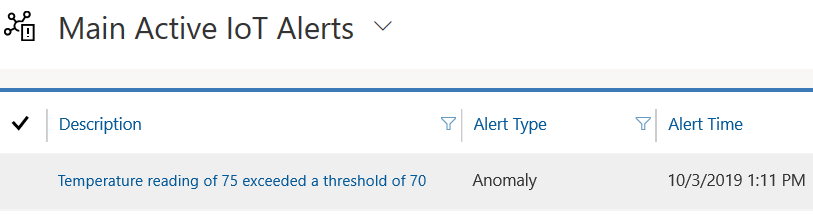
Select IoT Alerts.
Verify that an alert was created. (Example: Temperature of 75 exceeded a threshold of 70 Alert.)
From here, we could begin to interact with the device using commands. We will examine this in greater detail in Unit 6.
Task 2: Modify device rules to change to Celsius
In your web browser, select the Tab that contains your Azure portal.
Select and open the Storage Account.
Scroll down and under Blob service, click Containers.
Click devicerules.
Click on the 2016-05-30 folder.
Open the 22-40 folder.
Right click on the devicerules.json file and select View/edit blob.
Locate the Temperature property and change the value from 70 to 21.11111 (This is what 70 degrees would be in Celsius)
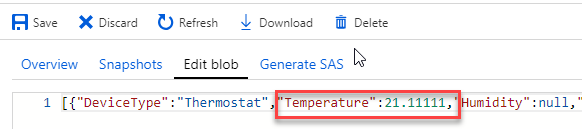
Click Save.
Stop and Start the Azure Stream Analytics Job again to reflect the latest value.
Navigate to Azure portal and open the resource group.
Select the resource of type Stream Analytics Jobs and open it.
Stop the resource and wait for it to stop.
Start the resource. Wait until the status is running.
Switch back to your Simulator and ensure the smt-9876 device is selected.
Change the value to something over 21.11111 and wait for the reading to register.
Switch back to Dynamics 365 Connected Field Service and verify that an Alert record was created.
Task 3: Modify device rules back to Fahrenheit.
Important
Unit 6 in this module will be using a simulated device to interact with Connected Field Service. The changes to make it Celsius will not work with this exercise. It is important that in the Blob, you modify the Temperature back to 70 to ensure that the simulator will register Fahrenheit and work accordingly. Do not forget to Stop and Start the Stream Analytics job once the file is updated again. This ensures that the stream points to latest threshold value.
Exercise 2: Register a physical device (Optional)
Each exercise consists of a scenario and learning objectives, the scenario describes the purpose of the exercises, while the objectives are listed and have bullet points.
Scenario
For this optional exercise, you will need a physical device. There are several available. In this exercise, you will be introduced to setting up an MXChip IoT DevKit. The MXChip IoT DevKit (a.k.a DevKit) is an all-in-one IoT device kit. You can use this chip to develop and prototype IoT (Internet of Things) solutions that take advantage of Microsoft Azure services.
It includes an Arduino-compatible development board with rich peripherals and sensors, an open-source board package, and a growing projects catalog.
If you do not have an MXChip IoT DevKit, you can visit Azure IoT Developer Kit and click on Get a Kit.
Task 1: Create and register a customer asset and an IoT device.
Go to your Connected Field Service application, select Customer Assets, and click + New.
Enter MXChip for Name, select Adventure Works for Account and click Save.
Locate the Device ID field, enter AZ3166 and click Save.
Click Register Devices.
Click OK.
In your web browser, select a new tab and navigate to Azure portal (Sign in to Azure if prompted. You need an Azure subscription associated with the account you are using).
Select Resource Groups.
Open the IoT Hub that you are using with your Connected Field Service installation.
Click on IoT devices. All currently registered devices with the IoT hub will appear.
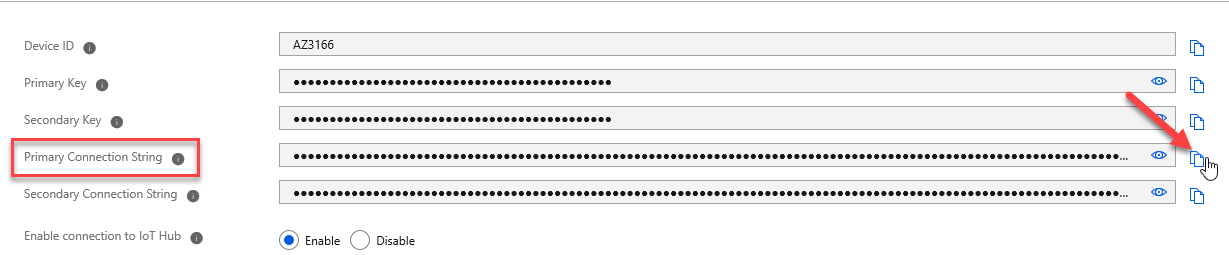
Select the AZ3166 device to open it.
Locate the device's Primary Connection String and copy it to an application like Notepad. (We will use it later.)
Task 2: Register a physical device
Flash the devices firmware
Download the latest pre-built Microsoft IoT Central firmware for the MXChip from the releases page on GitHub.
Select AZ3166-IoT-Central-x.x.x.bin.
Save the file locally.
Connect the DevKit device to your development machine using a USB cable.
In Windows, a file explorer window opens on a drive mapped to the storage on the DevKit device. For example, the drive might be called AZ3166 (E:).
Drag the AZ3166-IoT-Central-X.X.X.bin file onto the drive window.
When the copying is complete, the device will reboot with the new firmware.
Configure Wi-Fi
After the device reboots, you need to configure the Wi-Fi on the device.
Hold down button B, push and release the Reset button, and then release button B.
Your DevKit enters AP mode for configuring Wi-Fi. The screen displays the service set identifier(SSID) of the DevKit and the configuration portal IP address:
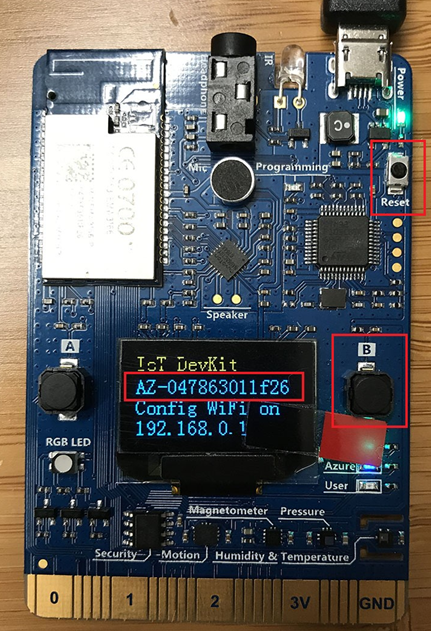
If your Wi-Fi SSID starts with AZ and not AZ3166 after applying the firmware, you need to follow the following steps to make sure the firmware gets applied correctly.
Bad - Firmware Not Applied Correctly

Good - Firmware Applied Correctly
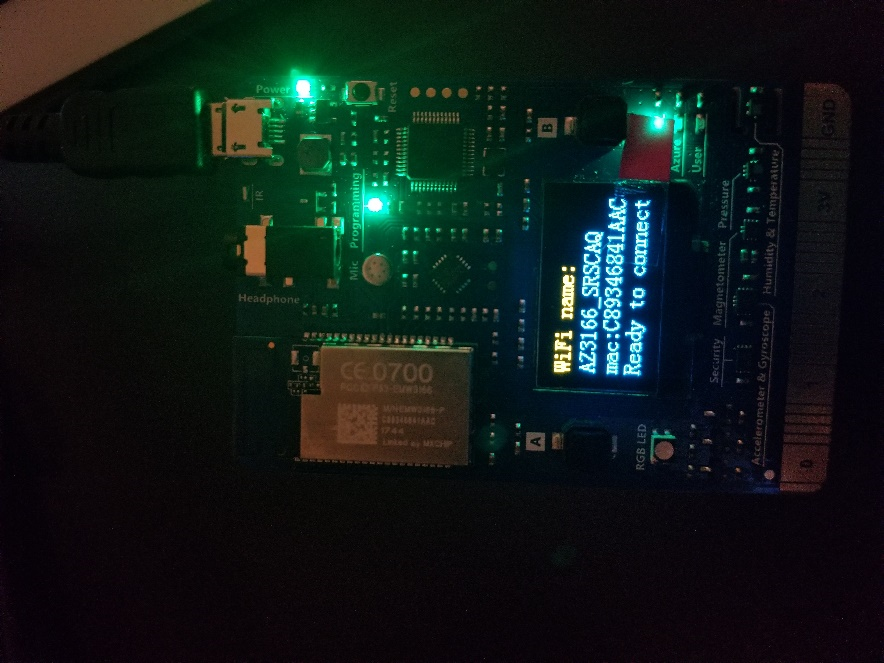
Important
You only need to do the steps below, if your device screen looks like the Image on the Left. If it looks like the image on the Right, your device is ready to configure Wi-Fi.
- Click Reset on the AZ3166.
- Hold down A+B Button AZ3166 will hard reset.
- Press Reset.
- Remove from Power.
- Place AZ3166 into AP Mode.
- If the SSID is AZ3166_XXXXXX, the firmware is applied correctly.
- If the SSID still shows AZ-XXXXXXXXXX, please refer to the Azure IoT Developer Kit and use SSH to update the IoT Hub Connection String.
On another Wi-Fi enabled device (like a computer or mobile phone) connect to the DevKit SSID (ex.AZ3166_SRSCAQ).
- Leave the Password Empty.
Open a web browser on connected device and put navigate to: http://192.168.0.1/start.
Select the Wi-Fi network you want to join and enter the Wi-Fi credentials.
Get the PIN CODE from the device and enter it in the Device Pin Code field.
In the Primary/Secondary Device Key, paste the connection string, you copied to Notepad earlier.
Select all the telemetry options.
Click Configure Device.
Reset device using Reset button.
Your physical device is now configured to connect with Azure IoT Hub.
Navigate back to your Azure portal, click on Resource Groups, select the Resource Group that contains all your Connected Field Service components.
From within the Components Listing, sort on the Type column. Click on it twice so that is sorts descending and that the Stream Analytics job is at the top.
Click the Stop Button to disable the job. This allows us to modify the query.
Click Yes. It will take few minutes to stop.
On the query section, select Edit Query.
This query does not include necessary information for the device we are working with, so we will replace it. Highlight all information in the query window and press the [DELETE] key of your keyboard.
They query should now be empty.
Next, paste the code below into the window.
 WITH AlertData AS
 (
 -- Web Simulator Devices
 SELECT
      Stream.DeviceID,
      'Temperature' AS ReadingType,
      Stream.Temperature AS Reading,
      Stream.EventToken AS EventToken,
      Ref.Temperature AS Threshold,
      Ref.TemperatureRuleOutput AS RuleOutput,
      Stream.EventEnqueuedUtcTime AS [time]
 FROM IoTStream Stream
 JOIN DeviceRulesBlob Ref ON Ref.DeviceType = 'Thermostat'
 WHERE
      Stream.EventToken IS NOT NULL AND Stream.Temperature > Ref.Temperature

 UNION

 -- MX Chip
 SELECT
      GetMetadataPropertyValue(Stream, '[IoTHUB].[ConnectionDeviceId]') as DeviceID,
      'Temperature' AS ReadingType,
      Stream.temp AS Reading,
      GetMetadataPropertyValue (Stream, 'EventId') as EventToken,
      Ref.Temperature AS Threshold,
      Ref.TemperatureRuleOutput AS RuleOutput,
      Stream.EventEnqueuedUtcTime AS [time]
 FROM IoTStream Stream
 JOIN DeviceRulesBlob Ref ON Ref.DeviceType = 'Thermostat'
 WHERE
      Stream.temp IS NOT NULL AND Stream.temp > Ref.Temperature
 )
 -- Insert data into the "Alerts" Service Bus Queue
 SELECT data.DeviceId,
     data.ReadingType,
     data.Reading,
     data.EventToken,
     data.Threshold,
     data.RuleOutput,
     data.Time
 INTO AlertsQueue
 FROM AlertData data
 WHERE LAG(data.DeviceID) OVER (PARTITION BY data.DeviceId, data.Reading, data.ReadingType LIMIT DURATION(minute, 1)) IS NULL
Click the Save Query button within the query window.
Close out the query window. This will return you to the properties of the Stream Analytics job.
Along the top click the Start button.
Select Now and click Start.
The job will take a minute or two to start. Once it is started, it will show under the Notifications area.
Task 3: Modify device alert settings and stream analytics to use the simulator
Important
Unit 6 in this module will be using a simulated device to interact with Connected Field Service. The changes we made to the device alert settings and the Stream Analytics will not work with this exercise. It is important that you modify those settings back to their original values.
Navigate back to your Azure portal, click on Resource Groups, select the Resource Group that contains all your Connected Field Service components.
From within the Components Listing, sort on the Type column. Click on it twice so that is sorts descending and that the Stream Analytics job is at the top.
Click the stop button to disable the job. This allows us to modify the query. It can take several minutes to stop. Once it is stopped, it will show under the notifications area.
On the Query Section, select Edit Query.
Next, paste the code below into the window.
WITH AlertData AS
(
-- Web Simulator Devices
SELECT
     Stream.DeviceID,
     'Temperature' AS ReadingType,
     Stream.Temperature AS Reading,
     Stream.EventToken AS EventToken,
     Ref.Temperature AS Threshold,
     Ref.TemperatureRuleOutput AS RuleOutput,
     Stream.EventEnqueuedUtcTime AS [time]
FROM IoTStream Stream
JOIN DeviceRulesBlob Ref ON Ref.DeviceType = 'Thermostat'
WHERE
     Ref.Temperature IS NOT NULL AND Stream.Temperature > Ref.Temperature

)

SELECT data.DeviceId,
    data.ReadingType,
    data.Reading,
    data.EventToken,
    data.Threshold,
    data.RuleOutput,
    data.Time
INTO AlertsQueue
FROM AlertData data
WHERE LAG(data.DeviceID) OVER (PARTITION BY data.DeviceId, data.Reading, data.ReadingType LIMIT DURATION(minute, 1)) IS NULL
Click the Save button within the Query Window.
Close out the Query window. This will return you to the properties of the Stream Analytics job.
Along the top click the Start button.
Select Now and click Start.
The job will take a minute or two to start. Once it is started, it will show under the Notifications area.