Detect an external event using a trigger
In Azure Logic Apps, a trigger always starts a workflow as the first step. To successfully run your workflow, you need to find the appropriate trigger, and set up the trigger's properties for your scenario. For this example, we use the Bing Search trigger to run the workflow when an article about the industry is published.
In this unit, we examine the trigger types plus the strengths and weaknesses around the most common options and how a trigger handles inputs and outputs.
Trigger types
Consider the various trigger conditions that businesses might use to run logic app workflows. Most examples that we've seen are triggers that detect whether data or an event in a service or system meets a specific condition. For example, when new article is available, a new row is added to a database, a new email arrives, or a new file is uploaded to cloud storage. Triggers that detect data or events can use either of the following techniques:
Triggers that periodically poll or check a service or system for specific data or an event that meets a condition
Triggers that wait and receive push notifications from a service or system when specific data or an event meets a condition
However, what if you need a trigger that's not bound to data or events in a service or system? Suppose you want to run your workflow every Saturday at midnight or some other schedule. You can use the Recurrence trigger to schedule when to run the actions in a workflow. For example, you can schedule workflows that perform administrative tasks, such as running backups or archiving old data.
Suppose you want to run your workflow only when called from code or another source? You can use the Request or "manual" trigger to wait for requests, for example, sent from code in your web app or mobile app.
The following diagram summarizes the previously described trigger types:

The following sections provide more information about polling triggers and push triggers.
What is a polling trigger?
A polling trigger periodically checks a service or system for data or an event that meets a specific condition. After this check, if the trigger finds data or an event that meets the condition, the trigger starts a new workflow run. For example, the RSS connector has a polling trigger that can regularly check for new posts in an RSS feed.
After you add a polling trigger to your workflow, you set the Frequency and an Interval to control how often the trigger runs. The frequency is a time unit, such as Second, Minute, Hour, Day, Week, or Month. The interval is the number of time units that lapse before the trigger checks again for data or an event. For example, a polling trigger with a frequency of Minute and an interval of 5 checks every five minutes.
Polling triggers require you to choose between how often the triggers run and how much they cost to run. Often, there's a delay between when new data or an event happens and when the trigger detects that data or event. For example, suppose a polling trigger checks for data every five minutes. New data is available after seven minutes. The trigger doesn't detect the new data until the next poll, which happens at 10 minutes. The following diagram shows how this polling works:

In the worst case, the potential delay when detecting new data is equal to the polling interval. So why not use a smaller interval? To check for new data, the Azure Logic Apps execution engine needs to run your workflow, which incurs a cost. Generally, the shorter the interval, the higher the cost, but the trigger responds faster to new data or events. The best polling interval for your trigger depends on your business process and tolerance for delay.
What is a push trigger?
A push trigger waits for notifications from a service or system when data or an event meets a specific condition. The trigger subscribes to an endpoint on another service or system. When new data or an event meets the condition, the service or system notifies the trigger, which immediately starts a new workflow run. For example, the Azure Service Bus connector has a push trigger that detects when a message is added to an Azure Service Bus queue.
Note
Push triggers use webhooks, which let triggers subscribe to the external service or system. At subscription time, Azure Logic Apps generates a callback URL for the trigger and registers the URL with the external service or system. Similarly, Azure Logic Apps unsubscribes and unregisters the callback URL when you don't need the subscription anymore, for example, if you disable or delete your workflow.
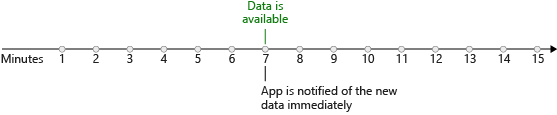
On the positive side, push triggers don't run when no data or events are available. So, they don't incur as much cost as polling does. These triggers also immediately respond when new data or events exist. The following diagram shows how this push process works:
Why not use push triggers all the time when they respond faster and cost less than polling triggers? Unfortunately, not every connector offers a push trigger. A service or system might not support push triggers, or maybe the connector author didn't choose to implement a push trigger. Generally, a connector offers either polling triggers or push triggers, but not both. In rare cases where a connector offers both options, consider using the push trigger for better efficiency and less cost.
The following screenshot shows the designer with the news monitoring logic app workflow where the Bing Search trigger appears as the first step:

Trigger parameters and return values
You can think of a trigger operation as a function call that has parameters (inputs) and return values (outputs). Trigger parameters let you configure the operation. The Bing Search trigger named On new news article has a parameter called Search query. The trigger uses this parameter to find news articles matching a search term for us. Some operations use both required and optional parameters. The SQL Server trigger named When an item is created has one required parameter called Table name and several optional parameters, such as Order By and Select Query.
A trigger's return values are the results or outputs from the trigger operation. For example, The Bing Search trigger named On new news article returns a NewsArticle object. This object contains values such as Name, URL, and Description. The Bitbucket connector has a trigger named When a pull request is merged. The trigger returns an object that contains data, such as the Repository identity and the Actor who approved the merge.
Some triggers return an array or collection, rather than a single item. The following diagram shows what this output array or collection looks like:

To process each item, you can use a loop, such as a For each or Until loop.
Some triggers accept an array or collection as input. By default, most triggers automatically split up the array for processing. Rather than have one workflow instance process the whole array, the Azure Logic Apps engine creates one workflow instance for each item, and runs all the instances in parallel.
The following diagram shows how the RSS trigger named When a feed item is published splits up the array and sends each item to an individual workflow instance for processing:

Triggers in the designer
The workflow designer includes a connector gallery that contains the triggers and actions you can use in your workflow. Typically, you use the connector gallery search box to find and select a connector for your scenario. Then, you review any triggers that the connector provides. The following screenshot shows how the workflow designer presents connectors for you to select:

After you select a connector, the triggers available for that connector appear:

The next unit shows how to create a logic app resource and workflow in the Azure portal along with how to add and configure trigger in the workflow designer.
The connector gallery groups connectors into the following general categories:
| Connector group | Description |
|---|---|
| Built-in (in-app) | Triggers and actions that natively run with the Azure Logic Apps runtime. Some operations work directly with specific Azure services without requiring you to create a connection, such as Azure Functions. Other operations perform tasks such as working with variables, controlling the path through your workflow, or performing general data tasks. |
| Managed (shared) | Triggers and actions that run in multitenant Azure and are managed by Microsoft. These operations are typically associated with a single service or system, and they receive or send calls to their specific service or system. These operations usually require that you create a connection first. |