Exercise - Branch based on tweet sentiment
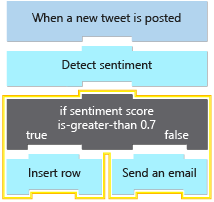
In this exercise, we're going to continue work on our social media monitoring app. We'll add a control action so the workflow can branch, based on the tweet's sentiment. The following diagram shows a conceptual view of the app and highlights the part that we'll work on.
Create SQL Server database to store positive tweets
When our workflow trigger receives a positive tweet, we want to save the tweet to a backend database. In this section, we'll run a script to create a database for us to use. Make sure to delete the database when you're finished with this module to avoid incurring charges. The Summary section contains instructions on deleting the database.
In your Cloud Shell session, run the following
curlcommand to copy the setup-sql-database.sh script from GitHub:curl https://raw.githubusercontent.com/MicrosoftDocs/mslearn-route-and-process-data-logic-apps/master/setup-sql-database.sh > setup-sql-database.shRun the following command to run the script. This command will take a couple minutes:
bash setup-sql-database.shWait for the script to complete. When the script finishes, Cloud Shell displays the values for the following properties:
- SQL Server instance name
- SQL Server username
- SQL Server password
- SQL Server database name
Save these values somewhere safe. We need these values later in this exercise when we update our logic app workflow in the Azure portal.
Add a Condition control action
This first step adds the Condition control action to the logic app workflow in the Azure portal. In programming terms, we're adding an if statement that tests a condition.
On your logic app resource menu, under Development Tools, return to the workflow designer by selecting Logic app designer.
On the designer, under the Sentiment action, select New step.
Under the Choose an operation search field, select Built-in. In the search field, enter condition.
Select the Control connector. From the actions section, select Condition.
Set up the condition
Now we need to specify the condition to test. Remember that the Sentiment action returns a score, which is a number between zero and one. If the number is greater than 0.7, we'll consider the tweet positive. Otherwise, the tweet is negative.
In the Condition action, select the leftmost Choose a value field.
From the dynamic content list that opens, select Sentiment.
In the middle column, from the operator list, select is greater than.
In the rightmost Choose a value field, enter 0.7.
When you're done, save your workflow.
Add the SQL Server "Insert row" action
Although the condition action is set up, the workflow doesn't specify the action to take if the score is positive or negative. When the sentiment score value is greater than 0.7, we want the workflow to add the tweet to a SQL database. For this task, we'll add the SQL Server action named Insert row to the workflow. When we add the action, we'll also provide our SQL Server database name and user credentials.
Under the condition action in the True section, select Add an action.
In the Choose an operation search field, enter SQL.
Select the SQL Server connector. From the actions list, select Insert row.
If required, provide the information for your SQL Server connection.
In the Connection name field, Enter SQLConnection.
From the Authentication type list, select SQL Server Authentication.
For SQL server name, enter the name for the SQL server that you previously created. Include the port number 3342 to access the public endpoint on the SQL Server instance.
For more information, review Connect to Azure SQL Database or SQL Managed Instance.
For SQL database name, enter PositiveTweetDatabase, which is the name for the database that we created with our script.
Enter the SQL username and SQL password that you saved earlier when the setup script finished.
When you're done, select Create.
Set up the SQL Server "Insert row" action
Now, specify how to map the tweet data to your database columns. Let's store the tweet's text in a column called Content and the username for the person who made the tweet in a column called Source.
In the Insert row action, from the Table name list, and select the table named Mentions.
Open the Add new parameter list, and select Content.
When the dynamic content list opens, under When a new tweet is posted, select Tweet text.
Substitution: If you're using the RSS trigger named When a feed item is published, select the FeedSummary property instead.
Open the Add new parameter list, and select Source.
When the dynamic content list opens, under When a new tweet is posted, select Tweeted by.
Substitution: If you're using the RSS trigger named When a feed item is published, select FeedTitle.
When you're done, save your workflow.
Add the Outlook "Send an email" action
Now, we want the workflow to send tweets that score 0.7 or less to customer support through email. To start, we need to find the Outlook Send an email action.
Note
If you don't have an Outlook.com email account and prefer not to create one, you can change the connector operation search term to Send an email so you can select another email provider, such as Gmail or Office 365 Outlook.
Under the condition action in the False section, select Add an action.
In the Choose an operation search field, enter Outlook.
Select the Outlook.com connector. From the actions list, select Send an email.
Set up the Outlook "Send an email" action
Now, map the tweet data to the respective email fields.
If prompted, select Sign in, and sign in with your Microsoft account credentials. If you don't have an account, you can create one now.
Confirm that you want to grant access for your logic app to your email account.
In the To field, enter a valid email address. For testing, you can use your own address.
In the Subject field, enter Negative tweet detected from. In the dynamic content list, from the When a new tweet is posted section, select Original tweet tweeted by.
Substitution: If you're using the RSS trigger named When a feed item is published, select FeedTitle.
In the Body field, enter Contents of tweet. In the dynamic content list, from the When a new tweet is posted section, select Original tweet text.
Substitution: If you're using the RSS trigger named When a feed item is published, select FeedSummary.
When you're done, save your workflow.
Review results with positive sentiment tweets
Now, the Control action is properly configured and running. Let's examine the SQL database to review our positive tweets.
On the Azure portal home page, select All resources. From the resource list, select the SQL database PositiveTweetDatabase.
From the SQL database resource menu, select Query editor.
Sign in to the database with the server admin Login and Password that you previously saved and created using the script in the preceding unit.
On the toolbar, select New Query.
In the query editor, enter Select * from dbo.mentions.
Select Run to run the query and list all positive tweets added to the database.
Review results with negative sentiment tweets
Finally, let's check our email account to see if we received any messages about negative tweets.
Sign into the email account that you provided in the Outlook action.
Wait for any email notifications to arrive.