Get started with intelligent routing
In addition to being able to run logical rules to assist with work classification and record assignment, you can use AI to intelligently route items. For example, you might escalate dissatisfied customers to a specific queue where senior agents are available to engage with them. Alternatively, you might want to use base interactions to have the system intelligently assign skills to incoming work items.
Unified routing includes multiple options to use AI and machine learning to enhance the routing experience:
Sentiment-based routing - Uses machine learning to predict the customer sentiment score for new work items.
Effort-based routing - Allows you to create and train machine learning models that determine the amount of effort that's needed for new work items.
Intelligent skill finder - Allows you to create and train machine learning models to determine the necessary skills for new work items.
Sentiment-based routing
Sentiment prediction allows organizations to use the customers' sentiment scores as a factor in classifying work items to route to agents. This feature allows you to write rules to classify work items and assign them to agents who are best equipped to handle them.
As work items come in, the sentiment model will assign a sentiment to them based on the following seven-point scale:
Very positive
Positive
Slightly positive
Neutral
Slightly negative
Negative
Very negative
The sentiment model is set up to look for and use only messages that customers have sent. Messages that have been sent by agents to customers aren't factored into the sentiment score.
Before you can use sentiment in your classification rules, you'll need to enable it in your system. You can do so in the Customer Service admin center app in the Routing section. Locate Sentiment-based routing and then enable sentiment prediction for routing.
Optionally, you can test the sentiment model by using the Dry run option. This option lets you test real phrases that you might expect to encounter when customers contact support. It helps you understand what the sentiment prediction on those phrases might look like. With the Dry run option, you can view key information, such as the sentiment category on the seven-point scale, the sentiment score that is scaled from zero to 100, and keywords from the phrase that influenced the sentiment score.
Create classification rules based on sentiment prediction
After you've enabled the sentiment prediction feature, you'll create a sentiment prediction in the work classification section of a workstream. When you create a new rule set, select Machine learning model and then set the type to Sentiment Prediction.
You'll need to define the input attribute where the customer sentiment will most likely be found. For example, for a case workstream, you would likely select the Description field because it might typically contain keywords that indicate the sentiment. For a messaging channel, you'll typically use the conversation record context.
The following image shows an example of what a sentiment prediction classification rule for a case would look like.
You can define up to 10 attributes, and you can use those attribute values to build the prediction model. At least one attribute, the first one, is mandatory and can't be deleted.
The output attribute will be set to Sentiment category, which you can use in conditions when you're creating routing and assignment rules.
Effort estimation
Another way that organizations can route information to agents is based on the amount of effort that will be required. In unified routing, effort is the length of time that's necessary to resolve a work item or the amount of time that's spent on a work item before it's moved to the next stage as defined by the organization. Unified routing includes an effort estimation model that you can use to classify and route work items. This feature allows you to determine the amount of time that it will take to address a work item. Based on that estimation, the item can be routed to the agent who has the bandwidth to manage it.
Organizations can use effort estimation to:
Estimate time for an agent analysis and assign accordingly.
Estimate time for a full case resolution and assign accordingly.
Create an effort estimation model
You can create the effort estimation models for any record that is enabled for unified routing. You can provide the context to the model for training by selecting the attributes. At least two attributes are mandatory, and you can specify up to 10 attributes. Attributes that indicate severity and priority are useful.
To create effort estimation models, go to the Customer Service admin center app. In the Routing section, select Manage for Effort-based routing. You'll need to specify a name for the model.
The Data summary section is where you'll define how effort is calculated. You'll need to define the following values:
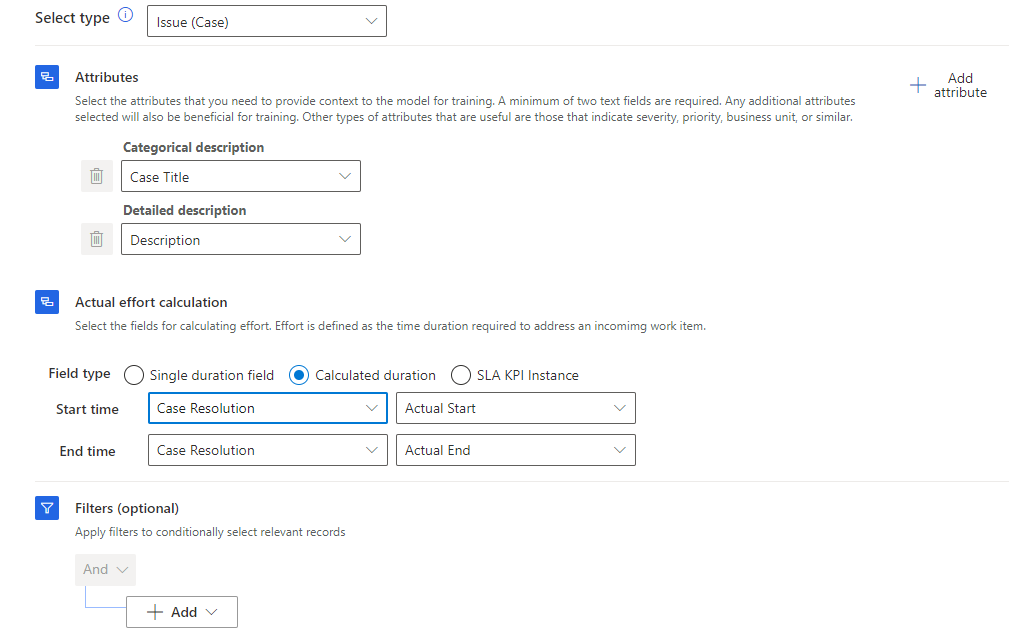
Record type - Defines the type of record that will be used with your model. For example, if you're trying to identify the amount of effort that's required to resolve specific types of cases, you would select Issue (Case).
Attributes - Defines the attributes (fields) that will have data that's relevant to the model. Initially you'll need to select values for the Categorical description and Detailed description fields. You can add other attributes as needed. You can add up to 10 attributes to be used to train the model.
Actual effort calculation - Specifies how the effort is going to be calculated. How it's calculated will be based on the different types of items that you're working with, but you can select one of the following options to determine the time to address an incoming work item:
Single duration field - Use in scenarios where the time is captured in a single field, such as the duration field on activity records like phone calls, tasks, and emails.
Calculated duration - Use in scenarios where a starting and ending time indicate the effort, such as using the Created on and Resolved on fields on a case to identify how long a record was open.
SLA KPI instance - Use in scenarios where you want to be able to use service level agreements (SLAs) that are defined in Dynamics 365 as the effort definition.
Filters (Optional) - Lets you filter the records to use in the model, such as limiting to only case records where the customer has a service level. Optionally, you can define the filter conditions to select only relevant records.
Date range (Optional) - Lets you limit the records that will be included in your model to specific date ranges.
The following image shows an example of what a model definition might look like for estimating the effort on case records. The effort calculation is using the Actual Start and Actual End options on the case resolution record to determine how much effort was required.
After you've defined everything that you want on the model, select Train AI Model. The Training tab displays the status of the training, which could take a couple of hours and depends on the conditions that are used. After the model is trained, the Model published successfully message will appear on the page.
As with the sentiment model, you can select Dry run and select an input value to test the model. The following details are available:
Effort value (minutes) - The time, in minutes, that's estimated for the work item to be addressed.
Confidence score - The degree of confidence, in a percentage value, of the effort prediction.
Performance grade
The performance grade of the model is indicated by A, B, C, D, E, or F. The letters indicate the quality of the model in descending order.
For more information, see Prediction model performance.
Create classification rules based on effort estimation model
After you've trained the effort estimation models, you can create classification rules based on the models. Then, you can use the rules with other rules to help categorize the work items to be routed to the correct agents who will help with the issues.
As with all other classification rules, you'll define the classification rule on the workstream that you want to use it with. In the Create work classification ruleset dialog, select the rule type as Machine learning model, and then select the type as Effort estimation.
In Select effort estimation model, select the model that you want to use for the prediction and then select Create.
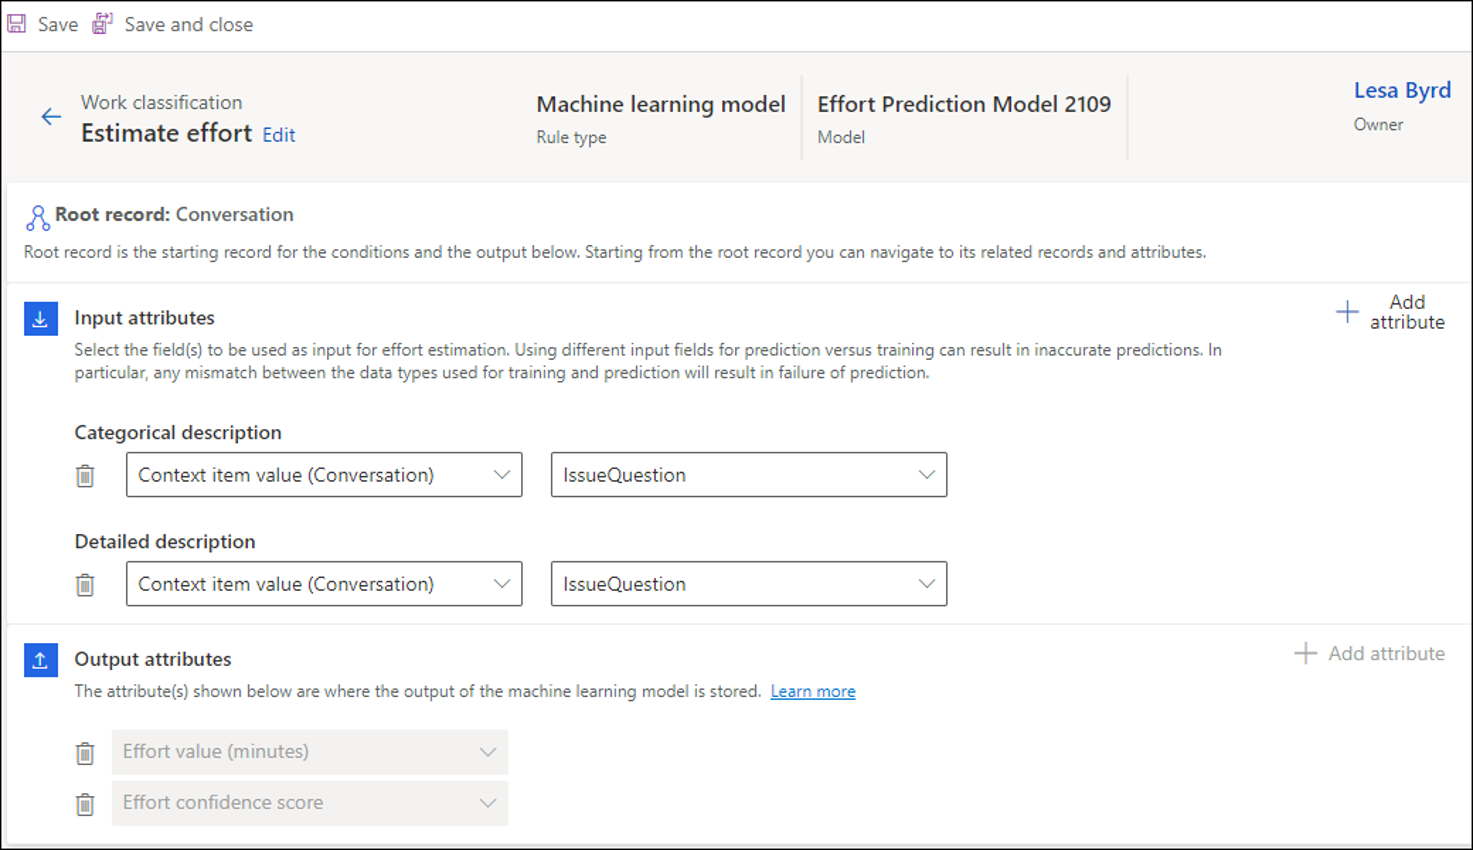
On the page that appears, select the input attributes to use for effort estimation. While you can use up to 10 attributes, the Categorical description and Detailed description fields are mandatory. By default, the output attributes are Effort value (minutes) and Effort confidence score and they can't be edited.
For the messaging channels, you should set the bot context variables or set up a pre-conversation survey so that you can use the input attributes.
Note
You can have only one effort estimation rule for each workstream.
Intelligent skill finder
The intelligent skill finder lets you create and train machine learning models that use AI to determine the necessary skills for new work items. The AI models examine the data and start to learn which skills to attach to a work item. For example, an incoming conversation might reference a specific model number for a product, such as the Café A-100 machine. The intelligent skill finder can examine past conversations to know that the system should attach the Café A-100 skill to the conversation and also attach the heating and electrical skills because they’re often required when you’re working with the machine.
Important
Intelligent skill finder is used with skill-based routing. While that isn't the primary focus of this course, you can learn more about skill-based routing by going to Skill-based routing.


