Exercise - Fix a failed test
At this point, you have a way to run unit tests as changes move through the build pipeline. You also have a way to measure the amount of code that's covered by your tests.
It's always a good idea to run your tests locally before you submit changes to the pipeline. But what happens when someone forgets and submits a change that breaks the build?
In this unit, you'll fix a broken build that's caused by a failing unit test. Here, you will:
- Get starter code from GitHub.
- Add code coverage tools to your project.
- Push the code up to your repository.
- Watch the pipeline automatically run and the unit tests fail.
- Reproduce the failure locally.
- Analyze and fix the failure.
- Push up a fix and watch the build succeed.
Review the new unit test
The team's latest feature involves the leaderboard. We need to get the number of scores from the database, so we can write a unit test to verify the IDocumentDBRepository<T>.GetItemsAsync method.
Here's what the test looks like. You don't need to add any code yet.
[TestCase(0, ExpectedResult=0)]
[TestCase(1, ExpectedResult=1)]
[TestCase(10, ExpectedResult=10)]
public int ReturnRequestedCount(int count)
{
    const int PAGE = 0; // take the first page of results

    // Fetch the scores.
    Task<IEnumerable<Score>> scoresTask = _scoreRepository.GetItemsAsync(
        score => true, // return all scores
        score => 1, // we don't care about the order
        PAGE,
        count // fetch this number of results
    );
    IEnumerable<Score> scores = scoresTask.Result;

    // Verify that we received the specified number of items.
    return scores.Count();
}
Recall that in an NUnit test, TestCase provides inline data to use to test that method. NUnit calls the ReturnRequestedCount unit test method like this:
ReturnRequestedCount(0);
ReturnRequestedCount(1);
ReturnRequestedCount(10);
This test also uses the ExpectedResult property to simplify the test code and help make its intention clear. NUnit automatically compares the return value against the value of this property, removing the need to explicitly call the assertion.
We'll choose a few values that represent typical queries. We'll also include 0 to cover that edge case.
Fetch the branch from GitHub
As you did earlier, fetch the failed-test branch from GitHub and check out (or switch to) that branch.
In Visual Studio Code, open the integrated terminal.
Run the following
git fetchandgit checkoutcommands to download a branch namedfailed-testfrom the Microsoft repository and switch to that branch:git fetch upstream failed-test git checkout -B failed-test upstream/failed-testWe named the branch
failed-testfor learning purposes. In practice, you'd name a branch after its purpose or feature.Run these commands to create a local tool manifest file, install the
ReportGeneratortool, and add thecoverlet.msbuildpackage to your tests project:dotnet new tool-manifest dotnet tool install dotnet-reportgenerator-globaltool dotnet add Tailspin.SpaceGame.Web.Tests package coverlet.msbuildYou need this step because the
failed-testbranch doesn't contain the work you added to theunit-testsbranch.Add your test project file and your tool manifest file to the staging index and commit your changes.
git add Tailspin.SpaceGame.Web.Tests/Tailspin.SpaceGame.Web.Tests.csproj
git add .config/dotnet-tools.json
git commit -m "Configure code coverage tests"
Run the following
git pushcommand to upload thefailed-testbranch to your GitHub repository:git push origin failed-test
See the test failure in the pipeline
Let's say that you were in a hurry and pushed up your work without running the tests one final time. Luckily, the pipeline can help you catch issues early when there are unit tests. You can see that here.
In Azure Pipelines, trace the build as it runs through the pipeline.
Expand the Run unit tests - Release task as it runs.
You see that the
ReturnRequestedCounttest method fails.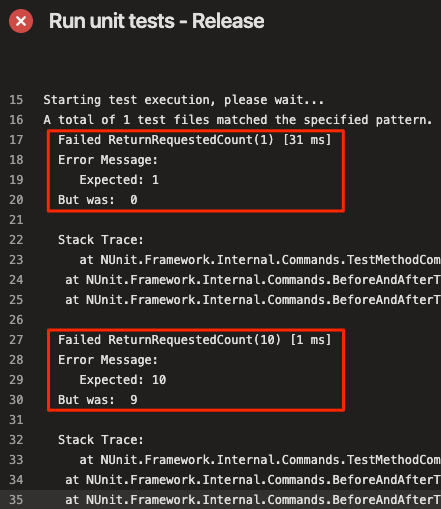
The test passes when the input value is 0, but it fails when the input value is 1 or 10.
The build is published to the pipeline only when the previous task succeeds. Here, the build wasn't published because the unit tests failed. This prevents others from accidentally obtaining a broken build.
In practice, you won't always manually trace the build as it runs. Here are a few ways you might discover the failure:
An email notification from Azure DevOps
You can configure Azure DevOps to send you an email notification when the build is complete. The subject line starts with "[Build failed]" when the build fails.
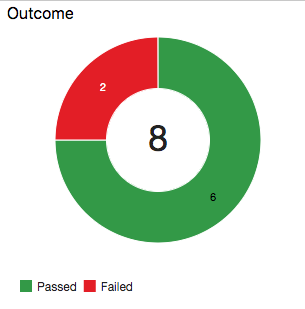
Azure Test Plans
In Azure DevOps, select Test Plans, and then select Runs. You see the recent test runs, including the one that just ran. Select the latest completed test. You see that two of the eight tests failed.
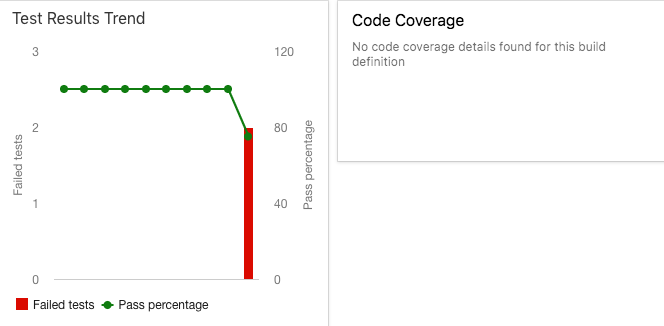
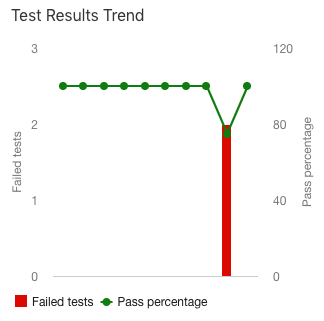
The dashboard
In Azure DevOps, select Overview, and then select Dashboards. You see the failure appear in the Test Results Trend widget. The Code Coverage widget is blank, which indicates that code coverage wasn't run.
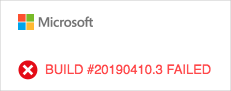
The build badge
Although the
failed-testbranch doesn't include the build badge in the README.md file, here's what you would see on GitHub when the build fails:
Analyze the test failure
When unit tests fail, you ordinarily have two choices, depending on the nature of the failure:
- If the test reveals a defect in the code, fix the code and rerun the tests.
- If the functionality changes, adjust the test to match the new requirements.
Reproduce the failure locally
In this section, you'll reproduce the failure locally.
In Visual Studio Code, open the integrated terminal.
In the terminal, run this
dotnet buildcommand to build the application:dotnet build --configuration ReleaseIn the terminal, run this
dotnet testcommand to run the unit tests:dotnet test --no-build --configuration ReleaseYou should see the same errors that you saw in the pipeline. Here's part of the output:
Starting test execution, please wait...
A total of 1 test files matched the specified pattern.
  Failed ReturnRequestedCount(1) [33 ms]
  Error Message:
     Expected: 1
  But was:  0

  Stack Trace:
     at NUnit.Framework.Internal.Commands.TestMethodCommand.Execute(TestExecutionContext context)
   at NUnit.Framework.Internal.Commands.BeforeAndAfterTestCommand.<>c__DisplayClass1_0.<Execute>b__0()
   at NUnit.Framework.Internal.Commands.BeforeAndAfterTestCommand.RunTestMethodInThreadAbortSafeZone(TestExecutionContext context, Action action)

  Failed ReturnRequestedCount(10) [1 ms]
  Error Message:
     Expected: 10
  But was:  9

  Stack Trace:
     at NUnit.Framework.Internal.Commands.TestMethodCommand.Execute(TestExecutionContext context)
   at NUnit.Framework.Internal.Commands.BeforeAndAfterTestCommand.<>c__DisplayClass1_0.<Execute>b__0()
   at NUnit.Framework.Internal.Commands.BeforeAndAfterTestCommand.RunTestMethodInThreadAbortSafeZone(TestExecutionContext context, Action action)


Failed!  - Failed:     2, Passed:     6, Skipped:     0, Total:     8, Duration: 98 ms
Find the cause of the error
You notice that each failed test produces a result that's off by one. For example, when 10 is expected, the test returns 9.
Take a look at the source code for the method that's being tested, LocalDocumentDBRepository<T>.GetItemsAsync. You should see this:
public Task<IEnumerable<T>> GetItemsAsync(
    Func<T, bool> queryPredicate,
    Func<T, int> orderDescendingPredicate,
    int page = 1, int pageSize = 10
)
{
    var result = _items
        .Where(queryPredicate) // filter
        .OrderByDescending(orderDescendingPredicate) // sort
        .Skip(page * pageSize) // find page
        .Take(pageSize - 1); // take items

    return Task<IEnumerable<T>>.FromResult(result);
}
In this scenario, you could check GitHub to see if the file was recently changed.

You suspect that pageSize - 1 is returning one fewer result and that this should be just pageSize. In our scenario, this is an error you made when you pushed work without testing, but in a real-world scenario, you could check with the developer who changed the file on GitHub to determine the reason for the change.
Tip
Discussion and collaboration can also happen on GitHub. You can comment on a pull request or open an issue.
Fix the error
In this section, you'll fix the error by changing the code back to its original state and running the tests to verify the fix.
In Visual Studio Code, open Tailspin.SpaceGame.Web/LocalDocumentDBRepository.cs from the file explorer.
Modify the
GetItemsAsyncmethod as shown here:public Task<IEnumerable<T>> GetItemsAsync( Func<T, bool> queryPredicate, Func<T, int> orderDescendingPredicate, int page = 1, int pageSize = 10 ) { var result = _items .Where(queryPredicate) // filter .OrderByDescending(orderDescendingPredicate) // sort .Skip(page * pageSize) // find page .Take(pageSize); // take items return Task<IEnumerable<T>>.FromResult(result); }This version changes
pageSize - 1topageSize.Save the file.
In the integrated terminal, build the application.
dotnet build --configuration ReleaseYou should see that the build succeeds.
In practice, you might run the app and briefly try it out. For learning purposes, we'll skip that for now.
In the terminal, run the unit tests.
dotnet test --no-build --configuration ReleaseYou see that the tests pass.
Starting test execution, please wait...
A total of 1 test files matched the specified pattern.

Passed!  - Failed:     0, Passed:     8, Skipped:     0, Total:     8, Duration: 69 ms
In the integrated terminal, add each modified file to the index, commit the changes, and push the branch up to GitHub.
git add .
git commit -m "Return correct number of items"
git push origin failed-test
Tip
The dot (
.) in thisgit addexample is a wildcard character. It matches all unstaged files in the current directory and all subdirectories.Before you use this wildcard character, it's a good practice to run
git statusbefore you commit to ensure that you're staging the files you intend to stage.Return to Azure Pipelines. Watch the change move through the pipeline. The tests pass, and the overall build succeeds.
Optionally, to verify the test results, you can select the Tests and Code Coverage tabs when the build completes.
You can also check out the dashboard to view the updated results trend.
Great! You've fixed the build. Next, you'll learn how to clean up your Azure DevOps environment.