Deploy Azure Container Instances in a virtual network
In this unit, you create an example application in an Azure Container Instances container to represent the customer's API. The application consists of an API that accesses an external database, which you deploy as an Azure SQL database.
You create the containerized application inside of a virtual network, so the app is accessible only to a customer with virtual network access. Because the application is reachable only from inside the virtual network, you create a test virtual machine (VM) as a jump host to simulate customer access and verify that the application is working.
Virtual networks are isolated networking segments where you can deploy workloads so they're only accessible privately, or optionally also over the public internet. Virtual networks typically host VMs, but you can also deploy other Azure resources like container instances to virtual networks.
An Azure resource deployed to a virtual network receives a private IP address from the virtual network range. The private IP is reachable only from inside the virtual network, from peered virtual networks, or from on-premises networks connected via Site-to-Site VPN or Azure ExpressRoute.
The following diagram shows the topology you deploy in this unit:
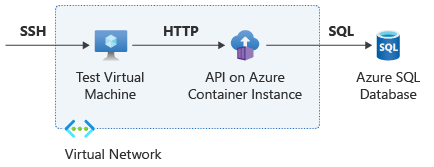
- You deploy the container instance that contains the customer API inside an Azure virtual network.
- You deploy a VM inside the same virtual network to use to test the API. You need the VM because, per your customer's business requirements, the container instance deployed in this virtual network isn't reachable via the public internet.
- You create the Azure SQL database that the customer API needs to operate. For this example, the container instance reaches the Azure SQL database over the public internet.
Create the environment
In the Azure portal, open the Azure Cloud Shell by selecting the Cloud Shell icon from the top menu bar. Make sure the Bash option is selected in the Cloud Shell.

In the Cloud Shell, enter the following code, which defines variables for this unit. You can optionally replace the
locationvalue with an Azure region nearer you.# Variables rg=acilab location=eastus aci_name=learnaci aci_dns=${aci_name}${RANDOM} vnet_name=acivnet vnet_prefix=192.168.0.0/16 vm_subnet_name=vm vm_subnet_prefix=192.168.1.0/24 aci_subnet_name=aci aci_subnet_prefix=192.168.2.0/24Run the following Azure CLI commands to create a resource group and a Linux VM to use for testing. In this example, Azure creates the virtual network when it creates the VM.
# Create test RG and VM
az group create -n $rg -l $location
az vm create -n test-vm -g $rg -l $location --image Ubuntu2204 --generate-ssh-keys \
    --public-ip-address test-vm-pip --public-ip-sku Standard --vnet-name $vnet_name \
    --vnet-address-prefix $vnet_prefix --subnet $vm_subnet_name --subnet-address-prefix $vm_subnet_prefix
vm_pip=$(az network public-ip show -n test-vm-pip -g $rg --query ipAddress -o tsv) && echo $vm_pip
Run the following code to verify that you can connect to the Azure VM over secure shell (SSH):
# Test SSH connectivity to virtual machine
ssh $vm_pip
[...]
exit
Important
You must install Azure CLI on the remote VM. To do that, run the following command on the VM after you connect:
curl -sL https://aka.ms/InstallAzureCLIDeb | sudo bashRun the following Azure CLI commands to create the database that the application connects to. In this example, you use the smallest Azure SQL Database SKU (Basic) to reduce costs. This size isn't recommended for production environments.
# Create database
sql_server_name=sqlserver$RANDOM
sql_db_name=mydb
sql_username=azure
sql_password=$(tr -dc A-Za-z0-9 </dev/urandom 2>/dev/null | head -c 15)
az sql server create -n $sql_server_name -g $rg -l $location --admin-user $sql_username --admin-password $sql_password
sql_server_fqdn=$(az sql server show -n $sql_server_name -g $rg -o tsv --query fullyQualifiedDomainName)
az sql db create -n $sql_db_name -s $sql_server_name -g $rg -e Basic -c 5 --no-wait
Create a container instance in the virtual network
Now that you have all the required components, you can deploy the Azure container instance. You specify the Azure SQL database Fully Qualified Domain Name (FQDN) and credentials in environment variables, so the container instance can connect to the database.
Run the following Azure CLI command to deploy the Azure container instance. Retry the command if you get an error on the first attempt.
# Create container instance in a new subnet
az network vnet subnet create -g $rg --vnet-name $vnet_name -n $aci_subnet_name --address-prefix $aci_subnet_prefix
vnet_id=$(az network vnet show -n $vnet_name -g $rg --query id -o tsv)
aci_subnet_id=$(az network vnet subnet show -n $aci_subnet_name --vnet-name $vnet_name -g $rg --query id -o tsv)
az container create -n $aci_name -g $rg -e "SQL_SERVER_USERNAME=$sql_username" \
  "SQL_SERVER_PASSWORD=$sql_password" \
  "SQL_SERVER_FQDN=${sql_server_fqdn}" \
  --image erjosito/yadaapi:1.0 \
  --ip-address private --ports 8080 --vnet $vnet_id --subnet $aci_subnet_id
Retrieve the IP address of the container instance with the
az container showcommand, and then connect to the test VM to verify connectivity. You need to be on the test VM to access the private IP address. The deployed API has an endpoint/api/healthcheckthat returns the valueOKif the container is up and running.# Test container reachability aci_ip=$(az container show -n $aci_name -g $rg --query 'ipAddress.ip' -o tsv) && echo $aci_ip ssh -n -o BatchMode=yes -o StrictHostKeyChecking=no $vm_pip "curl -s http://$aci_ip:8080/api/healthcheck"Note
The
-n -o BatchMode=yes -o StrictHostKeyChecking=nooptions in this command aren't important for this unit, but they're helpful for sending batch commands to a remote VM over SSH.
Update the Azure SQL firewall rules
Before the application can connect to the backend database, the Azure SQL firewall rules must be updated to allow the API access. The connection uses the public IP address, so it's important to know which source IP address the application uses to access the internet.
The egress IP address for an Azure container instance isn't trivial to obtain. The application endpoint api/ip shows some of the networking attributes, including the public egress IP address. In this case, the API code itself finds out the egress IP and uses it to update the Azure SQL database firewall rules.
The application should then be able to access the Azure SQL database. You can verify that the application can access the database by using the application endpoint api/sqlversion to show the database version.
Run the following code to update the firewall rules and test API access:
# Update Azure SQL firewall rules and test API
aci_pip=$(ssh -n -o BatchMode=yes -o StrictHostKeyChecking=no $vm_pip "curl -s http://$aci_ip:8080/api/ip" | jq -r .my_public_ip) && echo $aci_pip
az sql server firewall-rule create -g $rg -s $sql_server_name -n public_sqlapi_aci-source --start-ip-address $aci_pip --end-ip-address $aci_pip
ssh -n -o BatchMode=yes -o StrictHostKeyChecking=no $vm_pip "curl -s http://$aci_ip:8080/api/sqlversion"
ssh -n -o BatchMode=yes -o StrictHostKeyChecking=no $vm_pip "curl -s http://$aci_ip:8080/api/sqlsrcip"
The last command of the preceding code block calls the application's endpoint api/sqlsrcip, which sends a SQL query to the backend database asking for the source IP address the database sees. You can verify that the database sees the application's public IP address.