Exercise - Configure Identity support
Identity works out-of-the-box without any customization. In this unit, Identity is added to an existing ASP.NET Core Razor Pages project.
Open the starter project
To use the recommended GitHub Codespace, navigate to your Codespaces for the MicrosoftDocs/mslearn-secure-aspnet-core-identity repository. Create a new Codespace using the main branch, and then skip to Explore the app.
To use a local Dev Container, follow these steps:
In a Visual Studio Code window, press F1 key to open the command palette. Search for and select Dev-Containers: Clone Repository in Container Volume....
Enter the following repository URL:
https://github.com/MicrosoftDocs/mslearn-secure-aspnet-core-identity. Select themainbranch. Visual Studio Code creates the Dev Container. Accept any prompts to install recommended extensions.Skip to Explore the app.
To use a local development environment, follow these steps:
In a terminal window, run the following command to obtain the starter project:
git clone https://github.com/MicrosoftDocs/mslearn-secure-aspnet-core-identitySwitch to the source code directory and launch Visual Studio Code:
cd mslearn-secure-aspnet-core-identity
code .
Visual Studio Code opens. Accept any prompts to install recommended extensions, but DO NOT select Reopen in Container if prompted. Continue with the next steps.
Explore the app
After the project loads, press Ctrl+Shift+` to open a new terminal pane.
In the new terminal pane, set your location to the RazorPagesPizza directory:
cd RazorPagesPizzaIn the Explorer pane, expand the RazorPagesPizza directory to view the code. RazorPagesPizza is the project directory. As you proceed, assume all paths discussed in this module are relative to this location.
Let's run the app to get a quick introduction.
In the terminal pane, build the project and run the app:
dotnet runNote the URL displayed in the terminal output. For example,
https://localhost:7192.Open the app in your browser by selecting the URL with Ctrl+click.
Important
If you're using the Dev Container in local Docker, the SSL certificate from inside the container won't be trusted by your browser. To view the web app, you must do one of the following:
- Ignore the certificate error. If using Microsoft Edge, select Advanced and Continue to localhost (not recommended). Details vary by browser.
- Save the certificate and add it to your trusted certificate authorities.
- Import an existing development certificate inside the container. For more information, see the generated comments in ./devcontainer/devcontainter.json.
Explore the web app in the browser. Using the links on the header:
- Navigate to Pizza List
- Navigate back Home
Notice that you aren't required to authenticate.
To stop the app, press Ctrl+C in the terminal pane.
Add ASP.NET Core Identity to the project
The default Identity implementation can be added with dotnet command-line tools.
Install the ASP.NET Core code scaffolder:
dotnet tool install dotnet-aspnet-codegenerator --version 8.0.* --globalThe scaffolder is a .NET tool that:
- Is used to add the default Identity components to the project.
- Enables customization of Identity UI components in the next unit.
- Is invoked via
dotnet aspnet-codegeneratorin this module.
Add the following NuGet packages to the project:
dotnet add package Microsoft.VisualStudio.Web.CodeGeneration.Design --version 8.0.*
dotnet add package Microsoft.AspNetCore.Identity.EntityFrameworkCore --version 8.0.*
dotnet add package Microsoft.AspNetCore.Identity.UI --version 8.0.*
dotnet add package Microsoft.EntityFrameworkCore.Design --version 8.0.*
dotnet add package Microsoft.EntityFrameworkCore.SqlServer --version 8.0.*
dotnet add package Microsoft.EntityFrameworkCore.Tools --version 8.0.*
These packages install code generation templates and dependencies that are used by the scaffolder.
Tip
To view the available generators:
- In the command shell, run
dotnet aspnet-codegenerator -h. - When in Visual Studio, right-click the project in Solution Explorer and select Add > New Scaffolded Item.
- In the command shell, run
Use the scaffolder to add the default Identity components to the project. Run the following command in the terminal:
dotnet aspnet-codegenerator identity --useDefaultUI --dbContext RazorPagesPizzaAuth --userClass RazorPagesPizzaUserIn the preceding command:
- The generator identified as
identityis used to add the Identity framework to the project. - The
--useDefaultUIoption indicates that a Razor class library (RCL) containing the default UI elements is used. Bootstrap is used to style the components. - The
--dbContextoption specifies the name of an EF Core database context class to generate. - The
--userClassoption specifies the name of the user class to generate. The default user class isIdentityUser, but since the user class is extended in a later unit, a custom user class namedRazorPagesPizzaUseris specified. TheRazorPagesPizzaUserclass is derived fromIdentityUser.
The following Areas directory structure appears in the RazorPagesPizza directory:
- Areas
- Identity (displays on the same line as Areas)
- Data
- RazorPagesPizzaAuth.cs
- RazorPagesPizzaUser.cs
- Pages
- _ValidationScriptsPartial.cshtml
- _ViewStart.cshtml
- Data
- Identity (displays on the same line as Areas)
Tip
If the Areas directory doesn't appear in the Explorer pane automatically, select the Refresh Explorer button on the MSLEARN-SECURE-ASPNET-CORE-IDENTITY header in the Explorer pane.
Areas provide a way to partition an ASP.NET Core web app into smaller functional groups.
The scaffolder also made the following highlighted changes to Program.cs, reformatted for readability:
using Microsoft.AspNetCore.Identity;
using Microsoft.EntityFrameworkCore;
using RazorPagesPizza.Areas.Identity.Data;
var builder = WebApplication.CreateBuilder(args);
var connectionString = builder.Configuration.GetConnectionString("RazorPagesPizzaAuthConnection")
    ?? throw new InvalidOperationException("Connection string 'RazorPagesPizzaAuthConnection' not found.");

builder.Services.AddDbContext<RazorPagesPizzaAuth>(options => options.UseSqlServer(connectionString));

builder.Services.AddDefaultIdentity<IdentityUser>(options => options.SignIn.RequireConfirmedAccount = true)
    .AddEntityFrameworkStores<RazorPagesPizzaAuth>();

// Add services to the container.
builder.Services.AddRazorPages();

var app = builder.Build();

// Configure the HTTP request pipeline.
if (!app.Environment.IsDevelopment())
{
    app.UseExceptionHandler("/Error");
    // The default HSTS value is 30 days. You may want to change this for production scenarios, see https://aka.ms/aspnetcore-hsts.
    app.UseHsts();
}

app.UseHttpsRedirection();
app.UseStaticFiles();

app.UseRouting();

app.UseAuthorization();

app.MapRazorPages();

app.Run();
In the preceding code:
- The
RazorPagesPizzaAuthConnectionconnection string is read from appsettings.json. - The EF Core database context class, named
RazorPagesPizzaAuth, is configured with the connection string. - The Identity services are registered, including the default UI, token providers, and cookie-based authentication.
.AddDefaultIdentity<RazorPagesPizzaUser>tells the Identity services to use the customRazorPagesPizzaUseruser model.- The lambda expression
options => options.SignIn.RequireConfirmedAccount = truespecifies that users must confirm their email accounts. .AddEntityFrameworkStores<RazorPagesPizzaAuth>()specifies that Identity uses the default Entity Framework Core store for its database. TheRazorPagesPizzaAuthDbContextclass is used.
- The generator identified as
Configure the database connection
The ConnectionStrings section in appsettings.json should look similar to the following JSON:
"ConnectionStrings": {
    "RazorPagesPizzaAuthConnection": "Server=(localdb)\\mssqllocaldb;Database=RazorPagesPizza;Trusted_Connection=True;MultipleActiveResultSets=true"
}
This connection string points to an instance of SQL Server Express LocalDB by default. If you're developing locally, do nothing. This is the correct connection string.
In Codespaces or Dev Containers, the connection string is incorrect. If you are using the Codespace or Dev Container, you must change the connection string as follows! Be sure to save your changes.
"ConnectionStrings": {
    "RazorPagesPizzaAuthConnection": "Data Source=localhost;Initial Catalog=RazorPagesPizza;Integrated Security=False;User Id=sa;Password=P@ssw0rd;MultipleActiveResultSets=True;Encrypt=False"
}
This updates the connection string to connect to the instance of SQL Server inside the container.
Update the database
Now that you verified the connection string, you can generate and run a migration to build the database.
Run the following command to build the app:
dotnet buildThe build succeeds with no warnings. If the build fails, check the output for troubleshooting information.
Install the Entity Framework Core migration tool:
dotnet tool install dotnet-ef --version 8.0.* --globalThe migration tool is a .NET tool that:
- Generates code called a migration to create and update the database that supports the Identity entity model.
- Executes migrations against an existing database.
- Is invoked via
dotnet efin this module.
To update the database, create and run an EF Core migration:
dotnet ef migrations add CreateIdentitySchema
dotnet ef database update
The
CreateIdentitySchemaEF Core migration applied a Data Definition Language (DDL) change script to create the tables supporting Identity. For example, the following output depicts aCREATE TABLEstatement generated by the migration:info: Microsoft.EntityFrameworkCore.Database.Command[20101] Executed DbCommand (98ms) [Parameters=[], CommandType='Text', CommandTimeout='30'] CREATE TABLE [AspNetUsers] ( [Id] nvarchar(450) NOT NULL, [UserName] nvarchar(256) NULL, [NormalizedUserName] nvarchar(256) NULL, [Email] nvarchar(256) NULL, [NormalizedEmail] nvarchar(256) NULL, [EmailConfirmed] bit NOT NULL, [PasswordHash] nvarchar(max) NULL, [SecurityStamp] nvarchar(max) NULL, [ConcurrencyStamp] nvarchar(max) NULL, [PhoneNumber] nvarchar(max) NULL, [PhoneNumberConfirmed] bit NOT NULL, [TwoFactorEnabled] bit NOT NULL, [LockoutEnd] datetimeoffset NULL, [LockoutEnabled] bit NOT NULL, [AccessFailedCount] int NOT NULL, CONSTRAINT [PK_AspNetUsers] PRIMARY KEY ([Id]) );Tip
Did the
efcommand throw an error about LocalDb not being supported? Make sure you've set your connection string, as described in the "Configure the database connection" section!The SQL Server extension was added to Visual Studio Code, if needed, when you accepted the recommended extensions. Press Ctrl+Alt+D to switch to the SQL Server pane.
Expand the nodes under the existing database connection. Expand the Databases node, the RazorPagesPizza node, and finally the Tables node. Note the list of tables. This confirms the migration succeeded.
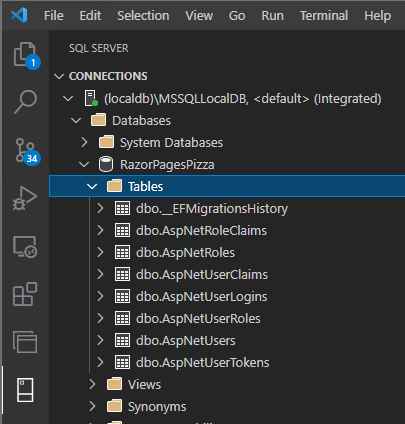
Note
The preceding image shows an example using SQL Server Express LocalDB. When using the .devcontainer, the connection is named mssql-container.

Add the sign-in and registration links
Navigate back to the Explorer pane. In Pages/Shared/_Layout.cshtml, replace the @* Add the _LoginPartial partial view *@ comment with the following.
<partial name="_LoginPartial" />
The preceding markup renders the _LoginPartial partial view within the header of any page that uses the default layout. The Identity scaffold added _LoginPartial. This partial view presents the user with Login and Register links if the user isn't signed in.
Test the Identity functionality
That's everything required to add the default Identity implementation. It's time to test it!
Make sure you save all your changes.
In the terminal pane, build the project and run the app:
dotnet runNavigate to the app in your browser as before.
Select the Register link in the app's header. Complete the form to create a new account.
The Register confirmation page is displayed. Since the app hasn't been configured to send confirmation emails, the confirmation link is provided on this page.
Select the confirmation link. A confirmation message is displayed.
Select the Login link in the app's header and sign in.
After a successful sign in:
- You get redirected to the homepage.
- The app's header displays Hello [email address]! and a Logout link.
- A cookie named .AspNetCore.Identity.Application is created. Identity preserves user sessions with cookie-based authentication.
Select the Logout link in the app's header.
After successfully logging out, the .AspNetCore.Identity.Application cookie is deleted to terminate the user session.
To stop the app, press Ctrl+C in the terminal pane.
Summary
In this unit, you added the default Identity implementation to an existing web app. In the next unit, you'll learn about extending and customizing Identity.