Create and define service-level agreements
Before you can create a service-level agreement (SLA), you'll need to create the KPIs that will be used in the SLA. You can use service-level agreement KPIs to measure factors such as how quickly agents are reaching out to customers or how quickly cases are being resolved. For example, you can use the First Response by KPI to measure whether agents are responding to customer service requests in a timely manner.
Create service-level agreement KPIs
By default, no service-level agreement KPIs are defined in the application. You'll need to specify which ones, such as First Response or Resolve by, that you'd like to track. After you've defined your service-level agreement KPIs, they'll be available to select as you define the SLA line items later.
You can create SLA KPIs from the Customer Service admin center by going to Service terms from the Operations group and selecting Manage in the SLA KPIs section.
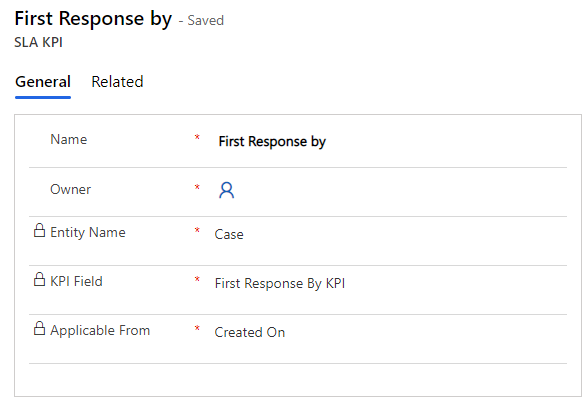
When defining an SLA KPI, you'll need to specify the following details:
Name - Specifies the name of the SLA KPI that will be used to identify it in the application.
Owner - Defines the owner of the item. By default, it's set to the person who’s creating the item, but you can change it.
Entity Name - Specifies the Microsoft Dataverse table that the KPI will be associated with, such as the Case table.
KPI Field - Specifies the KPI field that will be used for this item. For example, if you're creating an SLA KPI to define the time within which a first response should be sent to the customer, select FirstResponseByKPI in the list. Out-of-the-box, the Case table includes two options that you can choose from: FirstREsponseByKPI and ResolveByKPI.
Applicable From - Defines the field that will be used to measure warning and failure times.
You can set the Applicable From field to any date field that’s associated with that entity, such as Created On or Modified On. This field defines when the SLA KPIs should start being calculated.
For example, consider a scenario where you want to have an SLA with a four-hour First Response By KPI defined:
If you set the Applicable From field to Created On, the agent who takes the case will have four hours from the date and time that the case was created on to make a first initial response with the customer.
If you set the Applicable From field to Modified On, then whenever the case record is updated, the First Response By KPI timer will restart.
While using the Modified On field can be helpful in some instances, it's not an ideal trigger for tracking a first response KPI. Pay close attention to what you are setting the Applicable From field to because it can have a significant effect on how KPIs are calculated.
After you’ve defined an SLA KPI, you'll need to activate it so that it can be used in service-level agreements.
Create service-level agreements
You can create SLAs to track and measure specific KPIs based on who the customer is and the specifics around the case. SLAs are created at an organization level and aren't specific to an individual customer. You can apply SLAs to customer cases by manually associating the case to a specific SLA or by attaching the case to an entitlement that has a specific SLA associated with it. Commonly, you'll define a default SLA for an organization that will be automatically applied in instances where no SLA has been defined for a case.
After you've created the necessary SLA KPIs and Customer Service calendars, you can start creating SLAs in the Customer Service admin center by selecting Manage in the Service-level agreements (SLAs) section of Service terms.
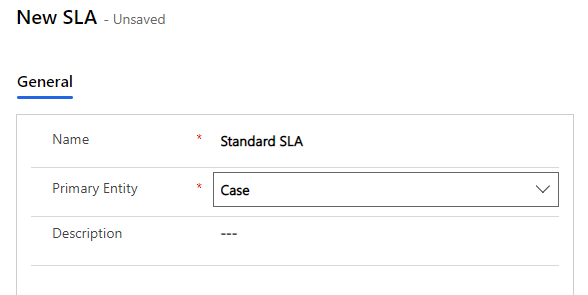
SLAs serve as the container for individual SLA items that will specify which SLA KPI is being used along with success criteria. Initially when you define an SLA, you'll need to provide the following details:
Name - Specifies the name of the SLA.
Primary Entity - Defines the Dataverse table that the SLA will apply to.
After you’ve defined the preceding information, you can save the SLA. By saving the SLA, you can add SLA items to it. The next unit discusses how to define SLA items.