Expense report policies and per diem rules
You can create expense report policies and define per diem rules to ensure that company policies are systematically enforced. Policies help employees stay within budget, provide all required information, and spend money only as they require it. Per diem rules are created to reimburse employees based on a daily fixed rate that might vary by geographical location.
Expense report policies
Companies have expense report policies that managers often check prior to approving expense reports. You can configure Project Operations to automatically review policies associated with an expense report before an employee is allowed to submit the expense report.
For example, policies can set limits on air fare or meal reimbursements. They may limit the number of nights an employee can stay in a hotel for a trip.
Expense report policies are created against expense categories and expense types. The following example shows the fields that the expense policies can be made against, Category group and Expense type, which are set up in Expense management > Setup > General > Expense categories.

Follow these steps to create an expense report policy:
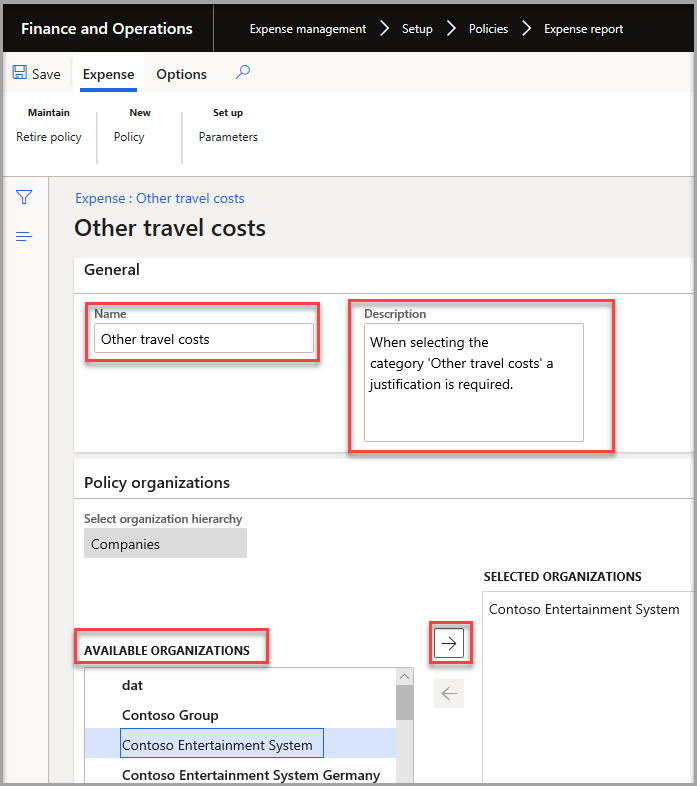
Go to Expense management > Setup > Policies > Expense report.
Select New in the Action Pane.
In the Name field, enter a name for the policy.
In the Description field, enter a short description of the policy.
Expand the Policy organizations FastTab.
In the Available organizations section, select the legal entity or entities for the policy.
Select the right arrow to move the legal entity to the Selected organizations section.
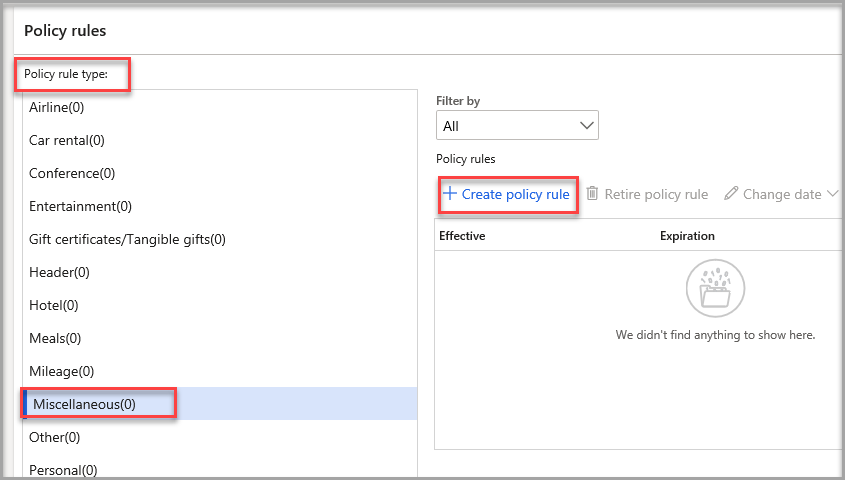
Expand the Policy rules FastTab.
Select the Policy rule type on the Expense categories page.
Select Create policy rule.
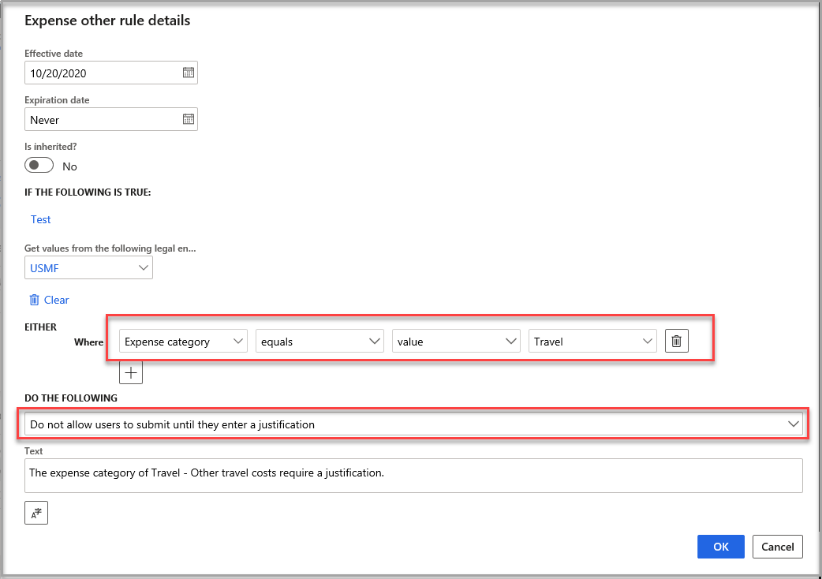
Enter the Effective date of the policy.
If the policy expires on a certain date, select the Expiration date, or leave it as Never if you have no intended expiration date.
In the Where field, select the conditions and criteria for the policy. In the following example, the expense category equals the value Travel.
In the Do the following drop-down menu, select what will happen when the user adds the category to the report. In the following example, Do not allow users to submit until they enter a justification was added.
In the Text field, enter the message that you want displayed when the user violates a policy. In the following example, The expense category of Travel - Other travel costs require a justification was added.
When an employee enters an expense line or attempts to submit an expense report that violates a configured policy, they will receive an error message that was defined when you created the policy.
You can define three types of policies:
- Warning – Allows the employee to submit an expense report or travel requisition. The expense will be marked for all approvers and for later reporting.
- Error – Requires the employee to revise the expense to comply with the policy before submitting the expense report or travel requisition.
- Justification – Requires the employee or a manager to enter a justification for exceeding the policy amount before submitting the expense report or travel requisition.
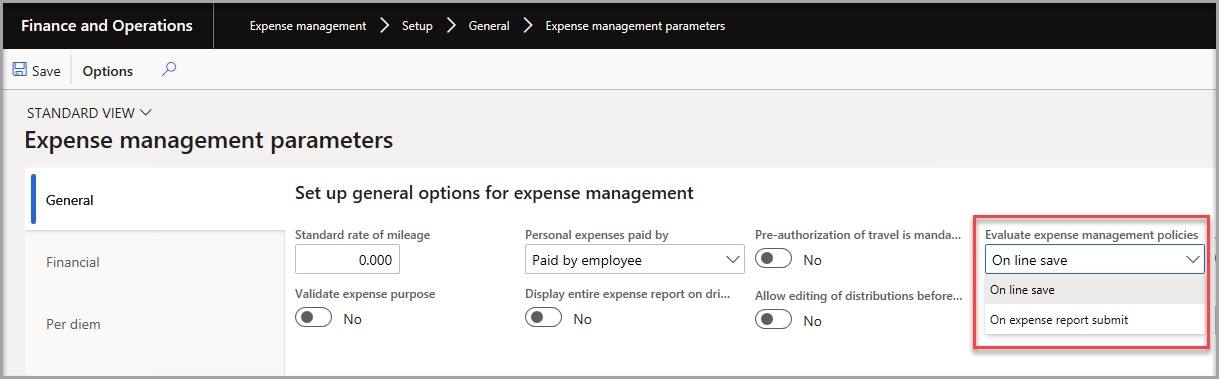
The Expense management parameters page provides an option for you to evaluate expense management policies either when a line is saved or when an expense report is submitted. If you choose to evaluate when a line is saved, the option ensures that users have earlier visibility into what they need to do to complete their entire expense report at once.
Otherwise, you can delay policy evaluation to save time for the employee during the expense entry process, if you have validation that occurs at the end, during submission to a workflow. If errors are thrown each time a line is saved, the creation of the expense report can seem cumbersome to the employee. If errors are thrown when the report is submitted, the employee can correct all errors at once. This process decision is one that your company will need to make.
To complete a policy, you will need to define:
- Organizations to which the rule applies
- Policy rules
To complete the setup for a specific policy, you need to understand organization types, order of precedence, and policy rule types because these will affect how the systems applies.
Organization types and order of precedence
The organization types that may be used for a policy are based on the types of operating units allowed within all the organization hierarchies that have Expenditure internal control. For example, if there are no hierarchies with this purpose, only the Companies/Legal entities are available to apply the policies. If the Expenditure internal control purpose is added to a department hierarchy consisting of department operating units, expense policies can also be set at the department level.
To set the default order of preference for managing expense policies, go to Set up > Parameters on the Policy rule parameters tab of the Policy parameters page. In the example below, both Departments and Companies may be used for expense policies but only Companies have been selected.

If you want to be able to use different policies for different departments, add Department to the order of precedence list and determine whether the department or the company to which the worker belongs should take precedence if multiple rules apply.
Policy rule types
There is a predefined set of policy rule types. Each rule type will use the default order of precedence specified on the Policy rule parameters tab of the Policy parameters page unless you override that default setting for a specific policy rule type. You will need to have at least two organization types available for expense policies before you can override the default order of precedence.
In the following examples, airlines use the Companies policy first and then the Department policy. Hotel expenses use the Department policy first and then the Companies policy.


Completing the policy definition
To complete the policy definition, select a set of organizations to which the policy should apply. An organization can be a legal entity or an operating unit. Select an organization hierarchy and then a node within the hierarchy. If you select a node with children, the policy will apply to all children as well as the selected parent node.
Remember, for an organization hierarchy to be available to select, it must be assigned the Expenditure internal control purpose. If the only option available to you is Companies, you have not assigned the Expenditure internal control purpose to any of your organizational hierarchies.
In the example below, client services often meet with clients and will have a different policy than other departments within the company. The Department organization hierarchy is used, and the Client Services department is selected. Next, you must select the policy rule type – in this case it is a Meals policy.

Note that for this policy to take precedence over any company level policy, the Meals policy rule type must put Department above Companies in the order of precedence.
The next step is to create the policy rule. Select the Create policy rule menu item to the right of the Policy rule list.
The rule looks at values specified on the expense report line and compares them to values specified in the rule to determine whether or not the expense is within policy. In this case, we want to allow a higher amount on meal expenses for client services, so the Amount field is selected.

Set the conditions for the policy rule. In this case we will allow an amount up to USD 200. The company rule is set to USD 150 but because this rule evaluates first, Client Services personnel will be allowed to exceed this amount, but a warning will be displayed.
Note
The Effective date you use is important. Any expense report lines with dates prior to the Effective date are not evaluated against a policy.
You must select one of the following options. In general, these actions can be summarized as warning, error, or require justification.
- Allow users to submit and approve but display warning message.
- Do not allow users to submit or approve and display error messages.
- Do not allow users to approve until they enter a justification.
- Do not allow users to submit until they enter a justification.
- Do not allow users to submit or approve until they enter a justification.
You may add as many conditions for a rule as you wish. Add additional conditions by selecting the + (plus) sign and selecting an operator. You can use the following operators:
- And
- Or
- And either - This option lets you specify two conditions. Only one needs to apply.
You can have many policy rules for a single policy. Each policy rule has its own Effective and Expiration dates.
Testing a policy rule
While defining a policy rule, you can test it against expense reports that have already been submitted.
Select the Test link to get a list of expense reports for the selected company.

Select an expense report and then a line within the report.
Select Evaluate. A notification appears at the top of the page to indicate whether the condition evaluated to True or False.

See a policy in action when submitting an expense report
For the following expense report, a line has been entered that exceeds the policy for meals for a person that is not in the Client services department. Notice the error icon.

When the employee attempts to submit this expense report for approval, the following message displays.

Retiring a policy
You can retire a policy by selecting the Maintain menu group and then selecting the Retire policy menu item on the Policy rule page.

You can also retire an individual policy rule within a policy by selecting the Retire policy rule menu item above the Policy rules grid.

Configure and set up per diems
When you create a per diem rule, you can:
- Specify that a percentage of the per diem rate will be withheld if a worker receives complimentary meals or services.
- Set a minimum and maximum number of hours that the per diem rate can apply to a worker's travel.
For example, rather than having an employee submit each receipt for meals, a company might decide to give their employees a standard rate each day for meals. Often, these rates will vary for different areas because the cost of a meal in a rural village could be different than a meal in a large city. For example, if an employee travels to Seattle for a business trip, their company might authorize a 75.00 US dollar (USD) base rate for all meals each day.
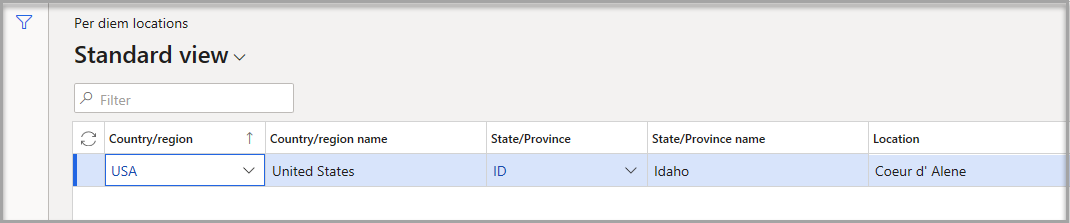
Before per diem calculations can be entered, the per diem locations must be set up in Expense management > Setup > Calculations and codes > Per diem locations. Enter all locations where per diem will be used.
The total per diem calculation amount is based on the start dates and end dates that are set on the Per diem amounts page.
- To set up the per diem rates, go to Expense management > Setup > Calculations and codes > Per diems.
- Select New.
- In the Location drop-down menu, select a location for the allowance.
- In the Currency drop-down menu, select the applicable currency.
- Expand the General FastTab.
- Select the Date from and the Date to information for when the allowance is effective.
- In the Hotel field, enter the per diem allowance as applicable.
- In the Meals field, enter the per diem allowance as applicable.
- In the Other field, enter the per diem allowance as applicable.
- Save the page.
